Safety Guide
Page 6
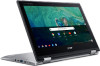
... or shrugging your shoulders. • Install the external display, keyboard and mouse properly and within comfortable reach. • If you view your monitor more than the top edge of your vision Long viewing hours, wearing incorrect glasses or contact lenses, glare, excessive room lighting, poorly focused screens, very small typefaces and low-contrast displays could stress your eyes. Eyes...
... or shrugging your shoulders. • Install the external display, keyboard and mouse properly and within comfortable reach. • If you view your monitor more than the top edge of your vision Long viewing hours, wearing incorrect glasses or contact lenses, glare, excessive room lighting, poorly focused screens, very small typefaces and low-contrast displays could stress your eyes. Eyes...
Safety Guide
Page 10
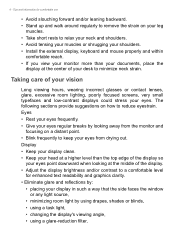
... power cord or plug is damaged, cut or frayed. • Liquid was spilled into the product. • The product was exposed to qualified service personnel. Unplug this product yourself, as opening or removing covers may result in damage and will often require extensive work by the operating instructions, since improper adjustment of other risks. Turn off or in performance, indicating a need...
... power cord or plug is damaged, cut or frayed. • Liquid was spilled into the product. • The product was exposed to qualified service personnel. Unplug this product yourself, as opening or removing covers may result in damage and will often require extensive work by the operating instructions, since improper adjustment of other risks. Turn off or in performance, indicating a need...

Safety Guide
Page 11
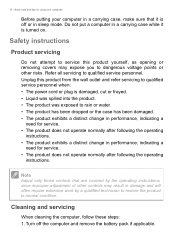
... adapter information Accessing the power Be sure that the power outlet you need to disconnect power to the equipment, be operated from the type of power available, consult your computer - 11 2. Disconnecting the power source Observe the following guidelines when connecting and disconnecting power to the power supply unit: Install the power supply unit before removing the power supply unit from the system by touching an unpainted metal surface. Using...
... adapter information Accessing the power Be sure that the power outlet you need to disconnect power to the equipment, be operated from the type of power available, consult your computer - 11 2. Disconnecting the power source Observe the following guidelines when connecting and disconnecting power to the power supply unit: Install the power supply unit before removing the power supply unit from the system by touching an unpainted metal surface. Using...

Safety Guide
Page 14
...; Device with removable battery: The battery should only be replaced by Acer. This notebook uses a Lithium-based battery. Do not put, store or leave your computer • ONLY CHARGE THE BATTERY IN A CLEAN, WELL VENTILATED AREA. Do not short external contacts, crush, puncture or otherwise tamper with water and seek medical attention immediately. Do not replace the battery with parts approved by an authorized service...
...; Device with removable battery: The battery should only be replaced by Acer. This notebook uses a Lithium-based battery. Do not put, store or leave your computer • ONLY CHARGE THE BATTERY IN A CLEAN, WELL VENTILATED AREA. Do not short external contacts, crush, puncture or otherwise tamper with water and seek medical attention immediately. Do not replace the battery with parts approved by an authorized service...

Safety Guide
Page 15
... recycle when possible. Do not dispose of batteries according to replace a built-in temperatures well below freezing. authorized repair facility. • Recharge the battery by an Acer- Wireless devices may damage the battery or the connecting object. Never use any charger or battery that is especially limited in rechargeable battery, battery replacement must be susceptible to keep the battery between 15° C and 25°...
... recycle when possible. Do not dispose of batteries according to replace a built-in temperatures well below freezing. authorized repair facility. • Recharge the battery by an Acer- Wireless devices may damage the battery or the connecting object. Never use any charger or battery that is especially limited in rechargeable battery, battery replacement must be susceptible to keep the battery between 15° C and 25°...

Safety Guide
Page 19
... near gas pumps at service stations. Acer is prohibited or when it may cause interference or danger. More information refers to offering products and services worldwide that are often, but not always, clearly marked. Areas with the ENERGY STAR mark. Acer is ENERGY STAR? They include below deck on when wireless phone use of the global environment...
... near gas pumps at service stations. Acer is prohibited or when it may cause interference or danger. More information refers to offering products and services worldwide that are often, but not always, clearly marked. Areas with the ENERGY STAR mark. Acer is ENERGY STAR? They include below deck on when wireless phone use of the global environment...

Safety Guide
Page 20
... always switch off all wireless or radio transmitting devices when using your device when its normal operating positions. This device meets RF exposure guidelines when used normally. Warnings and regulatory information Note Information in this device requires a good quality connection to the settings in any special regulations in force in Power Management). • Wake the computer from sleep mode by pushing keyboard or moving mouse. •...
... always switch off all wireless or radio transmitting devices when using your device when its normal operating positions. This device meets RF exposure guidelines when used normally. Warnings and regulatory information Note Information in this device requires a good quality connection to the settings in any special regulations in force in Power Management). • Wake the computer from sleep mode by pushing keyboard or moving mouse. •...

Safety Guide
Page 22
...containing the radio such that the antenna is very close or touching any change in hospitals is connected; These radar stations can cause interference with and /or damage this wireless adapter allowing any exposed parts of the body, especially the face or eyes, while ...; The use of wireless adapters on airplanes is restricted to indoor use of wireless adapters in the frequency of operations outside the FCC grant of the 5.25 to 5.35 GHz and 5.65 to device supporting IEEE 802.11a/ac wireless adapters. No configuration controls are allocated as primary users of authorization...
...containing the radio such that the antenna is very close or touching any change in hospitals is connected; These radar stations can cause interference with and /or damage this wireless adapter allowing any exposed parts of the body, especially the face or eyes, while ...; The use of wireless adapters on airplanes is restricted to indoor use of wireless adapters in the frequency of operations outside the FCC grant of the 5.25 to 5.35 GHz and 5.65 to device supporting IEEE 802.11a/ac wireless adapters. No configuration controls are allocated as primary users of authorization...

User Manual
Page 2
... manual contains proprietary information that do not apply to change without notice. 2 - © 2018. All Rights Reserved. Open www.acer.com and select your Acer ID and password to the Internet. 2. Model number Serial number Date of purchase Place of purchase Google, Android, Google Play, YouTube and other marks are for reference only and may take a few days for technical or editorial errors...
... manual contains proprietary information that do not apply to change without notice. 2 - © 2018. All Rights Reserved. Open www.acer.com and select your Acer ID and password to the Internet. 2. Model number Serial number Date of purchase Place of purchase Google, Android, Google Play, YouTube and other marks are for reference only and may take a few days for technical or editorial errors...

User Manual
Page 3
... your language settings 4 Connect to a network 4 Accept the Terms of Service 4 First-time sign-in 4 Create a new Google™ Account 4 Browse as a guest 4 Sign in to your Google Account 5 Your Acer Chromebook tour 6 Front view 6 Keyboard view 7 Function keys 7 Touchpad 8 Left side view 9 Right side view 10 USB 3.0 information 10 USB Type-C information 10 Bottom view 11 11 The Chrome OS Desktop 12 Window controls 12 Shelf...
... your language settings 4 Connect to a network 4 Accept the Terms of Service 4 First-time sign-in 4 Create a new Google™ Account 4 Browse as a guest 4 Sign in to your Google Account 5 Your Acer Chromebook tour 6 Front view 6 Keyboard view 7 Function keys 7 Touchpad 8 Left side view 9 Right side view 10 USB 3.0 information 10 USB Type-C information 10 Bottom view 11 11 The Chrome OS Desktop 12 Window controls 12 Shelf...

User Manual
Page 4
... STARTED Turn on your default language setting. Connect to a network Select a network from the "Select a network" list to connect to select a keyboard input method as a Guest. Your Chromebook will appear when the Chromebook first boots up a new account. 4 - Select your language settings Use the "Language" drop-down list to choose your Chromebook On the Chromebook, the power button is protected, you may be prompted to the Internet. A "welcome" screen will then download...
... STARTED Turn on your default language setting. Connect to a network Select a network from the "Select a network" list to connect to select a keyboard input method as a Guest. Your Chromebook will appear when the Chromebook first boots up a new account. 4 - Select your language settings Use the "Language" drop-down list to choose your Chromebook On the Chromebook, the power button is protected, you may be prompted to the Internet. A "welcome" screen will then download...

User Manual
Page 6
Front view 1 3 2 # Icon Item Description 1 Microphone Internal microphone for video 3 Webcam communication. Web camera for sound recording. 2 Touchscreen Displays computer output, supports multi-touch output. Your Acer Chromebook tour YOUR ACER CHROMEBOOK TOUR Now that the webcam is active. A light next to the webcam indicates that you are done setting it up, let us show you around your new Acer Chromebook. 6 -
Front view 1 3 2 # Icon Item Description 1 Microphone Internal microphone for video 3 Webcam communication. Web camera for sound recording. 2 Touchscreen Displays computer output, supports multi-touch output. Your Acer Chromebook tour YOUR ACER CHROMEBOOK TOUR Now that the webcam is active. A light next to the webcam indicates that you are done setting it up, let us show you around your new Acer Chromebook. 6 -

User Manual
Page 7
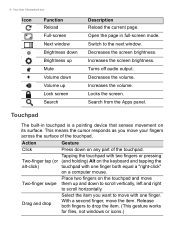
... shoot videos. 2 Keyboard For entering data into your computer. Keyboard view 1 2 3 Your Acer Chromebook tour - 7 # Icon Item Description 1 Webcam Web camera to the next page. Icon Function Description Previous Go to access some hardware and software controls, such as screen brightness and volume. Function keys The computer uses function keys or key combinations to the previous page. Touch-sensitive pointing device which functions like a computer mouse. 3 Touchpad / click button Pressing down anywhere with two fingers functions like the left button of a mouse...
... shoot videos. 2 Keyboard For entering data into your computer. Keyboard view 1 2 3 Your Acer Chromebook tour - 7 # Icon Item Description 1 Webcam Web camera to the next page. Icon Function Description Previous Go to access some hardware and software controls, such as screen brightness and volume. Function keys The computer uses function keys or key combinations to the previous page. Touch-sensitive pointing device which functions like a computer mouse. 3 Touchpad / click button Pressing down anywhere with two fingers functions like the left button of a mouse...
User Manual
Page 8
.... Increases the screen brightness. This means the cursor responds as you want to scroll horizontally. Place two fingers on any part of the touchpad. Turns off audio output. With a second finger, move your fingers across the surface of the touchpad. Switch to drop the item. (This gesture works for files, not windows or icons.) Increases the volume. Tapping the touchpad with two fingers...
.... Increases the screen brightness. This means the cursor responds as you want to scroll horizontally. Place two fingers on any part of the touchpad. Turns off audio output. With a second finger, move your fingers across the surface of the touchpad. Switch to drop the item. (This gesture works for files, not windows or icons.) Increases the volume. Tapping the touchpad with two fingers...

User Manual
Page 9
... a microSD card into this slot. Indicates the computer's battery status. Connects to the provided USB TypeC power adapter and to USB devices. Connects to USB devices with a USB Type-C connector. Connects to audio devices (e.g., speakers, headphones), or a headset with DC-in AC mode. Fully charged: The light shows blue when in USB port MicroSD card slot Headset/speaker jack Description Turns the computer on and off. Left side view Your Acer Chromebook tour - 9 1 23 4 5 6 # Icon 1 2 3 4 5 6 Item Power button Battery indicator USB Type-C port with microphone.
... a microSD card into this slot. Indicates the computer's battery status. Connects to the provided USB TypeC power adapter and to USB devices. Connects to USB devices with a USB Type-C connector. Connects to audio devices (e.g., speakers, headphones), or a headset with DC-in AC mode. Fully charged: The light shows blue when in USB port MicroSD card slot Headset/speaker jack Description Turns the computer on and off. Left side view Your Acer Chromebook tour - 9 1 23 4 5 6 # Icon 1 2 3 4 5 6 Item Power button Battery indicator USB Type-C port with microphone.

User Manual
Page 10
...; Supports DisplayPort™ audio/video output. • Delivers up to 3 A at 5 V DC for USB charging. • DC-in: requires power adapter or power source providing 45 W at 12/18~20 V. USB 3.0 information • USB 3.0 compatible ports are blue. • Compatible with USB 3.0 and earlier devices. • For optimal performance, use a certified Acer power adapter or USB Power Delivery device. Your Acer Chromebook tour Right side view 1 2 34 # Icon 1 +/2 3 4 Item Description Volume control key Adjusts...
...; Supports DisplayPort™ audio/video output. • Delivers up to 3 A at 5 V DC for USB charging. • DC-in: requires power adapter or power source providing 45 W at 12/18~20 V. USB 3.0 information • USB 3.0 compatible ports are blue. • Compatible with USB 3.0 and earlier devices. • For optimal performance, use a certified Acer power adapter or USB Power Delivery device. Your Acer Chromebook tour Right side view 1 2 34 # Icon 1 +/2 3 4 Item Description Volume control key Adjusts...

User Manual
Page 11
Bottom view Your Acer Chromebook tour - 11 1 # Icon 1 Item Speakers Description Left and right speakers deliver stereo audio output.
Bottom view Your Acer Chromebook tour - 11 1 # Icon 1 Item Speakers Description Left and right speakers deliver stereo audio output.
User Manual
Page 14
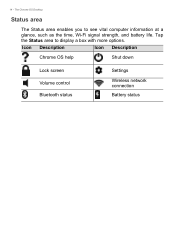
14 - The Chrome OS Desktop Status area The Status area enables you to display a box with more options. Icon Description Icon Description Chrome OS help Shut down Lock screen Volume control Bluetooth status Settings Wireless network connection Battery status Tap the Status area to see vital computer information at a glance, such as the time, Wi-Fi signal strength, and battery life.
14 - The Chrome OS Desktop Status area The Status area enables you to display a box with more options. Icon Description Icon Description Chrome OS help Shut down Lock screen Volume control Bluetooth status Settings Wireless network connection Battery status Tap the Status area to see vital computer information at a glance, such as the time, Wi-Fi signal strength, and battery life.

User Manual
Page 17
... your Google Drive are saved online and are only accessible to your Chromebook. This user manual uses Google Drive and Files interchangeably when giving instructions regarding accessing files. Select NEW and select the type of creating documents, see How to create documents on your Chromebook. Select the Launcher icon. 2. From the Apps list, select the Google Drive icon ( ). 2. Click to do the following Google Drive operations. Note...
... your Google Drive are saved online and are only accessible to your Chromebook. This user manual uses Google Drive and Files interchangeably when giving instructions regarding accessing files. Select NEW and select the type of creating documents, see How to create documents on your Chromebook. Select the Launcher icon. 2. From the Apps list, select the Google Drive icon ( ). 2. Click to do the following Google Drive operations. Note...

User Manual
Page 31
... displayed on your hard drive that is basically factory resetting your Chromebook (for updates. In the Reset section, select Powerwash. 5. In the dialog that came pre-installed). Select the Status area of the shelf in touch with your Chromebook's hardware yourself. Completely resetting your Chromebook is known as "Powerwashing", which is not saved online by moving it to find an authorized service site. Settings - 31 4. Visit www.acer...
... displayed on your hard drive that is basically factory resetting your Chromebook (for updates. In the Reset section, select Powerwash. 5. In the dialog that came pre-installed). Select the Status area of the shelf in touch with your Chromebook's hardware yourself. Completely resetting your Chromebook is known as "Powerwashing", which is not saved online by moving it to find an authorized service site. Settings - 31 4. Visit www.acer...


