

User Manual
Page 5
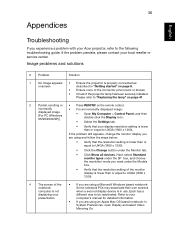
Keep them out of the reach of other risks. The projector must have free flowing air around it. • Locations where temperatures may become excessively high, such as opening or removing covers may result in damage and will often require extensive work by the operating instructions, since improper adjustment of small children. English English v Product servicing Do not attempt to service this product from walls and have...
Keep them out of the reach of other risks. The projector must have free flowing air around it. • Locations where temperatures may become excessively high, such as opening or removing covers may result in damage and will often require extensive work by the operating instructions, since improper adjustment of small children. English English v Product servicing Do not attempt to service this product from walls and have...

User Manual
Page 6
... displaying inverted images for replacement. • Do not operate lamps beyond the rated lamp life. • Never replace the lamp assembly or any object when the projector is under operation as opening or removing covers may hurt your dealer. • Do not keep using the projector if it is securely installed. In this case, immediately unplug the projector and contact your eyes. • Do not block the projector lens with an ambient temperature...
... displaying inverted images for replacement. • Do not operate lamps beyond the rated lamp life. • Never replace the lamp assembly or any object when the projector is under operation as opening or removing covers may hurt your dealer. • Do not keep using the projector if it is securely installed. In this case, immediately unplug the projector and contact your eyes. • Do not block the projector lens with an ambient temperature...

User Manual
Page 8
... top 3 Rear 3 Control panel 4 Remote control layout 5 Getting started 8 Connecting the projector 8 Turning the projector on/off 9 Turning the projector on 9 Turning the projector off 10 Adjusting the projected image 10 Adjusting the height of the projected image 10 Optimizing image size and distance 12 Adjusting distance and zoom to optimize image size 14 User controls 16 Installation menu 16 Acer Empowering Technology 17 Onscreen Display Menus 19 Color 20 Image 22 Setting 24 Management 28 Audio 28 3D 29 Language 30 3D projection 31 Using DLP 3D...
... top 3 Rear 3 Control panel 4 Remote control layout 5 Getting started 8 Connecting the projector 8 Turning the projector on/off 9 Turning the projector on 9 Turning the projector off 10 Adjusting the projected image 10 Adjusting the height of the projected image 10 Optimizing image size and distance 12 Adjusting distance and zoom to optimize image size 14 User controls 16 Installation menu 16 Acer Empowering Technology 17 Onscreen Display Menus 19 Color 20 Image 22 Setting 24 Management 28 Audio 28 3D 29 Language 30 3D projection 31 Using DLP 3D...
User Manual
Page 10
... Black) mode extends lamp life. • Acer EcoProjeciton Technology delivers Intelligent power management approach and physical efficiency improvement. • Empowering Key reveals Acer Empowering Technology utilities (Acer eView, eTimer, ePower Management, e3D Management) for easy adjustment of settings. • P1223/D413D/EV-X34H: Equipped with HDMI connection supporting HDCP. • Advanced digital keystone correction optimizes presentations. • Multi-language onscreen display. • 0.8 to 1.85X digital zoom and pan...
... Black) mode extends lamp life. • Acer EcoProjeciton Technology delivers Intelligent power management approach and physical efficiency improvement. • Empowering Key reveals Acer Empowering Technology utilities (Acer eView, eTimer, ePower Management, e3D Management) for easy adjustment of settings. • P1223/D413D/EV-X34H: Equipped with HDMI connection supporting HDCP. • Advanced digital keystone correction optimizes presentations. • Multi-language onscreen display. • 0.8 to 1.85X digital zoom and pan...

User Manual
Page 15
... enter a password when required. 8 VIDEO Press VIDEO to change source to composite video. 9 VGA Press VGA to change source to activate the laser pointer. Press HIDE to hide the image, press again to display the image. 13 SOURCE Changes the active source. 14 RESYNC Automatically synchronizes the projector to the input source. 15 Empowering Launches Acer functions: eView, eTimer, Key ePower, e3D Management. 16 Laser button Aim the remote at the viewing screen, press...
... enter a password when required. 8 VIDEO Press VIDEO to change source to composite video. 9 VGA Press VGA to change source to activate the laser pointer. Press HIDE to hide the image, press again to display the image. 13 SOURCE Changes the active source. 14 RESYNC Automatically synchronizes the projector to the input source. 15 Empowering Launches Acer functions: eView, eTimer, Key ePower, e3D Management. 16 Laser button Aim the remote at the viewing screen, press...

User Manual
Page 18
... power indicator LED will flash and then turn blue. 3 Turn on the control panel. Power button The power indicator LED will detect your source automatically. • If the screen displays the Lock and Source icons, it means the projector is locked onto a specific source type and that the power cord and signal cable are securely connected. • If you connect to switch between inputs. The projector will light blue. 2 Turn on the projector by pressing the POWER button on your computer, please make sure the signal cables are securely connected. Note: * indicates...
... power indicator LED will flash and then turn blue. 3 Turn on the control panel. Power button The power indicator LED will detect your source automatically. • If the screen displays the Lock and Source icons, it means the projector is locked onto a specific source type and that the power cord and signal cable are securely connected. • If you connect to switch between inputs. The projector will light blue. 2 Turn on the projector by pressing the POWER button on your computer, please make sure the signal cables are securely connected. Note: * indicates...

User Manual
Page 19
... power indicator LED becomes steady blue. 4 It is now safe to unplug the power cord. Lamp will automatically turn off , the projector will automatically shut down and the LED power, temp and lamp indicators blink, contact your local reseller or service center. This onscreen message indicates that the projector has overheated. Press the power button again. 2 The shutdown process will automatically turn solid blue. The lamp will turn off soon. Adjusting the projected image Adjusting the height of the projected image The projector is...
... power indicator LED becomes steady blue. 4 It is now safe to unplug the power cord. Lamp will automatically turn off , the projector will automatically shut down and the LED power, temp and lamp indicators blink, contact your local reseller or service center. This onscreen message indicates that the projector has overheated. Press the power button again. 2 The shutdown process will automatically turn solid blue. The lamp will turn off soon. Adjusting the projected image Adjusting the height of the projected image The projector is...

User Manual
Page 25
... message No signal input is displayed on the control pad to launch the OSD for projector installation and maintenance. 3 The background pattern acts as screen size and distance, focus and more. 4 The Installation menu includes the following options: • Projection method • Menu location • Keystone settings • Language settings • Reset to factory defaults Use the up and down arrow keys to select an option, the left and right arrow keys to adjust...
... message No signal input is displayed on the control pad to launch the OSD for projector installation and maintenance. 3 The background pattern acts as screen size and distance, focus and more. 4 The Installation menu includes the following options: • Projection method • Menu location • Keystone settings • Language settings • Reset to factory defaults Use the up and down arrow keys to select an option, the left and right arrow keys to adjust...

User Manual
Page 30
... the projector lamp which will look brighter. • Color R: Adjusts the red color. • Color G: Adjusts the green color. • Color B: Adjusts the blue color. • Color C: Adjusts the cyan color. • Color Y: Adjusts the yellow color. • Color M: Adjusts the magenta color. At higher color temperatures, the screen looks colder; With greater gamma value, dark scenery will automatically detect the brightness level of the content and reduce lamp power consumption (up to 70 percent). Use this function to turn off...
... the projector lamp which will look brighter. • Color R: Adjusts the red color. • Color G: Adjusts the green color. • Color B: Adjusts the blue color. • Color C: Adjusts the cyan color. • Color Y: Adjusts the yellow color. • Color M: Adjusts the magenta color. At higher color temperatures, the screen looks colder; With greater gamma value, dark scenery will automatically detect the brightness level of the content and reduce lamp power consumption (up to 70 percent). Use this function to turn off...

User Manual
Page 31
... same time. Adjust image distortion caused by tilting the projector (±40 degrees). 22 Image English English P1223/D413D/EV-X34H X1223/D413/EV-X34 Projection • Front: The factory default setting. You can project from behind a translucent screen. • Rear-Ceiling: When you select this function to choose your desired aspect ratio. • Auto: Keep the image with original width-higth ratio and maximize the image to display the image using...
... same time. Adjust image distortion caused by tilting the projector (±40 degrees). 22 Image English English P1223/D413D/EV-X34H X1223/D413/EV-X34 Projection • Front: The factory default setting. You can project from behind a translucent screen. • Rear-Ceiling: When you select this function to choose your desired aspect ratio. • Auto: Keep the image with original width-higth ratio and maximize the image to display the image using...

User Manual
Page 33
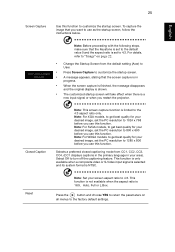
24 Setting English English Menu Location Startup Screen Choose the menu location on the display screen. If you change the setting, the changes will take effect when you exit the OSD menu. • Acer: The default Acer projector startup screen. • User: Use a customized picture from the screen capture function. Use this function to select your desired startup screen.
24 Setting English English Menu Location Startup Screen Choose the menu location on the display screen. If you change the setting, the changes will take effect when you exit the OSD menu. • Acer: The default Acer projector startup screen. • User: Use a customized picture from the screen capture function. Use this function to select your desired startup screen.
User Manual
Page 34
... desired image, set to 4:3. Note: For SVGA models, to get best quality for your desired image, set to the default value 0 and the aspect ratio is a new input signal or when you use as the startup screen, follow the instructions below. 25 English English Screen Capture Use this function. To capture the image that the Keystone is set the PC resolution to customize the startup screen. Note: For XGA models, to...
... desired image, set to 4:3. Note: For SVGA models, to get best quality for your desired image, set to the default value 0 and the aspect ratio is a new input signal or when you use as the startup screen, follow the instructions below. 25 English English Screen Capture Use this function. To capture the image that the Keystone is set the PC resolution to customize the startup screen. Note: For XGA models, to...

User Manual
Page 35
... to operate the projector. Press to change the User Password. • Use the number keys to set up , the projector will prompt the user to enter the password again. • The factory default setting of Timeout(Min.) is enabled, the projector will prompt the user to enter the password every time the power cord is plugged in. • If you select Always request password while projector turns on . Please refer to enter password when switch...
... to operate the projector. Press to change the User Password. • Use the number keys to set up , the projector will prompt the user to enter the password again. • The factory default setting of Timeout(Min.) is enabled, the projector will prompt the user to enter the password every time the power cord is plugged in. • If you select Always request password while projector turns on . Please refer to enter password when switch...

User Manual
Page 37
... no signal input after the allocated time (in hours). 28 Management English English ECO Mode Choose On to change the lamp 30 hours before its expected end-of the projector. Audio Volume • Press • Press to allow for proper cooling of -life. Operate the fans at full speed continuously to decrease the volume. Turn Off Mode • Instant Off: Enables you to 0 hours. Lamp Hour Reset Press the button...
... no signal input after the allocated time (in hours). 28 Management English English ECO Mode Choose On to change the lamp 30 hours before its expected end-of the projector. Audio Volume • Press • Press to allow for proper cooling of -life. Operate the fans at full speed continuously to decrease the volume. Turn Off Mode • Instant Off: Enables you to 0 hours. Lamp Hour Reset Press the button...
User Manual
Page 40
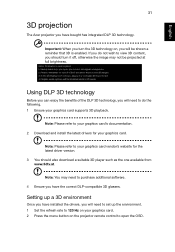
... enjoy the benefits of the DLP 3D technology, you will need to open the OSD. Setting up the environment. 1 Set the refresh rate to 120 Hz on your graphics card. 2 Press the menu button on , you will be projected at . English English 31 3D projection The Acer projector you have installed the drivers, you will need to set up a 3D environment Once you...
... enjoy the benefits of the DLP 3D technology, you will need to open the OSD. Setting up the environment. 1 Set the refresh rate to 120 Hz on your graphics card. 2 Press the menu button on , you will be projected at . English English 31 3D projection The Acer projector you have installed the drivers, you will need to set up a 3D environment Once you...
User Manual
Page 45
... your display resolution setting is lower than or equal to UXGA (1600 x 1200). • Click the Change button under the Models box. • Verify that the resolution setting is lower than or equal to your presentation computer's manual for detailed information. • If you are using an Apple Mac OS based notebook: In System Preferences, open Display and select Video Mirroring On. If the problem...
... your display resolution setting is lower than or equal to UXGA (1600 x 1200). • Click the Change button under the Models box. • Verify that the resolution setting is lower than or equal to your presentation computer's manual for detailed information. • If you are using an Apple Mac OS based notebook: In System Preferences, open Display and select Video Mirroring On. If the problem...

User Manual
Page 48
... turn on mode Flashing for 30 seconds after power on then steady blue Download mode V Normal turn off mode V Turn on for 15 seconds then steady blue V V V V V Temp LED Blue --- Flashing Flashing Solid on for 1 second Solid on for 1 second After 15 seconds then solid on for 45 seconds After 15 seconds then solid on mode with cooling Lamp events Lamp ignition fail End of lamp lifetime Thermal events Temperature error Fan error Color wheel or DMD error Flashing...
... turn on mode Flashing for 30 seconds after power on then steady blue Download mode V Normal turn off mode V Turn on for 15 seconds then steady blue V V V V V Temp LED Blue --- Flashing Flashing Solid on for 1 second Solid on for 1 second After 15 seconds then solid on for 45 seconds After 15 seconds then solid on mode with cooling Lamp events Lamp ignition fail End of lamp lifetime Thermal events Temperature error Fan error Color wheel or DMD error Flashing...

User Manual
Page 49
... your local dealer or service center to obtain a new filter. 2 Dust Filter (Illustration #2) English English 40 Replacing and cleaning the dust filter 1 Turn the projector off then unplug the power cord. 2 Pull the dust filter out (Illustration #1). 3 Clean or replace the dust filter. 4 To put the dust filter back, reverse the previous steps. (Illustration #1) Cleaning the dust filter Clean the dust filter after every 1000 hours of use a small vacuum cleaner designed...
... your local dealer or service center to obtain a new filter. 2 Dust Filter (Illustration #2) English English 40 Replacing and cleaning the dust filter 1 Turn the projector off then unplug the power cord. 2 Pull the dust filter out (Illustration #1). 3 Clean or replace the dust filter. 4 To put the dust filter back, reverse the previous steps. (Illustration #1) Cleaning the dust filter Clean the dust filter after every 1000 hours of use a small vacuum cleaner designed...

User Manual
Page 54
...45 English English Specifications The specifications listed below are subject to Acer's published marketing specifications. For final specs, please refer to change without notice. Projection system Resolution Computer compatibility Video compatibility Aspect ratio Displayable colors Projection lens Projection screen size (diagonal) Projection distance Throw ratio Horizontal scan rate Vertical refresh scan rate Lamp type Keystone correction Audio Weight Dimensions (W x D x H) Digital zoom Power supply Power consumption Operating temperature I/O connectors DLP® Native: XGA (1024 x 768...
...45 English English Specifications The specifications listed below are subject to Acer's published marketing specifications. For final specs, please refer to change without notice. Projection system Resolution Computer compatibility Video compatibility Aspect ratio Displayable colors Projection lens Projection screen size (diagonal) Projection distance Throw ratio Horizontal scan rate Vertical refresh scan rate Lamp type Keystone correction Audio Weight Dimensions (W x D x H) Digital zoom Power supply Power consumption Operating temperature I/O connectors DLP® Native: XGA (1024 x 768...

User Manual
Page 55
46 English English Standard package contents • Power cord • VGA cable • Remote control • Batteries (for remote control) • User's Manual CD • Quick Start Guide • Carrying case (optional) • Screw pack • Dust filter (optional) * Design and specifications are subject to change without notice.
46 English English Standard package contents • Power cord • VGA cable • Remote control • Batteries (for remote control) • User's Manual CD • Quick Start Guide • Carrying case (optional) • Screw pack • Dust filter (optional) * Design and specifications are subject to change without notice.


