
Manual
Page 1
Fast Ethernet Print Server 2 Parallel, 1 USB Hardware User's Guide Rev. 01 (October, 2002) About This Guide i
Fast Ethernet Print Server 2 Parallel, 1 USB Hardware User's Guide Rev. 01 (October, 2002) About This Guide i

Manual
Page 3
..., pursuant to correct the interference at his own expense. CE Mark Warning This is likely to radio communications. TABLE OF CONTENTS 0 ABOUT THIS GUIDE V 1 INTRODUCTION 7 PRINT SERVER FEATURES 7 EXTERNAL FEATURES 8 Port Connectors 9 About This Guide iii Copyright Statement No part of 1976. Trademarks Copyright © 2000 Contents subject to their respective...
..., pursuant to correct the interference at his own expense. CE Mark Warning This is likely to radio communications. TABLE OF CONTENTS 0 ABOUT THIS GUIDE V 1 INTRODUCTION 7 PRINT SERVER FEATURES 7 EXTERNAL FEATURES 8 Port Connectors 9 About This Guide iii Copyright Statement No part of 1976. Trademarks Copyright © 2000 Contents subject to their respective...

Manual
Page 4
... DC Power Connector 10 LED Indicators 10 2 UNPACKING AND INSTALLATION 11 UNPACKING AND INSPECTING THE PRINT SERVER 11 INSTALLING THE PRINT SERVER 12 POWER ON SELF-TEST 13 TESTING YOUR PRINT SERVER 14 3 PRODUCT SPECIFICATIONS 15 PRINTER CONNECTION 15 NETWORK CONNECTION 15 NETWORK PROTOCOLS 16 MANAGEMENT ... 17 PARALLEL PORTS 17 0 ABOUT THIS GUIDE This manual describes the 2 Parallel 1 USB Port Ethernet/Fast Ethernet Multiprotocol Print Server, including a description of the Print Server to allow it to be used with your network, consult the PS Admin User's Guide included with your...
... DC Power Connector 10 LED Indicators 10 2 UNPACKING AND INSTALLATION 11 UNPACKING AND INSPECTING THE PRINT SERVER 11 INSTALLING THE PRINT SERVER 12 POWER ON SELF-TEST 13 TESTING YOUR PRINT SERVER 14 3 PRODUCT SPECIFICATIONS 15 PRINTER CONNECTION 15 NETWORK CONNECTION 15 NETWORK PROTOCOLS 16 MANAGEMENT ... 17 PARALLEL PORTS 17 0 ABOUT THIS GUIDE This manual describes the 2 Parallel 1 USB Port Ethernet/Fast Ethernet Multiprotocol Print Server, including a description of the Print Server to allow it to be used with your network, consult the PS Admin User's Guide included with your...

Manual
Page 5
...printers much faster than a PC's parallel printer port. Print Server Features The Print Server improve network printing services in three ways: ♦ The Print Server picks up the workload of managing print file traffic to its connected printers, delivering print jobs to high-performance printers much faster than a file..., and allows the file servers' full capacity to be used for fi le access or other direct services to network users. The Print Server offers extraordinary flexibility, operating with all major network operating systems and protocols: ♦ TCP/IP UNIX lpr/lpd (HP-UX,...
...printers much faster than a PC's parallel printer port. Print Server Features The Print Server improve network printing services in three ways: ♦ The Print Server picks up the workload of managing print file traffic to its connected printers, delivering print jobs to high-performance printers much faster than a file..., and allows the file servers' full capacity to be used for fi le access or other direct services to network users. The Print Server offers extraordinary flexibility, operating with all major network operating systems and protocols: ♦ TCP/IP UNIX lpr/lpd (HP-UX,...

Manual
Page 6
...9830; Default IP address - 192.168.0.1 ♦ Subnet Mask - 255.255.255.0 Note: The PC's IP address must correspond with the Print Server, making configuration and management quick and easy. One USB and two identical parallel ports are located on its rear panel. Power LPT2 LPT1 ...Microsoft LAN Manager, IBM LAN Server ♦ AppleTalk MacOS EtherTalk Windows-based setup and administration software, PS Admin, is supplied with the print server's IP address in the same segment for the two devices to configure settings through the web browser. These printer ports are independently ...
...9830; Default IP address - 192.168.0.1 ♦ Subnet Mask - 255.255.255.0 Note: The PC's IP address must correspond with the Print Server, making configuration and management quick and easy. One USB and two identical parallel ports are located on its rear panel. Power LPT2 LPT1 ...Microsoft LAN Manager, IBM LAN Server ♦ AppleTalk MacOS EtherTalk Windows-based setup and administration software, PS Admin, is supplied with the print server's IP address in the same segment for the two devices to configure settings through the web browser. These printer ports are independently ...
Manual
Page 7
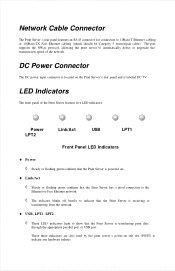
... features an RJ-45 connector for connection to indicate any hardware failures. DC Power Connector The DC power input connector is located on the Print Server's rear panel and is labeled DC 5V LED Indicators The front panel of the network. These three indicators are also used by the... print server's power-on . ♦ Link/Act ◊ Steady or flashing green confirms that the Print Server has a good connection to the Ethernet or Fast Ethernet network. ◊ The indicator blinks off briefly...
... features an RJ-45 connector for connection to indicate any hardware failures. DC Power Connector The DC power input connector is located on the Print Server's rear panel and is labeled DC 5V LED Indicators The front panel of the network. These three indicators are also used by the... print server's power-on . ♦ Link/Act ◊ Steady or flashing green confirms that the Print Server has a good connection to the Ethernet or Fast Ethernet network. ◊ The indicator blinks off briefly...

Manual
Page 8
... addition to this Hardware User's Guide, be certain that you have: ♦ One Fast Ethernet print server ♦ One AC power adapter suitable for your country's electric power ♦ One Print Server Installation CD ♦ One Quick Installation Guide If any item is missing, or if you find... any damage or mismatch, promptly contact your Print Server and connect it to install your dealer for assistance. 2 2 ...
... addition to this Hardware User's Guide, be certain that you have: ♦ One Fast Ethernet print server ♦ One AC power adapter suitable for your country's electric power ♦ One Print Server Installation CD ♦ One Quick Installation Guide If any item is missing, or if you find... any damage or mismatch, promptly contact your Print Server and connect it to install your dealer for assistance. 2 2 ...

Manual
Page 9
...RJ-45 (10Base-T/100Base-TX) connector on each printer is a problem with the LEDs themselves. When you have confirmed proper operation of the Print Server. 6. Follow this procedure to confirm their steady and flashing operation. Confirm that your dealer for several seconds. While each connected printer.... 7. This will proceed. Then the USB, LPT1 and LPT2 LEDs should flash on the Print Server's front panel should show steady green for correction of the USB, LPT1 and LPT2 LED indicators following the self-test. Irregularity of...
...RJ-45 (10Base-T/100Base-TX) connector on each printer is a problem with the LEDs themselves. When you have confirmed proper operation of the Print Server. 6. Follow this procedure to confirm their steady and flashing operation. Confirm that your dealer for several seconds. While each connected printer.... 7. This will proceed. Then the USB, LPT1 and LPT2 LEDs should flash on the Print Server's front panel should show steady green for correction of the USB, LPT1 and LPT2 LED indicators following the self-test. Irregularity of...
Manual
Page 10
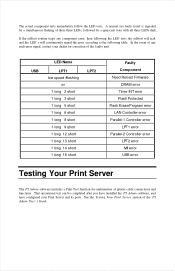
...result is signaled by a quiescent state with all three LEDs dark. If the self-test routine traps any such error signal, contact your Print Server and its ports. In the event of any component error, then following the LED tests the self-test will halt and the LED's... LAN Controller error Parallel-1 Controller error LPT1 error Parallel-2 Controller error LPT2 error MII error USB error Testing Your Print Server The PS Admin software includes a Print Test function for correction of printer cable connections and functions. That operational test can be completed after you have installed...
...result is signaled by a quiescent state with all three LEDs dark. If the self-test routine traps any such error signal, contact your Print Server and its ports. In the event of any component error, then following the LED tests the self-test will halt and the LED's... LAN Controller error Parallel-1 Controller error LPT1 error Parallel-2 Controller error LPT2 error MII error USB error Testing Your Print Server The PS Admin software includes a Print Test function for correction of printer cable connections and functions. That operational test can be completed after you have installed...

Manual
Page 13
... Bi-directional Bi-directional Bi-directional Bi-directional Printer Printer Printer Printer Host Printer Host Host B 4 PORT PINOUTS This appendix shows the pinouts of the print server's 25-pin parallel port connector (identical to the connector used on most personal computers), as well as the 36-pin Centronics connector used on...
... Bi-directional Bi-directional Bi-directional Bi-directional Printer Printer Printer Printer Host Printer Host Host B 4 PORT PINOUTS This appendix shows the pinouts of the print server's 25-pin parallel port connector (identical to the connector used on most personal computers), as well as the 36-pin Centronics connector used on...

Quick installation guide
Page 2
... the other end into an electrical outlet. Repeat this process for each printer on your network Warning: Do not plug the power cord to the Print Server until you have reached Step 4. Fig. 1.1 See Fig 1.1 Step 2 Make sure all the printers are powered OFF, then connect one end of the Ethernet... cable to the RJ-45 port of the Print Server and attach the other end of the power cord into the Print Server and the other end of the cable to the printer port of the printer. Step 4 Plug one end...
... the other end into an electrical outlet. Repeat this process for each printer on your network Warning: Do not plug the power cord to the Print Server until you have reached Step 4. Fig. 1.1 See Fig 1.1 Step 2 Make sure all the printers are powered OFF, then connect one end of the Ethernet... cable to the RJ-45 port of the Print Server and attach the other end of the power cord into the Print Server and the other end of the cable to the printer port of the printer. Step 4 Plug one end...

Quick installation guide
Page 3
....168. 1.x (where x is a number between 2 ~ 253 and is not currently assigned to any device on a piece of paper. Step 8 Go to access the Print Server's Web Configuration Utility. You will need these information after you to Section 3, Accessing the Web Configuration Utility. See Fig. 2.2 Step 7 Click OK and OK... must be on the same subnet as your network in Section 3. Step 5 Enter 255.255.255.0 for you have set up the print server in order for the Subnet mask. See Fig. 2.1 Step 3 Write down your current network settings including IP address, subnet mask, and default ...
....168. 1.x (where x is a number between 2 ~ 253 and is not currently assigned to any device on a piece of paper. Step 8 Go to access the Print Server's Web Configuration Utility. You will need these information after you to Section 3, Accessing the Web Configuration Utility. See Fig. 2.2 Step 7 Click OK and OK... must be on the same subnet as your network in Section 3. Step 5 Enter 255.255.255.0 for you have set up the print server in order for the Subnet mask. See Fig. 2.1 Step 3 Write down your current network settings including IP address, subnet mask, and default ...

Quick installation guide
Page 4
For Windows 95/98/ME Step 1 Go to do so. Step 7 Restart the computer if you have set up the print server in Section 3. Step 5 Enter 255.255.255.0 for the Subnet mask. Fig. 2.3 Fig. 2.4 See Fig. 2.3 Step 3 Write down your network). You will need these ...
For Windows 95/98/ME Step 1 Go to do so. Step 7 Restart the computer if you have set up the print server in Section 3. Step 5 Enter 255.255.255.0 for the Subnet mask. Fig. 2.3 Fig. 2.4 See Fig. 2.3 Step 3 Write down your network). You will need these ...
Quick installation guide
Page 5
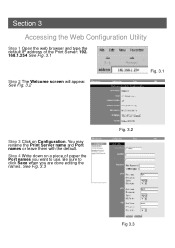
See Fig. 3.3 Fig. 3.2 Fig 3.3 You may rename the Print Server name and Port names or leave them with the default. Be sure to use. See Fig. 3.2 Fig. 3.1 Step 3 Click on a piece of the Print Server: 192. 168.1.254 See Fig. 3.1 Step 2 The Welcome screen will appear. Step 4 Write down on Configuration. Section 3 Accessing the Web Configuration Utility Step 1 Open the web browser and type the default IP address of paper the Port names you want to click Save when you are done editing the names.
See Fig. 3.3 Fig. 3.2 Fig 3.3 You may rename the Print Server name and Port names or leave them with the default. Be sure to use. See Fig. 3.2 Fig. 3.1 Step 3 Click on a piece of the Print Server: 192. 168.1.254 See Fig. 3.1 Step 2 The Welcome screen will appear. Step 4 Write down on Configuration. Section 3 Accessing the Web Configuration Utility Step 1 Open the web browser and type the default IP address of paper the Port names you want to click Save when you are done editing the names.

Quick installation guide
Page 6
... for XP) and select Add Printer. Fig. 3.4 Section 4 Adding Printer For Windows 2000/XP Step 1 Go to Start, Settings, Printers. (Printers and Faxes for the Print Server you want to be on TCP/IP Protocol under Configuration. Note: This Installation Guide uses the default IP address as your original settings. Step... Fig. 4.1 Fig. 4.1 See Fig. 3.4 Step 6 You can choose to click Save when you can manually assign an IP address and subnet mask to allow the Print Server to use.
... for XP) and select Add Printer. Fig. 3.4 Section 4 Adding Printer For Windows 2000/XP Step 1 Go to Start, Settings, Printers. (Printers and Faxes for the Print Server you want to be on TCP/IP Protocol under Configuration. Note: This Installation Guide uses the default IP address as your original settings. Step... Fig. 4.1 Fig. 4.1 See Fig. 3.4 Step 6 You can choose to click Save when you can manually assign an IP address and subnet mask to allow the Print Server to use.

Quick installation guide
Page 7
Step 6 Type in the IP address of paper in Section 3 and click Next. See Fig. 4.3 Note: You must add each port separately. At the drop-down on Settings. Step 7 Select Custom then click on the piece of the Print Server and the port name you have written down menu, select Standard TCP/IP Port and click Next. See Fig. 4.4 Fig. 4.2 Fig 4.3 Fig. 4.4 See Fig. 4.2 Step 5 Click Next at the Add Standard TCP/IP Printer Port Wizard. Step 4 Select Create a new port.
Step 6 Type in the IP address of paper in Section 3 and click Next. See Fig. 4.3 Note: You must add each port separately. At the drop-down on Settings. Step 7 Select Custom then click on the piece of the Print Server and the port name you have written down menu, select Standard TCP/IP Port and click Next. See Fig. 4.4 Fig. 4.2 Fig 4.3 Fig. 4.4 See Fig. 4.2 Step 5 Click Next at the Add Standard TCP/IP Printer Port Wizard. Step 4 Select Create a new port.

Quick installation guide
Page 8
..., and click Next. Note: If your printer is already installed, select Keep existing driver and click Next. For Windows 2000, select if you want to print a test page and click Next. See Fig. 4.7 Step 14 Select if you want to set this printer as the default printer. Step 10 Click Finish...
..., and click Next. Note: If your printer is already installed, select Keep existing driver and click Next. For Windows 2000, select if you want to print a test page and click Next. See Fig. 4.7 Step 14 Select if you want to set this printer as the default printer. Step 10 Click Finish...

Quick installation guide
Page 9
.... 4.10 Step 9 Click OK. See Fig. 4.9 Step 8 Click OK to accept the location of your CD-ROM drive. Step 10 Select LPR for TCP/IP Printing and click Properties. Step 3 Select Client and click Add. Step 5 Insert the provided CD into the CDROM drive. See Fig. 4.11 Step 11 Click Add...
.... 4.10 Step 9 Click OK. See Fig. 4.9 Step 8 Click OK to accept the location of your CD-ROM drive. Step 10 Select LPR for TCP/IP Printing and click Properties. Step 3 Select Client and click Add. Step 5 Insert the provided CD into the CDROM drive. See Fig. 4.11 Step 11 Click Add...

Quick installation guide
Page 10
... (where D is the letter of your computer is correct, select if you are prompted to do so. See Fig. 4.13 Restart the computer if you print from MS-DOSbased programs, and click Next. Click OK. Step 17 Select Network Printer and click Next. See Fig. 4.14 Step 20 Verify the Network... may prompt you have written down on the piece of paper in Section 3 and click OK. Step 12 Type in the IP address of the Print Server and the port name you for the Windows 98 CD-ROM. Step 14 Click OK. Step 16 Click Next at the Add Printer Wizard...
... (where D is the letter of your computer is correct, select if you are prompted to do so. See Fig. 4.13 Restart the computer if you print from MS-DOSbased programs, and click Next. Click OK. Step 17 Select Network Printer and click Next. See Fig. 4.14 Step 20 Verify the Network... may prompt you have written down on the piece of paper in Section 3 and click OK. Step 12 Type in the IP address of the Print Server and the port name you for the Windows 98 CD-ROM. Step 14 Click OK. Step 16 Click Next at the Add Printer Wizard...

Quick installation guide
Page 12
... sections to obtain the latest information. Step 1 Open the web browser and type in the CD for installation and operation procedures for your Print Server. Management System Status: displays general information about the Printer. See Fig. 5.2 Printer Name Printer Status Click Refresh to choose from: Management,... also use the Web Configuration Utility to configure the settings for the PS Admin. Fig. 5.1 Printer Status: displays general information about the Print Server. Note: As an option, you want to view. The default IP address is 192.168.1.254 Step 2 On the Welcome screen...
... sections to obtain the latest information. Step 1 Open the web browser and type in the CD for installation and operation procedures for your Print Server. Management System Status: displays general information about the Printer. See Fig. 5.2 Printer Name Printer Status Click Refresh to choose from: Management,... also use the Web Configuration Utility to configure the settings for the PS Admin. Fig. 5.1 Printer Status: displays general information about the Print Server. Note: As an option, you want to view. The default IP address is 192.168.1.254 Step 2 On the Welcome screen...