
Quick Installation Guide
Page 1
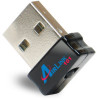
... your computer. Step 1.1 Insert the USB adapter into an available USB port of other advanced features, please refer to the User's Manual that can find the software and installation instructions for MAC 10.4, 10.5, 10.6 is under the MAC directory on the provided CD. Ver. 1.0 Quick Installation Guide Wireless N 150 Ultra Mini USB Adapter Model # AWLL5099 Package Contents: • Wireless N 150 USB Adapter • Driver & Utility CD • Quick Installation Guide Section 1 Install the Wireless USB Adapter This Quick Installation Guide only provides the basic...
... your computer. Step 1.1 Insert the USB adapter into an available USB port of other advanced features, please refer to the User's Manual that can find the software and installation instructions for MAC 10.4, 10.5, 10.6 is under the MAC directory on the provided CD. Ver. 1.0 Quick Installation Guide Wireless N 150 Ultra Mini USB Adapter Model # AWLL5099 Package Contents: • Wireless N 150 USB Adapter • Driver & Utility CD • Quick Installation Guide Section 1 Install the Wireless USB Adapter This Quick Installation Guide only provides the basic...

Quick Installation Guide
Page 3
Windows 7/Vista Users: When you get warning message(s), make sure that you give permission to Start, Run, and type D:\Utility\Setup.exe (where D is the letter of the driver software. Step 1.4 The AutoPlay screen will pop up. Step 1.3 Insert the Installation CD in the CD ROM drive. Select Install Utility and Driver from the menu. Click Run Autorun.exe on the screen. Note: If the Autorun screen doesn't appear automatically, go to continue with the installation of your CD ROM drive) and click OK. The Autorun screen will popup.
Windows 7/Vista Users: When you get warning message(s), make sure that you give permission to Start, Run, and type D:\Utility\Setup.exe (where D is the letter of the driver software. Step 1.4 The AutoPlay screen will pop up. Step 1.3 Insert the Installation CD in the CD ROM drive. Select Install Utility and Driver from the menu. Click Run Autorun.exe on the screen. Note: If the Autorun screen doesn't appear automatically, go to continue with the installation of your CD ROM drive) and click OK. The Autorun screen will popup.

Quick Installation Guide
Page 4
Step 1.6 Select Yes, I will restart my computer now. Click Finish to begin the installation. The driver and utility have been installed. Step 1.5 Click Next to complete the installation. Please wait for Airlink101 Wireless Adapter, and the utility. Please continue to finish installing the Airlink101 Wireless Monitor and driver for Windows to Section 2.
Step 1.6 Select Yes, I will restart my computer now. Click Finish to begin the installation. The driver and utility have been installed. Step 1.5 Click Next to complete the installation. Please wait for Airlink101 Wireless Adapter, and the utility. Please continue to finish installing the Airlink101 Wireless Monitor and driver for Windows to Section 2.

Quick Installation Guide
Page 5
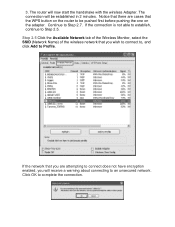
Section 2 Connect to Wireless Network Step 2.1 Click on Available Network tab, a list of your screen. Airlink101 Wireless Monitor screen will be shown. Click on the wireless icon in the system tray at the bottom right-hand corner of available network will popup.
Section 2 Connect to Wireless Network Step 2.1 Click on Available Network tab, a list of your screen. Airlink101 Wireless Monitor screen will be shown. Click on the wireless icon in the system tray at the bottom right-hand corner of available network will popup.

Quick Installation Guide
Page 6
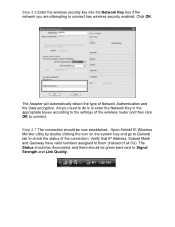
The connection should be now established. Step 2.3 Enter the network security key if the wireless network you want to connect to connect has wireless encryption enabled. Click OK. Step 2.2 Then, select the one you are attempting to and click Connect.
The connection should be now established. Step 2.3 Enter the network security key if the wireless network you want to connect to connect has wireless encryption enabled. Click OK. Step 2.2 Then, select the one you are attempting to and click Connect.

Quick Installation Guide
Page 7
... and easy way to configure the encryption for your router doesn't support WPS compatible function, continue to use it is starting to establish a connection. 2. Push the Easy Setup Button of the Router. This window pops up on the monitor. Push the Easy Setup Button (WPS compatible button) of the Adapter until you need to acknowledge you that supports this feature. In order...
... and easy way to configure the encryption for your router doesn't support WPS compatible function, continue to use it is starting to establish a connection. 2. Push the Easy Setup Button of the Router. This window pops up on the monitor. Push the Easy Setup Button (WPS compatible button) of the Adapter until you need to acknowledge you that supports this feature. In order...
Quick Installation Guide
Page 8
... OK to Step 2.7. Continue to complete the connection. The connection will now start the handshake with the wireless Adapter. If the network that you are cases that there are attempting to connect does not have encryption enabled, you wish to connect to, and click Add to an unsecured network. The router will be pushed first before pushing the one...
... OK to Step 2.7. Continue to complete the connection. The connection will now start the handshake with the wireless Adapter. If the network that you are cases that there are attempting to connect does not have encryption enabled, you wish to connect to, and click Add to an unsecured network. The router will be pushed first before pushing the one...
Quick Installation Guide
Page 9
... Airlink101 Wireless Monitor utility by double clicking the icon on the system tray and go to General tab to connect has wireless security enabled. Step 2.7 The connection should be now established. Step 2.6 Enter the wireless security key into the Network Key box if the network you need to do is to enter the Network Key in the appropriate boxes according to the settings of the wireless...
... Airlink101 Wireless Monitor utility by double clicking the icon on the system tray and go to General tab to connect has wireless security enabled. Step 2.7 The connection should be now established. Step 2.6 Enter the wireless security key into the Network Key box if the network you need to do is to enter the Network Key in the appropriate boxes according to the settings of the wireless...

Quick Installation Guide
Page 10
You have now connected to the wireless network successfully. Congratulations!
You have now connected to the wireless network successfully. Congratulations!

Quick Installation Guide
Page 11
....11 specifications. Section 3 Technical Support E-mail: support@airlink101.com Toll Free: 1-888-746-3238 Website: www.airlink101.com *Theoretical maximum wireless signal rate derived from . Troubleshooting 1. If you reboot the router. Your router has 11 different channels to the documentation that the USB adapter is not guaranteed. Photo of their respective owners. If you cannot connect to change without notice. You do not need...
....11 specifications. Section 3 Technical Support E-mail: support@airlink101.com Toll Free: 1-888-746-3238 Website: www.airlink101.com *Theoretical maximum wireless signal rate derived from . Troubleshooting 1. If you reboot the router. Your router has 11 different channels to the documentation that the USB adapter is not guaranteed. Photo of their respective owners. If you cannot connect to change without notice. You do not need...


