

Getting Started Guide
Page 2
...; U.S. The features and specifications described in basic electrical and mechanical procedures should install or maintain this guide are subject to Alcatel-Lucent. OmniAccess™, Omni Switch/Router™, PolicyView™, RouterView™, SwitchManager™, VoiceView™, WebView™, X-...the manufacturer's instructions. The Lithium battery will be reproduced in whole or in your chassis is a danger of battery recommended by Alcatel-Lucent. Patent No. 6,339,830 • U.S. Lithium Batteries Caution. Patent No. 6,542,507 • U.S. Copyright &#...
...; U.S. The features and specifications described in basic electrical and mechanical procedures should install or maintain this guide are subject to Alcatel-Lucent. OmniAccess™, Omni Switch/Router™, PolicyView™, RouterView™, SwitchManager™, VoiceView™, WebView™, X-...the manufacturer's instructions. The Lithium battery will be reproduced in whole or in your chassis is a danger of battery recommended by Alcatel-Lucent. Patent No. 6,339,830 • U.S. Lithium Batteries Caution. Patent No. 6,542,507 • U.S. Copyright &#...

Getting Started Guide
Page 3
Table of Contents OmniSwitch 6850 Series 1 Related Documentation 2 Installing the Hardware 3 Items Required 3 Site Preparation 3 Environmental Requirements 3 Electrical Requirements 3 NEBS GR-1089 Compliance Requirements . . . . 3 Weight Considerations 4 Items Included 5 Unpacking and Initial Setup 5 Unpacking the Chassis 5 Recommendations 5 Instructions 5 Setting Up the Switch 6 Airflow Considerations 6 Installation Options 7 Installing the Switch on a Tabletop or Bench . . . 7 Tabletop Mounting Steps 7 Rack-Mounting the Switch 8 Rack Mounting Steps 8 Installing Combo Port...
Table of Contents OmniSwitch 6850 Series 1 Related Documentation 2 Installing the Hardware 3 Items Required 3 Site Preparation 3 Environmental Requirements 3 Electrical Requirements 3 NEBS GR-1089 Compliance Requirements . . . . 3 Weight Considerations 4 Items Included 5 Unpacking and Initial Setup 5 Unpacking the Chassis 5 Recommendations 5 Instructions 5 Setting Up the Switch 6 Airflow Considerations 6 Installation Options 7 Installing the Switch on a Tabletop or Bench . . . 7 Tabletop Mounting Steps 7 Rack-Mounting the Switch 8 Rack Mounting Steps 8 Installing Combo Port...
Getting Started Guide
Page 4
Files and Directories 20 Boot and Image Files 20 boot.params File 20 boot.cfg File 20 Image Files 21 Working and Certified Directories 22 Working Directory 22 Certified Directory 23 Using WebView 26 Browser Compatibility 26 Logging In to WebView 26 Navigating WebView 27 Online Help 29 Additional Information 29 Troubleshooting 30 iv June 2007
Files and Directories 20 Boot and Image Files 20 boot.params File 20 boot.cfg File 20 Image Files 21 Working and Certified Directories 22 Working Directory 22 Certified Directory 23 Using WebView 26 Browser Compatibility 26 Logging In to WebView 26 Navigating WebView 27 Online Help 29 Additional Information 29 Troubleshooting 30 iv June 2007

Getting Started Guide
Page 5
... 26 25 48 47 46 45 44 43 42 41 40 39 38 37 OmniSwitch 6850-48L OmniSwitch 6850-P24L OmniSwitch 6850-P48L OmniSwitch 6850-U24X OmniSwitch 6850-24 OmniSwitch 6850-48 OmniSwitch 6850-24X OmniSwitch 6850-48X OmniSwitch 6850-P24 OmniSwitch 6850-P48 OmniSwitch 6850-P24X OmniSwitch 6850-P48X The...
... 26 25 48 47 46 45 44 43 42 41 40 39 38 37 OmniSwitch 6850-48L OmniSwitch 6850-P24L OmniSwitch 6850-P48L OmniSwitch 6850-U24X OmniSwitch 6850-24 OmniSwitch 6850-48 OmniSwitch 6850-24X OmniSwitch 6850-48X OmniSwitch 6850-P24 OmniSwitch 6850-P48 OmniSwitch 6850-P24X OmniSwitch 6850-P48X The...

Getting Started Guide
Page 6
Topics include the software 2 OmniSwitch 6850 Series directory architecture, image rollback protections, authenticated switch access, managing switch files, system configuration, using SNMP, and using web management software (WebView). • OmniSwitch 6800/6850/9000 Network Configuration Guide Includes network configuration procedures and descriptive information on all the major software features and protocols included in the User Manual CD: • OmniSwitch 6850 Series Getting Started Guide Describes the hardware and software procedures for integration into a network. June 2007 ...
Topics include the software 2 OmniSwitch 6850 Series directory architecture, image rollback protections, authenticated switch access, managing switch files, system configuration, using SNMP, and using web management software (WebView). • OmniSwitch 6800/6850/9000 Network Configuration Guide Includes network configuration procedures and descriptive information on all the major software features and protocols included in the User Manual CD: • OmniSwitch 6850 Series Getting Started Guide Describes the hardware and software procedures for integration into a network. June 2007 ...
Getting Started Guide
Page 7
No clearance is approximately 2 meters (6.5 feet) long. Electrical Requirements OmniSwitch 6850 Series switches have the following general electrical requirements: • Each switch requires one grounded AC power source. • Grounded AC power source must be made using 8AWG copper conductors. All connections should be 110V for North American installations (220V international). • Each supplied AC power cord is necessary at the front, back, and sides of each chassis and power supply module. NEBS GR-1089 Compliance Requirements The following notes and warnings apply to ...
No clearance is approximately 2 meters (6.5 feet) long. Electrical Requirements OmniSwitch 6850 Series switches have the following general electrical requirements: • Each switch requires one grounded AC power source. • Grounded AC power source must be made using 8AWG copper conductors. All connections should be 110V for North American installations (220V international). • Each supplied AC power cord is necessary at the front, back, and sides of each chassis and power supply module. NEBS GR-1089 Compliance Requirements The following notes and warnings apply to ...

Getting Started Guide
Page 8
... Note. All bare conductors must be coated with an appropriate antioxidant compound before connecting them. The intra-building ports of eight OS6850 switches weighs approximately 112 lbs (50 Kgs). 4 Installing the Hardware June 2007 A stack of the equipment must be used for... this platform, including Gigabit Ethernet, are made. Weight Considerations A single OS6850 weighs approximately 14 lbs (6.24 Kgs). The intra-building interfaces of this purpose during installation) Warning. All surfaces that connect to the...
... Note. All bare conductors must be coated with an appropriate antioxidant compound before connecting them. The intra-building ports of eight OS6850 switches weighs approximately 112 lbs (50 Kgs). 4 Installing the Hardware June 2007 A stack of the equipment must be used for... this platform, including Gigabit Ethernet, are made. Weight Considerations A single OS6850 weighs approximately 14 lbs (6.24 Kgs). The intra-building interfaces of this purpose during installation) Warning. All surfaces that connect to the...

Getting Started Guide
Page 9
Refer to be included: • Stacking cables (per order) • SFPs (per order) • 10-Gigabit XFPs (per order) • Backup power supply components and cables (per order) Unpacking and Initial Setup Unpacking the Chassis To protect your order, Small Form-Factor Pluggables (SFPs), stacking cables and backup power supply components may be pre-installed on the items ordered for the switch and switch software. Remove any smaller boxes or pouches that are ready to "Related Documentation" on page 2 for a complete list of the packaging. Depending on some orders) • ...
Refer to be included: • Stacking cables (per order) • SFPs (per order) • 10-Gigabit XFPs (per order) • Backup power supply components and cables (per order) Unpacking and Initial Setup Unpacking the Chassis To protect your order, Small Form-Factor Pluggables (SFPs), stacking cables and backup power supply components may be pre-installed on the items ordered for the switch and switch software. Remove any smaller boxes or pouches that are ready to "Related Documentation" on page 2 for a complete list of the packaging. Depending on some orders) • ...

Getting Started Guide
Page 10
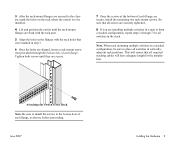
... sides of chassis. Always allow adequate clearance at rear of the switch. Chassis Top View 6 Installing the Hardware June 2007 Setting Up the Switch Note. Alcatel-Lucent provides factory-installed blank cover plates for adequate chassis airflow and access to "Setting Up the Switch." The following diagram shows recommended minimum clearances...
... sides of chassis. Always allow adequate clearance at rear of the switch. Chassis Top View 6 Installing the Hardware June 2007 Setting Up the Switch Note. Alcatel-Lucent provides factory-installed blank cover plates for adequate chassis airflow and access to "Setting Up the Switch." The following diagram shows recommended minimum clearances...

Getting Started Guide
Page 11
Clearance is to "Rack-Mounting the Switch" on its side. Never attempt to eight switches may be installed: • Tabletop installation • Rack-mount installation For information on setting up ." Up to operate a switch positioned on page 8. Note. For information on rack-mounting the switch, refer to be sure that you have placed the chassis within reach of required AC power sources. Also, be installed. 2 Be sure that you have placed all required AC power sources. If you are placing multiple switches in a stacked configuration, carefully stack the remaining ...
Clearance is to "Rack-Mounting the Switch" on its side. Never attempt to eight switches may be installed: • Tabletop installation • Rack-mount installation For information on setting up ." Up to operate a switch positioned on page 8. Note. For information on rack-mounting the switch, refer to be sure that you have placed the chassis within reach of required AC power sources. Also, be installed. 2 Be sure that you have placed all required AC power sources. If you are placing multiple switches in a stacked configuration, carefully stack the remaining ...

Getting Started Guide
Page 12
...it in the rack, and a second person to secure the chassis to the rack using attachment screws (not supplied). • Alcatel-Lucent provides two rack-mount flanges with the four threaded holes in the OmniSwitch chassis. Rack-mount flanges may come factory-installed ...provided Phillips-head screws. These flanges support standard 19-inch rack mount installations. For more information, contact your AlcatelLucent representative. • Alcatel-Lucent does not provide rack-mount screws. Rack-Mounting the Switch Refer to the important guidelines below before installing the OmniSwitch chassis in...
...it in the rack, and a second person to secure the chassis to the rack using attachment screws (not supplied). • Alcatel-Lucent provides two rack-mount flanges with the four threaded holes in the OmniSwitch chassis. Rack-mount flanges may come factory-installed ...provided Phillips-head screws. These flanges support standard 19-inch rack mount installations. For more information, contact your AlcatelLucent representative. • Alcatel-Lucent does not provide rack-mount screws. Rack-Mounting the Switch Refer to the important guidelines below before installing the OmniSwitch chassis in...
Getting Started Guide
Page 13
Be sure to install the screws in verticallyadjacent rack positions. Attaching the Switch to place all switches in the bottom hole of each flange, as shown, before proceeding. 3 After the rack-mount flanges are secured to the chassis, mark the holes on the rack where the switch is to be sure to the Rack Note. Tighten both screws until the rack-mount flanges are flush with the rack post. 5 Align the holes in step 3. 6 Once the holes are aligned, insert a rack-mount screw (not provided) through 7 for the installation. This will ensure that were marked in the flanges with ...
Be sure to install the screws in verticallyadjacent rack positions. Attaching the Switch to place all switches in the bottom hole of each flange, as shown, before proceeding. 3 After the rack-mount flanges are secured to the chassis, mark the holes on the rack where the switch is to be sure to the Rack Note. Tighten both screws until the rack-mount flanges are flush with the rack post. 5 Align the holes in step 3. 6 Once the holes are aligned, insert a rack-mount screw (not provided) through 7 for the installation. This will ensure that were marked in the flanges with ...

Getting Started Guide
Page 14
Installing Backup Power Supply Components For detailed information on connecting stacked switches, refer to the OmniSwitch 6850 Series Hardware Users Guide. For information on installing backup power supply components-including the backup power supply, connector cables, and power cords-refer to the OmniSwitch 6850 Series Hardware Users Guide. Combo port preferences are user-configurable via the system software. Note. These combo ports support hot-swappable fiber Small Form-Factor Pluggables (SFPs). For further details regarding supported SFP and XFP transceivers, refer to ...
Installing Backup Power Supply Components For detailed information on connecting stacked switches, refer to the OmniSwitch 6850 Series Hardware Users Guide. For information on installing backup power supply components-including the backup power supply, connector cables, and power cords-refer to the OmniSwitch 6850 Series Hardware Users Guide. Combo port preferences are user-configurable via the system software. Note. These combo ports support hot-swappable fiber Small Form-Factor Pluggables (SFPs). For further details regarding supported SFP and XFP transceivers, refer to ...
Getting Started Guide
Page 15
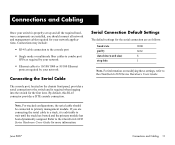
Connections and Cabling Once your switch is properly set up and all network and management cables required for the first time. Note. June 2007 Connections and Cabling 11 Refer to the OmniSwitch 6850 Series Hardware Users Guide. Serial Connection Default Settings The default settings for the serial connection are connecting the serial cable to wait until the stack has booted and the primary module has been dynamically assigned. If you should be connected to primary management module. By default, this RJ-45 connector provides a DTE console connection. For stacked ...
Connections and Cabling Once your switch is properly set up and all network and management cables required for the first time. Note. June 2007 Connections and Cabling 11 Refer to the OmniSwitch 6850 Series Hardware Users Guide. Serial Connection Default Settings The default settings for the serial connection are connecting the serial cable to wait until the stack has booted and the primary module has been dynamically assigned. If you should be connected to primary management module. By default, this RJ-45 connector provides a DTE console connection. For stacked ...

Getting Started Guide
Page 16
...switch to all OmniSwitch 6850 Series switches except for the OmniSwitch 6850-24X, OmniSwitch 6850-P24X, OmniSwitch 6850-48X, OmniSwitch 6850-P48X, and OmniSwitch 6850-U24X). The default value is failed; Next, plug the power cord into the power connector socket at the switch's rear panel. solid green if an ...refer to all OmniSwitch 6850 Series switches except for the OmniSwitch 6850-24X, OmniSwitch 6850-P24X, OmniSwitch 6850-48X, OmniSwitch 6850-P48X, and OmniSwitch 6850-U24X). 1-8 (non-blinking), depending on /off , if no operational BPS is located on the switch's front panel.
...switch to all OmniSwitch 6850 Series switches except for the OmniSwitch 6850-24X, OmniSwitch 6850-P24X, OmniSwitch 6850-48X, OmniSwitch 6850-P48X, and OmniSwitch 6850-U24X). The default value is failed; Next, plug the power cord into the power connector socket at the switch's rear panel. solid green if an ...refer to all OmniSwitch 6850 Series switches except for the OmniSwitch 6850-24X, OmniSwitch 6850-P24X, OmniSwitch 6850-48X, OmniSwitch 6850-P48X, and OmniSwitch 6850-U24X). 1-8 (non-blinking), depending on /off , if no operational BPS is located on the switch's front panel.

Getting Started Guide
Page 17
Contact Alcatel-Lucent Customer Support if the unexpected LED state persists. June 2007 Booting OmniSwitch 6850 Series Switches 13 If any of the LED state differs from the states shown in the table above, refer to the OmniSwitch 6850 Series Hardware Users Guide. For information on booting stacked configurations and dynamic slot numbering, refer to the OmniSwitch 6850 Series Hardware Users Guide for more information.
Contact Alcatel-Lucent Customer Support if the unexpected LED state persists. June 2007 Booting OmniSwitch 6850 Series Switches 13 If any of the LED state differs from the states shown in the table above, refer to the OmniSwitch 6850 Series Hardware Users Guide. For information on booting stacked configurations and dynamic slot numbering, refer to the OmniSwitch 6850 Series Hardware Users Guide for more information.
Getting Started Guide
Page 18
Complete the following steps during your changes Note. Logging in to the Switch When you first log in to the switch or stack • Unlock session types • Change the login password • Set the date and time • Set optional system information • Save your first login session: • Log in to the switch's Command Line Interface (CLI) and configure basic information. If you are ready to log in to the switch or stack, you will be prompted for a login (i.e., user) name and password. During this first login session, only one user name option and one password option ...
Complete the following steps during your changes Note. Logging in to the Switch When you first log in to the switch or stack • Unlock session types • Change the login password • Set the date and time • Set optional system information • Save your first login session: • Log in to the switch's Command Line Interface (CLI) and configure basic information. If you are ready to log in to the switch or stack, you will be prompted for a login (i.e., user) name and password. During this first login session, only one user name option and one password option ...

Getting Started Guide
Page 19
... authorized to your OmniSwitch 6850 Series switch is a trademark of your OmniSwitch 6800/ 6850/9000 Switch Management Guide. Copyright(c), 1994-2007 Alcatel-Lucent All Rights reserved. OmniSwitch(TM) is an important step in the United States Patent and Trademark Office. -> More Information on... assigning IP addresses in a stacked configuration, refer to the "Managing Switch User Accounts" chapter of Alcatel-Lucent registered in the setup process. The IP address for these session types serves as the current software version and system date, displays...
... authorized to your OmniSwitch 6850 Series switch is a trademark of your OmniSwitch 6800/ 6850/9000 Switch Management Guide. Copyright(c), 1994-2007 Alcatel-Lucent All Rights reserved. OmniSwitch(TM) is an important step in the United States Patent and Trademark Office. -> More Information on... assigning IP addresses in a stacked configuration, refer to the "Managing Switch User Accounts" chapter of Alcatel-Lucent registered in the setup process. The IP address for these session types serves as the current software version and system date, displays...

Getting Started Guide
Page 20
Note. When you unlock session types, you are manually unlocked by the user. All other session types (Telnet, FTP, WebView, SNMP, etc.) are "locked out" until they are granting switch access to the "Managing Switch User Accounts" chapter of your OmniSwitch 6800/ 6850/9000 Switch Management Guide. For more than one basis. However, you must use a direct console port connection. For example: -> aaa authentication http local -> aaa authentication telnet local -> aaa authentication ftp local 16 Your First Login Session June 2007 The CLI command used to unlock session types is a ...
Note. When you unlock session types, you are manually unlocked by the user. All other session types (Telnet, FTP, WebView, SNMP, etc.) are "locked out" until they are granting switch access to the "Managing Switch User Accounts" chapter of your OmniSwitch 6800/ 6850/9000 Switch Management Guide. For more than one basis. However, you must use a direct console port connection. For example: -> aaa authentication http local -> aaa authentication telnet local -> aaa authentication ftp local 16 Your First Login Session June 2007 The CLI command used to unlock session types is a ...

Getting Started Guide
Page 21
User Accounts. The switch's authentication software uses the first occurrence of nonrepeating characters. Be sure to uniquely identify the password. Note. A better password might be engr2735. 4 You will require the new password in order to the Switch" on page 14). 2 Enter the keyword password and press Enter. 3 Enter your OmniSwitch 6800/6850/9000 Switch Management Guide. New password settings are automatically saved in the local user database. June 2007 Your First Login Session 17 Also note that you have logged into the switch as engr. Typically, the password ...
User Accounts. The switch's authentication software uses the first occurrence of nonrepeating characters. Be sure to uniquely identify the password. Note. A better password might be engr2735. 4 You will require the new password in order to the Switch" on page 14). 2 Enter the keyword password and press Enter. 3 Enter your OmniSwitch 6800/6850/9000 Switch Management Guide. New password settings are automatically saved in the local user database. June 2007 Your First Login Session 17 Also note that you have logged into the switch as engr. Typically, the password ...