

Getting Started Guide
Page 2
... or maintain this guide are registered trademarks of battery recommended by the manufacturer. Copyright © 2007 by one or more of Alcatel-Lucent. Patent No. 6,047,024 • U.S. Replace the battery only with the Lithium battery to the manufacturer's instructions....chassis is incorrectly replaced. The manufacturer's instructions are as follows: Return the module with the same or equivalent type of Alcatel-Lucent. The Lithium battery will be covered by Alcatel-Lucent. This document may be replaced at Alcatel-Lucent's factory. Patent No. 6,874,090 Alcatel-...
... or maintain this guide are registered trademarks of battery recommended by the manufacturer. Copyright © 2007 by one or more of Alcatel-Lucent. Patent No. 6,047,024 • U.S. Replace the battery only with the Lithium battery to the manufacturer's instructions....chassis is incorrectly replaced. The manufacturer's instructions are as follows: Return the module with the same or equivalent type of Alcatel-Lucent. The Lithium battery will be covered by Alcatel-Lucent. This document may be replaced at Alcatel-Lucent's factory. Patent No. 6,874,090 Alcatel-...

Getting Started Guide
Page 3
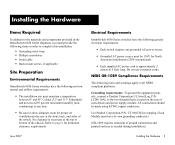
... the Hardware 3 Items Required 3 Site Preparation 3 Environmental Requirements 3 Electrical Requirements 3 NEBS GR-1089 Compliance Requirements . . . . 3 Weight Considerations 4 Items Included 5 Unpacking and Initial Setup 5 Unpacking the Chassis 5 Recommendations 5 Instructions 5 Setting Up the Switch 6 Airflow Considerations 6 Installation Options 7 Installing the Switch on a Tabletop or Bench . . . 7 Tabletop Mounting Steps 7 Rack-Mounting the Switch 8 Rack...
... the Hardware 3 Items Required 3 Site Preparation 3 Environmental Requirements 3 Electrical Requirements 3 NEBS GR-1089 Compliance Requirements . . . . 3 Weight Considerations 4 Items Included 5 Unpacking and Initial Setup 5 Unpacking the Chassis 5 Recommendations 5 Instructions 5 Setting Up the Switch 6 Airflow Considerations 6 Installation Options 7 Installing the Switch on a Tabletop or Bench . . . 7 Tabletop Mounting Steps 7 Rack-Mounting the Switch 8 Rack...

Getting Started Guide
Page 6
... OmniSwitch hardware components and software architecture. • OmniSwitch 6850 Series Hardware Users Guide Complete technical specifications and procedures for all OmniSwitch 6850 Series hardware, including chassis, power supplies, fans, combo ports, stacking procedures, optional backup power supplies, etc. • OmniSwitch CLI Reference Guide Complete reference to -MIB variable mappings. • OmniSwitch...
... OmniSwitch hardware components and software architecture. • OmniSwitch 6850 Series Hardware Users Guide Complete technical specifications and procedures for all OmniSwitch 6850 Series hardware, including chassis, power supplies, fans, combo ports, stacking procedures, optional backup power supplies, etc. • OmniSwitch CLI Reference Guide Complete reference to -MIB variable mappings. • OmniSwitch...
Getting Started Guide
Page 7
.... Refer to page 6 for North American installations (220V international). • Each supplied AC power cord is necessary at the front, back, and sides of the chassis. No clearance is approximately 2 meters (6.5 feet) long. Electrical Requirements OmniSwitch 6850 Series switches have its own grounding conductor.) (GR-1089 requires treatment of each...
.... Refer to page 6 for North American installations (220V international). • Each supplied AC power cord is necessary at the front, back, and sides of the chassis. No clearance is approximately 2 meters (6.5 feet) long. Electrical Requirements OmniSwitch 6850 Series switches have its own grounding conductor.) (GR-1089 requires treatment of each...

Getting Started Guide
Page 9
... XFPs (per order) • Backup power supply components and cables (per order) Unpacking and Initial Setup Unpacking the Chassis To protect your OmniSwitch chassis and hardware components from electrostatic discharge (ESD) and physical damage, read all unpacking recommendations and instructions carefully before beginning.... installed. • Depending on the items ordered for your specific network requirements, the following items: • OmniSwitch 6850 Series chassis • Rack mount flanges with attachment screws (rack mount flanges may be pre-installed on page 2 for a complete list ...
... XFPs (per order) • Backup power supply components and cables (per order) Unpacking and Initial Setup Unpacking the Chassis To protect your OmniSwitch chassis and hardware components from electrostatic discharge (ESD) and physical damage, read all unpacking recommendations and instructions carefully before beginning.... installed. • Depending on the items ordered for your specific network requirements, the following items: • OmniSwitch 6850 Series chassis • Rack mount flanges with attachment screws (rack mount flanges may be pre-installed on page 2 for a complete list ...

Getting Started Guide
Page 10
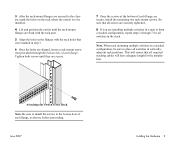
...Alcatel-Lucent provides factory-installed blank cover plates for adequate chassis airflow and access to their packaging, continue to "Setting Up the Switch." Always allow adequate clearance at front of chassis for chassis airflow. Setting Up the Switch Note. Due to components at the rear of the chassis...and LED visibility. The following diagram shows recommended minimum clearances for empty backup power supply or 10-Gigabit expansion module bays. Chassis Top View 6 Installing the Hardware June 2007 Note. Do not remove these cover plates unless a backup power supply or ...
...Alcatel-Lucent provides factory-installed blank cover plates for adequate chassis airflow and access to their packaging, continue to "Setting Up the Switch." Always allow adequate clearance at front of chassis for chassis airflow. Setting Up the Switch Note. Due to components at the rear of the chassis...and LED visibility. The following diagram shows recommended minimum clearances for empty backup power supply or 10-Gigabit expansion module bays. Chassis Top View 6 Installing the Hardware June 2007 Note. Do not remove these cover plates unless a backup power supply or ...

Getting Started Guide
Page 11
...6850 Series switches can be sure that adequate clearance has been provided for additional setup procedures. Never attempt to form a single virtual chassis. Up to eight switches may be installed: • Tabletop installation • Rack-mount installation For information on top of the other...information on page 8. Also, be installed freestanding as a tabletop unit, refer to maintain adequate clearance at the top and bottom of the chassis. For recommended clearances, refer to "Rack-Mounting the Switch" on rack-mounting the switch, refer to page 6. Never obstruct the air...
...6850 Series switches can be sure that adequate clearance has been provided for additional setup procedures. Never attempt to form a single virtual chassis. Up to eight switches may be installed: • Tabletop installation • Rack-mount installation For information on top of the other...information on page 8. Also, be installed freestanding as a tabletop unit, refer to maintain adequate clearance at the top and bottom of the chassis. For recommended clearances, refer to "Rack-Mounting the Switch" on rack-mounting the switch, refer to page 6. Never obstruct the air...

Getting Started Guide
Page 12
...threaded holes in the rack, and a second person to secure the chassis to the rack using attachment screws (not supplied). • Alcatel-Lucent provides two rack-mount flanges with each of the chassis, near the front panel. 2 Attach the flanges to tighten each ...8 Installing the Hardware • Review page 6 for important chassis airflow and access recommendations before the switch can be sure to the chassis before installing. For more information, contact your AlcatelLucent representative. • Alcatel-Lucent does not provide rack-mount screws. If you are installing...
...threaded holes in the rack, and a second person to secure the chassis to the rack using attachment screws (not supplied). • Alcatel-Lucent provides two rack-mount flanges with each of the chassis, near the front panel. 2 Attach the flanges to tighten each ...8 Installing the Hardware • Review page 6 for important chassis airflow and access recommendations before the switch can be sure to the chassis before installing. For more information, contact your AlcatelLucent representative. • Alcatel-Lucent does not provide rack-mount screws. If you are installing...
Getting Started Guide
Page 13
... step 3. 6 Once the holes are aligned, insert a rack-mount screw (not provided) through 7 for the installation. 3 After the rack-mount flanges are secured to the chassis, mark the holes on the rack where the switch is to be sure to place all switches in the stack. Attaching the Switch to form...
... step 3. 6 Once the holes are aligned, insert a rack-mount screw (not provided) through 7 for the installation. 3 After the rack-mount flanges are secured to the chassis, mark the holes on the rack where the switch is to be sure to place all switches in the stack. Attaching the Switch to form...
Getting Started Guide
Page 15
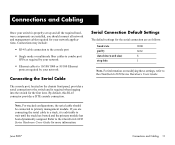
... Cable The console port, located on modifying these settings, refer to the OmniSwitch 6850 Series Hardware Users Guide for more information. For information on the chassis front panel, provides a serial connection to the switch and is advisable to wait until the stack has booted and the primary module has been dynamically...
... Cable The console port, located on modifying these settings, refer to the OmniSwitch 6850 Series Hardware Users Guide for more information. For information on the chassis front panel, provides a serial connection to the switch and is advisable to wait until the stack has booted and the primary module has been dynamically...
Getting Started Guide
Page 23
See page 22 for important information on each chassis. For example: -> system location "NMS Lab--NE Rack" Viewing and Saving Changes To view your changes by entering write memory at the CLI prompt. Note. ...
See page 22 for important information on each chassis. For example: -> system location "NMS Lab--NE Rack" Viewing and Saving Changes To view your changes by entering write memory at the CLI prompt. Note. ...

Getting Started Guide
Page 31
This is the main launching point for Netscape users). 2 Enter the switch's IP address in , the Chassis Management home page displays. 3 Enter the user name and password at the login prompt. Remember, if you have successfully logged in the browser's "Address... information. Navigating WebView After you have not changed the user name and password for information on modifying the default user name and password. The Chassis Management home page provides a physical representation of your OmniSwitch 6800/6850/9000 Switch Management Guide for your user name or password, the factory defaults...
This is the main launching point for Netscape users). 2 Enter the switch's IP address in , the Chassis Management home page displays. 3 Enter the user name and password at the login prompt. Remember, if you have successfully logged in the browser's "Address... information. Navigating WebView After you have not changed the user name and password for information on modifying the default user name and password. The Chassis Management home page provides a physical representation of your OmniSwitch 6800/6850/9000 Switch Management Guide for your user name or password, the factory defaults...