

Getting Started Guide
Page 2
...™, WebView™, X-Cell™, X-Vision™, and the Xylan logo are registered trademarks of Alcatel-Lucent. Patent No. 6,047,024 • U.S. The Lithium battery will be covered by Alcatel-Lucent. The features and specifications described in your chassis is incorrectly replaced. Patent No. 6,314,106 • U.S. Lithium Batteries Caution. Patents: • U.S. Patent...
...™, WebView™, X-Cell™, X-Vision™, and the Xylan logo are registered trademarks of Alcatel-Lucent. Patent No. 6,047,024 • U.S. The Lithium battery will be covered by Alcatel-Lucent. The features and specifications described in your chassis is incorrectly replaced. Patent No. 6,314,106 • U.S. Lithium Batteries Caution. Patents: • U.S. Patent...

Getting Started Guide
Page 3
... the Hardware 3 Items Required 3 Site Preparation 3 Environmental Requirements 3 Electrical Requirements 3 NEBS GR-1089 Compliance Requirements . . . . 3 Weight Considerations 4 Items Included 5 Unpacking and Initial Setup 5 Unpacking the Chassis 5 Recommendations 5 Instructions 5 Setting Up the Switch 6 Airflow Considerations 6 Installation Options 7 Installing the Switch on a Tabletop or Bench . . . 7 Tabletop Mounting Steps 7 Rack-Mounting the Switch 8 Rack...
... the Hardware 3 Items Required 3 Site Preparation 3 Environmental Requirements 3 Electrical Requirements 3 NEBS GR-1089 Compliance Requirements . . . . 3 Weight Considerations 4 Items Included 5 Unpacking and Initial Setup 5 Unpacking the Chassis 5 Recommendations 5 Instructions 5 Setting Up the Switch 6 Airflow Considerations 6 Installation Options 7 Installing the Switch on a Tabletop or Bench . . . 7 Tabletop Mounting Steps 7 Rack-Mounting the Switch 8 Rack...

Getting Started Guide
Page 6
... in the User Manual CD: • OmniSwitch 6850 Series Getting Started Guide Describes the hardware and software procedures for all OmniSwitch 6850 Series hardware, including chassis, power supplies, fans, combo ports, stacking procedures, optional backup power supplies, etc. • OmniSwitch CLI Reference Guide Complete reference to -MIB variable mappings. • OmniSwitch...
... in the User Manual CD: • OmniSwitch 6850 Series Getting Started Guide Describes the hardware and software procedures for all OmniSwitch 6850 Series hardware, including chassis, power supplies, fans, combo ports, stacking procedures, optional backup power supplies, etc. • OmniSwitch CLI Reference Guide Complete reference to -MIB variable mappings. • OmniSwitch...
Getting Started Guide
Page 7
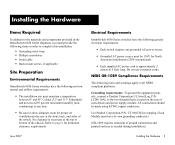
...the equipment properly, connect a Panduit Corporation UL listed Lug, P/N: LCD8-10AL to the two threaded holes located on the rear of each chassis and power supply module. All connections should be 110V for North American installations (220V international). • Each supplied AC power cord is ... at any time. • Be sure to allow adequate room for proper air ventilation and access at the top or bottom of the chassis. NEBS GR-1089 Compliance Requirements The following general electrical requirements: • Each switch requires one grounded AC power source. • Grounded ...
...the equipment properly, connect a Panduit Corporation UL listed Lug, P/N: LCD8-10AL to the two threaded holes located on the rear of each chassis and power supply module. All connections should be 110V for North American installations (220V international). • Each supplied AC power cord is ... at any time. • Be sure to allow adequate room for proper air ventilation and access at the top or bottom of the chassis. NEBS GR-1089 Compliance Requirements The following general electrical requirements: • Each switch requires one grounded AC power source. • Grounded ...

Getting Started Guide
Page 9
...to be installed. Depending on the items ordered for your specific network requirements, the following items: • OmniSwitch 6850 Series chassis • Rack mount flanges with attachment screws (rack mount flanges may be pre-installed on some orders) • Power...XFPs (per order) • Backup power supply components and cables (per order) Unpacking and Initial Setup Unpacking the Chassis To protect your OmniSwitch chassis and hardware components from electrostatic discharge (ESD) and physical damage, read all unpacking recommendations and instructions carefully before beginning....
...to be installed. Depending on the items ordered for your specific network requirements, the following items: • OmniSwitch 6850 Series chassis • Rack mount flanges with attachment screws (rack mount flanges may be pre-installed on some orders) • Power...XFPs (per order) • Backup power supply components and cables (per order) Unpacking and Initial Setup Unpacking the Chassis To protect your OmniSwitch chassis and hardware components from electrostatic discharge (ESD) and physical damage, read all unpacking recommendations and instructions carefully before beginning....

Getting Started Guide
Page 10
...sure that will make up the stack. 6 Once all OmniSwitch 6850 Series switches have been removed from the switch chassis. Note. Always allow adequate clearance at left and right sides for the remaining switches that your switch is to components at ... remove these cover plates unless a backup power supply or expansion module is placed in a stacked configuration, repeat steps 1 through 4 for chassis airflow. Alcatel-Lucent provides factory-installed blank cover plates for cable access and LED visibility. BPS PWR PRI OK OmniSwitch 6850-48 USB 4 1CLASS 12LASER P3RODUCT...
...sure that will make up the stack. 6 Once all OmniSwitch 6850 Series switches have been removed from the switch chassis. Note. Always allow adequate clearance at left and right sides for the remaining switches that your switch is to components at ... remove these cover plates unless a backup power supply or expansion module is placed in a stacked configuration, repeat steps 1 through 4 for chassis airflow. Alcatel-Lucent provides factory-installed blank cover plates for cable access and LED visibility. BPS PWR PRI OK OmniSwitch 6850-48 USB 4 1CLASS 12LASER P3RODUCT...

Getting Started Guide
Page 11
...to the front, back, and sides of the switch. If you have placed all required AC power sources. Note. Note. For detailed chassis airflow diagrams, refer to "Connections and Cabling" on its side. OmniSwitch 6850 Series switches must be installed. 2 Be sure that you...that you are installing a single (i.e., standalone) switch, continue to the OmniSwitch 6850 Series Hardware Users Guide. If you have placed the chassis within reach of the chassis. Clearance is to be placed "right side up a switch as a tabletop unit, refer to page 6. Installing the Switch on a ...
...to the front, back, and sides of the switch. If you have placed all required AC power sources. Note. Note. For detailed chassis airflow diagrams, refer to "Connections and Cabling" on its side. OmniSwitch 6850 Series switches must be installed. 2 Be sure that you...that you are installing a single (i.e., standalone) switch, continue to the OmniSwitch 6850 Series Hardware Users Guide. If you have placed the chassis within reach of the chassis. Clearance is to be placed "right side up a switch as a tabletop unit, refer to page 6. Installing the Switch on a ...

Getting Started Guide
Page 12
...standard 19-inch rack mount installations. Be sure to the rack using attachment screws (not supplied). • Alcatel-Lucent provides two rack-mount flanges with the four threaded holes in the OmniSwitch chassis. If this is the case, skip steps 1 and 2 below. 1 Align the holes in the provided...are installing the switch in a relay rack, be rack mounted. Rack-Mounting the Switch Refer to the important guidelines below before installing the OmniSwitch chassis in a rack. • It is recommended that you install heavier equipment at the bottom of the rack whenever possible. • If ...
...standard 19-inch rack mount installations. Be sure to the rack using attachment screws (not supplied). • Alcatel-Lucent provides two rack-mount flanges with the four threaded holes in the OmniSwitch chassis. If this is the case, skip steps 1 and 2 below. 1 Align the holes in the provided...are installing the switch in a relay rack, be rack mounted. Rack-Mounting the Switch Refer to the important guidelines below before installing the OmniSwitch chassis in a rack. • It is recommended that you install heavier equipment at the bottom of the rack whenever possible. • If ...
Getting Started Guide
Page 13
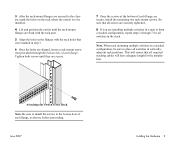
... position the switch until they are secure. 7 Once the screws at the bottom of each flange. 3 After the rack-mount flanges are secured to the chassis, mark the holes on the rack where the switch is to be sure to place all switches in the bottom hole of each flange, as...
... position the switch until they are secure. 7 Once the screws at the bottom of each flange. 3 After the rack-mount flanges are secured to the chassis, mark the holes on the rack where the switch is to be sure to place all switches in the bottom hole of each flange, as...
Getting Started Guide
Page 15
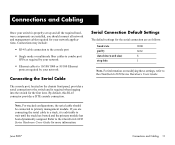
... all network and management cables required for the first time. Note. Serial Connection Default Settings The default settings for more information. For information on the chassis front panel, provides a serial connection to primary management module. By default, this RJ-45 connector provides a DTE console connection. If you should be connected to...
... all network and management cables required for the first time. Note. Serial Connection Default Settings The default settings for more information. For information on the chassis front panel, provides a serial connection to primary management module. By default, this RJ-45 connector provides a DTE console connection. If you should be connected to...
Getting Started Guide
Page 23
... a sticker or placard with a unique identifier (e.g., the switch's default IP address) on these directories. If you use a physical labeling system for important information on each chassis. Note. Refer to the OmniSwitch 6850 Series Hardware Users Guide. For stacked configurations, be very useful.
... a sticker or placard with a unique identifier (e.g., the switch's default IP address) on these directories. If you use a physical labeling system for important information on each chassis. Note. Refer to the OmniSwitch 6850 Series Hardware Users Guide. For stacked configurations, be very useful.

Getting Started Guide
Page 31
Refer to use the new information. June 2007 Using WebView 27 2 Enter the switch's IP address in , the Chassis Management home page displays. 3 Enter the user name and password at the login prompt. Navigating WebView After you have already changed your OmniSwitch ...logged in the browser's "Address" text field ("Location:" for WebView. The login screen displays. This is the main launching point for Netscape users). The Chassis Management home page provides a physical representation of your user name or password, the factory defaults are admin and switch, respectively.
Refer to use the new information. June 2007 Using WebView 27 2 Enter the switch's IP address in , the Chassis Management home page displays. 3 Enter the user name and password at the login prompt. Navigating WebView After you have already changed your OmniSwitch ...logged in the browser's "Address" text field ("Location:" for WebView. The login screen displays. This is the main launching point for Netscape users). The Chassis Management home page provides a physical representation of your user name or password, the factory defaults are admin and switch, respectively.