User Manual
Page 3
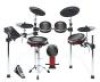
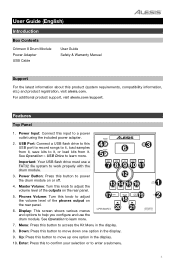
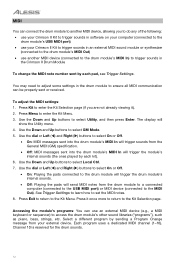
... load kits from it. USB Port: Connect a USB flash drive to this input to a power outlet using the included power adapter. 2. See Operation > USB Drive to learn more . 5 Important: Your USB flash drive must use the drum module. See Operation to learn more . 7 8 9 10 11 12 13 14 15 16 1 17 19 18 2 20 21 7. For additional product support, visit alesis.com/support. Features Top Panel 1. User Guide (English) Introduction Box Contents Crimson II Drum Module Power Adapter USB Cable User Guide Safety & Warranty Manual Support...
... load kits from it. USB Port: Connect a USB flash drive to this input to a power outlet using the included power adapter. 2. See Operation > USB Drive to learn more . 5 Important: Your USB flash drive must use the drum module. See Operation to learn more . 7 8 9 10 11 12 13 14 15 16 1 17 19 18 2 20 21 7. For additional product support, visit alesis.com/support. Features Top Panel 1. User Guide (English) Introduction Box Contents Crimson II Drum Module Power Adapter USB Cable User Guide Safety & Warranty Manual Support...

User Manual
Page 4
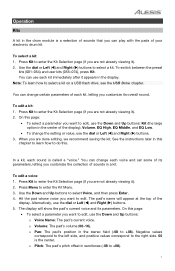
... (number values, kits, songs, etc.). Tom 4 Trigger Input: Connect an optional single- USB MIDI Port: Connect this button to the previous setting) in the display. The drum module will be mixed with the drum module's sounds. 8 54 2 7 6 33 1 3. Click: Press this USB port to record-arm the drum module. Control the volume by turning the Phones Volume knob on the top panel. 2. MIDI Out: Connect an external MIDI device (synthesizer, sound module, etc.) to this button to a computer using a standard 5-pin MIDI cable. 8. See...
... (number values, kits, songs, etc.). Tom 4 Trigger Input: Connect an optional single- USB MIDI Port: Connect this button to the previous setting) in the display. The drum module will be mixed with the drum module's sounds. 8 54 2 7 6 33 1 3. Click: Press this USB port to record-arm the drum module. Control the volume by turning the Phones Volume knob on the top panel. 2. MIDI Out: Connect an external MIDI device (synthesizer, sound module, etc.) to this button to a computer using a standard 5-pin MIDI cable. 8. See...
User Manual
Page 5
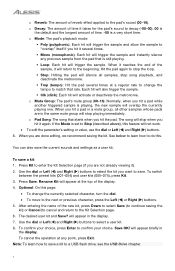
... buttons to select a kit. Alternatively, use the Down and Up buttons: o Voice Name: The pad's current voice. Press Kit to enter the Kit Selection page (if you want to select a kit on a USB flash drive, see the USB Drive chapter. On this chapter to learn how to edit. o Volume: The pad's volume (00-16). o Pitch: The pad's pitch offset in the display. See the instructions later in the stereo field (-08 to +08). 5 To edit a voice: 1. o Pan: The pad...
... buttons to select a kit. Alternatively, use the Down and Up buttons: o Voice Name: The pad's current voice. Press Kit to enter the Kit Selection page (if you want to select a kit on a USB flash drive, see the USB Drive chapter. On this chapter to learn how to edit. o Volume: The pad's volume (00-16). o Pitch: The pad's pitch offset in the display. See the instructions later in the stereo field (-08 to +08). 5 To edit a voice: 1. o Pan: The pad...
User Manual
Page 6
... several times at a regular rate to change the currently selected character, turn the dial. • To move to the beginning. If the Mode is a very short time. Rename Kit will not work. • To edit the parameter's setting or value, use the dial or Left () and Right () buttons. 6. Optional: On this feature will appear at any previous sample from the pad that...
... several times at a regular rate to change the currently selected character, turn the dial. • To move to the beginning. If the Mode is a very short time. Rename Kit will not work. • To edit the parameter's setting or value, use the dial or Left () and Right () buttons. 6. Optional: On this feature will appear at any previous sample from the pad that...
User Manual
Page 7
... the Kit Selection page. 2. Use the dial or Left () and Right () buttons to play the song. The button will appear in the display. The length of the accompaniment and your performances and save them to the drum module's built-in memory or to a connected USB flash drive. • When using the module's internal memory, you can record up to 5 user songs as MIDI files. • When using a USB flash drive, you can record up to , Songs 061...
... the Kit Selection page. 2. Use the dial or Left () and Right () buttons to play the song. The button will appear in the display. The length of the accompaniment and your performances and save them to the drum module's built-in memory or to a connected USB flash drive. • When using the module's internal memory, you can record up to 5 user songs as MIDI files. • When using a USB flash drive, you can record up to , Songs 061...
User Manual
Page 8
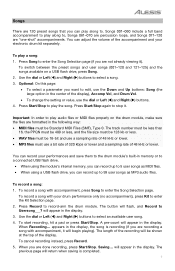
... change it ). 2. When you activate the metronome, its settings will show the current trigger and its parameters, letting you want to edit, use the Down and Up buttons: Time Sig (the time signature), Volume, Interval (how often the metronome clicks), Sound, and Output (whether the metronome plays through all kits. The pad's name will appear in the display. 2. Metronome The built-in metronome (or "click track") can adjust. You can change the tempo...
... change it ). 2. When you activate the metronome, its settings will show the current trigger and its parameters, letting you want to edit, use the Down and Up buttons: Time Sig (the time signature), Volume, Interval (how often the metronome clicks), Sound, and Output (whether the metronome plays through all kits. The pad's name will appear in the display. 2. Metronome The built-in metronome (or "click track") can adjust. You can change the tempo...

User Manual
Page 9
.... o MIDI Note: When the drum module's USB MIDI port or MIDI Out is too high, you may be silenced because the module incorrectly interprets the hit as crosstalk. To save your changes will not affect the trigger or its sound if you are not using those connections, this value is too low, you may not be lost when you may trigger extra, undesired notes while playing normally. Don't set...
.... o MIDI Note: When the drum module's USB MIDI port or MIDI Out is too high, you may be silenced because the module incorrectly interprets the hit as crosstalk. To save your changes will not affect the trigger or its sound if you are not using those connections, this value is too low, you may not be lost when you may trigger extra, undesired notes while playing normally. Don't set...
User Manual
Page 10
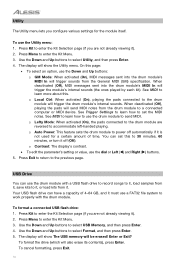
... it). 2. The display will trigger the drum module's internal sounds. See MIDI to learn how to use a FAT32 file system to work properly with a USB flash drive to record songs to it, load samples from it, save kits to it, or load kits from it. o Auto Power: This feature sets the drum module to power off (Off). Your USB flash drive can have a capacity of time. Press Kit to enter the Kit Selection page (if you are reversed...
... it). 2. The display will trigger the drum module's internal sounds. See MIDI to learn how to use a FAT32 file system to work properly with a USB flash drive to record songs to it, load samples from it, save kits to it, or load kits from it. o Auto Power: This feature sets the drum module to power off (Off). Your USB flash drive can have a capacity of time. Press Kit to enter the Kit Selection page (if you are reversed...
User Manual
Page 11
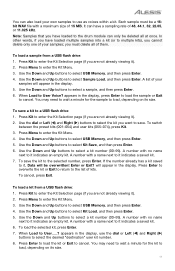
... switch between the preset kits (001-054) and user kits (055-074), press Kit. 3. To load a kit from a USB flash drive: 1. Use the Down and Up buttons to enter the Kit Menu. 4. Use the Down and Up buttons to select a sample, and then press Enter. 6. Use the Down and Up buttons to select a kit number (00-99). Press Kit to load, depending on its size. A number with no name next to the drum module...
... switch between the preset kits (001-054) and user kits (055-074), press Kit. 3. To load a kit from a USB flash drive: 1. Use the Down and Up buttons to enter the Kit Menu. 4. Use the Down and Up buttons to select a sample, and then press Enter. 6. Use the Down and Up buttons to select a kit number (00-99). Press Kit to load, depending on its size. A number with no name next to the drum module...
User Manual
Page 12
... drum module's MIDI Out) • use an external MIDI device (e.g., a MIDI keyboard or sequencer) to select GM Mode. 5. Use the Down and Up buttons to access the drum module's other sound libraries ("programs"), such as piano, bass, strings, etc. Use the dial or Left () and Right () buttons to select On or Off. • On: Playing the pads connected to the drum module will trigger the drum module's internal sounds. • Off: Playing the pads will send MIDI notes from your Crimson II Kit to trigger sounds in the drum module...
... drum module's MIDI Out) • use an external MIDI device (e.g., a MIDI keyboard or sequencer) to select GM Mode. 5. Use the Down and Up buttons to access the drum module's other sound libraries ("programs"), such as piano, bass, strings, etc. Use the dial or Left () and Right () buttons to select On or Off. • On: Playing the pads connected to the drum module will trigger the drum module's internal sounds. • Off: Playing the pads will send MIDI notes from your Crimson II Kit to trigger sounds in the drum module...
User Manual
Page 13
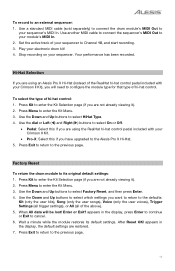
... Channel 10, and start recording. 3. Enter or Exit? Set the active track of your Crimson II Kit), you are using the RealHat hi-hat control pedal included with your sequencer's MIDI In. Press Kit to the defaults: Kit (only the user kits), Song (only the user songs), Voice (only the user voices), Trigger Settings (all trigger settings), or All (all of the RealHat hi-hat control pedal included with your sequencer to select Factory Reset, and then press Enter. 4. Wait a minute while the module...
... Channel 10, and start recording. 3. Enter or Exit? Set the active track of your Crimson II Kit), you are using the RealHat hi-hat control pedal included with your sequencer's MIDI In. Press Kit to the defaults: Kit (only the user kits), Song (only the user songs), Voice (only the user voices), Trigger Settings (all trigger settings), or All (all of the RealHat hi-hat control pedal included with your sequencer to select Factory Reset, and then press Enter. 4. Wait a minute while the module...
User Manual
Page 58
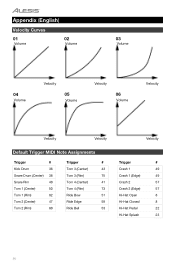
Appendix (English) Velocity Curves 01 Volume 02 Volume 03 Volume 04 Volume Velocity 05 Volume Velocity 06 Volume Velocity Velocity Velocity Default Trigger MIDI Note Assignments Trigger # Trigger # Kick Drum 36 Tom 3 (Center) 43 Snare Drum (Center) 38 Tom 3 (Rim) 75 Snare Rim 40 Tom 4 (Center) 41 Tom 1 (Center) 50 Tom 4 (Rim) 73 Tom 1 (Rim) 82 Ride Bow 51 Tom 2 (Center) 47 Ride Edge 59 Tom 2 (Rim) 80 Ride Bell 53 Velocity Trigger # Crash...
Appendix (English) Velocity Curves 01 Volume 02 Volume 03 Volume 04 Volume Velocity 05 Volume Velocity 06 Volume Velocity Velocity Velocity Default Trigger MIDI Note Assignments Trigger # Trigger # Kick Drum 36 Tom 3 (Center) 43 Snare Drum (Center) 38 Tom 3 (Rim) 75 Snare Rim 40 Tom 4 (Center) 41 Tom 1 (Center) 50 Tom 4 (Rim) 73 Tom 1 (Rim) 82 Ride Bow 51 Tom 2 (Center) 47 Ride Edge 59 Tom 2 (Rim) 80 Ride Bell 53 Velocity Trigger # Crash...
User Manual
Page 59
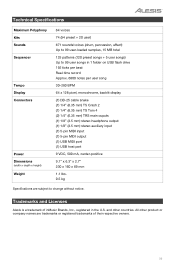
... Specifications Maximum Polyphony Kits Sounds Sequencer Tempo Display Connectors Power Dimensions (width x depth x height) Weight 64 voices 74 (54 preset + 20 user) 671 sounds/voices (drum, percussion, effect) Up to 99 user-loaded samples, 15 MB total 125 patterns (120 preset songs + 5 user songs) Up to change without notice. and other product or company names are subject to 99 user songs in 1 folder on USB flash drive 192 ticks per beat Real-time record Approx. 6800 notes...
... Specifications Maximum Polyphony Kits Sounds Sequencer Tempo Display Connectors Power Dimensions (width x depth x height) Weight 64 voices 74 (54 preset + 20 user) 671 sounds/voices (drum, percussion, effect) Up to 99 user-loaded samples, 15 MB total 125 patterns (120 preset songs + 5 user songs) Up to change without notice. and other product or company names are subject to 99 user songs in 1 folder on USB flash drive 192 ticks per beat Real-time record Approx. 6800 notes...


