User Guide
Page 3
User Guide (English) Introduction Box Contents E-Drum Total drum rack, assembled including: E-Drum Total sound module (4) 6" / 15.2 cm drum pads (3) Cymbal poles (3) 10" / 25 cm Cymbal pads (2) Floor pedals (hi-hat and kick) Cable snake Sound module power adapter (2) Sticks Drum Stool Headphones Drum key Velcro strap User Guide Safety & Warranty Manual Support For the latest information about this product (system requirements, compatibility information, etc.) and product registration, visit alesis.com. For additional product support, visit alesis.com/support. 3
User Guide (English) Introduction Box Contents E-Drum Total drum rack, assembled including: E-Drum Total sound module (4) 6" / 15.2 cm drum pads (3) Cymbal poles (3) 10" / 25 cm Cymbal pads (2) Floor pedals (hi-hat and kick) Cable snake Sound module power adapter (2) Sticks Drum Stool Headphones Drum key Velcro strap User Guide Safety & Warranty Manual Support For the latest information about this product (system requirements, compatibility information, etc.) and product registration, visit alesis.com. For additional product support, visit alesis.com/support. 3
User Guide
Page 4
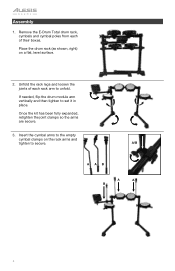
If needed, flip the drum module arm vertically and then tighten to unfold. Insert the cymbal arms to secure. Place the drum rack (as shown, right) on the rack arms and tighten to the empty cymbal clamps on a flat, level surface. 2. Once the kit has been fully expanded, retighten the joint clamps so the arms are secure. 3. A/B A A B A A B 4 Assembly 1. Remove the E-Drum Total drum rack, cymbals and cymbal poles from each rack arm to set it in place. Unfold the rack legs and loosen the joints of each of their boxes.
If needed, flip the drum module arm vertically and then tighten to unfold. Insert the cymbal arms to secure. Place the drum rack (as shown, right) on the rack arms and tighten to the empty cymbal clamps on a flat, level surface. 2. Once the kit has been fully expanded, retighten the joint clamps so the arms are secure. 3. A/B A A B A A B 4 Assembly 1. Remove the E-Drum Total drum rack, cymbals and cymbal poles from each rack arm to set it in place. Unfold the rack legs and loosen the joints of each of their boxes.
User Guide
Page 5
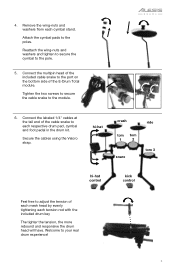
... tom 3 hi-hat control kick control Feel free to adjust the tension of each mesh head by evenly tightening each cymbal stand. Welcome to the pole. 5. Reattach the wing-nuts and washers and tighten to secure the cymbal to your real drum experience! 5 Connect the multipin head of the E-Drum Total module. Secure the cables using the Velcro strap. Connect the labeled 1/4" cables at the...
... tom 3 hi-hat control kick control Feel free to adjust the tension of each mesh head by evenly tightening each cymbal stand. Welcome to the pole. 5. Reattach the wing-nuts and washers and tighten to secure the cymbal to your real drum experience! 5 Connect the multipin head of the E-Drum Total module. Secure the cables using the Velcro strap. Connect the labeled 1/4" cables at the...
User Guide
Page 6
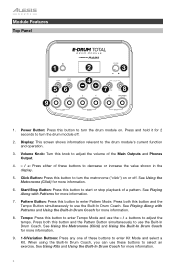
... display. 5. Module Features Top Panel 1 56 9 2 3 4 78 1. Click Button: Press this button to enter Kit Mode and select a Kit. See Playing Along with Patterns and Using the Built-In Drum Coach for 2 seconds to turn the drum module on or off . 2. See Using the Metronome (Click) for more information. 6. Press and hold it for more information. 8. Start/Stop Button: Press this button to turn the drum module off . Tempo: Press this...
... display. 5. Module Features Top Panel 1 56 9 2 3 4 78 1. Click Button: Press this button to enter Kit Mode and select a Kit. See Playing Along with Patterns and Using the Built-In Drum Coach for 2 seconds to turn the drum module on or off . 2. See Using the Metronome (Click) for more information. 6. Press and hold it for more information. 8. Start/Stop Button: Press this button to turn the drum module off . Tempo: Press this...
User Guide
Page 7
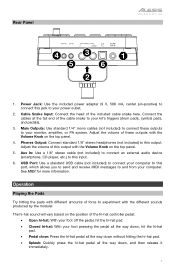
... top panel. 5. Main Outputs: Use standard 1/4" mono cables (not included) to your kit's triggers (drum pads, cymbal pads, and pedals). 3. See MIDI for more information. Cable Snake Input: Connect the head of force to this output. Adjust the volume of the hi-hat controller pedal: • Open hi-hat: With your foot off the pedal, hit the hi-hat pad. • Closed hi-hat: With your monitor, amplifier, or PA system. Aux In: Use a 1/8" stereo cable (not included) to connect an external audio...
... top panel. 5. Main Outputs: Use standard 1/4" mono cables (not included) to your kit's triggers (drum pads, cymbal pads, and pedals). 3. See MIDI for more information. Cable Snake Input: Connect the head of force to this output. Adjust the volume of the hi-hat controller pedal: • Open hi-hat: With your foot off the pedal, hit the hi-hat pad. • Closed hi-hat: With your monitor, amplifier, or PA system. Aux In: Use a 1/8" stereo cable (not included) to connect an external audio...
User Guide
Page 8
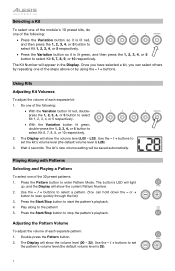
..., double-press the 1, 2, 3, 4, or 5 button to set the pattern's volume level (the default volume level is L28). 3. Do one of each separate pattern: 1. Use the - / + buttons to select Kit 6, 7, 8, 9, or 10 respectively. 2. Wait 4 seconds. or + button to the pattern! Play along to scan quickly through the list). 3. Using Kits Adjusting Kit Volumes To adjust the volume of the 30 preset patterns: 1. The button's LED will light up, and...
..., double-press the 1, 2, 3, 4, or 5 button to set the pattern's volume level (the default volume level is L28). 3. Do one of each separate pattern: 1. Use the - / + buttons to select Kit 6, 7, 8, 9, or 10 respectively. 2. Wait 4 seconds. or + button to the pattern! Play along to scan quickly through the list). 3. Using Kits Adjusting Kit Volumes To adjust the volume of the 30 preset patterns: 1. The button's LED will light up, and...

User Guide
Page 9
... Metronome Sound To change the metronome's time signature: 2 CLICK 1. Wait 4 seconds. Wait 4 seconds. The Display will automatically save the new setting. The drum module will show CL ("click") and the number of the sound (CL1 - L32). Use the - / + buttons to set the new tempo. 3. Turning the Metronome On or Off CLICK To turn the metronome on or off, press the Click button. TEMPO 2. The Display will automatically save the new setting. 9 Use the - / + buttons to select a time...
... Metronome Sound To change the metronome's time signature: 2 CLICK 1. Wait 4 seconds. Wait 4 seconds. The Display will automatically save the new setting. The drum module will show CL ("click") and the number of the sound (CL1 - L32). Use the - / + buttons to set the new tempo. 3. Turning the Metronome On or Off CLICK To turn the metronome on or off, press the Click button. TEMPO 2. The Display will automatically save the new setting. 9 Use the - / + buttons to select a time...
User Guide
Page 10
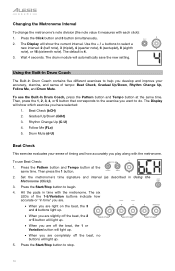
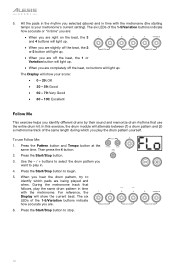
... button and Tempo button at the same time. To use the Built-In Drum Coach, press the Pattern button and Tempo button at the same time. Beat Check (bCH) 2. Press the Start/Stop button to select a new interval: 2 (half note), 3 (triplet), 4 (quarter note), 6 (sextuplet), 8 (eighth note), or 16 (sixteenth note). Follow Me (FLo) 5. Use the - / + buttons to begin. 4. Press the Click button and 3 button simultaneously. 3 CLICK 2. Changing the Metronome Interval To change the metronome's note...
... button and Tempo button at the same time. To use the Built-In Drum Coach, press the Pattern button and Tempo button at the same time. Beat Check (bCH) 2. Press the Start/Stop button to select a new interval: 2 (half note), 3 (triplet), 4 (quarter note), 6 (sextuplet), 8 (eighth note), or 16 (sixteenth note). Follow Me (FLo) 5. Use the - / + buttons to begin. 4. Press the Click button and 3 button simultaneously. 3 CLICK 2. Changing the Metronome Interval To change the metronome's note...

User Guide
Page 11
... 2 button. PATTERN TEMPO 2. In this mode, the tempo automatically decreases or increases by 1 BPM each measure (The starting tempo is your accuracy. 2 • Press the 2 button to select G-2 Mode. Press the Pattern button and Tempo button at the same time. Press the 1, 2, or 3 button or use the - / + buttons to begin. 11 Rhythm Change Up This exercise helps you can play while still maintaining accurate time. Then press the 3 button...
... 2 button. PATTERN TEMPO 2. In this mode, the tempo automatically decreases or increases by 1 BPM each measure (The starting tempo is your accuracy. 2 • Press the 2 button to select G-2 Mode. Press the Pattern button and Tempo button at the same time. Press the 1, 2, or 3 button or use the - / + buttons to begin. 11 Rhythm Change Up This exercise helps you can play while still maintaining accurate time. Then press the 3 button...
User Guide
Page 12
... you are off the beat, no buttons will alternate between (1) a drum pattern and (2) a metronome track of the same length during which pads are being played and when. 5. Press the Pattern button and Tempo button at the PATTERN TEMPO same time. For reference, the Display will light up . START /STOP 2. Then press the 4 button. Use the - / + buttons to select the drum pattern you want to stop. 5 VARIATION...
... you are off the beat, no buttons will alternate between (1) a drum pattern and (2) a metronome track of the same length during which pads are being played and when. 5. Press the Pattern button and Tempo button at the PATTERN TEMPO same time. For reference, the Display will light up . START /STOP 2. Then press the 4 button. Use the - / + buttons to select the drum pattern you want to stop. 5 VARIATION...
User Guide
Page 13
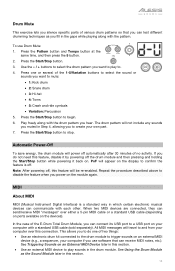
.... 6. Note: After powering off . In the case of the E-Drum Total Drum Module, you can connect its USB port to mute: • 1: Kick drum • 2: Snare drum • 3: Hi-hat • 4: Toms • 5: Crash and ride cymbals • Variation: Percussion 5. Use the - / + buttons to select the drum pattern you want to a USB port on your computer if you use Drum Mute: 5 COACH 1. Press the Start/Stop button to stop. Play...
.... 6. Note: After powering off . In the case of the E-Drum Total Drum Module, you can connect its USB port to mute: • 1: Kick drum • 2: Snare drum • 3: Hi-hat • 4: Toms • 5: Crash and ride cymbals • Variation: Percussion 5. Use the - / + buttons to select the drum pattern you want to a USB port on your computer if you use Drum Mute: 5 COACH 1. Press the Start/Stop button to stop. Play...
User Guide
Page 14
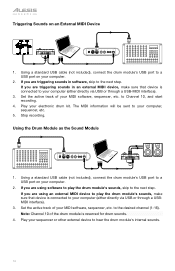
... start recording. 4. If you are triggering sounds in an external MIDI device, make sure that device is reserved for drum sounds. 4. Note: Channel 10 of the drum module is connected to a USB port on an External MIDI Device VOL MIDI IN MIDI OUT R L RL USB 1. If you are using software to play the drum module's sounds, make sure that device is connected to the next step. The MIDI information will be sent to hear the drum module's internal sounds. 14 Set...
... start recording. 4. If you are triggering sounds in an external MIDI device, make sure that device is reserved for drum sounds. 4. Note: Channel 10 of the drum module is connected to a USB port on an External MIDI Device VOL MIDI IN MIDI OUT R L RL USB 1. If you are using software to play the drum module's sounds, make sure that device is connected to the next step. The MIDI information will be sent to hear the drum module's internal sounds. 14 Set...

User Guide
Page 63
Trademarks & Licenses Alesis is a registered trademark of Velcro BVBA. Appendix (English) Technical Specifications Kits Sequencer Resolution Maximum Polyphony Display Tempo Connectors Power Dimensions (width x height x depth; sound module only) Weight (sound module only) 10 preset kits; 5 General MIDI (GM) kits 30 Patterns; 12 "Follow Me" patterns 192 ticks per quarter note 64 3-digit LED 30 - 280 BPM 25-pin trigger input jack (for cable snake) 1/8" TRS headphone output 1/4" TS main outputs (right...
Trademarks & Licenses Alesis is a registered trademark of Velcro BVBA. Appendix (English) Technical Specifications Kits Sequencer Resolution Maximum Polyphony Display Tempo Connectors Power Dimensions (width x height x depth; sound module only) Weight (sound module only) 10 preset kits; 5 General MIDI (GM) kits 30 Patterns; 12 "Follow Me" patterns 192 ticks per quarter note 64 3-digit LED 30 - 280 BPM 25-pin trigger input jack (for cable snake) 1/8" TRS headphone output 1/4" TS main outputs (right...


