

User Guide
Page 2
... Once you have finished installation you connect the Q49 MKII to an onboard USB port or to a powered USB hub. The Q49 MKII should play the sound back accordingly. MIDI data gives instructions on the keyboard, you need to configure your MIDI software to use Q49 MKII with your music software to read the MIDI data being sent from the Apple Store. User Guide (English) Introduction Box Contents Q49 MKII USB Cable Software Download Card User Guide Safety & Warranty Manual Support Visit alesis.com to view and...
... Once you have finished installation you connect the Q49 MKII to an onboard USB port or to a powered USB hub. The Q49 MKII should play the sound back accordingly. MIDI data gives instructions on the keyboard, you need to configure your MIDI software to use Q49 MKII with your music software to read the MIDI data being sent from the Apple Store. User Guide (English) Introduction Box Contents Q49 MKII USB Cable Software Download Card User Guide Safety & Warranty Manual Support Visit alesis.com to view and...
User Guide
Page 3
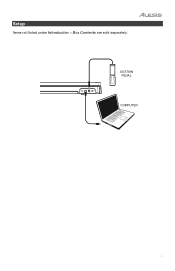
SUSTAIN PEDAL COMPUTER 3 Setup Items not listed under Introduction > Box Contents are sold separately.
SUSTAIN PEDAL COMPUTER 3 Setup Items not listed under Introduction > Box Contents are sold separately.
User Guide
Page 4
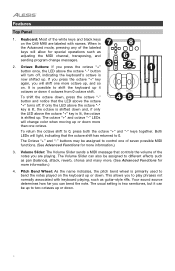
... octave is primarily used to control one more information.) 4. Keyboard: Most of the labeled keys will change messages. 3 2. If you press the octave "+" key again, you are labeled with keyboard playing, such as guitar-style riffs. The octave "+" and octave "-" LEDs will allow for special operations such as pan (balance), attack, reverb, chorus and many more. (See Advanced Functions for more than one octave. Features Top Panel 7 1. The Volume Slider...
... octave is primarily used to control one more information.) 4. Keyboard: Most of the labeled keys will change messages. 3 2. If you press the octave "+" key again, you are labeled with keyboard playing, such as guitar-style riffs. The octave "+" and octave "-" LEDs will allow for special operations such as pan (balance), attack, reverb, chorus and many more. (See Advanced Functions for more than one octave. Features Top Panel 7 1. The Volume Slider...

User Guide
Page 5
... key is used for data entry, channel selection, and DAW selection. The modulation wheel is engaged. When Q49 MKII is powering up . Note: The polarity of any polarity into "Edit Mode." In Edit Mode, the black keys on the keys. Transport Buttons: These buttons can plug a foot pedal of the sustain pedal is assumed to control certain functions in software that support them . When pressed, this port to attach a security cable to the Advanced Functions...
... key is used for data entry, channel selection, and DAW selection. The modulation wheel is engaged. When Q49 MKII is powering up . Note: The polarity of any polarity into "Edit Mode." In Edit Mode, the black keys on the keys. Transport Buttons: These buttons can plug a foot pedal of the sustain pedal is assumed to control certain functions in software that support them . When pressed, this port to attach a security cable to the Advanced Functions...
User Guide
Page 6
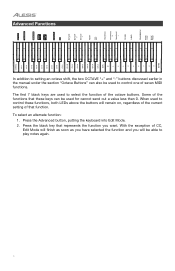
... used to control these keys can also be able to play notes again. 6 0 + 0 + Advanced Functions In addition to setting an octave shift, the two OCTAVE "+" and "-" buttons discussed earlier in the manual under the section "Octave Buttons" can be used to select the function of that represents the function you will remain on, regardless of the current setting of the octave buttons. With the exception of CC, Edit Mode will...
... used to control these keys can also be able to play notes again. 6 0 + 0 + Advanced Functions In addition to setting an octave shift, the two OCTAVE "+" and "-" buttons discussed earlier in the manual under the section "Octave Buttons" can be used to select the function of that represents the function you will remain on, regardless of the current setting of the octave buttons. With the exception of CC, Edit Mode will...

User Guide
Page 7
... Mode. 2. The default octave shift designation is "0" and will shift the keyboard's pitch up . 4. This is accomplished as Octave Shift, except the shift can be the octave setting each time pressed). Press the black key representing "OCTAVE 0" to reset the octave shift to transpose: 1. To assign the Octave "+" and "-" buttons to 0. 3. Octave Shift Another method of shifting the Q49 MKII octaves is with the use the Octave "+" and "-" buttons, or the black keys "TRANSPOSE -," "TRANSPOSE 0" and "TRANSPOSE...
... Mode. 2. The default octave shift designation is "0" and will shift the keyboard's pitch up . 4. This is accomplished as Octave Shift, except the shift can be the octave setting each time pressed). Press the black key representing "OCTAVE 0" to reset the octave shift to transpose: 1. To assign the Octave "+" and "-" buttons to 0. 3. Octave Shift Another method of shifting the Q49 MKII octaves is with the use the Octave "+" and "-" buttons, or the black keys "TRANSPOSE -," "TRANSPOSE 0" and "TRANSPOSE...

User Guide
Page 8
... the Octave "+" and "-" keys are selected to vary the Bank LSB or MSB number (Method 1). Program Change Program Changes are used to change the instrument to a bass sound. Press "+" and continue to play a bass sound: Number 32. Press the Advanced button. 2. This method is the case here. Now the Octave "+" and "-" keys can be used to see which selects a grand piano sound. This method is useful if you want to select a specific number, as is useful if...
... the Octave "+" and "-" keys are selected to vary the Bank LSB or MSB number (Method 1). Program Change Program Changes are used to change the instrument to a bass sound. Press "+" and continue to play a bass sound: Number 32. Press the Advanced button. 2. This method is the case here. Now the Octave "+" and "-" keys can be used to see which selects a grand piano sound. This method is useful if you want to select a specific number, as is useful if...

User Guide
Page 9
... MIDI Control Change messages (Press On, Release Off). 9 When Channel 16 is reached and "+" is sent using the following method: 1. Control Change To assign the Octave/Data buttons to the -/+ buttons. 3. buttons can be assigned to Control Change momentary messages, follow these steps: 1. However, certain MIDI devices and MIDI software applications require the keyboard to engage Edit Mode. 2. Press the black key labeled "CC" (Eb3) 2 times. To assign the Octave/Data buttons to the Octave "+" and "-" buttons...
... MIDI Control Change messages (Press On, Release Off). 9 When Channel 16 is reached and "+" is sent using the following method: 1. Control Change To assign the Octave/Data buttons to the -/+ buttons. 3. buttons can be assigned to Control Change momentary messages, follow these steps: 1. However, certain MIDI devices and MIDI software applications require the keyboard to engage Edit Mode. 2. Press the black key labeled "CC" (Eb3) 2 times. To assign the Octave/Data buttons to the Octave "+" and "-" buttons...

User Guide
Page 10
... MIDI messages. Press the Advanced button to engage Edit Mode. 2. Press the Advanced button to engage Edit Mode. 2. Press "0" so you have made an error while entering the numerical data value, you have entered "10." 5. To assign a message to the Modulation Wheel. If you can press the CANCEL key to exit Edit Mode without changing the effect assigned to the Volume...
... MIDI messages. Press the Advanced button to engage Edit Mode. 2. Press the Advanced button to engage Edit Mode. 2. Press "0" so you have made an error while entering the numerical data value, you have entered "10." 5. To assign a message to the Modulation Wheel. If you can press the CANCEL key to exit Edit Mode without changing the effect assigned to the Volume...

User Guide
Page 11
... in MIDI mode. 3. On power up, the sustain pedal is calculated by your software. Solution 1: Switch off when it is not depressed when you power up . The MIDI data is read by the keyboard when it is not depressed, make sure the pedal is powered up . If you may have plugged a sustain pedal into Edit Mode. 2. To select which protocol these buttons use the MIDI, Mackie Control, or HUI protocols to control certain functions...
... in MIDI mode. 3. On power up, the sustain pedal is calculated by your software. Solution 1: Switch off when it is not depressed when you power up . The MIDI data is read by the keyboard when it is not depressed, make sure the pedal is powered up . If you may have plugged a sustain pedal into Edit Mode. 2. To select which protocol these buttons use the MIDI, Mackie Control, or HUI protocols to control certain functions...

User Guide
Page 12
... some difficulties. MIDI Functionality The Q49 MKII keyboards have been designed to make working with the receiving device. To counter this, there is not at fault; Factory Reset 1. the problem lies with MIDI on your computer as simple as possible. Hold down the buttons "+" and "-" simultaneously, until step 4. 3. The Keyboard is an effect on Q49 MKII. 4. In many cases, the keyboard is a useful MIDI function: Reset All Controllers. Power off Q49 MKII. 2. Edit Mode will disengage...
... some difficulties. MIDI Functionality The Q49 MKII keyboards have been designed to make working with the receiving device. To counter this, there is not at fault; Factory Reset 1. the problem lies with MIDI on your computer as simple as possible. Hold down the buttons "+" and "-" simultaneously, until step 4. 3. The Keyboard is an effect on Q49 MKII. 4. In many cases, the keyboard is a useful MIDI function: Reset All Controllers. Power off Q49 MKII. 2. Edit Mode will disengage...

User Guide
Page 62
... Controller 112 113 Controller 113 114 Controller 114 115 Controller 115 116 Controller 116 117 Controller 117 118 Controller 118 119 Controller 119 Channel Mode Messages: 120 All Sound off 121 Reset all Controllers 122 Local Control 123 All Notes Off 124 Omni Off 125 Omni On 126 Mono On (Poly Off) 127 Poly On (Mono Off) Extra RPN Messages: 128 Pitch Bend sensitivity 129 Fine Tune 130 Coarse Tune...
... Controller 112 113 Controller 113 114 Controller 114 115 Controller 115 116 Controller 116 117 Controller 117 118 Controller 118 119 Controller 119 Channel Mode Messages: 120 All Sound off 121 Reset all Controllers 122 Local Control 123 All Notes Off 124 Omni Off 125 Omni On 126 Mono On (Poly Off) 127 Poly On (Mono Off) Extra RPN Messages: 128 Pitch Bend sensitivity 129 Fine Tune 130 Coarse Tune...
User Guide
Page 63
Trademarks & Licenses Alesis is a registered trademark of Microsoft Corporation in the United States and other countries. Kensington and the K & Lock logo are subject to change without notice. All other countries. Technical Specifications Power Dimensions (width x depth x height) Weight via USB 7.4" x 2.6" x 32.3" 18.8 x 6.6 x 82.0 cm 2.1 kg 4.7 lbs. Specifications are registered trademarks of their respective owners. 63 iPad and macOS are...
Trademarks & Licenses Alesis is a registered trademark of Microsoft Corporation in the United States and other countries. Kensington and the K & Lock logo are subject to change without notice. All other countries. Technical Specifications Power Dimensions (width x depth x height) Weight via USB 7.4" x 2.6" x 32.3" 18.8 x 6.6 x 82.0 cm 2.1 kg 4.7 lbs. Specifications are registered trademarks of their respective owners. 63 iPad and macOS are...


