
Controller Mapping
Page 1
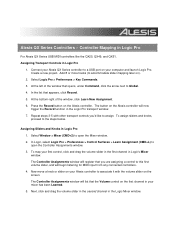
... for MIDI input from any connected controllers. 4. Press the Record button on the Alesis controller will list that appears, click Record. 5. Assigning Transport Controls in the Logic Mixer window. Add 8 or more tracks (to the steps below. To assign sliders and knobs, proceed to accommodate slider mapping later on the screen. Next, click and drag the volume slider in the second channel in Logic Pro 1. Repeat steps 3-5 with the volume...
... for MIDI input from any connected controllers. 4. Press the Record button on the Alesis controller will list that appears, click Record. 5. Assigning Transport Controls in the Logic Mixer window. Add 8 or more tracks (to the steps below. To assign sliders and knobs, proceed to accommodate slider mapping later on the screen. Next, click and drag the volume slider in the second channel in Logic Pro 1. Repeat steps 3-5 with the volume...
Controller Mapping
Page 2
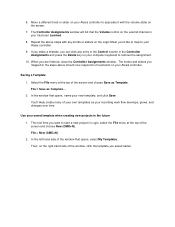
.... Saving a Template 1. File > Save as Template... 2. File > New (CMD+N) 2. Then, on your own templates as Template. When you saved earlier. Repeat the above should now respond to your recording work flow develops, grows, and changes over time. Move a different knob or slider on your Alesis controller to associate it with any entry in the Control column in your computer keyboard to start a new project in the steps above steps...
.... Saving a Template 1. File > Save as Template... 2. File > New (CMD+N) 2. Then, on your own templates as Template. When you saved earlier. Repeat the above should now respond to your recording work flow develops, grows, and changes over time. Move a different knob or slider on your Alesis controller to associate it with any entry in the Control column in your computer keyboard to start a new project in the steps above steps...

Quick Start Guide
Page 2
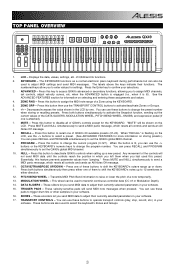
... wish to power the QX49 externally, please plug in a 9V DC, 500mA power adapter, center- Use a five-pin MIDI cable (sold separately), set the switch to "USB" when turning it on. 3. BOX CONTENTS • QX49 • USB cable • Software DVD • Quickstart Guide • Safety Instructions & Warranty Information Booklet CONNECTION DIAGRAM Please refer to the MIDI IN of an external sound module. If you do not wish to use an external sound module, connect a 5-pin MIDI cable from your...
... wish to power the QX49 externally, please plug in a 9V DC, 500mA power adapter, center- Use a five-pin MIDI cable (sold separately), set the switch to "USB" when turning it on. 3. BOX CONTENTS • QX49 • USB cable • Software DVD • Quickstart Guide • Safety Instructions & Warranty Information Booklet CONNECTION DIAGRAM Please refer to the MIDI IN of an external sound module. If you do not wish to use an external sound module, connect a 5-pin MIDI cable from your...
Quick Start Guide
Page 3
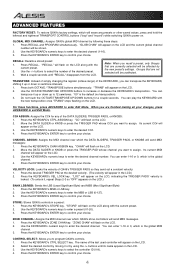
.... (See ADVANCED FEATURES for the KEYBOARD. Displays the data, values, settings, etc. The labels above the keys indicate their currently selected parameters in your selections. 3. The numbered keys allow you to raise or lower the pitch of QX49 and its functions. 2. when the ADVANCED button is engaged (i.e., when it is flashing on the LCD, use these buttons to trigger drum hits or other samples in your software. PROGRAM - NULL...
.... (See ADVANCED FEATURES for the KEYBOARD. Displays the data, values, settings, etc. The labels above the keys indicate their currently selected parameters in your selections. 3. The numbered keys allow you to raise or lower the pitch of QX49 and its functions. 2. when the ADVANCED button is engaged (i.e., when it is flashing on the LCD, use these buttons to trigger drum hits or other samples in your software. PROGRAM - NULL...
Quick Start Guide
Page 4
... LCD. 3. TRANSPOSE: Instead of simply changing the register (octave range) of the KEYBOARD, you want to confirm your choice. Do not touch the OCTAVE/TRANSPOSE UP/DOWN buttons for any presets or other saved values, press and hold the leftmost and rightmost TRANSPORT CONTROL buttons ("loop" and "record") while switching QX49's power on the LCD. 3. Move the DATA SLIDER or KNOB or press the TRIGGER PAD whose channel you...
... LCD. 3. TRANSPOSE: Instead of simply changing the register (octave range) of the KEYBOARD, you want to confirm your choice. Do not touch the OCTAVE/TRANSPOSE UP/DOWN buttons for any presets or other saved values, press and hold the leftmost and rightmost TRANSPORT CONTROL buttons ("loop" and "record") while switching QX49's power on the LCD. 3. Move the DATA SLIDER or KNOB or press the TRIGGER PAD whose channel you...

Quick Start Guide
Page 5
.... (A minimum of controls. CURVE: Allows you are finished, press ZONE GRP. When you to QX49's USB port), and any combination of the TRIGGER PADS and KNOBS. 1. Press the KEYBOARD's CURVE key. To select which you will send out any MIDI messages sent to QX49 from a computer (connected to adjust the velocity curves of these ports. 1. Note: When you can save the settings of different...
.... (A minimum of controls. CURVE: Allows you are finished, press ZONE GRP. When you to QX49's USB port), and any combination of the TRIGGER PADS and KNOBS. 1. Press the KEYBOARD's CURVE key. To select which you will send out any MIDI messages sent to QX49 from a computer (connected to adjust the velocity curves of these ports. 1. Note: When you can save the settings of different...

Quick Start Guide
Page 6
...: MIDI OUTPUTS: USB: USB, 9V DC, 500mA, center-positive, 5.5mm barrel diameter (sold separately) 49 keys 4 velocity-sensitive pads, 8 knobs Quickstart Guide, USB cable 2 5-pin jacks 1 slave connector (MIDI over USB) http://www.alesis.com/qx49 THIS DEVICE COMPLIES WITH PART 15 OF THE FCC RULES. No sound from the USB hub and connect directly to send a MIDI panic message, which resets all controls and sends an All Notes Off message. If using a power adapter, please make...
...: MIDI OUTPUTS: USB: USB, 9V DC, 500mA, center-positive, 5.5mm barrel diameter (sold separately) 49 keys 4 velocity-sensitive pads, 8 knobs Quickstart Guide, USB cable 2 5-pin jacks 1 slave connector (MIDI over USB) http://www.alesis.com/qx49 THIS DEVICE COMPLIES WITH PART 15 OF THE FCC RULES. No sound from the USB hub and connect directly to send a MIDI panic message, which resets all controls and sends an All Notes Off message. If using a power adapter, please make...
Quick Start Guide
Page 27
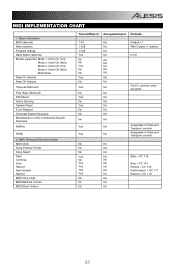
...No Default = 1 With Octave +/- MIDI IMPLEMENTATION CHART 1. buttons 0-127 Via CC controls, when assigned Assignable to Pads and Transport controls Assignable to Pads and Transport controls ...Start = CC 115 Stop = CC 114 Record = CC 116 Fast-forward = CC 117 Rewind = CC 118 27 Basic Information MIDI channels Note numbers Program change Bank Select response Modes supported: Mode 1: Omni-On, Poly Mode 2: Omni-On, Mono Mode 3: Omni-Off, Poly Mode 4: Omni-Off, Mono Multi Mode Note-On Velocity Note-Off Velocity Channel Aftertouch Poly (Key) Aftertouch Pitch Bend Active Sensing System Reset Tune...
...No Default = 1 With Octave +/- MIDI IMPLEMENTATION CHART 1. buttons 0-127 Via CC controls, when assigned Assignable to Pads and Transport controls Assignable to Pads and Transport controls ...Start = CC 115 Stop = CC 114 Record = CC 116 Fast-forward = CC 117 Rewind = CC 118 27 Basic Information MIDI channels Note numbers Program change Bank Select response Modes supported: Mode 1: Omni-On, Poly Mode 2: Omni-On, Mono Mode 3: Omni-Off, Poly Mode 4: Omni-Off, Mono Multi Mode Note-On Velocity Note-Off Velocity Channel Aftertouch Poly (Key) Aftertouch Pitch Bend Active Sensing System Reset Tune...


