
Controller Mapping
Page 1
... will now trigger the Record function in Logic's Mixer window. At the bottom-right of the window that you 'd like the QX25, QX49, and QX61. Select Window > Mixer (CMD+2) to open the Mixer window. 2. The Controller Assignments window will list that appears, click...> Preferences > Control Surfaces > Learn Assignment (CMD+L) to open the Controller Assignments window. 3. Assigning Transport Controls in Logic Pro For Alesis QX Series USB MIDI controllers like to the steps below. Select Logic Pro > Preferences > Key Commands. 3. Controller Mapping in Logic Pro 1. To assign ...
... will now trigger the Record function in Logic's Mixer window. At the bottom-right of the window that you 'd like the QX25, QX49, and QX61. Select Window > Mixer (CMD+2) to open the Mixer window. 2. The Controller Assignments window will list that appears, click...> Preferences > Control Surfaces > Learn Assignment (CMD+L) to open the Controller Assignments window. 3. Assigning Transport Controls in Logic Pro For Alesis QX Series USB MIDI controllers like to the steps below. Select Logic Pro > Preferences > Key Commands. 3. Controller Mapping in Logic Pro 1. To assign ...

Quick Start Guide
Page 2
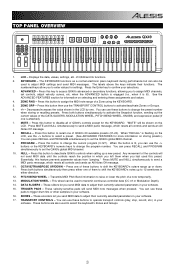
...6. Plug in a 9V DC, 500mA power adapter, center-positive, 5.5mm barrel diameter. 2. POWER SWITCH - If you connect QX49 to send MIDI data from your setup or if you do not wish to the MIDI OUT port of an external sound module. This connection is ready to use an external sound module, connect... of an external device. 5. Plug a standard USB cable into this outlet and into the USB port of the QX49 to the QX49. COMPUTER MIDI OUT - Connect a USB cable from the KEYBOARD MIDI OUT of your computer, it on. If you are powering it via its USB CONNECTION, set the switch to "POWER" ...
...6. Plug in a 9V DC, 500mA power adapter, center-positive, 5.5mm barrel diameter. 2. POWER SWITCH - If you connect QX49 to send MIDI data from your setup or if you do not wish to the MIDI OUT port of an external sound module. This connection is ready to use an external sound module, connect... of an external device. 5. Plug a standard USB cable into this outlet and into the USB port of the QX49 to the QX49. COMPUTER MIDI OUT - Connect a USB cable from the KEYBOARD MIDI OUT of your computer, it on. If you are powering it via its USB CONNECTION, set the switch to "POWER" ...
Quick Start Guide
Page 3
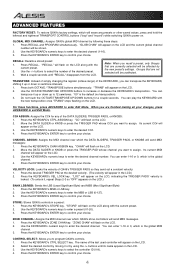
... used to transmit continuous controller data (CC #1 or Modulation Depth). 14. ZONE GRP - When "RECALL" is lit, you send MIDI data to deactivate QX49's controls when calling up a new preset. PROGRAM - Press this button to activate the Snapshot function, sending out the current values of... values for the KEYBOARD. Press one . ZONE RNG - Press MUTE and NULL simultaneously to send a MIDI panic message, which you left them to assign MIDI channels, set the QX49's global MIDI channel. 10. DATA SLIDERS - LCD - Press this button then use these assignments and values. 4. ...
... used to transmit continuous controller data (CC #1 or Modulation Depth). 14. ZONE GRP - When "RECALL" is lit, you send MIDI data to deactivate QX49's controls when calling up a new preset. PROGRAM - Press this button to activate the Snapshot function, sending out the current values of... values for the KEYBOARD. Press one . ZONE RNG - Press MUTE and NULL simultaneously to send a MIDI panic message, which you left them to assign MIDI channels, set the QX49's global MIDI channel. 10. DATA SLIDERS - LCD - Press this button then use these assignments and values. 4. ...
Quick Start Guide
Page 4
GLOBAL MIDI CHANNEL: Assigns QX49's global MIDI channel by using the -/+ buttons until "RECALL" disappears from the LCD. "GLOB CHAN" will appear on the LCD. 2. Press RECALL. For these steps: 1. Press the ...'s CTRL ASSIGN key. "CC" will flash on the LCD and the current global channel number will be shown. 2. CHANNEL ASSIGN: Assigns the MIDI channel over which QX49's Zone controllers will send MIDI messages. 1. Press the KEYBOARD's CHAN ASSIGN key. Use the KEYBOARD's numeric keys to enter the MSB or LSB (0-127). 3. Use the...
GLOBAL MIDI CHANNEL: Assigns QX49's global MIDI channel by using the -/+ buttons until "RECALL" disappears from the LCD. "GLOB CHAN" will appear on the LCD. 2. Press RECALL. For these steps: 1. Press the ...'s CTRL ASSIGN key. "CC" will flash on the LCD and the current global channel number will be shown. 2. CHANNEL ASSIGN: Assigns the MIDI channel over which QX49's Zone controllers will send MIDI messages. 1. Press the KEYBOARD's CHAN ASSIGN key. Use the KEYBOARD's numeric keys to enter the MSB or LSB (0-127). 3. Use the...

Quick Start Guide
Page 5
...Zone (or Zones) you can save the settings of different combinations of these three Groups. The COMPUTER MIDI OUT will send its KEYBOARD MIDI OUT. • When both MIDI ports. ZONES QX49's MIDI note range can select any range of keys regardless of a Zone, see STORE and RECALL above .... You may assign Zones that Zone. 2. GROUPS When storing presets on QX49 will send out any MIDI messages sent to be unaffected. 5 QX49's controls are divided into three Zones, which Groups will be displayed on the LCD. Use the TRANSPORT CONTROL ...
...Zone (or Zones) you can save the settings of different combinations of these three Groups. The COMPUTER MIDI OUT will send its KEYBOARD MIDI OUT. • When both MIDI ports. ZONES QX49's MIDI note range can select any range of keys regardless of a Zone, see STORE and RECALL above .... You may assign Zones that Zone. 2. GROUPS When storing presets on QX49 will send out any MIDI messages sent to be unaffected. 5 QX49's controls are divided into three Zones, which Groups will be displayed on the LCD. Use the TRANSPORT CONTROL ...

Quick Start Guide
Page 6
..., 500mA, center-positive, 5.5mm barrel diameter (sold separately) 49 keys 4 velocity-sensitive pads, 8 knobs Quickstart Guide, USB cable 2 5-pin jacks 1 slave connector (MIDI over USB) http://www.alesis.com/qx49 THIS DEVICE COMPLIES WITH PART 15 OF THE FCC RULES. Restart the software application with the controller plugged in your application. Usually, the...
..., 500mA, center-positive, 5.5mm barrel diameter (sold separately) 49 keys 4 velocity-sensitive pads, 8 knobs Quickstart Guide, USB cable 2 5-pin jacks 1 slave connector (MIDI over USB) http://www.alesis.com/qx49 THIS DEVICE COMPLIES WITH PART 15 OF THE FCC RULES. Restart the software application with the controller plugged in your application. Usually, the...
Quick Start Guide
Page 27
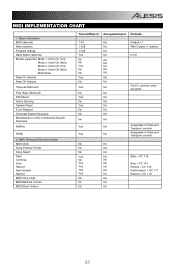
...No No No Start = CC 115 Stop = CC 114 Record = CC 116 Fast-forward = CC 117 Rewind = CC 118 27 Basic Information MIDI channels Note numbers Program change Bank Select response Modes supported: Mode 1: Omni-On, Poly Mode 2: Omni-On, Mono Mode 3: Omni-Off, Poly... Universal System Exclusive Manufacturer or Non-Commercial System Exclusive NRPNs RPNs 2. MIDI Timing and Synchronization MIDI Clock Song Position Pointer Song Select Start Continue Stop Record Fast-forward Rewind MIDI Time Code MIDI Machine Control MIDI Show Control Transmit/Export Recognize/Import Remarks 1-16 No 1-128 No ...
...No No No Start = CC 115 Stop = CC 114 Record = CC 116 Fast-forward = CC 117 Rewind = CC 118 27 Basic Information MIDI channels Note numbers Program change Bank Select response Modes supported: Mode 1: Omni-On, Poly Mode 2: Omni-On, Mono Mode 3: Omni-Off, Poly... Universal System Exclusive Manufacturer or Non-Commercial System Exclusive NRPNs RPNs 2. MIDI Timing and Synchronization MIDI Clock Song Position Pointer Song Select Start Continue Stop Record Fast-forward Rewind MIDI Time Code MIDI Machine Control MIDI Show Control Transmit/Export Recognize/Import Remarks 1-16 No 1-128 No ...


