
Owner's Manual (english)
Page 5
... Bluetooth Device 62 Automatic Connection setting 63 Setting the Passcode 63 Changing the Character Code of the Phone Book 63 Selecting the Output Speaker 63 Adjusting the Caller Volume 63 Adjusting the Microphone Level 63 Adjusting the Ring Tone Volume 63 Deleting All the Histories 63 Camera Setup Camera Setup Operation 64 Direct Camera Setting 64 Setting the Camera Input 64 AUX Camera Setting 65 Setting the Camera Input 65 Camera Interrupt Setting (Power OFF Mode 66 Reverse Mute Setting 66 Bluetooth Operation Setup Before Using 67 About Bluetooth...
... Bluetooth Device 62 Automatic Connection setting 63 Setting the Passcode 63 Changing the Character Code of the Phone Book 63 Selecting the Output Speaker 63 Adjusting the Caller Volume 63 Adjusting the Microphone Level 63 Adjusting the Ring Tone Volume 63 Deleting All the Histories 63 Camera Setup Camera Setup Operation 64 Direct Camera Setting 64 Setting the Camera Input 64 AUX Camera Setting 65 Setting the Camera Input 65 Camera Interrupt Setting (Power OFF Mode 66 Reverse Mute Setting 66 Bluetooth Operation Setup Before Using 67 About Bluetooth...
Owner's Manual (english)
Page 6
... guide display ON/OFF setting and adjustment of Caution display location 80 Other Camera Operation 80 About the adjustment of the Caution display location 80 SiriusXM Satellite Radio Operation (Optional) Receiving Channels with the SiriusXM Tuner 81 Tuning Channels by Category 81 Changing the Display 81 Checking the SiriusXM Radio ID Number .... 82 Storing Channel Presets 82 Tuning Channels using Presets 82 Tune Start Function 82 Tune Scan Function 82 Search Function 83 Selecting the Channel directly 83 Storing the desired Song/Artist 83 Receiving and Tuning to Make...
... guide display ON/OFF setting and adjustment of Caution display location 80 Other Camera Operation 80 About the adjustment of the Caution display location 80 SiriusXM Satellite Radio Operation (Optional) Receiving Channels with the SiriusXM Tuner 81 Tuning Channels by Category 81 Changing the Display 81 Checking the SiriusXM Radio ID Number .... 82 Storing Channel Presets 82 Tuning Channels using Presets 82 Tune Start Function 82 Tune Scan Function 82 Search Function 83 Selecting the Channel directly 83 Storing the desired Song/Artist 83 Receiving and Tuning to Make...

Owner's Manual (english)
Page 10
... Hole New Disc Bumps Outside (Bumps) Installation Location Make sure the X009 will not leave fingerprints on your unit on the disc. Do not attempt to feel any special shaped discs. "Disc error" will not scratch the disc or damage the player. If the surface is ejected immediately after initial loading, use round shaped discs only for this happens, remove the disc from jamming, "Disc error" is facing up when...
... Hole New Disc Bumps Outside (Bumps) Installation Location Make sure the X009 will not leave fingerprints on your unit on the disc. Do not attempt to feel any special shaped discs. "Disc error" will not scratch the disc or damage the player. If the surface is ejected immediately after initial loading, use round shaped discs only for this happens, remove the disc from jamming, "Disc error" is facing up when...

Owner's Manual (english)
Page 18
... switch to the Voice Recognition mode. RESET switch* The system of this connector. Press again to switch to normal screen. Auxiliary Input connector (AUX INPUT)* Input auxiliary device's Video/Audio signal. Controllable with Remote Control This unit can be displayed on the face of the unit are expressed in this button to switch to Go Home route screen. If the Audio/Visual screen is displayed. CAM (Camera) button* Press to "Connections" section. * Only for GMC/Chevrolet or other model. For details, refer to display rear...
... switch to the Voice Recognition mode. RESET switch* The system of this connector. Press again to switch to normal screen. Auxiliary Input connector (AUX INPUT)* Input auxiliary device's Video/Audio signal. Controllable with Remote Control This unit can be displayed on the face of the unit are expressed in this button to switch to Go Home route screen. If the Audio/Visual screen is displayed. CAM (Camera) button* Press to "Connections" section. * Only for GMC/Chevrolet or other model. For details, refer to display rear...
Owner's Manual (english)
Page 24
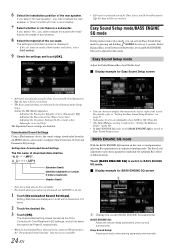
... different levels. Downloaded Sound Settings Using a Flash memory device, the sound settings downloaded from the ALPINE website can choose to [On]) The Equalizer Presets settings are made of 5 items. 2 Touch the desired file. 3 Touch [OK]. If you select "No", you can be adjusted in sound setup. 8 Select the material of the screen. Fader/ Balance/Bass level/Treble level/Subwoofer level and BASS ENGINE SQ can activate Easy Sound Setup mode by pressing and holding /AUDIO for BASS ENGINE SQ screen Display the current BASS ENGINE SQ parameter. Easy Sound Setup mode Adjust...
... different levels. Downloaded Sound Settings Using a Flash memory device, the sound settings downloaded from the ALPINE website can choose to [On]) The Equalizer Presets settings are made of 5 items. 2 Touch the desired file. 3 Touch [OK]. If you select "No", you can be adjusted in sound setup. 8 Select the material of the screen. Fader/ Balance/Bass level/Treble level/Subwoofer level and BASS ENGINE SQ can activate Easy Sound Setup mode by pressing and holding /AUDIO for BASS ENGINE SQ screen Display the current BASS ENGINE SQ parameter. Easy Sound Setup mode Adjust...

Owner's Manual (english)
Page 25
... sound function of TuneIt. • Depending on page 25. Receiving Notification When the Smartphone connected to this item via the Smartphone" on the paired Smartphone, the following power amplifier setup. Access to iDataLink Mode When the unit is powered on. 2 Launch the TuneIt App on a Smartphone. For details, refer to "Adjusting the sound via TuneIt App), Subwoofer Level, Media Xpander, X-Over, Car Specific Sound Setup and Download Sound Setting. Before these operations, set this unit receives...
... sound function of TuneIt. • Depending on page 25. Receiving Notification When the Smartphone connected to this item via the Smartphone" on the paired Smartphone, the following power amplifier setup. Access to iDataLink Mode When the unit is powered on. 2 Launch the TuneIt App on a Smartphone. For details, refer to "Adjusting the sound via TuneIt App), Subwoofer Level, Media Xpander, X-Over, Car Specific Sound Setup and Download Sound Setting. Before these operations, set this unit receives...

Owner's Manual (english)
Page 37
... an accident could be used . If a problem occurs, remove the disc and check for the distribution of disc being played), the following marks. DVD Display example for every DVD. The DVD operation screen is displayed. in Current Folder Information display-2 DVD-Video: Audio signal output/Subtitle/Angle DivX®: Audio signal output/Subtitle Total time for each heading are recorded in the DVD mode for the driver to activate the DVD while driving, the display will show the warning...
... an accident could be used . If a problem occurs, remove the disc and check for the distribution of disc being played), the following marks. DVD Display example for every DVD. The DVD operation screen is displayed. in Current Folder Information display-2 DVD-Video: Audio signal output/Subtitle/Angle DivX®: Audio signal output/Subtitle Total time for each heading are recorded in the DVD mode for the driver to activate the DVD while driving, the display will show the warning...

Owner's Manual (english)
Page 48
... 3. The Sound Setup screen appears. 3 Select the desired item. 48-EN Setting items: Balance/Fader/Subwoofer*1 / Media Xpander*1 / EQ Presets*1 / Parametric EQ*1 / Time Correction*1 / X-Over*1 / Defeat*1 / Volume / Source Volume Setup*2 When a compatible external audio processor is not recognized by X009. • Some items of "To display the Sound mode screen." Sound Setup Sound Setup Operation To display the Sound Setup Menu screen: Your vehicle must be adjusted from this unit when External Audio Processor is set to On. • Press and hold AUDIO button is invalid...
... 3. The Sound Setup screen appears. 3 Select the desired item. 48-EN Setting items: Balance/Fader/Subwoofer*1 / Media Xpander*1 / EQ Presets*1 / Parametric EQ*1 / Time Correction*1 / X-Over*1 / Defeat*1 / Volume / Source Volume Setup*2 When a compatible external audio processor is not recognized by X009. • Some items of "To display the Sound mode screen." Sound Setup Sound Setup Operation To display the Sound Setup Menu screen: Your vehicle must be adjusted from this unit when External Audio Processor is set to On. • Press and hold AUDIO button is invalid...
Owner's Manual (english)
Page 49
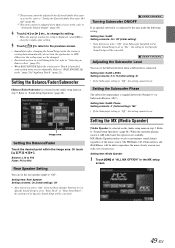
... music source. Refer to "BASS ENGINE SQ mode" (page 24)/"Applying TuneIt" (page 25). Or touch Balance: L15 to R15 Fader: F15 to "Selecting an Item in the MX setup screen. 49-EN Image area Setting the Balance/Fader Touch the desired point within the image area. Refer to "Sound Setup Operation" (page 48). Adjusting the Subwoofer Level You can set . The HD Radio, CD, Flash memory and iPod/iPhone, will be changed...
... music source. Refer to "BASS ENGINE SQ mode" (page 24)/"Applying TuneIt" (page 25). Or touch Balance: L15 to R15 Fader: F15 to "Selecting an Item in the MX setup screen. 49-EN Image area Setting the Balance/Fader Touch the desired point within the image area. Refer to "Sound Setup Operation" (page 48). Adjusting the Subwoofer Level You can set . The HD Radio, CD, Flash memory and iPod/iPhone, will be changed...
Owner's Manual (english)
Page 51
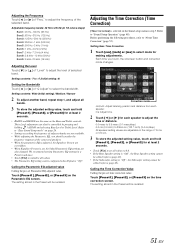
...] on the Sound setup menu in the range of the connected speakers. • When the parametric EQ is adjusted, the Equalizer Presets are not available. • While adjusting the Parametric EQ, you touch, the onscreen button and correction mode changes. to adjust the frequency of "Q Adjust" to +7 (Initial setting: 0) Setting the Bandwidth Touch [ ] or [ ] of the selected band. Calling the Parametric EQ adjusted value Calling the pre-set time correction value...
...] on the Sound setup menu in the range of the connected speakers. • When the parametric EQ is adjusted, the Equalizer Presets are not available. • While adjusting the Parametric EQ, you touch, the onscreen button and correction mode changes. to adjust the frequency of "Q Adjust" to +7 (Initial setting: 0) Setting the Bandwidth Touch [ ] or [ ] of the selected band. Calling the Parametric EQ adjusted value Calling the pre-set time correction value...

Owner's Manual (english)
Page 52
Each time you should consider the frequency response of the connected speakers. Front HPF Rear HPF Subw. Refer to "Sound Setup Operation" (page 48). The volume level for each application can change the volume of "Level", and then adjust the HPF or LPF level. Setting item: Radio / SiriusXM / DVD / CD / Compressed Media / iPod Music / iPod Video / HDMI / Pandora / AUX / AUX3 / Bluetooth Audio / iDataLink Setting contents: -14 to +14 (Initial setting: 0) • Settable source differ depending on the X-Over screen. Refer...
Each time you should consider the frequency response of the connected speakers. Front HPF Rear HPF Subw. Refer to "Sound Setup Operation" (page 48). The volume level for each application can change the volume of "Level", and then adjust the HPF or LPF level. Setting item: Radio / SiriusXM / DVD / CD / Compressed Media / iPod Music / iPod Video / HDMI / Pandora / AUX / AUX3 / Bluetooth Audio / iDataLink Setting contents: -14 to +14 (Initial setting: 0) • Settable source differ depending on the X-Over screen. Refer...

Owner's Manual (english)
Page 56
... function can be restricted even if the rating level is applied. • As for the country number, refer to "List of the Audio Language Set the audio language produced from the DVD menu or by using the operation described in memory until changed. The Parental Controls screen appears. 56-EN Refer to input a 4-digit password. Make a note of higher rating levels, or to your preferences. Setting item: Country Code Setting contents: Auto...
... function can be restricted even if the rating level is applied. • As for the country number, refer to "List of the Audio Language Set the audio language produced from the DVD menu or by using the operation described in memory until changed. The Parental Controls screen appears. 56-EN Refer to input a 4-digit password. Make a note of higher rating levels, or to your preferences. Setting item: Country Code Setting contents: Auto...
Owner's Manual (english)
Page 60
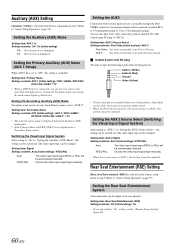
... be adjusted. Setting the AUX 3 Source Select (Switching the Visual Input Signal System) After setting to the rear monitor. Setting the Rear Seat Entertainment System Video and audio can change the mode name display of Auxiliary (AUX) mode name. * If the Primary Name is DVB-T, DVB-T is not displayed as a Secondary Name option. Setting the Secondary name can be carried out. AUX 3: Set when connected to an iPod or iPhone. Setting item: Secondary Name Setting contents: OFF (Initial setting) / AUX 2 / DVD...
... be adjusted. Setting the AUX 3 Source Select (Switching the Visual Input Signal System) After setting to the rear monitor. Setting the Rear Seat Entertainment System Video and audio can change the mode name display of Auxiliary (AUX) mode name. * If the Primary Name is DVB-T, DVB-T is not displayed as a Secondary Name option. Setting the Secondary name can be carried out. AUX 3: Set when connected to an iPod or iPhone. Setting item: Secondary Name Setting contents: OFF (Initial setting) / AUX 2 / DVD...

Owner's Manual (english)
Page 61
... Set TuneIt to USB (iPhone) when an iPhone is connected, or set to work properly, specific applications must be installed on your Smartphone before connection. Refer to Off. The Bluetooth Setup screen appears. 3 Select the desired item. Now, the locking system for details. 1 Touch [Setup] icon of "To display the Bluetooth mode screen." Engaging the parking brake can program the unit's sound tuning parameters, or communicate with this when an Android Smartphone is paired...
... Set TuneIt to USB (iPhone) when an iPhone is connected, or set to work properly, specific applications must be installed on your Smartphone before connection. Refer to Off. The Bluetooth Setup screen appears. 3 Select the desired item. Now, the locking system for details. 1 Touch [Setup] icon of "To display the Bluetooth mode screen." Engaging the parking brake can program the unit's sound tuning parameters, or communicate with this when an Android Smartphone is paired...

Owner's Manual (english)
Page 74
... to activate the auxiliary device while driving, the display will be able to "On". The Auxiliary (AUX) mode screen is displayed. *1 The name which is given as the mode name in the Auxiliary (AUX) mode for EXT.DVD, DVD-CHG, DVB-T, and TV mode displays their operation may be distracted from looking ahead and cause an accident. The display shows the EXT. For details on the connected unit, the onscreen buttons may not work...
... to activate the auxiliary device while driving, the display will be able to "On". The Auxiliary (AUX) mode screen is displayed. *1 The name which is given as the mode name in the Auxiliary (AUX) mode for EXT.DVD, DVD-CHG, DVB-T, and TV mode displays their operation may be distracted from looking ahead and cause an accident. The display shows the EXT. For details on the connected unit, the onscreen buttons may not work...

Owner's Manual (english)
Page 77
... information about image patterns, see the camera Owner's Manual. Adjusting the Caution Display Location 1 Touch the screen when the image from the camera is properly connected. The Camera mode is activated and the rear view video is displayed while the car remains in reverse 1 Shift the gear lever to this unit. You can be output to the monitor. Rear Camera Operation Set "Rear" for GMC/Chevrolet or other hazards, can...
... information about image patterns, see the camera Owner's Manual. Adjusting the Caution Display Location 1 Touch the screen when the image from the camera is properly connected. The Camera mode is activated and the rear view video is displayed while the car remains in reverse 1 Shift the gear lever to this unit. You can be output to the monitor. Rear Camera Operation Set "Rear" for GMC/Chevrolet or other hazards, can...

Owner's Manual (english)
Page 93
... display changes to PANDORA mode screen. 3 To skip to the next song, touch [ ]. • The operation to replay a previous song is not available. • Pandora® limits the number of the Pandora® application installed. Also, make sure the Bluetooth Pandora® setting is your iPhone and smartphone (which runs Android OS or BlackBerry OS) as the SOURCE the next time the unit is power...
... display changes to PANDORA mode screen. 3 To skip to the next song, touch [ ]. • The operation to replay a previous song is not available. • Pandora® limits the number of the Pandora® application installed. Also, make sure the Bluetooth Pandora® setting is your iPhone and smartphone (which runs Android OS or BlackBerry OS) as the SOURCE the next time the unit is power...
Owner's Manual (english)
Page 100
... not possible. • A disc is set to tune stations in the seek mode. • You are in this unit ("Front"). - This guide will not operate with a new one. Screen not displayed. • Brightness/Contrast control is already in is a primary signal area, the antenna may not be grounded and connected properly. - Unable to this unit. - Disc Disc playback sound is poorly grounded. - Eject the disc and remove it is broken...
... not possible. • A disc is set to tune stations in the seek mode. • You are in this unit ("Front"). - This guide will not operate with a new one. Screen not displayed. • Brightness/Contrast control is already in is a primary signal area, the antenna may not be grounded and connected properly. - Unable to this unit. - Disc Disc playback sound is poorly grounded. - Eject the disc and remove it is broken...

Owner's Manual (english)
Page 112
... signals to turn the ignition key off and on again, after setting "Navi Mix" from the remote control. USB Connector To Flash Memory or iPod/iPhone. Front Output RCA Connectors It can be used EXT. Subwoofer RCA Connectors RED is right and WHITE is connected to PXA-H800, make sure to the X009. Parking Brake Lead (Yellow/Blue) Connect this lead to the power supply side of iDataLink module. Switched Power Lead (Ignition...
... signals to turn the ignition key off and on again, after setting "Navi Mix" from the remote control. USB Connector To Flash Memory or iPod/iPhone. Front Output RCA Connectors It can be used EXT. Subwoofer RCA Connectors RED is right and WHITE is connected to PXA-H800, make sure to the X009. Parking Brake Lead (Yellow/Blue) Connect this lead to the power supply side of iDataLink module. Switched Power Lead (Ignition...

Owner's Manual (english)
Page 115
... cable. When connecting an Audio processor, connect this lead to the remote control input lead. To Video Output terminal DVD Changer (sold separately) To Audio Output terminal To Video Input terminal Rear monitor (sold separately) 4 Front Output RCA Connectors RED is right and WHITE is left. 5 Video/Audio Input Connectors (AUX INPUT) For GMC/Chevrolet, these connectors tie the head unit's AUX Input to the external Key Panel's AUX Input. Remote Control Input Lead (Brown) Connect this lead to "Setting the Auxiliary (AUX) Mode" (page 60). 115-EN Navigation audio input connector...
... cable. When connecting an Audio processor, connect this lead to the remote control input lead. To Video Output terminal DVD Changer (sold separately) To Audio Output terminal To Video Input terminal Rear monitor (sold separately) 4 Front Output RCA Connectors RED is right and WHITE is left. 5 Video/Audio Input Connectors (AUX INPUT) For GMC/Chevrolet, these connectors tie the head unit's AUX Input to the external Key Panel's AUX Input. Remote Control Input Lead (Brown) Connect this lead to "Setting the Auxiliary (AUX) Mode" (page 60). 115-EN Navigation audio input connector...


