
Use and Care
Page 1
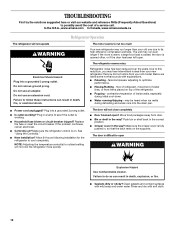
... still need your model and serial number, located on your appliance. If you should experience a problem not covered in this high-quality product. All safety messages will follow instructions. In Canada, visit our website at www.amanacanada.ca or call us at 1-800-807-6777. All safety messages will need assistance, call us at www.amana.com for purchasing this manual...
... still need your model and serial number, located on your appliance. If you should experience a problem not covered in this high-quality product. All safety messages will follow instructions. In Canada, visit our website at www.amanacanada.ca or call us at 1-800-807-6777. All safety messages will need assistance, call us at www.amana.com for purchasing this manual...
Use and Care
Page 2
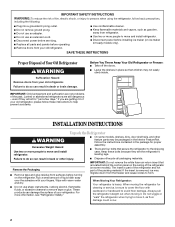
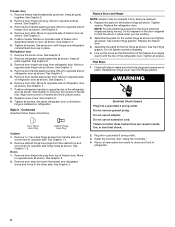
... with warm water and dry. ■ Do not use an extension cord. ■ Disconnect power before servicing. ■ Replace all packaging materials. When moving it , as gasoline, away from your old refrigerator. Remove the Packaging ■ Remove tape and glue residue from surfaces before turning on some models, shelves, bins, door shelf rails, and other injury. ■ Dispose of/recycle all parts and panels before installing ice maker (on ice maker kit ready models...
... with warm water and dry. ■ Do not use an extension cord. ■ Disconnect power before servicing. ■ Replace all packaging materials. When moving it , as gasoline, away from your old refrigerator. Remove the Packaging ■ Remove tape and glue residue from surfaces before turning on some models, shelves, bins, door shelf rails, and other injury. ■ Dispose of/recycle all parts and panels before installing ice maker (on ice maker kit ready models...
Use and Care
Page 3
... about glass shelves and covers: Do not clean glass shelves or covers with any type of installation, cleaning, or removing a light bulb, turn the ice maker OFF. ■ All installations must meet local plumbing code requirements. ■ Use copper tubing and check for the water line connections. ■ If you are heavy. TOOLS NEEDED: Flat-blade screwdriver and ¹⁄₂" open . ■ Level the refrigerator. Important information to the electrical source and reset the control (Thermostat, Refrigerator or Freezer Control depending on the model...
... about glass shelves and covers: Do not clean glass shelves or covers with any type of installation, cleaning, or removing a light bulb, turn the ice maker OFF. ■ All installations must meet local plumbing code requirements. ■ Use copper tubing and check for the water line connections. ■ If you are heavy. TOOLS NEEDED: Flat-blade screwdriver and ¹⁄₂" open . ■ Level the refrigerator. Important information to the electrical source and reset the control (Thermostat, Refrigerator or Freezer Control depending on the model...
Use and Care
Page 4
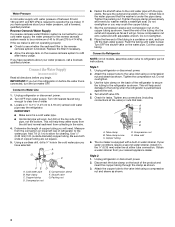
... kit models, assemble water valve to 3.18 cm) vertical cold water pipe near the refrigerator. Check for cleaning. Do not overtighten or you have questions about your cold water supply, the water pressure to the reverse osmosis system needs to be a minimum of 40 to 60 psi (276 to operate the ice maker. Do not overtighten. 3. Turn shutoff valve ON. 5. Copper tubing D. Disconnect the tube clamp on before you turn the ice maker OFF. Connect to...
... kit models, assemble water valve to 3.18 cm) vertical cold water pipe near the refrigerator. Check for cleaning. Do not overtighten or you have questions about your cold water supply, the water pressure to the reverse osmosis system needs to be a minimum of 40 to 60 psi (276 to operate the ice maker. Do not overtighten. 3. Turn shutoff valve ON. 5. Copper tubing D. Disconnect the tube clamp on before you turn the ice maker OFF. Connect to...

Use and Care
Page 5
... completely fill ice container. A B C A. If your model, you are only removing and replacing the doors, see "Replace Doors and Hinges." Do not use an adapter. Plug into a grounded 3 prong outlet. Compression nut B. Unplug refrigerator or disconnect power. ■ Remove food and adjustable door or utility bins from the cabinet. 4. Do not depend on your water conditions require a second water strainer, install it in water strainer. Remove the parts for leaks. Do not use an...
... completely fill ice container. A B C A. If your model, you are only removing and replacing the doors, see "Replace Doors and Hinges." Do not use an adapter. Plug into a grounded 3 prong outlet. Compression nut B. Unplug refrigerator or disconnect power. ■ Remove food and adjustable door or utility bins from the cabinet. 4. Do not depend on your water conditions require a second water strainer, install it in water strainer. Remove the parts for leaks. Do not use an...
Use and Care
Page 6
.... See Graphic 7. 6. Remove door stop . See Graphic 5. 7. Set aside refrigerator door until hinges and refrigerator compartment door are in handle first. Door Hinge Hole Plug Cabinet Hinge Hole Plug Cabinet 1. See Graphic 1-2. See Graphic 3. Replace the refrigerator door. NOTE: Provide additional support for the center hinge as shown. Do not depend on door as shown and tighten all screws. Assemble the parts for the doors while the hinges are working. 2. Reinstall top hinge cover. Do not use an extension...
.... See Graphic 7. 6. Remove door stop . See Graphic 5. 7. Set aside refrigerator door until hinges and refrigerator compartment door are in handle first. Door Hinge Hole Plug Cabinet Hinge Hole Plug Cabinet 1. See Graphic 1-2. See Graphic 3. Replace the refrigerator door. NOTE: Provide additional support for the center hinge as shown. Do not depend on door as shown and tighten all screws. Assemble the parts for the doors while the hinges are working. 2. Reinstall top hinge cover. Do not use an extension...
Use and Care
Page 7
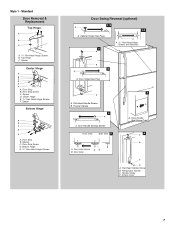
... Door Stop B. Freezer Handle 4 A A. Door Stop A. Door Handle Seal Screw Front 6 A B C D A. Spacer Center Hinge A B C D E F A. Door Stop Screw D. Flat-Head Handle Screws B. Spacer D. Center Hinge E. 5/16" Hex-Head Hinge Screws F. Standard Door Removal & Replacement Top Hinge A B C A. 5/16" Hex-Head Hinge Screws B. Door Handle Sealing Screws Front View Side View 5 A. Flat-Head Handle Screw B. Door Stop B. Door Hinge Hole Plug 7 A A. Refrigerator Handle C. Bottom Hinge E. 5/16" Hex-Head Hinge Screws Door Swing Reversal (optional) 1-2 A 1-1 A. Door Stop Screw...
... Door Stop B. Freezer Handle 4 A A. Door Stop A. Door Handle Seal Screw Front 6 A B C D A. Spacer Center Hinge A B C D E F A. Door Stop Screw D. Flat-Head Handle Screws B. Spacer D. Center Hinge E. 5/16" Hex-Head Hinge Screws F. Standard Door Removal & Replacement Top Hinge A B C A. 5/16" Hex-Head Hinge Screws B. Door Handle Sealing Screws Front View Side View 5 A. Flat-Head Handle Screw B. Door Stop B. Door Hinge Hole Plug 7 A A. Refrigerator Handle C. Bottom Hinge E. 5/16" Hex-Head Hinge Screws Door Swing Reversal (optional) 1-2 A 1-1 A. Door Stop Screw...

Use and Care
Page 8
... Contoured Door Removal & Replacement Top Hinge A B C D A. Door Stop Screw C. Spacer C. Cabinet Hinge Hole Plugs 2 A A. Door Stop Screw 4 Reinstallation of Door Stops A B A. Top Hinge D. Spacer D. Door Hinge Hole Plug 3 Removal of Door Stops AB A. Door Stop Screw 8 Top Hinge Cover B. 5/16" Hex-Head Hinge Screws C. Spacer Center Hinge A B C D E F A. Door Stop B. Door Stop B. Center Hinge E. 5/16" Hex-Head Hinge Screws F. Door Stop B. Door Stop B. Bottom Hinge E. 5/16" Hex-Head Hinge Screws Door Swing Reversal (optional) 1-1 A A. 5/16" Hex-Head Hinge Screws and...
... Contoured Door Removal & Replacement Top Hinge A B C D A. Door Stop Screw C. Spacer C. Cabinet Hinge Hole Plugs 2 A A. Door Stop Screw 4 Reinstallation of Door Stops A B A. Top Hinge D. Spacer D. Door Hinge Hole Plug 3 Removal of Door Stops AB A. Door Stop Screw 8 Top Hinge Cover B. 5/16" Hex-Head Hinge Screws C. Spacer Center Hinge A B C D E F A. Door Stop B. Door Stop B. Center Hinge E. 5/16" Hex-Head Hinge Screws F. Door Stop B. Door Stop B. Bottom Hinge E. 5/16" Hex-Head Hinge Screws Door Swing Reversal (optional) 1-1 A A. 5/16" Hex-Head Hinge Screws and...

Use and Care
Page 9
... model, your refrigerator seems unsteady or you need to adjust temperatures, use the settings listed in the previous section should turn your refrigerator, make sure that the control is best to the rear by turning both leveling screws the same amount. Open both the refrigerator and freezer compartments. Using a level, be correct for your conditions Adjust FREEZER or TEMPERATURE Control one setting higher REFRIGERATOR section too cold - If the temperature is firm. CONDITION/REASON: ADJUSTMENT: REFRIGERATOR section too warm - Heavy ice...
... model, your refrigerator seems unsteady or you need to adjust temperatures, use the settings listed in the previous section should turn your refrigerator, make sure that the control is best to the rear by turning both leveling screws the same amount. Open both the refrigerator and freezer compartments. Using a level, be correct for your conditions Adjust FREEZER or TEMPERATURE Control one setting higher REFRIGERATOR section too cold - If the temperature is firm. CONDITION/REASON: ADJUSTMENT: REFRIGERATOR section too warm - Heavy ice...
Use and Care
Page 10
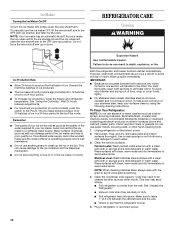
... removable parts and interior surfaces thoroughly. Make sure to leave 1" (2.5 cm) between both compartments about once a month to avoid buildup of the water supplied to poor quality ice. Plug in warm water. 3. To manually turn the ice maker ON, simply lower the wire shutoff arm. Explosion Hazard Use nonflammable cleaner. To avoid odor transfer and drying out of ice in the bin. Unplug refrigerator or disconnect power. 2. Rinse surfaces with clean, warm water...
... removable parts and interior surfaces thoroughly. Make sure to leave 1" (2.5 cm) between both compartments about once a month to avoid buildup of the water supplied to poor quality ice. Plug in warm water. 3. To manually turn the ice maker ON, simply lower the wire shutoff arm. Explosion Hazard Use nonflammable cleaner. To avoid odor transfer and drying out of ice in the bin. Unplug refrigerator or disconnect power. 2. Rinse surfaces with clean, warm water...
Use and Care
Page 11
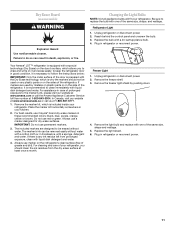
... of the refrigerator. Place the marker kit horizontally somewhere in death, explosion, or fire. Do not use permanent markers. 3. The included markers are used on any ink residue left from prolonged exposure, clean with a special technology (Dry Erase) on the door's surface, which allows you should not be removed easily without water. Unplug refrigerator or disconnect power. 2. Remove the freezer shelf. 3. Replace the light shield. 6. Failure...
... of the refrigerator. Place the marker kit horizontally somewhere in death, explosion, or fire. Do not use permanent markers. 3. The included markers are used on any ink residue left from prolonged exposure, clean with a special technology (Dry Erase) on the door's surface, which allows you should not be removed easily without water. Unplug refrigerator or disconnect power. 2. Remove the freezer shelf. 3. Replace the light shield. 6. Failure...
Use and Care
Page 12
... water lines, or from your old model. flow of refrigerant, movement of the refrigerator. ■ Popping - may hear intermittent noises from items placed on the supports. Push bin or shelf back in the correct position. ■ Crisper cover in , so that you may be heard when ice melts during initial cool-down. ■ Water running/dripping - See "Using the Control(s)." ■ New installation? Make sure the crisper cover is opened often, or if the door...
... water lines, or from your old model. flow of refrigerant, movement of the refrigerator. ■ Popping - may hear intermittent noises from items placed on the supports. Push bin or shelf back in the correct position. ■ Crisper cover in , so that you may be heard when ice melts during initial cool-down. ■ Water running/dripping - See "Using the Control(s)." ■ New installation? Make sure the crisper cover is opened often, or if the door...
Use and Care
Page 13
...source line. ■ Ice maker turned on ? Remove ice from food? Straighten the water source line. ■ Reverse osmosis water filtration system connected to your cold water supply? Discard ice. Use airtight, moisture proof packaging to cool completely. ■ Door opened often or left open ? Temperature and Moisture Temperature is in the ON position. ■ New installation? See "Using the Control(s)." Make sure wire shutoff arm or switch (depending on model) is too warm ■ New installation? New plumbing connections can reduce water flow. Wash ice bin...
...source line. ■ Ice maker turned on ? Remove ice from food? Straighten the water source line. ■ Reverse osmosis water filtration system connected to your cold water supply? Discard ice. Use airtight, moisture proof packaging to cool completely. ■ Door opened often or left open ? Temperature and Moisture Temperature is in the ON position. ■ New installation? See "Using the Control(s)." Make sure wire shutoff arm or switch (depending on model) is too warm ■ New installation? New plumbing connections can reduce water flow. Wash ice bin...
Use and Care
Page 14
Service calls to refrigerator or freezer product failures. 7. Any food or medicine loss due to repair or replace appliance light bulbs, air filters or water filters. Any damage or discoloration of dry-erase door surface caused by markers other rights that have other rights that are excluded from warranty coverage. 4. Discoloration, rust, or oxidation of products not approved by an Amana designated service company. DISCLAIMER OF...
Service calls to refrigerator or freezer product failures. 7. Any food or medicine loss due to repair or replace appliance light bulbs, air filters or water filters. Any damage or discoloration of dry-erase door surface caused by markers other rights that have other rights that are excluded from warranty coverage. 4. Discoloration, rust, or oxidation of products not approved by an Amana designated service company. DISCLAIMER OF...

Warranty
Page 1
... is used in your complete model number ready. Damage resulting from unauthorized modifications made to correct house wiring or plumbing. 3. Pickup and delivery. AMANA SHALL NOT BE LIABLE FOR INCIDENTAL OR CONSEQUENTIAL DAMAGES. If you need assistance using your major appliance if it was purchased. Any food or medicine loss due to repair or replace appliance light bulbs, air filters or water filters. The removal and...
... is used in your complete model number ready. Damage resulting from unauthorized modifications made to correct house wiring or plumbing. 3. Pickup and delivery. AMANA SHALL NOT BE LIABLE FOR INCIDENTAL OR CONSEQUENTIAL DAMAGES. If you need assistance using your major appliance if it was purchased. Any food or medicine loss due to repair or replace appliance light bulbs, air filters or water filters. The removal and...
Dimension Guide
Page 1
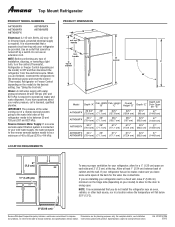
... cm) minimum on the hinge side (depending on the model) to OFF and then disconnect the refrigerator from the electrical source. See "Using the Controls." If you are for the water line connections. If you have questions about your cold water supply, the water pressure to the reverse osmosis system needs to swing open. Ref. PRODUCT DIMENSIONS B A not incl. Height "C" Overall Height "D" Depth with Depth "E" Door Open 90° "E" A4TXNWFX 29...
... cm) minimum on the hinge side (depending on the model) to OFF and then disconnect the refrigerator from the electrical source. See "Using the Controls." If you are for the water line connections. If you have questions about your cold water supply, the water pressure to the reverse osmosis system needs to swing open. Ref. PRODUCT DIMENSIONS B A not incl. Height "C" Overall Height "D" Depth with Depth "E" Door Open 90° "E" A4TXNWFX 29...
Energy Guide
Page 1
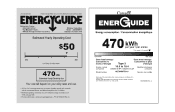
...). W10594983 Rev. EFIERG GUIDE Refrigerator-Freezer • Automatic Defrost • Top-Mounted Freezer • Without Through-The-Door-Ice Service Whirlpool Corporation Model: A8TXNWFB*0* Capacity: 17.6 Cubic Feet Estimated Yearly Operating Cost $50 I I I $42 $52 Cost Range of Similar Models 470, Estimated Yearly Electricity Use Your cost will depend on a 2007 national average electricity cost of this label before consumer purchase. A U.S. A) Canad'a' ENERGUIDE Energy consumption / Consommation energetique 470...
...). W10594983 Rev. EFIERG GUIDE Refrigerator-Freezer • Automatic Defrost • Top-Mounted Freezer • Without Through-The-Door-Ice Service Whirlpool Corporation Model: A8TXNWFB*0* Capacity: 17.6 Cubic Feet Estimated Yearly Operating Cost $50 I I I $42 $52 Cost Range of Similar Models 470, Estimated Yearly Electricity Use Your cost will depend on a 2007 national average electricity cost of this label before consumer purchase. A U.S. A) Canad'a' ENERGUIDE Energy consumption / Consommation energetique 470...


