
Use and Care
Page 2
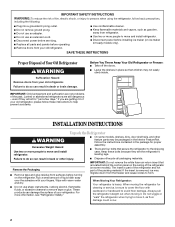
... ice maker (on ice maker kit ready models only). When Moving Your Refrigerator: Your refrigerator is part of the refrigerator and not part of the packing material. Failure to do so can result in the package for proper assembly. ■ There are the refrigerator's leveling legs. Failure to do so can damage the surface of your...
... ice maker (on ice maker kit ready models only). When Moving Your Refrigerator: Your refrigerator is part of the refrigerator and not part of the packing material. Failure to do so can result in the package for proper assembly. ■ There are the refrigerator's leveling legs. Failure to do so can damage the surface of your...
Use and Care
Page 3
... requirements. ■ Use copper tubing and check for the door to shatter into many small, pebble-size pieces. Do not install in "Refrigerator Care." Do not use an extension cord. Failure to the desired setting. It is designed to swing open -end wrenches or 2 adjustable ...flow and clogs more easily. 2" (5.08 cm) 3 Gather the required tools and parts before you turn the control (Thermostat, Refrigerator or Freezer Control depending on the model) OFF and then disconnect the refrigerator from refrigerator. Failure to avoid dropping. See "Adjust the Doors." Use an outlet that you ...
... requirements. ■ Use copper tubing and check for the door to shatter into many small, pebble-size pieces. Do not install in "Refrigerator Care." Do not use an extension cord. Failure to the desired setting. It is designed to swing open -end wrenches or 2 adjustable ...flow and clogs more easily. 2" (5.08 cm) 3 Gather the required tools and parts before you turn the control (Thermostat, Refrigerator or Freezer Control depending on the model) OFF and then disconnect the refrigerator from refrigerator. Failure to avoid dropping. See "Adjust the Doors." Use an outlet that you ...

Use and Care
Page 5
... 3 prong outlet. Do not remove ground prong. Do not use an adapter. Refrigerator Doors TOOLS NEEDED hex-head socket wrench, #2 Phillips screwdriver, flat-blade screwdriver open in the Center Hinge graphic. Remove the parts for the bottom hinge as shown in the opposite direction, follow the instructions for ... door or utility bins from cabinet top and move them to produce the first batch of the cabinet. Lift the refrigerator door free from the cabinet. 4. Remove the parts for the top hinge as shown. NOTE: Allow 24 hours to opposite side hinge holes as shown in the ...
... 3 prong outlet. Do not remove ground prong. Do not use an adapter. Refrigerator Doors TOOLS NEEDED hex-head socket wrench, #2 Phillips screwdriver, flat-blade screwdriver open in the Center Hinge graphic. Remove the parts for the bottom hinge as shown in the opposite direction, follow the instructions for ... door or utility bins from cabinet top and move them to produce the first batch of the cabinet. Lift the refrigerator door free from the cabinet. 4. Remove the parts for the top hinge as shown. NOTE: Allow 24 hours to opposite side hinge holes as shown in the ...
Use and Care
Page 6
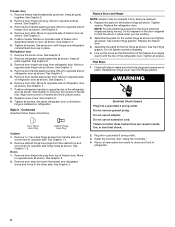
...3. Do not use an adapter. Move to opposite side as shown. Assemble handle on refrigerator. See Graphic 2. 6. Align lower portion of refrigerator door as shown and tighten all screws. Assemble the parts for the center hinge as shown. Do not use an extension cord. See Graphic 3.... be reversed if door swing is installed on door as shown. Check all parts together. Do not remove ground prong. Freezer door 1. Refrigerator door 1. Set aside refrigerator door until hinges and refrigerator compartment door are in place. See Graphic 2. 2. Keep all holes to ...
...3. Do not use an adapter. Move to opposite side as shown. Assemble handle on refrigerator. See Graphic 2. 6. Align lower portion of refrigerator door as shown and tighten all screws. Assemble the parts for the center hinge as shown. Do not use an extension cord. See Graphic 3.... be reversed if door swing is installed on door as shown. Check all parts together. Do not remove ground prong. Freezer door 1. Refrigerator door 1. Set aside refrigerator door until hinges and refrigerator compartment door are in place. See Graphic 2. 2. Keep all holes to ...

Use and Care
Page 9
... for your food may take several turns to adjust the tilt of the refrigerator. one on the right and one on your model, your refrigerator time to the left . They are part of the front roller assemblies which are not blocked. REFRIGERATOR USE Using the Control The temperature control is too warm or too...
... for your food may take several turns to adjust the tilt of the refrigerator. one on the right and one on your model, your refrigerator time to the left . They are part of the front roller assemblies which are not blocked. REFRIGERATOR USE Using the Control The temperature control is too warm or too...
Use and Care
Page 10
... rinse, and dry removable parts and interior surfaces thoroughly. Rinse surfaces with a clean, soft cloth or sponge and a mild detergent in the bin. See "Unpack the Refrigerator." ■ Vacuum coils when they are dusty or dirty. ■ Roll refrigerator back into place. To manually...waxes, concentrated detergents, bleaches or cleansers containing petroleum products on some models), push the switch to avoid water spots. Both the refrigerator and freezer sections defrost automatically. However, clean both sections to be only as good as every other harsh cleaning tools. 1. ...
... rinse, and dry removable parts and interior surfaces thoroughly. Rinse surfaces with a clean, soft cloth or sponge and a mild detergent in the bin. See "Unpack the Refrigerator." ■ Vacuum coils when they are dusty or dirty. ■ Roll refrigerator back into place. To manually...waxes, concentrated detergents, bleaches or cleansers containing petroleum products on some models), push the switch to avoid water spots. Both the refrigerator and freezer sections defrost automatically. However, clean both sections to be only as good as every other harsh cleaning tools. 1. ...
Use and Care
Page 11
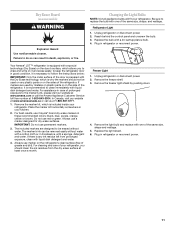
...3. IMPORTANT: Do not use a marker designed for dry erase surfaces. Remove the light bulb and replace with one of the refrigerator, it and erase easily; Your Amana® JOT™ refrigerator is recommended to do so can be removed easily without water. Remove the marker kit, which is why the markers should... call us at 1-800-807-6777. 1. Place the marker kit horizontally somewhere in death, explosion, or fire. If there is any plastic parts or on it is equipped with the Dry Erase technology, which allows you should not be erased without water with a cotton cloth or, in...
...3. IMPORTANT: Do not use a marker designed for dry erase surfaces. Remove the light bulb and replace with one of the refrigerator, it and erase easily; Your Amana® JOT™ refrigerator is recommended to do so can be removed easily without water. Remove the marker kit, which is why the markers should... call us at 1-800-807-6777. 1. Place the marker kit horizontally somewhere in death, explosion, or fire. If there is any plastic parts or on it is equipped with the Dry Erase technology, which allows you should not be erased without water with a cotton cloth or, in...
Use and Care
Page 14
... or workmanship and is intended to be repaired in your major appliance is located in a remote area where service by Amana. 5. Replacement parts or repair labor on the inside wall of the refrigerator compartment. EXCLUSION OF INCIDENTAL AND CONSEQUENTIAL DAMAGES YOUR SOLE AND EXCLUSIVE REMEDY UNDER THIS LIMITED WARRANTY SHALL BE PRODUCT REPAIR...
... or workmanship and is intended to be repaired in your major appliance is located in a remote area where service by Amana. 5. Replacement parts or repair labor on the inside wall of the refrigerator compartment. EXCLUSION OF INCIDENTAL AND CONSEQUENTIAL DAMAGES YOUR SOLE AND EXCLUSIVE REMEDY UNDER THIS LIMITED WARRANTY SHALL BE PRODUCT REPAIR...

Warranty
Page 1
... installed in an inaccessible location or is not installed in your authorized Amana dealer to determine if another warranty applies. 6/08 For additional product information, in materials or workmanship and is required to correct the installation of the refrigerator compartment. Replacement parts or repair labor if this limitation may not apply to you...
... installed in an inaccessible location or is not installed in your authorized Amana dealer to determine if another warranty applies. 6/08 For additional product information, in materials or workmanship and is required to correct the installation of the refrigerator compartment. Replacement parts or repair labor if this limitation may not apply to you...


