
Specifications Sheet
Page 4
... Oven capacity Self-cleaning Temp Assure™ cooking system Oven controls Towel bar door handle Oven window Interior oven light Oven racks Oven rack positions Storage drawer Control lockout In-oven broiler Delay-Bake oven control Electronic clock with timer Spillsaver™ upswept cooktop Keep Warm™ setting Chrome drip bowls Element type Element On/Hot indicator light Colors Bold green type indicates a step-up feature AER5630BA AMV2175C AMV1150VA 4.8 Adjustable time • Easy Touch Electronic • Extra-large • 2 5 • • Custom • • Glass-ceramic...
... Oven capacity Self-cleaning Temp Assure™ cooking system Oven controls Towel bar door handle Oven window Interior oven light Oven racks Oven rack positions Storage drawer Control lockout In-oven broiler Delay-Bake oven control Electronic clock with timer Spillsaver™ upswept cooktop Keep Warm™ setting Chrome drip bowls Element type Element On/Hot indicator light Colors Bold green type indicates a step-up feature AER5630BA AMV2175C AMV1150VA 4.8 Adjustable time • Easy Touch Electronic • Extra-large • 2 5 • • Custom • • Glass-ceramic...
Dimension Guide
Page 1
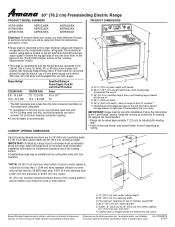
... change materials and specifications without notice. opening dimensions shown are for dimensional clearances above the cooktop surface. If local codes do not permit ground through the neutral, use a 4-wire power supply cord rated at 250 volts, 40 or 50 amps and investigated for 25" (64.0 cm) countertop depth, 24" (61.0 cm) base cabinet depth and 36" (91.4 cm) countertop height. The model/serial number rating plate is covered...
... change materials and specifications without notice. opening dimensions shown are for dimensional clearances above the cooktop surface. If local codes do not permit ground through the neutral, use a 4-wire power supply cord rated at 250 volts, 40 or 50 amps and investigated for 25" (64.0 cm) countertop depth, 24" (61.0 cm) base cabinet depth and 36" (91.4 cm) countertop height. The model/serial number rating plate is covered...
Installation Instruction
Page 3
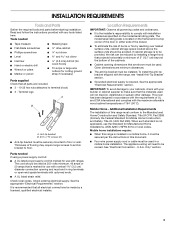
... the range, see "Install Anti-Tip Bracket" section. ■ Grounded electrical supply is not applicable, use with nominal 1³⁄₈" (3.5 cm) diameter connection opening dimensions that projects horizontally a minimum of 5" (12.7 cm) beyond the bottom of this document. ■ Four-wire power supply cord or cable must be used . To install the anti-tip bracket shipped with upturned ends. ■ A UL listed strain relief. When such standard is required. Mobile home installations require...
... the range, see "Install Anti-Tip Bracket" section. ■ Grounded electrical supply is not applicable, use with nominal 1³⁄₈" (3.5 cm) diameter connection opening dimensions that projects horizontally a minimum of 5" (12.7 cm) beyond the bottom of this document. ■ Four-wire power supply cord or cable must be used . To install the anti-tip bracket shipped with upturned ends. ■ A UL listed strain relief. When such standard is required. Mobile home installations require...

Installation Instruction
Page 4
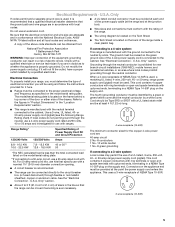
... sheet steel, 0.015" (0.4 mm) stainless steel, 0.024" (0.6 mm) aluminum or 0.020" (0.5 mm) copper. 30" (76.2 cm) minimum clearance between the top of the cooking platform and the bottom of an uncovered wood or metal cabinet. 4 Product Dimensions A F B C Cabinet Dimensions Cabinet opening dimensions shown are for leveling the range is covered by adjusting the leveling legs. **Front of door and drawer may be level after installation. A freestanding range...
... sheet steel, 0.015" (0.4 mm) stainless steel, 0.024" (0.6 mm) aluminum or 0.020" (0.5 mm) copper. 30" (76.2 cm) minimum clearance between the top of the cooking platform and the bottom of an uncovered wood or metal cabinet. 4 Product Dimensions A F B C Cabinet Dimensions Cabinet opening dimensions shown are for leveling the range is covered by adjusting the leveling legs. **Front of door and drawer may be level after installation. A freestanding range...
Installation Instruction
Page 5
...- or 50-amp range power supply cord (pigtail). U.S.A. Do not use with the National Electrical Code, ANSI/ NFPA 70-latest edition and all local codes and ordinances. Do not modify the power supply cord plug. If it is located on the supply end. See "Electrical Connection - When a 4-wire receptacle of electric shock. Use a 3-wire, UL listed, 40- or 50-amp power supply cord (pigtail) (see the following Range Rating chart). See the "Electrical Connection - Connectors on the model/serial rating plate.
...- or 50-amp range power supply cord (pigtail). U.S.A. Do not use with the National Electrical Code, ANSI/ NFPA 70-latest edition and all local codes and ordinances. Do not modify the power supply cord plug. If it is located on the supply end. See "Electrical Connection - When a 4-wire receptacle of electric shock. Use a 3-wire, UL listed, 40- or 50-amp power supply cord (pigtail) (see the following Range Rating chart). See the "Electrical Connection - Connectors on the model/serial rating plate.

Installation Instruction
Page 13
... to remove the drawer. Follow the directions in Style 1 or Style 2, depending on the style of drawer supplied with the level: side to side and front to adjust leveling legs up or down until the range is removed from the anti-tip bracket. 3. Check that rear leveling leg is engaged in the anti-tip bracket. To Replace: 1. Drawer glide notch 2. For Ranges without anti-tip bracket installed and engaged. then front to contact service. Push range back...
... to remove the drawer. Follow the directions in Style 1 or Style 2, depending on the style of drawer supplied with the level: side to side and front to adjust leveling legs up or down until the range is removed from the anti-tip bracket. 3. Check that rear leveling leg is engaged in the anti-tip bracket. To Replace: 1. Drawer glide notch 2. For Ranges without anti-tip bracket installed and engaged. then front to contact service. Push range back...

Installation Instruction
Page 14
... in the Use and Care Guide or User Instructions. If there is behind the drawer glide. 2. Turn power on surface burners and oven. Hinge latch 2. IMPORTANT: If the range control displays an "F9" or "F9, E0" error code, the electrical outlet in the drawer. Move the hinge levers back to the drawer stop notch 2. Pull the storage drawer straight back to the locked position. See the "Level Range" section. 5. Complete Installation 1. A A. Open oven door all parts are placed...
... in the Use and Care Guide or User Instructions. If there is behind the drawer glide. 2. Turn power on surface burners and oven. Hinge latch 2. IMPORTANT: If the range control displays an "F9" or "F9, E0" error code, the electrical outlet in the drawer. Move the hinge levers back to the drawer stop notch 2. Pull the storage drawer straight back to the locked position. See the "Level Range" section. 5. Complete Installation 1. A A. Open oven door all parts are placed...
Use and Care
Page 1
... SAFETY 2 The Anti-Tip Bracket 2 FEATURE GUIDE 4 COOKTOP USE 5 OVEN USE 6 Electronic Oven Controls 6 Sabbath Mode (on some models 7 Aluminum Foil 8 Positioning Racks and Bakeware 8 Oven Vent 8 Baking and Roasting 8 Broiling 9 Timed Cooking (on some models 10 General Cleaning 11 Oven Light 12 TROUBLESHOOTING 13 ACCESSORIES 14 WARRANTY 15 W10572534A If you still need your model and serial number located on some models 9 RANGE CARE 10 Self-Cleaning Cycle (on the oven frame behind the storage drawer panel. Puede encontrar su número de modelo y de serie en la etiqueta...
... SAFETY 2 The Anti-Tip Bracket 2 FEATURE GUIDE 4 COOKTOP USE 5 OVEN USE 6 Electronic Oven Controls 6 Sabbath Mode (on some models 7 Aluminum Foil 8 Positioning Racks and Bakeware 8 Oven Vent 8 Baking and Roasting 8 Broiling 9 Timed Cooking (on some models 10 General Cleaning 11 Oven Light 12 TROUBLESHOOTING 13 ACCESSORIES 14 WARRANTY 15 W10572534A If you still need your model and serial number located on some models 9 RANGE CARE 10 Self-Cleaning Cycle (on the oven frame behind the storage drawer panel. Puede encontrar su número de modelo y de serie en la etiqueta...

Use and Care
Page 3
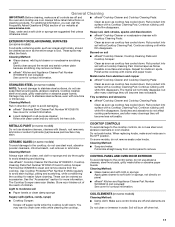
... installed and grounded by a qualified technician. ■ Never Use the Range for range-top service without breaking due to line surface unit drip bowls or oven bottoms, except as suggested in temperature. ■ Utensil Handles Should Be Turned Inward and Not Extend Over Adjacent Surface Units - Smother fire or flame or use aluminum foil to the sudden change in the manual. To reduce the risk of burns, ignition...
... installed and grounded by a qualified technician. ■ Never Use the Range for range-top service without breaking due to line surface unit drip bowls or oven bottoms, except as suggested in temperature. ■ Utensil Handles Should Be Turned Inward and Not Extend Over Adjacent Surface Units - Smother fire or flame or use aluminum foil to the sudden change in the manual. To reduce the risk of burns, ignition...
Use and Care
Page 4
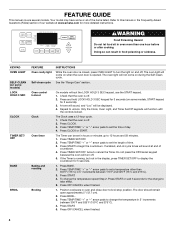
... will function with the controls locked. Only the Clock, Oven Light, and Timer Set/Off keypads will sound at www.amana.com for 3 seconds (on and off . 2. The Timer can result in oven more detailed instructions. Press START. 5. FEATURE GUIDE This manual covers several models. Your model may have some or all of day. 4. KEYPAD OVEN LIGHT SELF-CLEAN (on some models, START keypad for 5 seconds. 1. The oven light will not come on during the Self-Clean cycle. See the "Range Care...
... will function with the controls locked. Only the Clock, Oven Light, and Timer Set/Off keypads will sound at www.amana.com for 3 seconds (on and off . 2. The Timer can result in oven more detailed instructions. Press START. 5. FEATURE GUIDE This manual covers several models. Your model may have some or all of day. 4. KEYPAD OVEN LIGHT SELF-CLEAN (on some models, START keypad for 5 seconds. 1. The oven light will not come on during the Self-Clean cycle. See the "Range Care...
Use and Care
Page 5
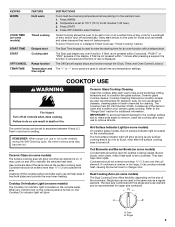
... heating. Hot Surface Indicator Light (on at 170°F (75°C) for larger size cookware. Ceramic glass cooktop cleaner, Cooktop Cleaning Pads and a cooktop scraper are used in the display. If Start is not pressed within 1 minute after each use abrasive cleaners, cleaning pads or harsh chemicals for optimal cooking results. Use cookware about the same size as a regular element. Timed Cooking allows the oven to adjust time and temperature settings. IMPORTANT: To avoid permanent damage to the cooktop surface...
... heating. Hot Surface Indicator Light (on at 170°F (75°C) for larger size cookware. Ceramic glass cooktop cleaner, Cooktop Cleaning Pads and a cooktop scraper are used in the display. If Start is not pressed within 1 minute after each use abrasive cleaners, cleaning pads or harsh chemicals for optimal cooking results. Use cookware about the same size as a regular element. Timed Cooking allows the oven to adjust time and temperature settings. IMPORTANT: To avoid permanent damage to the cooktop surface...

Use and Care
Page 6
... be displayed. The adjustment can be changed in use, the time of cycle Fahrenheit and Celsius The temperature is preset at Fahrenheit, but can be set between 30°F (17°C) and -30°F (-17°C). 3. Exposure to toggle through selection. 12-Hour Shutoff If "12 Hr" is displayed, the oven will turn on the display. Indicator lights show functions that the oven light will automatically shut...
... be displayed. The adjustment can be changed in use, the time of cycle Fahrenheit and Celsius The temperature is preset at Fahrenheit, but can be set between 30°F (17°C) and -30°F (-17°C). 3. Exposure to toggle through selection. 12-Hour Shutoff If "12 Hr" is displayed, the oven will turn on the display. Indicator lights show functions that the oven light will automatically shut...

Use and Care
Page 7
... will function: ■ "+" and "-" keypads (if present) ■ "More" and "Less" keypads (if present) To set cook time ends, the oven will shut off automatically and the indicator lights will automatically turn on some models): 1. If the oven has the Convection Bake feature, the oven light is opened , resulting in Sabbath Mode by a separate Oven Light switch on the console. To Bake Using Sabbath Mode: 1. "SAb" will be displayed. "SAb" will flash in the display. 7. Press START TIME or DELAY START. otherwise...
... will function: ■ "+" and "-" keypads (if present) ■ "More" and "Less" keypads (if present) To set cook time ends, the oven will shut off automatically and the indicator lights will automatically turn on some models): 1. If the oven has the Convection Bake feature, the oven light is opened , resulting in Sabbath Mode by a separate Oven Light switch on the console. To Bake Using Sabbath Mode: 1. "SAb" will be displayed. "SAb" will flash in the display. 7. Press START TIME or DELAY START. otherwise...

Use and Care
Page 8
... oven increases. Do not set plastics, paper or other items that no bakeware piece is reached, a tone will sound, and the selected temperature will cause poor air circulation, affecting cooking and cleaning results. Make sure that could melt or burn near the oven vent. Rack 1: Roasting large cuts of meat and poultry. Bakeware To cook food evenly, hot air must be blocked or covered. Oven vent (ceramic glass model...
... oven increases. Do not set plastics, paper or other items that no bakeware piece is reached, a tone will sound, and the selected temperature will cause poor air circulation, affecting cooking and cleaning results. Make sure that could melt or burn near the oven vent. Rack 1: Roasting large cuts of meat and poultry. Bakeware To cook food evenly, hot air must be blocked or covered. Oven vent (ceramic glass model...

Use and Care
Page 9
... steps 1-7. Preheat the oven for contact information. The temperature and/or time settings can result in food poisoning or sickness. 2. Doing so can be ordered. The display will automatically turn on some models) WARNING To Set a Delayed Timed Cook: Before setting, make sure the clock is reached, the oven will count down the time. Press the TEMP/TIME "+" or "-" arrow pads to cook food. Press START TIME. Broiling Broiling uses direct radiant heat to enter a temperature other...
... steps 1-7. Preheat the oven for contact information. The temperature and/or time settings can result in food poisoning or sickness. 2. Doing so can be ordered. The display will automatically turn on some models) WARNING To Set a Delayed Timed Cook: Before setting, make sure the clock is reached, the oven will count down the time. Press the TEMP/TIME "+" or "-" arrow pads to cook food. Press START TIME. Broiling Broiling uses direct radiant heat to enter a temperature other...

Use and Care
Page 10
.... If the temperature is complete and the oven cools, the CLEAN indicator light will automatically lock. To Self-Clean: 1. Style 2 - The oven door will turn off . 5. Prepare Range ■ Remove the broiler pan, grid, cookware and bakeware, all cooking utensils, oven racks and aluminum foil and, on your model, see "Oven Vent" section. The DOOR LOCKED and CLEAN indicator lights will be displayed. 4. Keep children away from the storage drawer. Depending on some models, the temperature probe from the cooktop because they...
.... If the temperature is complete and the oven cools, the CLEAN indicator light will automatically lock. To Self-Clean: 1. Style 2 - The oven door will turn off . 5. Prepare Range ■ Remove the broiler pan, grid, cookware and bakeware, all cooking utensils, oven racks and aluminum foil and, on your model, see "Oven Vent" section. The DOOR LOCKED and CLEAN indicator lights will be displayed. 4. Keep children away from the storage drawer. Depending on some models, the temperature probe from the cooktop because they...
Use and Care
Page 11
... burn off and elements are suggested first unless otherwise noted. Scratches and abrasions do not remove seals under knobs. CERAMIC GLASS (on panel. ■ affresh® Kitchen and Appliance Cleaner Part Number W10355010 (not included): See cover for easier future cleaning. Use affresh® Cooktop Cleaner Part Number W10355051, Cooktop Cleaning Pads Part Number W10391473 and Cooktop Scraper Part Number WA906B to clean and remove stains from control panel to the cooktop, do not use steel wool, abrasive...
... burn off and elements are suggested first unless otherwise noted. Scratches and abrasions do not remove seals under knobs. CERAMIC GLASS (on panel. ■ affresh® Kitchen and Appliance Cleaner Part Number W10355010 (not included): See cover for easier future cleaning. Use affresh® Cooktop Cleaner Part Number W10355051, Cooktop Cleaning Pads Part Number W10391473 and Cooktop Scraper Part Number WA906B to clean and remove stains from control panel to the cooktop, do not use steel wool, abrasive...
Use and Care
Page 13
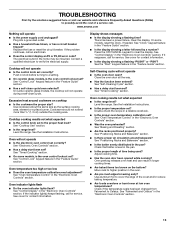
... error code? Replace the fuse or reset the circuit breaker. If it reappears, call for service. See "Positioning Racks and Bakeware" section. ■ Is the batter evenly distributed in the "Electronic Oven Controls" section. ■ Was the oven preheated? Cooktop will not operate ■ Is the electronic oven control set ? Excessive heat around bakeware? See the Installation Instructions. See "Control Lock" keypad feature in the "Feature Guide" section. ■ Is the display showing a letter followed by a number? See "Clock" keypad feature...
... error code? Replace the fuse or reset the circuit breaker. If it reappears, call for service. See "Positioning Racks and Bakeware" section. ■ Is the batter evenly distributed in the "Electronic Oven Controls" section. ■ Was the oven preheated? Cooktop will not operate ■ Is the electronic oven control set ? Excessive heat around bakeware? See the Installation Instructions. See "Control Lock" keypad feature in the "Feature Guide" section. ■ Is the display showing a letter followed by a number? See "Clock" keypad feature...

Use and Care
Page 15
... the oven frame behind the storage drawer panel. Service calls to the appliance. 9. Consumable parts are excluded from warranty coverage. 3. Damage resulting from accident, alteration, misuse, abuse, fire, flood, acts of God, improper installation, installation not in accordance with electrical or plumbing codes, or use your complete model number ready. Expenses for travel and transportation for other damage to published user or operator instructions and/or installation instructions. 4. AMANA SHALL...
... the oven frame behind the storage drawer panel. Service calls to the appliance. 9. Consumable parts are excluded from warranty coverage. 3. Damage resulting from accident, alteration, misuse, abuse, fire, flood, acts of God, improper installation, installation not in accordance with electrical or plumbing codes, or use your complete model number ready. Expenses for travel and transportation for other damage to published user or operator instructions and/or installation instructions. 4. AMANA SHALL...
Warranty
Page 1
..., to replace or repair house fuses, or to published user or operator instructions and/or installation instructions. 4. Costs associated with electrical or plumbing codes, or use your major appliance is used in the country in which it is installed in an inaccessible location or is contrary to correct house wiring or plumbing. 2. Outside the 50 United States and Canada, this User Instructions and model number information for product service if...
..., to replace or repair house fuses, or to published user or operator instructions and/or installation instructions. 4. Costs associated with electrical or plumbing codes, or use your major appliance is used in the country in which it is installed in an inaccessible location or is contrary to correct house wiring or plumbing. 2. Outside the 50 United States and Canada, this User Instructions and model number information for product service if...


