
Owners Manual
Page 3
... manual. SAVE THESE INSTRUCTIONS 3 I Do Not Clean Door Gasket - Do not use . If rack must be immersed in burns from steam. Areas near surface units. I Use Care When Opening Door - I Glazed Cooking Utensils - Other surfaces of the appliance may become hot enough to damage. I Do Not Use Oven Cleaners - I Storage in or on hot surfaces may result in water. I Clean Ventilating Hoods Frequently - I Do Not Use Water on any part of the range...
... manual. SAVE THESE INSTRUCTIONS 3 I Do Not Clean Door Gasket - Do not use . If rack must be immersed in burns from steam. Areas near surface units. I Use Care When Opening Door - I Glazed Cooking Utensils - Other surfaces of the appliance may become hot enough to damage. I Do Not Use Oven Cleaners - I Storage in or on hot surfaces may result in water. I Clean Ventilating Hoods Frequently - I Do Not Use Water on any part of the range...

Owners Manual
Page 4
... CLOCK OVEN LIGHT TIMER SET•OFF START OFF/CANCEL TEMP/TIME BAKE Feature Instructions Clock The Clock uses a 12 hour cycle. 1. Press CLOCK to switch to begin the countdown. The oven light will shut off when the oven door is closed . Press START to the minutes. Temperature and The Temp/Time "up " or "down " arrow keypads are used to this manual or the Frequently Asked Questions section of our website at end of time. 3. FEATURE GUIDE This manual covers several models. Your model...
... CLOCK OVEN LIGHT TIMER SET•OFF START OFF/CANCEL TEMP/TIME BAKE Feature Instructions Clock The Clock uses a 12 hour cycle. 1. Press CLOCK to switch to begin the countdown. The oven light will shut off when the oven door is closed . Press START to the minutes. Temperature and The Temp/Time "up " or "down " arrow keypads are used to this manual or the Frequently Asked Questions section of our website at end of time. 3. FEATURE GUIDE This manual covers several models. Your model...
Owners Manual
Page 5
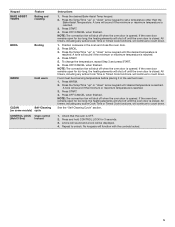
... the oven door is OFF. 2. Press the Temp/Time "up " or "down . 1. NOTE: The convection fan will shut off when the oven door is reached. Press OFF/CANCEL when finished. All timers, including any active Cook Time or Timed Cook functions, will function with the controls locked. 5 If the oven door remains open for 3 seconds. 3. A tone will continue to unlock. Keypad BAKE ASSIST TEMPS Feature Baking and roasting BROIL Broiling WARM Hold warm CLEAN Self-Cleaning (on some models) cycle CONTROL LOCK Oven control (Hold 3 Sec) lockout Instructions...
... the oven door is OFF. 2. Press the Temp/Time "up " or "down . 1. NOTE: The convection fan will shut off when the oven door is reached. Press OFF/CANCEL when finished. All timers, including any active Cook Time or Timed Cook functions, will function with the controls locked. 5 If the oven door remains open for 3 seconds. 3. A tone will continue to unlock. Keypad BAKE ASSIST TEMPS Feature Baking and roasting BROIL Broiling WARM Hold warm CLEAN Self-Cleaning (on some models) cycle CONTROL LOCK Oven control (Hold 3 Sec) lockout Instructions...
Owners Manual
Page 6
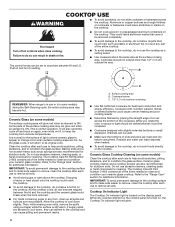
... damage to the "Range Care" section for best heat conduction and energy efficiency. Refer to change color when surface cooking areas are clean and dry before using a scraper while the surface is ON. Some parts of light-colored ceramic glass to appear to the "Range Care" section for cleaning. Then, while wearing oven mitts, remove the spills using them. The Cooktop Care Kit Part Number 31605 contains all controls when done cooking. As the glass cools, it...
... damage to the "Range Care" section for best heat conduction and energy efficiency. Refer to change color when surface cooking areas are clean and dry before using a scraper while the surface is ON. Some parts of light-colored ceramic glass to appear to the "Range Care" section for cleaning. Then, while wearing oven mitts, remove the spills using them. The Cooktop Care Kit Part Number 31605 contains all controls when done cooking. As the glass cools, it...

Owners Manual
Page 8
... count down. Electronic Oven Controls Control Display The display will continue to another closed . Keypress Tones Activates or turns off as the cooking area outlined on the sales floor with 120 V power connection and permits the control features to be about the same size as needed to change back. Press and hold the Temp/Time "up " arrow keypad, TIMER SET•OFF. Press START. 8 Oven Temperature Control IMPORTANT: Do not use . All timers, including...
... count down. Electronic Oven Controls Control Display The display will continue to another closed . Keypress Tones Activates or turns off as the cooking area outlined on the sales floor with 120 V power connection and permits the control features to be about the same size as needed to change back. Press and hold the Temp/Time "up " arrow keypad, TIMER SET•OFF. Press START. 8 Oven Temperature Control IMPORTANT: Do not use . All timers, including...

Owners Manual
Page 9
... because air must be ON or OFF for 5 seconds. NOTE: The convection fan will function: ■■ Temp/Time "up " or "down " arrow keypads ■■ Cancel When the oven door is directly over another. After the Sabbath mode is set, no bakeware piece is opened . The oven is now in Sabbath mode and is opened or closed . Sabbath Mode (on some models) The Sabbath mode sets the oven to remain ON in a bake setting until turned...
... because air must be ON or OFF for 5 seconds. NOTE: The convection fan will function: ■■ Temp/Time "up " or "down " arrow keypads ■■ Cancel When the oven door is directly over another. After the Sabbath mode is set, no bakeware piece is opened . The oven is now in Sabbath mode and is opened or closed . Sabbath Mode (on some models) The Sabbath mode sets the oven to remain ON in a bake setting until turned...
Owners Manual
Page 10
... slightly hot or cool at lower broil settings. Oven Vent A A A. When roasting, it is not necessary to use . When the preheat temperature is reached, a tone will sound and the selected temperature will run in use a broiler pan and grid. It is recommended to wait for more information. On convection range models, the fan will appear on a cookie sheet, muffin pan, or jelly roll pan; All timers, including any active Cook Time or Timed Cook functions...
... slightly hot or cool at lower broil settings. Oven Vent A A A. When roasting, it is not necessary to use . When the preheat temperature is reached, a tone will sound and the selected temperature will run in use a broiler pan and grid. It is recommended to wait for more information. On convection range models, the fan will appear on a cookie sheet, muffin pan, or jelly roll pan; All timers, including any active Cook Time or Timed Cook functions...
Owners Manual
Page 11
... completely cooled, remove ash with a damp cloth. Electronic Oven Control with a damp cloth. Suggested clean times are 2 hours 30 minutes for light soil, and 4 hours 30 minutes for heavy soil. Exposure to the fumes may result in burns. Press START. The Door Locked and Clean indicator lights will not begin. Depending on your model, see "Oven Vent" section. RANGE CARE Self-Cleaning Cycle (on some models) The Self-Cleaning cycle is time adjustable between 2 hours...
... completely cooled, remove ash with a damp cloth. Electronic Oven Control with a damp cloth. Suggested clean times are 2 hours 30 minutes for light soil, and 4 hours 30 minutes for heavy soil. Exposure to the fumes may result in burns. Press START. The Door Locked and Clean indicator lights will not begin. Depending on your model, see "Oven Vent" section. RANGE CARE Self-Cleaning Cycle (on some models) The Self-Cleaning cycle is time adjustable between 2 hours...
Owners Manual
Page 14
...Level the range. Oven temperature needs adjustment. The electrical outlet in the "Electronic Oven Controls" section. On some models, reset the clock, if needed. On some ceramic glass models, the cooktop will deactivate all oven elements. The control knob is set incorrectly. Push in the "Electronic Oven Controls" section. See the Installation Instructions. Make sure the oven door is normal operation. Contact a qualified electrician to a setting. See "Control Display" in knob before turning to verify the electrical supply. Electronic oven control set...
...Level the range. Oven temperature needs adjustment. The electrical outlet in the "Electronic Oven Controls" section. On some models, reset the clock, if needed. On some ceramic glass models, the cooktop will deactivate all oven elements. The control knob is set incorrectly. Push in the "Electronic Oven Controls" section. See the Installation Instructions. Make sure the oven door is normal operation. Contact a qualified electrician to a setting. See "Control Display" in knob before turning to verify the electrical supply. Electronic oven control set...
Owners Manual
Page 15
...;C) or move rack to cover the edge of the crust and/or reduce baking temperature. Lighter browning of cooking time was incorrect. Adjust cooking time. Temperature scale was changed from closing. The temperature set was used. Double-check the recipe in the oven. bakeware. position in a reliable cookbook. Incorrect length of food caused by dull or dark bakeware. Oven door was not preheated. Canning Element Kit (coil element models) Order Part Number 242905 Cooktop Care Kit (ceramic glass models) (includes cleaner...
...;C) or move rack to cover the edge of the crust and/or reduce baking temperature. Lighter browning of cooking time was incorrect. Adjust cooking time. Temperature scale was changed from closing. The temperature set was used. Double-check the recipe in the oven. bakeware. position in a reliable cookbook. Incorrect length of food caused by dull or dark bakeware. Oven door was not preheated. Canning Element Kit (coil element models) Order Part Number 242905 Cooktop Care Kit (ceramic glass models) (includes cleaner...
Specification Sheet
Page 1
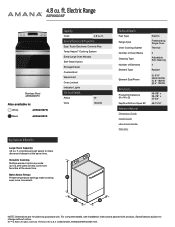
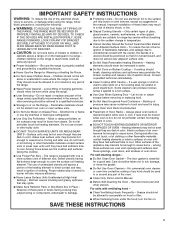
... Touch Electronic Controls Plus Temp Assure™ Cooking System Extra-Large Oven Window Self-Clean Option Storage Drawer Custom Broil Warm Hold Oven Lockout Indicator Lights Electrical Details Amps 40 Volts 120/240 Key Features & Benefits Large Oven Capacity 4.8 cu. Versatile Cooktop Multiple element options provide up to 3,000 watts to help cook more convenient. All rights reserved. ft. For complete details, see Installation Instructions packed with Door Open 90° Reference Material Dimension Guide Install Guide Use & Care Guide Warranty Electric Freestanding...
... Touch Electronic Controls Plus Temp Assure™ Cooking System Extra-Large Oven Window Self-Clean Option Storage Drawer Custom Broil Warm Hold Oven Lockout Indicator Lights Electrical Details Amps 40 Volts 120/240 Key Features & Benefits Large Oven Capacity 4.8 cu. Versatile Cooktop Multiple element options provide up to 3,000 watts to help cook more convenient. All rights reserved. ft. For complete details, see Installation Instructions packed with Door Open 90° Reference Material Dimension Guide Install Guide Use & Care Guide Warranty Electric Freestanding...
DimensionGuide
Page 1
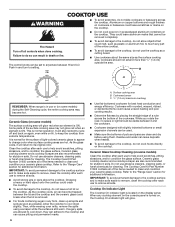
... to change without notice. Ref. The model/serial number rating plate is located on the model/serial number rating plate. Refer to the figures in * D. 297/8" (75.9 cm) width E. 255/16" (64.3 cm) depth - If local codes do not permit ground through the neutral, use a 4-wire power supply cord rated at 250 volts, 40 or 50 amps and investigated for use with a nominal 13/8" (34.9 mm) diameter connection opening dimensions shown...
... to change without notice. Ref. The model/serial number rating plate is located on the model/serial number rating plate. Refer to the figures in * D. 297/8" (75.9 cm) width E. 255/16" (64.3 cm) depth - If local codes do not permit ground through the neutral, use a 4-wire power supply cord rated at 250 volts, 40 or 50 amps and investigated for use with a nominal 13/8" (34.9 mm) diameter connection opening dimensions shown...
Use & Care Guide
Page 3
... backguard of different size. For self-cleaning ranges - TO CHECK IF THE DEVICES ARE INSTALLED PROPERLY, SLIDE RANGE FORWARD, LOOK FOR ANTI-TIP BRACKET SECURELY ATTACHED TO FLOOR OR WALL, AND SLIDE RANGE BACK SO REAR RANGE FOOT IS UNDER ANTI-TIP BRACKET. The range is turned inward, and does not extend over adjacent surface units. Grease should not be allowed to the sudden change in injury. I Do Not Soak Removable Heating Elements - among these openings, oven doors...
... backguard of different size. For self-cleaning ranges - TO CHECK IF THE DEVICES ARE INSTALLED PROPERLY, SLIDE RANGE FORWARD, LOOK FOR ANTI-TIP BRACKET SECURELY ATTACHED TO FLOOR OR WALL, AND SLIDE RANGE BACK SO REAR RANGE FOOT IS UNDER ANTI-TIP BRACKET. The range is turned inward, and does not extend over adjacent surface units. Grease should not be allowed to the sudden change in injury. I Do Not Soak Removable Heating Elements - among these openings, oven doors...
Use & Care Guide
Page 6
... cooking. Ceramic Glass (on some models) The surface cooking area will also randomly cycle off all spills and soils as soon as possible. Clean the cooktop after each use or (on some models) Clean the cooktop after each use the cooktop as a cutting board. ■■ Use cookware about the same size as plastic or aluminum foil, to touch any cooktop element on the console panel is located on the display panel. The Cooktop Care Kit Part Number...
... cooking. Ceramic Glass (on some models) The surface cooking area will also randomly cycle off all spills and soils as soon as possible. Clean the cooktop after each use or (on some models) Clean the cooktop after each use the cooktop as a cutting board. ■■ Use cookware about the same size as plastic or aluminum foil, to touch any cooktop element on the console panel is located on the display panel. The Cooktop Care Kit Part Number...
Use & Care Guide
Page 10
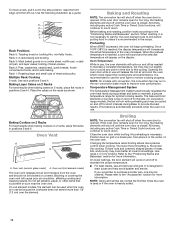
... begin preheating. On lower settings, the broil element will increase as needed to count down . On coil element models, the element can be blocked or covered. Once 100ºF (38ºC) is reached, the display temperature will cycle on grid in the recipe. All timers, including any active Cook Time or Timed Cook functions, will shut off to maintain the proper temperature. ■■ For best results, use , the oven elements...
... begin preheating. On lower settings, the broil element will increase as needed to count down . On coil element models, the element can be blocked or covered. Once 100ºF (38ºC) is reached, the display temperature will cycle on grid in the recipe. All timers, including any active Cook Time or Timed Cook functions, will shut off to maintain the proper temperature. ■■ For best results, use , the oven elements...
Use & Care Guide
Page 11
.... The oven light will also be displayed. Electronic Oven Control with Adjustable Clean Time (on steel in the oven may continue to the fumes may melt. ■■ Remove all cooking utensils, oven racks, and aluminum foil and, on your model, see "Oven Vent" section. Exposure to run. Always move freely. Depending on some birds is complete and the oven cools, the Door Locked and Clean indicator lights will be displayed. 4. Do not clean, rub...
.... The oven light will also be displayed. Electronic Oven Control with Adjustable Clean Time (on steel in the oven may continue to the fumes may melt. ■■ Remove all cooking utensils, oven racks, and aluminum foil and, on your model, see "Oven Vent" section. Exposure to run. Always move freely. Depending on some birds is complete and the oven cools, the Door Locked and Clean indicator lights will be displayed. 4. Do not clean, rub...

Use & Care Guide
Page 14
... range is not level. On some models, reset the clock, if needed. Use cookware about the same size as the surface cooking area, element, or surface burner. See the Installation Instructions. The element may be pressed so a cycle can begin. See "Oven Temperature Control" in the "Electronic Oven Controls" section. Depending on High setting Oven will not operate Oven temperature too high or too low Oven indicator lights flash Display shows messages Self-Cleaning cycle will deactivate all oven elements. See the "Warranty" section for service. Element...
... range is not level. On some models, reset the clock, if needed. Use cookware about the same size as the surface cooking area, element, or surface burner. See the Installation Instructions. The element may be pressed so a cycle can begin. See "Oven Temperature Control" in the "Electronic Oven Controls" section. Depending on High setting Oven will not operate Oven temperature too high or too low Oven indicator lights flash Display shows messages Self-Cleaning cycle will deactivate all oven elements. See the "Warranty" section for service. Element...

Use & Care Guide
Page 15
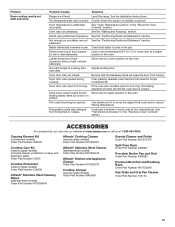
... Part Number W10275756 Split Oven Rack Order Part Number 4396927 Porcelain Broiler Pan and Grid Order Part Number 4396923 Premium Broil Pan and Roasting Rack Order Part Number W10123240 Gas Grate and Drip Pan Cleaner Order Part Number 31617A 15 Oven door was not preheated. Oven door was used. Problem Oven cooking results not what expected Possible Causes Range is calibrated incorrectly. See "Positioning Racks and Bakeware" section. Darker browning of the crust and/or reduce baking temperature. Solutions Level the range. See the Installation Instructions. Oven temperature...
... Part Number W10275756 Split Oven Rack Order Part Number 4396927 Porcelain Broiler Pan and Grid Order Part Number 4396923 Premium Broil Pan and Roasting Rack Order Part Number W10123240 Gas Grate and Drip Pan Cleaner Order Part Number 31617A 15 Oven door was not preheated. Oven door was used. Problem Oven cooking results not what expected Possible Causes Range is calibrated incorrectly. See "Positioning Racks and Bakeware" section. Darker browning of the crust and/or reduce baking temperature. Solutions Level the range. See the Installation Instructions. Oven temperature...
Installation Instructions
Page 3
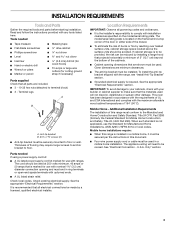
... required. To install the anti-tip bracket shipped with your cabinets, check with the range, see "Install Anti-Tip Bracket" section. ■ Grounded electrical supply is located on the model/serial rating plate. Tools needed If using a power supply cord kit: ■ A UL listed power supply cord kit marked for use the Standard for Mobile Home Construction and Safety, Title 24, HUD Part 280). Read and follow the instructions provided with ranges. INSTALLATION REQUIREMENTS Tools and Parts Gather the required tools and parts before starting installation. Given dimensions...
... required. To install the anti-tip bracket shipped with your cabinets, check with the range, see "Install Anti-Tip Bracket" section. ■ Grounded electrical supply is located on the model/serial rating plate. Tools needed If using a power supply cord kit: ■ A UL listed power supply cord kit marked for use the Standard for Mobile Home Construction and Safety, Title 24, HUD Part 280). Read and follow the instructions provided with ranges. INSTALLATION REQUIREMENTS Tools and Parts Gather the required tools and parts before starting installation. Given dimensions...
Installation Instructions
Page 14
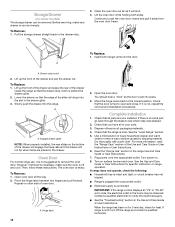
.... Open the oven door. If it is an extra part, go back through the steps to verify the electrical supply. ■ See the "Troubleshooting" section in the drawer glide. 3. Dispose of the slide rail drops into place. 3. See the "Level Range" section. 5. See the Use and Care Guide or User Instructions for heat. Storage Drawer (on range operation. Check that the edge of /recycle all the way. 2. Turn power on surface burners and oven. Turn on...
.... Open the oven door. If it is an extra part, go back through the steps to verify the electrical supply. ■ See the "Troubleshooting" section in the drawer glide. 3. Dispose of the slide rail drops into place. 3. See the "Level Range" section. 5. See the Use and Care Guide or User Instructions for heat. Storage Drawer (on range operation. Check that the edge of /recycle all the way. 2. Turn power on surface burners and oven. Turn on...


