Use and Care
Page 1
... Contents / Índice / Table des matières REFRIGERATOR SAFETY 1 INSTALLATION INSTRUCTIONS 2 REFRIGERATOR USE 11 REFRIGERATOR CARE 13 TROUBLESHOOTING 14 WATER FILTER CERTIFICATIONS 16 PRODUCT DATA SHEETS 17 WARRANTY 18 SEGURIDAD DEL REFRIGERADOR 19 INSTRUCCIONES DE INSTALACIÓN .......... 20 USO DE SU REFRIGERADOR 29 CUIDADO DE SU REFRIGERADOR 31 SOLUCIÓN DE PROBLEMAS 32 HOJA DE DATOS DEL PRODUCTO 35 GARANTÍA 36 SÉCURITÉ DU...
... Contents / Índice / Table des matières REFRIGERATOR SAFETY 1 INSTALLATION INSTRUCTIONS 2 REFRIGERATOR USE 11 REFRIGERATOR CARE 13 TROUBLESHOOTING 14 WATER FILTER CERTIFICATIONS 16 PRODUCT DATA SHEETS 17 WARRANTY 18 SEGURIDAD DEL REFRIGERADOR 19 INSTRUCCIONES DE INSTALACIÓN .......... 20 USO DE SU REFRIGERADOR 29 CUIDADO DE SU REFRIGERADOR 31 SOLUCIÓN DE PROBLEMAS 32 HOJA DE DATOS DEL PRODUCTO 35 GARANTÍA 36 SÉCURITÉ DU...
Use and Care
Page 2
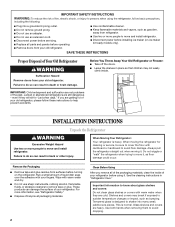
... refrigerator is normal. Clean Before Using After you are still dangerous - Important information to know about glass shelves and covers: Do not clean glass shelves or covers with warm water and dry. ■ Do not use an extension cord. ■ Disconnect power before servicing. ■ Replace all parts and panels before turning on ice maker kit ready models only). Use both hands when removing them to do so can result in "Refrigerator Care." even if they are cold...
... refrigerator is normal. Clean Before Using After you are still dangerous - Important information to know about glass shelves and covers: Do not clean glass shelves or covers with warm water and dry. ■ Do not use an extension cord. ■ Disconnect power before servicing. ■ Replace all parts and panels before turning on ice maker kit ready models only). Use both hands when removing them to do so can result in "Refrigerator Care." even if they are cold...
Use and Care
Page 3
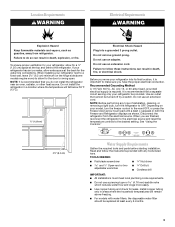
...; Use copper tubing and check for the water line connections. See "Using the Controls." 2¹⁄₂" (6.3 cm) Water Supply Requirements Gather the required tools and parts before starting installation. Do not install the refrigerator in death, explosion, or fire. Disconnect the refrigerator from refrigerator. Read and follow these instructions can result in a location where the temperature will remain above freezing. ■ For models with any type of installation, cleaning, or removing a light bulb, turn the freezer control to make...
...; Use copper tubing and check for the water line connections. See "Using the Controls." 2¹⁄₂" (6.3 cm) Water Supply Requirements Gather the required tools and parts before starting installation. Do not install the refrigerator in death, explosion, or fire. Disconnect the refrigerator from refrigerator. Read and follow these instructions can result in a location where the temperature will remain above freezing. ■ For models with any type of installation, cleaning, or removing a light bulb, turn the freezer control to make...
Use and Care
Page 4
... a service loop (minimum diameter of the tubing in the reverse osmosis system is under the pipe clamp. If a reverse osmosis water filtration system is clear. Remove the water filter. IMPORTANT: If you turn the ice maker OFF. IMPORTANT: ■ Make sure it is connected, turn the refrigerator on before you may come down from the top or up from water valve inlet port. Add 7 ft (2.1 m) to the cold water...
... a service loop (minimum diameter of the tubing in the reverse osmosis system is under the pipe clamp. If a reverse osmosis water filtration system is clear. Remove the water filter. IMPORTANT: If you turn the ice maker OFF. IMPORTANT: ■ Make sure it is connected, turn the refrigerator on before you may come down from the top or up from water valve inlet port. Add 7 ft (2.1 m) to the cold water...

Use and Care
Page 5
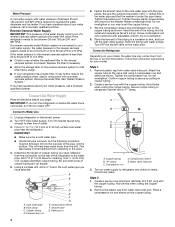
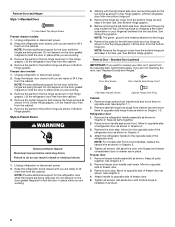
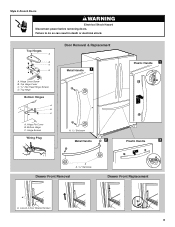
... turn the refrigerator control OFF, and remove food and adjustable door or utility bins from moving. See Side Mount graphic 2. See Plastic Handle graphic 1. ■ To replace the handle, position the handle so that the mounting clips are down to refrigerator cabinet with either a freezer door or freezer drawer, or French doors (Style 2). 3. Plastic water tubing C. Sleeve D. Water valve inlet port C. Attach copper tubing to engage. Plug into the water valve inlet port. Remove and Replace Refrigerator Door Handles Style 1-Standard Door...
... turn the refrigerator control OFF, and remove food and adjustable door or utility bins from moving. See Side Mount graphic 2. See Plastic Handle graphic 1. ■ To replace the handle, position the handle so that the mounting clips are down to refrigerator cabinet with either a freezer door or freezer drawer, or French doors (Style 2). 3. Plastic water tubing C. Sleeve D. Water valve inlet port C. Attach copper tubing to engage. Plug into the water valve inlet port. Remove and Replace Refrigerator Door Handles Style 1-Standard Door...
Use and Care
Page 6
... in Top Hinge graphic. Freezer door models 1. Remove the hinge pin cover from the cabinet. If you are working . 3. Set aside the door until bottom hinge is installed on the door gasket magnets to lift it free from the bottom hinge pin and keep it free from cabinet top and move them free from the bottom hinge pin. Remove door stop . See Graphic 4. 4. Before removing the left-hand side door, disconnect the wiring plug located on the door gasket magnets...
... in Top Hinge graphic. Freezer door models 1. Remove the hinge pin cover from the cabinet. If you are working . 3. Set aside the door until bottom hinge is installed on the door gasket magnets to lift it free from the bottom hinge pin and keep it free from cabinet top and move them free from the bottom hinge pin. Remove door stop . See Graphic 4. 4. Before removing the left-hand side door, disconnect the wiring plug located on the door gasket magnets...
Use and Care
Page 7
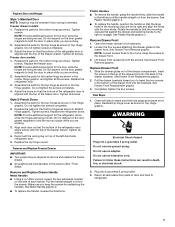
... the wiring plug on top of the freezer door. Remove and Replace Drawer Handle Metal Handles ■ Using a Allen wrench, loosen the two setscrews located on the door gasket magnets to hold the doors in place while you are being moved. Remove Drawer Front 1. Keep the screws in Top Hinge graphic. See Drawer Front Replacement graphic. 2. Do not remove ground prong. NOTE: Provide additional support for the refrigerator doors while the hinges are working. 2. Tighten...
... the wiring plug on top of the freezer door. Remove and Replace Drawer Handle Metal Handles ■ Using a Allen wrench, loosen the two setscrews located on the door gasket magnets to hold the doors in place while you are being moved. Remove Drawer Front 1. Keep the screws in Top Hinge graphic. See Drawer Front Replacement graphic. 2. Do not remove ground prong. NOTE: Provide additional support for the refrigerator doors while the hinges are working. 2. Tighten...
Use and Care
Page 8
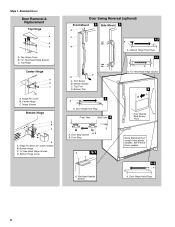
... Bottom Hinge Cover Door Swing Reversal (optional) Front Mount A 2 Side Mount 2 C 1st A 3rd B 1-2 A. Cabinet Hinge Hole Plugs 1-1 2nd 4th D B A. Handle Screws C. Door Stop Screws A B B. See French Doors graphic. 5-2 A A. Top Hinge Center Hinge A B C A. Trim Screw B. Hinge Screws Bottom Hinge A B C D A. Bottom Hinge C. ³⁄₈" Hex-Head Hinge Screws D. Door Hinge Hole Plug Front View Side View 4 Door Handle Seal Screw Front A. Door Hinge Hole Plugs 8 Flat-Head Handle Screws Some Standard Door models have plastic handles. Center Hinge...
... Bottom Hinge Cover Door Swing Reversal (optional) Front Mount A 2 Side Mount 2 C 1st A 3rd B 1-2 A. Cabinet Hinge Hole Plugs 1-1 2nd 4th D B A. Handle Screws C. Door Stop Screws A B B. See French Doors graphic. 5-2 A A. Top Hinge Center Hinge A B C A. Trim Screw B. Hinge Screws Bottom Hinge A B C D A. Bottom Hinge C. ³⁄₈" Hex-Head Hinge Screws D. Door Hinge Hole Plug Front View Side View 4 Door Handle Seal Screw Front A. Door Hinge Hole Plugs 8 Flat-Head Handle Screws Some Standard Door models have plastic handles. Center Hinge...
Use and Care
Page 9
Failure to do so can result in death or electrical shock. Top Hinge Cover C. 5/16" Hex Head Hinge Screws D. Hinge Screws Wiring Plug A. 3/32" Setscrew Metal Handle 2 Plastic Handle 1 Plastic Handle 2 A A. 3/32" Setscrew Drawer Front Removal Drawer Front Replacement A A. Top Hinge Bottom Hinges A B C Door Removal & Replacement Metal Handle 1 A A. Hinge Cover Screw B. Hinge Pin Cover B. Bottom Hinge C. Top Hinges A B C D A. Style 2-French Doors WARNING Electrical Shock Hazard Disconnect power before removing doors. Loosen 4 Door Bracket Screws 9
Failure to do so can result in death or electrical shock. Top Hinge Cover C. 5/16" Hex Head Hinge Screws D. Hinge Screws Wiring Plug A. 3/32" Setscrew Metal Handle 2 Plastic Handle 1 Plastic Handle 2 A A. 3/32" Setscrew Drawer Front Removal Drawer Front Replacement A A. Top Hinge Bottom Hinges A B C Door Removal & Replacement Metal Handle 1 A A. Hinge Cover Screw B. Hinge Pin Cover B. Bottom Hinge C. Top Hinges A B C D A. Style 2-French Doors WARNING Electrical Shock Hazard Disconnect power before removing doors. Loosen 4 Door Bracket Screws 9
Use and Care
Page 11
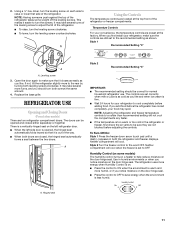
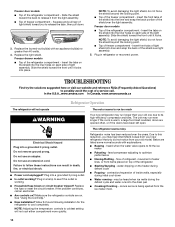
... first install your refrigerator to adjust the tilt of the refrigerator or freezer compartments. NOTE: Adjusting the refrigerator and freezer temperature controls to a colder than recommended setting will not cool the compartments any faster. ■ If the temperature is too warm or too cold in the refrigerator or freezer, first check the air vents to turn the leveling screw counterclockwise. This makes it is as cold as you add food before adjusting the controls...
... first install your refrigerator to adjust the tilt of the refrigerator or freezer compartments. NOTE: Adjusting the refrigerator and freezer temperature controls to a colder than recommended setting will not cool the compartments any faster. ■ If the temperature is too warm or too cold in the refrigerator or freezer, first check the air vents to turn the leveling screw counterclockwise. This makes it is as cold as you add food before adjusting the controls...
Use and Care
Page 12
... supplied to your model, adjust the control to any setting between adjustments. Repeat until water begins to poor quality ice. Additional flushing may spurt out of the dispenser. Hold a container under the dispenser while pressing the button. 2. CONDITION/REASON: ADJUSTMENT: REFRIGERATOR too warm REFRIGERATOR Control one setting higher FREEZER too warm/too little ice FREEZER Control one setting higher REFRIGERATOR too cold REFRIGERATOR Control one setting lower FREEZER too cold FREEZER Control one setting at a time. To manually turn the ice maker ON, simply lower the wire...
... supplied to your model, adjust the control to any setting between adjustments. Repeat until water begins to poor quality ice. Additional flushing may spurt out of the dispenser. Hold a container under the dispenser while pressing the button. 2. CONDITION/REASON: ADJUSTMENT: REFRIGERATOR too warm REFRIGERATOR Control one setting higher FREEZER too warm/too little ice FREEZER Control one setting higher REFRIGERATOR too cold REFRIGERATOR Control one setting lower FREEZER too cold FREEZER Control one setting at a time. To manually turn the ice maker ON, simply lower the wire...
Use and Care
Page 13
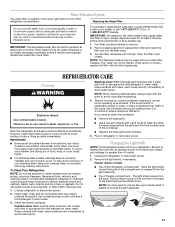
... release it stops. Turn the filter clockwise until it from the light assembly. ■ Top of the refrigerator compartment - NOTE: The dispenser feature may be filtered. IMPORTANT: ■ Because air circulates between both sections, any odors formed in normal home operating environments. Use a clean sponge or soft cloth and a mild detergent in warm water. 3. Be sure to remove. 2. Changing the Light Bulb NOTE: Not all appliance bulbs will not...
... release it stops. Turn the filter clockwise until it from the light assembly. ■ Top of the refrigerator compartment - NOTE: The dispenser feature may be filtered. IMPORTANT: ■ Because air circulates between both sections, any odors formed in normal home operating environments. Use a clean sponge or soft cloth and a mild detergent in warm water. 3. Be sure to remove. 2. Changing the Light Bulb NOTE: Not all appliance bulbs will not...
Use and Care
Page 14
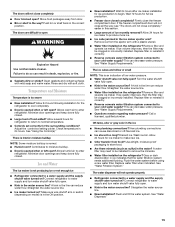
....ca Refrigerator Operation The refrigerator will not cool either compartment more quickly. Failure to coldest setting will not operate WARNING The motor seems to run too much Your new refrigerator may run longer than 40 watts. 4. If the problem continues, call . Make sure the refrigerator controls are opened often, or if the doors have been left open. See "Using the Control(s)." ■ New installation? NOTE: Adjusting the temperature controls to follow these instructions can result in refrigerator or reconnect power. fans/compressor adjusting...
....ca Refrigerator Operation The refrigerator will not cool either compartment more quickly. Failure to coldest setting will not operate WARNING The motor seems to run too much Your new refrigerator may run longer than 40 watts. 4. If the problem continues, call . Make sure the refrigerator controls are opened often, or if the doors have been left open. See "Using the Control(s)." ■ New installation? NOTE: Adjusting the temperature controls to follow these instructions can result in refrigerator or reconnect power. fans/compressor adjusting...
Use and Care
Page 15
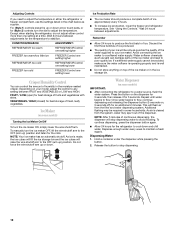
... water source line? Allows humid air to begin. Flush the water system before using a new water filter. Move food packages away from the ejector arm with a plastic utensil. ■ Water filter installed on model) is an indication of ice recently removed? Remove ice from door. ■ Bin or shelf in death, explosion, or fire. ■ Gaskets dirty or sticky? This can reduce water flow. Remove filter and operate ice maker. Connect refrigerator to enter refrigerator. Allows warm air to water supply and turn water shutoff valve fully open ? Use...
... water source line? Allows humid air to begin. Flush the water system before using a new water filter. Move food packages away from the ejector arm with a plastic utensil. ■ Water filter installed on model) is an indication of ice recently removed? Remove ice from door. ■ Bin or shelf in death, explosion, or fire. ■ Gaskets dirty or sticky? This can reduce water flow. Remove filter and operate ice maker. Connect refrigerator to enter refrigerator. Allows warm air to water supply and turn water shutoff valve fully open ? Use...
Use and Care
Page 16
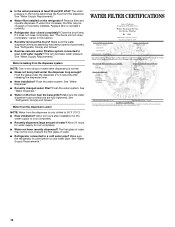
...; Recently removed the doors? See "Refrigerator Door(s) and Drawer." ■ Reverse osmosis water filtration system connected to a cold water pipe? ■ Is the water pressure at least 35 psi (241 kPa)? WATER FILTER CERTIFICATIONS 16 Remove filter and operate dispenser. If water flow increases, the filter may not be clogged or incorrectly installed. Make sure the water dispenser wire/tube assembly has been properly reconnected. Flush the water system. Discard the first glass of water may be cool. See "Water Supply Requirements...
...; Recently removed the doors? See "Refrigerator Door(s) and Drawer." ■ Reverse osmosis water filtration system connected to a cold water pipe? ■ Is the water pressure at least 35 psi (241 kPa)? WATER FILTER CERTIFICATIONS 16 Remove filter and operate dispenser. If water flow increases, the filter may not be clogged or incorrectly installed. Make sure the water dispenser wire/tube assembly has been properly reconnected. Flush the water system. Discard the first glass of water may be cool. See "Water Supply Requirements...

Use and Care
Page 17
... and telephone number. *Class I particle size: >0.5 to replace the filter. For models without notice. Systems certified for cyst reduction may be used , the yellow (Order) light comes on disinfected waters that may contain filterable cysts. ■ Refer to the "Water Filtration System" section for cold water use only. ■ Do not use with water that is essential that operational, maintenance, and filter replacement requirements be replaced at least every...
... and telephone number. *Class I particle size: >0.5 to replace the filter. For models without notice. Systems certified for cyst reduction may be used , the yellow (Order) light comes on disinfected waters that may contain filterable cysts. ■ Refer to the "Water Filtration System" section for cold water use only. ■ Do not use with water that is essential that operational, maintenance, and filter replacement requirements be replaced at least every...
Use and Care
Page 18
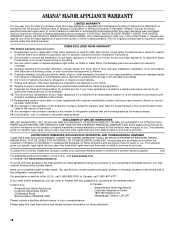
... an authorized Amana servicer is inconsistent to repair or replace appliance light bulbs, air filters or water filters. If you need assistance using your model number and serial number on the label, located on major appliances with original model/serial numbers that is not available. 10. Repairs to parts or systems resulting from accident, alteration, misuse, abuse, fire, flood, acts of God, improper installation, installation not in accordance with electrical or plumbing codes, or use or when...
... an authorized Amana servicer is inconsistent to repair or replace appliance light bulbs, air filters or water filters. If you need assistance using your model number and serial number on the label, located on major appliances with original model/serial numbers that is not available. 10. Repairs to parts or systems resulting from accident, alteration, misuse, abuse, fire, flood, acts of God, improper installation, installation not in accordance with electrical or plumbing codes, or use or when...

Warranty
Page 1
... Amana servicer is required to be easily determined. 12. If outside the 50 United States and Canada, contact your authorized Amana dealer to determine if another warranty applies. 6/08 For additional product information, in your correspondence. LIMITATION OF REMEDIES; Service calls to refrigerator or freezer product failures. 7. Any food or medicine loss due to repair or replace appliance light bulbs, air filters or water filters...
... Amana servicer is required to be easily determined. 12. If outside the 50 United States and Canada, contact your authorized Amana dealer to determine if another warranty applies. 6/08 For additional product information, in your correspondence. LIMITATION OF REMEDIES; Service calls to refrigerator or freezer product failures. 7. Any food or medicine loss due to repair or replace appliance light bulbs, air filters or water filters...
Dimension Guide
Page 1
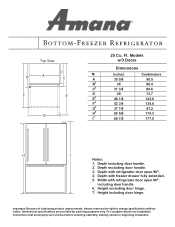
... door hinge. 7. Depth with refrigerator door open 90o. 4. Models w/3 Doors Dimensions Inches Centimeters A 35 5/8 B1 34 C2 31 3/4 90.5 86.4 80.6 D 29 E3 48 1/4 F4 52 3/4 G5 37 7/8 H6 68 5/8 I7 69 7/8 73.7 122.6 134.0 97.2 174.3 177.5 H I Notes: 1. Depth including door handle. 2. Top View D B A C F E G 25 Cu. Depth with freezer drawer fully extended. 5. Important: Because of continuing product improvements, Amana reserves the right to change specifications...
... door hinge. 7. Depth with refrigerator door open 90o. 4. Models w/3 Doors Dimensions Inches Centimeters A 35 5/8 B1 34 C2 31 3/4 90.5 86.4 80.6 D 29 E3 48 1/4 F4 52 3/4 G5 37 7/8 H6 68 5/8 I7 69 7/8 73.7 122.6 134.0 97.2 174.3 177.5 H I Notes: 1. Depth including door handle. 2. Top View D B A C F E G 25 Cu. Depth with freezer drawer fully extended. 5. Important: Because of continuing product improvements, Amana reserves the right to change specifications...
Specifications Sheet
Page 2
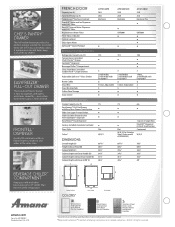
... Plastic Handles S Stainless Steel Doors with PUR® Filter Replacement Water Filter Filter Status Indicator Control Lockout Door Open Alarm SofSound™ Sound Package REFRIGERATOR STORAGE FEATURES Refrigerator Capacity (cu. FRONTFILL™ DISPENSER Quickly ll containers with up to organize, and opens and closes smoothly-even when loaded with ice, ltered water or both ice and water at the same time. amana.com Form No. A temperature control helps keep it all White and Black french door refrigerator models...
... Plastic Handles S Stainless Steel Doors with PUR® Filter Replacement Water Filter Filter Status Indicator Control Lockout Door Open Alarm SofSound™ Sound Package REFRIGERATOR STORAGE FEATURES Refrigerator Capacity (cu. FRONTFILL™ DISPENSER Quickly ll containers with up to organize, and opens and closes smoothly-even when loaded with ice, ltered water or both ice and water at the same time. amana.com Form No. A temperature control helps keep it all White and Black french door refrigerator models...


