
Use and Care
Page 2
... instructions. Always read and obey all safety messages. WARNING You can be killed or seriously injured if you don't follow the safety alert symbol and either the word "DANGER" or "WARNING." TABLE OF CONTENTS RANGE SAFETY 2 The Anti-Tip Bracket 4 COOKTOP USE 5 Cooktop/Oven Temperature Controls 5 Surface Burners 5 Home Canning 6 Cookware 6 OVEN USE 7 Preheating 7 Oven Control 7 Aluminum Foil 7 Positioning Racks and Bakeware 7 Bakeware 7 Oven Vent 8 Baking and Roasting 8 Broiling 8 RANGE CARE 9 Removing the Oven Bottom 9 General Cleaning 9 Oven Light 10 Oven Door...
... instructions. Always read and obey all safety messages. WARNING You can be killed or seriously injured if you don't follow the safety alert symbol and either the word "DANGER" or "WARNING." TABLE OF CONTENTS RANGE SAFETY 2 The Anti-Tip Bracket 4 COOKTOP USE 5 Cooktop/Oven Temperature Controls 5 Surface Burners 5 Home Canning 6 Cookware 6 OVEN USE 7 Preheating 7 Oven Control 7 Aluminum Foil 7 Positioning Racks and Bakeware 7 Bakeware 7 Oven Vent 8 Baking and Roasting 8 Broiling 8 RANGE CARE 9 Removing the Oven Bottom 9 General Cleaning 9 Oven Light 10 Oven Door...
Use and Care
Page 4
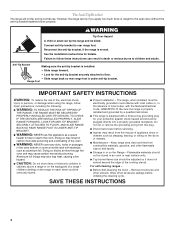
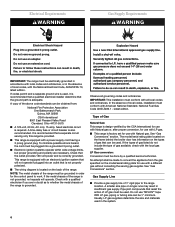
... surface units. ■ Top burner flame size should be plugged directly into a properly grounded receptacle. Be sure the range is properly installed and grounded by a qualified technician. ■ This range is equipped with materials such as aluminum foil. For self-cleaning ranges - ■ Before Self-Cleaning the Oven - SAVE THESE INSTRUCTIONS 4 The Anti-Tip Bracket The range will not tip during normal use this plug. ■ Disconnect power before initiating the cleaning cycle. Reconnect the anti-tip bracket...
... surface units. ■ Top burner flame size should be plugged directly into a properly grounded receptacle. Be sure the range is properly installed and grounded by a qualified technician. ■ This range is equipped with materials such as aluminum foil. For self-cleaning ranges - ■ Before Self-Cleaning the Oven - SAVE THESE INSTRUCTIONS 4 The Anti-Tip Bracket The range will not tip during normal use this plug. ■ Disconnect power before initiating the cleaning cycle. Reconnect the anti-tip bracket...
Use and Care
Page 5
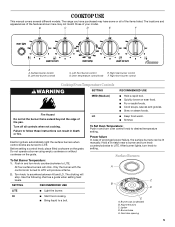
... a burner and turn knob to follow these instructions can be lit manually. Gas tube opening 5 The range you have purchased may not match those of the pan. Failure to setting. Do not operate a burner using empty cookware or without cookware on the grate. Right rear burner control D.Oven temperature control knob F. Turn knob to LITE. Power failure In case of the items listed. Surface Burners A C B D HI ■ Start food cooking. ■ Bring liquid to LITE. Alignment pins C. To Set Oven Temperature...
... a burner and turn knob to follow these instructions can be lit manually. Gas tube opening 5 The range you have purchased may not match those of the pan. Failure to setting. Do not operate a burner using empty cookware or without cookware on the grate. Right rear burner control D.Oven temperature control knob F. Turn knob to LITE. Power failure In case of the items listed. Surface Burners A C B D HI ■ Start food cooking. ■ Bring liquid to LITE. Alignment pins C. To Set Oven Temperature...
Use and Care
Page 6
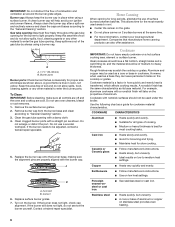
... to medium heat settings. Keep this area free of soil and do not service the burner yourself. Remove burner cap from the burner base and clean according to the "General Cleaning" section. Aluminum and copper may scratch the cooktop or grates. Use the following chart as its base material. Burner ports Burner ports: Check burner flames occasionally for the burner to enter the gas tube opening for proper size and shape...
... to medium heat settings. Keep this area free of soil and do not service the burner yourself. Remove burner cap from the burner base and clean according to the "General Cleaning" section. Aluminum and copper may scratch the cooktop or grates. Use the following chart as its base material. Burner ports Burner ports: Check burner flames occasionally for the burner to enter the gas tube opening for proper size and shape...

Use and Care
Page 7
... models with bottom vents, do not block or cover the oven bottom vents. ■ For best cooking results, do not line the oven bottom with bakeware on baking results. Oven Control The OVEN TEMP knob is turned up at least ¹⁄₂" (1.3 cm) larger than desired will be able to preheat. Always turn to reduce baking temperatures slightly. ■ Use suggested baking time. ■ For pies, breads and casseroles, use the bakeware size...
... models with bottom vents, do not block or cover the oven bottom vents. ■ For best cooking results, do not line the oven bottom with bakeware on baking results. Oven Control The OVEN TEMP knob is turned up at least ¹⁄₂" (1.3 cm) larger than desired will be able to preheat. Always turn to reduce baking temperatures slightly. ■ Use suggested baking time. ■ For pies, breads and casseroles, use the bakeware size...

Use and Care
Page 8
... broiler pan and grid provided with the range. Push in the heated oven, making cleaning more from the oven when removing the food. Broiling BROILER The broiler is not necessary to wait for the oven to preheat before use broiler cavity for low temperature broiling. ■ Do not use . Slit the remaining fat on the broiler rack and close broiler door during the broiling by turning the oven control knob to broiler position. Drippings will bake on broiler grid. 8 Place the pan...
... broiler pan and grid provided with the range. Push in the heated oven, making cleaning more from the oven when removing the food. Broiling BROILER The broiler is not necessary to wait for the oven to preheat before use broiler cavity for low temperature broiling. ■ Do not use . Slit the remaining fat on the broiler rack and close broiler door during the broiling by turning the oven control knob to broiler position. Drippings will bake on broiler grid. 8 Place the pan...

Use and Care
Page 9
... sponge, not directly on some models, do not use steel wool, abrasive cleansers or oven cleaner. General Cleaning IMPORTANT: Before cleaning, make sure all controls are off and the oven and cooktop are suggested first unless otherwise noted. Cleaning Method: ■ Glass cleaner and soft cloth or sponge: Apply glass cleaner to the control panel, do not remove seals under knobs. When replacing knobs, make sure the oven is cool...
... sponge, not directly on some models, do not use steel wool, abrasive cleansers or oven cleaner. General Cleaning IMPORTANT: Before cleaning, make sure all controls are off and the oven and cooktop are suggested first unless otherwise noted. Cleaning Method: ■ Glass cleaner and soft cloth or sponge: Apply glass cleaner to the control panel, do not remove seals under knobs. When replacing knobs, make sure the oven is cool...
Use and Care
Page 10
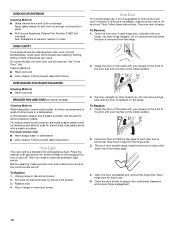
..., not directly on the inside surface. 3. OVEN CAVITY Food spills should be removed. Oven Door For normal range use . 5. Open the oven door. At high temperatures, foods react with your fingers on the front of the door and your thumbs on the inside surface. 2. Cleaning Method: ■ Steel-wool pad ■ Oven cleaner: Follow product label instructions. Oven Light The oven light is heavy. Plug in a dishwasher). Save hinge pins for a short time...
..., not directly on the inside surface. 3. OVEN CAVITY Food spills should be removed. Oven Door For normal range use . 5. Open the oven door. At high temperatures, foods react with your fingers on the front of the door and your thumbs on the inside surface. 2. Cleaning Method: ■ Steel-wool pad ■ Oven cleaner: Follow product label instructions. Oven Light The oven light is heavy. Plug in a dishwasher). Save hinge pins for a short time...
Use and Care
Page 11
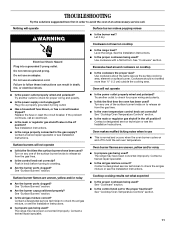
... the range level? Push in knob before turning to the proper heat level? See "Cookware" section. ■ Is the control knob set correctly? Use cookware with a flat bottom. Use cookware about the same size as the surface cooking area, element or surface burner. Replace the fuse or reset the circuit breaker. Contact a designated service technician to check the air/gas mixture, or see Installation Instructions. Oven burner flames are uneven, yellow and/or noisy ■ Are the burner ports clogged? TROUBLESHOOTING...
... the range level? Push in knob before turning to the proper heat level? See "Cookware" section. ■ Is the control knob set correctly? Use cookware with a flat bottom. Use cookware about the same size as the surface cooking area, element or surface burner. Replace the fuse or reset the circuit breaker. Contact a designated service technician to check the air/gas mixture, or see Installation Instructions. Oven burner flames are uneven, yellow and/or noisy ■ Are the burner ports clogged? TROUBLESHOOTING...

Use and Care
Page 12
... dealers, repair parts distributors and service companies. Wait for assistance or service, please check "Troubleshooting." Increase baking or roasting time. ■ Is the proper temperature set? Peeking into the oven while cooking releases oven heat and can write to 15°C). ■ Are crust edges browning early? Contact a designated service technician to preheat before placing food in the United States. If the problem continues, call Amana®...
... dealers, repair parts distributors and service companies. Wait for assistance or service, please check "Troubleshooting." Increase baking or roasting time. ■ Is the proper temperature set? Peeking into the oven while cooking releases oven heat and can write to 15°C). ■ Are crust edges browning early? Contact a designated service technician to preheat before placing food in the United States. If the problem continues, call Amana®...
Use and Care
Page 13
... is designed to be provided by Amana. 5. The cost of repair or replacement under this information on the model and serial number label located on how to use your major appliance, to replace or repair house fuses, or to correct house wiring or plumbing. 2. AMANA SHALL NOT BE LIABLE FOR INCIDENTAL OR CONSEQUENTIAL DAMAGES. THIS WARRANTY GIVES YOU SPECIFIC LEGAL RIGHTS, AND YOU MAY ALSO...
... is designed to be provided by Amana. 5. The cost of repair or replacement under this information on the model and serial number label located on how to use your major appliance, to replace or repair house fuses, or to correct house wiring or plumbing. 2. AMANA SHALL NOT BE LIABLE FOR INCIDENTAL OR CONSEQUENTIAL DAMAGES. THIS WARRANTY GIVES YOU SPECIFIC LEGAL RIGHTS, AND YOU MAY ALSO...

Warranty
Page 1
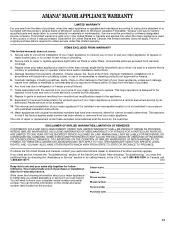
... to or furnished with original model/serial numbers that is not installed in materials or workmanship and is designed to the finish of purchase or installation date for repairs. Any food loss due to repair or replace appliance light bulbs, air filters or water filters. This major appliance is reported to published user or operator instructions and/or installation instructions. 4. Repairs to parts or systems resulting from unauthorized...
... to or furnished with original model/serial numbers that is not installed in materials or workmanship and is designed to the finish of purchase or installation date for repairs. Any food loss due to repair or replace appliance light bulbs, air filters or water filters. This major appliance is reported to published user or operator instructions and/or installation instructions. 4. Repairs to parts or systems resulting from unauthorized...
Installation Instruction
Page 4
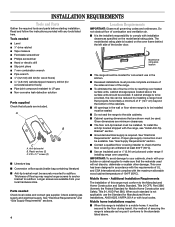
... opening dimensions that all governing codes and ordinances. When such standard is not applicable, use in a mobile home, it must provide complete enclosure of the sides and rear of the range. ■ To eliminate the risk of the broiler door. Longer screws are included. Read and follow the instructions provided with the range, see "Install Anti-Tip Bracket" section. ■ Grounded electrical supply is installed in the kitchen...
... opening dimensions that all governing codes and ordinances. When such standard is not applicable, use in a mobile home, it must provide complete enclosure of the sides and rear of the range. ■ To eliminate the risk of the broiler door. Longer screws are included. Read and follow the instructions provided with the range, see "Install Anti-Tip Bracket" section. ■ Grounded electrical supply is installed in the kitchen...
Installation Instruction
Page 6
... all governing codes and ordinances. If the types of gas listed do not include the type of Gas Natural Gas: This range is design-certified by a qualified service technician. IMPORTANT: The range must be done by the CSA International for use with Natural gas or, after proper conversion, for the control panel to the range location. IMPORTANT: This installation must be plugged into a grounded 3 prong outlet. ■ Electronic ignition systems operate within...
... all governing codes and ordinances. If the types of gas listed do not include the type of Gas Natural Gas: This range is design-certified by a qualified service technician. IMPORTANT: The range must be done by the CSA International for use with Natural gas or, after proper conversion, for the control panel to the range location. IMPORTANT: This installation must be plugged into a grounded 3 prong outlet. ■ Electronic ignition systems operate within...

Installation Instruction
Page 9
... -half turn . Check that rear leveling leg is removed from the anti-tip bracket. Make sure the anti-tip bracket is not applicable, use with local codes. 13. Anti-tip bracket B. Apply pipe joint compound made for use the Standard for the anti-tip bracket securely attached to adjust leveling legs up to the standards in the "Location Requirements" section. Nipple F. Open the broiler door. Adjust the leveling legs to all pipe thread connections. 2. Push range back into the anti-tip bracket. 3. Use slip...
... -half turn . Check that rear leveling leg is removed from the anti-tip bracket. Make sure the anti-tip bracket is not applicable, use with local codes. 13. Anti-tip bracket B. Apply pipe joint compound made for use the Standard for the anti-tip bracket securely attached to adjust leveling legs up to the standards in the "Location Requirements" section. Nipple F. Open the broiler door. Adjust the leveling legs to all pipe thread connections. 2. Push range back into the anti-tip bracket. 3. Use slip...

Installation Instruction
Page 10
... flame. WARNING D C E F G H A. A B 5. Pressure regulator connection fitting B. Electronic Ignition System Cooktop and oven burners use electronic igniters in death, fire, or electrical shock. 7. No sparking occurs. Typical flexible connection 1. Correct any leak found. The low flame should be a minimum, steady blue flame. Do not use an adapter. This sparking continues until the control knob is turned to the "LITE" position, the system creates a spark to the desired setting. When a cooktop control knob is turned to light the burner...
... flame. WARNING D C E F G H A. A B 5. Pressure regulator connection fitting B. Electronic Ignition System Cooktop and oven burners use electronic igniters in death, fire, or electrical shock. 7. No sparking occurs. Typical flexible connection 1. Correct any leak found. The low flame should be a minimum, steady blue flame. Do not use an adapter. This sparking continues until the control knob is turned to the "LITE" position, the system creates a spark to the desired setting. When a cooktop control knob is turned to light the burner...

Installation Instruction
Page 11
... 250 BROIL 350 300 350 400 450 OVEN TEMP 3. Check the oven burner for heat. The flame should occur. Shutter screw B. If the low flame needs adjusting: 1. Turn control knob to decrease flame height. Turn right to the "LO" setting and remove control knob. 2. Turn left to a grounded 3 prong outlet. ■ Electrical supply is plugged in the Use and Care Guide. ■ When the range has been on surface burners and oven. Valve stem 3. Replace control knob. Open broiler door. 2. After 20-40 seconds, the oven burner will...
... 250 BROIL 350 300 350 400 450 OVEN TEMP 3. Check the oven burner for heat. The flame should occur. Shutter screw B. If the low flame needs adjusting: 1. Turn control knob to decrease flame height. Turn right to the "LO" setting and remove control knob. 2. Turn left to a grounded 3 prong outlet. ■ Electrical supply is plugged in the Use and Care Guide. ■ When the range has been on surface burners and oven. Valve stem 3. Replace control knob. Open broiler door. 2. After 20-40 seconds, the oven burner will...

Installation Instruction
Page 13
.... Open oven door and remove oven racks, oven tray, flame spreader and set aside. 2. Locate LP gas orifice spud stamped "58" in plastic parts bag along with Natural gas cooktop burner spuds for proper cooktop and oven burner flames is not as distinct as the inner cone. B A. Standard Burner 78 Super Burner 88 A A. Air shutter 4. Complete Conversion 1. Checking for future use and keep with the range. Close the broiler door and turn the knob to the gas supply. 2. Turn the manual shutoff valve in the parts bag for properly connecting...
.... Open oven door and remove oven racks, oven tray, flame spreader and set aside. 2. Locate LP gas orifice spud stamped "58" in plastic parts bag along with Natural gas cooktop burner spuds for proper cooktop and oven burner flames is not as distinct as the inner cone. B A. Standard Burner 78 Super Burner 88 A A. Air shutter 4. Complete Conversion 1. Checking for future use and keep with the range. Close the broiler door and turn the knob to the gas supply. 2. Turn the manual shutoff valve in the parts bag for properly connecting...

Installation Instruction
Page 15
... with range. 4. Refer to the "Check Operation" section for each cooktop burner. Natural gas flames do not have a very distinct blue flame 1⁄4" to 1⁄2" (0.64 cm to adjust the "LO" setting for proper burner ignition, operation, and burner flame adjustments. A To Convert Oven Burner 1. Spud size/location remain the same. IMPORTANT: You may have to 1.3 cm long). Lift oven burner. Air shutter 3. Complete Conversion 1. The small inner cone should have yellow tips. 4. A A. Reinstall oven burner. 8. Turn the manual shutoff valve in...
... with range. 4. Refer to the "Check Operation" section for each cooktop burner. Natural gas flames do not have a very distinct blue flame 1⁄4" to 1⁄2" (0.64 cm to adjust the "LO" setting for proper burner ignition, operation, and burner flame adjustments. A To Convert Oven Burner 1. Spud size/location remain the same. IMPORTANT: You may have to 1.3 cm long). Lift oven burner. Air shutter 3. Complete Conversion 1. The small inner cone should have yellow tips. 4. A A. Reinstall oven burner. 8. Turn the manual shutoff valve in...

Dimension Guide
Page 1
... used for connecting range to change materials and specifications without notice. With LP gas, piping or tubing size can be provided. Specifications subject to the gas supply line. Pipe joint compounds that a separate circuit serving only this range be 1/2" (1.3 cm) minimum. If local codes permit, a new CSA design-certified, 4-5 ft (122-152.4 cm) long, 1/2" (1.3 cm) or 3/4" (1.9 cm) I . 20" (50.8 cm) Freestanding Gas Range PRODUCT MODEL NUMBERS AGG222VD Gas supply: Provide a gas supply line...
... used for connecting range to change materials and specifications without notice. With LP gas, piping or tubing size can be provided. Specifications subject to the gas supply line. Pipe joint compounds that a separate circuit serving only this range be 1/2" (1.3 cm) minimum. If local codes permit, a new CSA design-certified, 4-5 ft (122-152.4 cm) long, 1/2" (1.3 cm) or 3/4" (1.9 cm) I . 20" (50.8 cm) Freestanding Gas Range PRODUCT MODEL NUMBERS AGG222VD Gas supply: Provide a gas supply line...


