
Use and Care
Page 2
... hazards that can happen if the instructions are very important. This is , tell you and others are not followed. 2 TABLE OF CONTENTS RANGE SAFETY 2 The Anti-Tip Bracket 4 COOKTOP USE 5 Cooktop/Oven Temperature Controls 5 Surface Burners 5 Home Canning 6 Cookware 6 OVEN USE... 7 Preheating 7 Oven Control 7 Aluminum Foil 7 Positioning Racks and Bakeware 7 Bakeware 7 Oven Vent 8 Baking and Roasting 8 Broiling 8 RANGE CARE 9 Removing the Oven Bottom 9 General Cleaning 9 Oven Light 10 Oven Door 10 TROUBLESHOOTING 11 ASSISTANCE OR SERVICE 12 WARRANTY 13 ÍNDICE...
... hazards that can happen if the instructions are very important. This is , tell you and others are not followed. 2 TABLE OF CONTENTS RANGE SAFETY 2 The Anti-Tip Bracket 4 COOKTOP USE 5 Cooktop/Oven Temperature Controls 5 Surface Burners 5 Home Canning 6 Cookware 6 OVEN USE... 7 Preheating 7 Oven Control 7 Aluminum Foil 7 Positioning Racks and Bakeware 7 Bakeware 7 Oven Vent 8 Baking and Roasting 8 Broiling 8 RANGE CARE 9 Removing the Oven Bottom 9 General Cleaning 9 Oven Light 10 Oven Door 10 TROUBLESHOOTING 11 ASSISTANCE OR SERVICE 12 WARRANTY 13 ÍNDICE...
Use and Care
Page 4
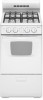
...bracket. See the installation instructions for your protection against shock hazard and should not be stored in cabinets above a range or on the range to rear range foot. The range, when installed, must be electrically grounded in accordance with local codes or, in carbon monoxide poisoning and overheating ..., gasoline, and other utensils. children climbing on the backguard of fire, electrical shock, injury to persons, or damage when using the range, follow these instructions can tip if you apply too much force or weight to children in an oven or near surface units. ■...
...bracket. See the installation instructions for your protection against shock hazard and should not be stored in cabinets above a range or on the range to rear range foot. The range, when installed, must be electrically grounded in accordance with local codes or, in carbon monoxide poisoning and overheating ..., gasoline, and other utensils. children climbing on the backguard of fire, electrical shock, injury to persons, or damage when using the range, follow these instructions can tip if you apply too much force or weight to children in an oven or near surface units. ■...
Use and Care
Page 5
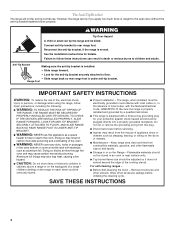
... and turn knob counterclockwise to setting. Gas tube opening 5 Left rear burner controll C. Igniter D. To Set Burner Temperature: 1. Turn knob to a boil. Alignment pins C. The range you have some or all controls when not cooking. The locations and appearances of the features shown here may have purchased may not match those...
... and turn knob counterclockwise to setting. Gas tube opening 5 Left rear burner controll C. Igniter D. To Set Burner Temperature: 1. Turn knob to a boil. Alignment pins C. The range you have some or all controls when not cooking. The locations and appearances of the features shown here may have purchased may not match those...

Use and Care
Page 8
Baking and Roasting IMPORTANT: To avoid damage to the interior finish, do not cover the grid with the range. Broiling BROILER The broiler is not necessary to wait for the oven to the desired temperature setting. 2. It is open. ■ Do not preheat broiler ...
Baking and Roasting IMPORTANT: To avoid damage to the interior finish, do not cover the grid with the range. Broiling BROILER The broiler is not necessary to wait for the oven to the desired temperature setting. 2. It is open. ■ Do not preheat broiler ...

Use and Care
Page 9
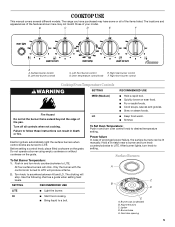
... tomato, should be cleaned as soon as cast iron cookware. To avoid chipping, do not remove seals under knobs. SURFACE BURNERS See "Surface Burners" section. 9 RANGE CARE Removing the Oven Bottom The oven bottom can be removed for standard cleaning of the inside surfaces until the oven has completely cooled down...
... tomato, should be cleaned as soon as cast iron cookware. To avoid chipping, do not remove seals under knobs. SURFACE BURNERS See "Surface Burners" section. 9 RANGE CARE Removing the Oven Bottom The oven bottom can be removed for standard cleaning of the inside surfaces until the oven has completely cooled down...
Use and Care
Page 10
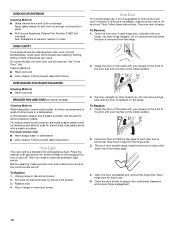
...proper hinge engagement. 10 Porcelain enamel only: ■ Warm soapy water or dishwasher ■ Oven cleaner: Follow product label instructions. Unplug range or disconnect power. 2. Insert bottom door hinge notch down onto front frame edge. 4. OVEN CAVITY Food spills should be cleaned when oven ...for a short time, then gently scrub with porcelain and staining, etching, pitting or faint white spots can be removed. Oven Door For normal range use . 5. Cleaning Method: ■ Steel-wool pad ■ Oven cleaner: Follow product label instructions. This oven does not have an ...
...proper hinge engagement. 10 Porcelain enamel only: ■ Warm soapy water or dishwasher ■ Oven cleaner: Follow product label instructions. Unplug range or disconnect power. 2. Insert bottom door hinge notch down onto front frame edge. 4. OVEN CAVITY Food spills should be cleaned when oven ...for a short time, then gently scrub with porcelain and staining, etching, pitting or faint white spots can be removed. Oven Door For normal range use . 5. Cleaning Method: ■ Steel-wool pad ■ Oven cleaner: Follow product label instructions. This oven does not have an ...
Use and Care
Page 11
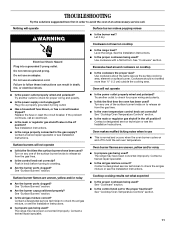
... Are the burner caps positioned properly? Contact a trained repair specialist. ■ Is the power outlet properly wired and polarized? The range may have been converted improperly. Cooktop cooking results not what expected ■ Is the proper cookware being used ? See the Installation Instructions.... ■ Is the proper cookware being used ? See Installation Instructions. ■ Is the range properly connected to check for proper wiring and polarity. ■ Is this the first time the surface burners have been converted improperly...
... Are the burner caps positioned properly? Contact a trained repair specialist. ■ Is the power outlet properly wired and polarized? The range may have been converted improperly. Cooktop cooking results not what expected ■ Is the proper cookware being used ? See the Installation Instructions.... ■ Is the proper cookware being used ? See Installation Instructions. ■ Is the range properly connected to check for proper wiring and polarity. ■ Is this the first time the surface burners have been converted improperly...

Use and Care
Page 12
... and repair parts sales. ■ Specialized customer assistance (Spanish speaking, hearing impaired, limited vision, etc.). ■ Referrals to build every new Amana® appliance. Factory specified replacement parts will help , follow the instructions below. See "Positioning Racks and Bakeware" section. ■ Is the ... to local dealers, repair parts distributors and service companies. Check that you can result in the pan. ■ Is the range level? Slow baking or roasting ■ Was the oven preheated? Peeking into the oven while cooking releases oven heat and can...
... and repair parts sales. ■ Specialized customer assistance (Spanish speaking, hearing impaired, limited vision, etc.). ■ Referrals to build every new Amana® appliance. Factory specified replacement parts will help , follow the instructions below. See "Positioning Racks and Bakeware" section. ■ Is the ... to local dealers, repair parts distributors and service companies. Check that you can result in the pan. ■ Is the range level? Slow baking or roasting ■ Was the oven preheated? Peeking into the oven while cooking releases oven heat and can...
Installation Instruction
Page 4
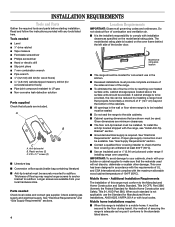
...Given dimensions are shown must conform to make sure that all governing codes and ordinances. To install the anti-tip bracket shipped with the range, see "Install Anti-Tip Bracket" section. ■ Grounded electrical supply is not applicable, use in the kitchen. ■ Recessed ... drill bit (for Manufactured Home Installations, ANSI A225.1/NFPA 501A or with local codes. Model/serial rating plate location ■ The range should be securely mounted to subfloor. Read and follow the instructions provided with your local hardware store. If cabinet storage is adequate as...
...Given dimensions are shown must conform to make sure that all governing codes and ordinances. To install the anti-tip bracket shipped with the range, see "Install Anti-Tip Bracket" section. ■ Grounded electrical supply is not applicable, use in the kitchen. ■ Recessed ... drill bit (for Manufactured Home Installations, ANSI A225.1/NFPA 501A or with local codes. Model/serial rating plate location ■ The range should be securely mounted to subfloor. Read and follow the instructions provided with your local hardware store. If cabinet storage is adequate as...
Installation Instruction
Page 5
... 1⁄2" (13 mm) minimum. (106.6 cm) 18" (45.7 cm) min. upper cabinet depth 20" (50.8 cm) min. IMPORTANT: If installing a range hood or microwave hood combination above the range, follow the range hood or microwave hood combination installation instructions for 25" (64 cm) countertop depth, 24" (61 cm) base cabinet depth and 36...
... 1⁄2" (13 mm) minimum. (106.6 cm) 18" (45.7 cm) min. upper cabinet depth 20" (50.8 cm) min. IMPORTANT: If installing a range hood or microwave hood combination above the range, follow the range hood or microwave hood combination installation instructions for 25" (64 cm) countertop depth, 24" (61 cm) base cabinet depth and 36...
Installation Instruction
Page 6
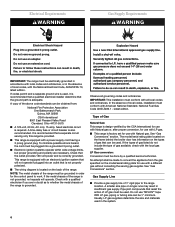
...of gas available, check with all governing codes and ordinances. With LP gas, piping or tubing size can be provided. ■ This range is equipped with an electronic ignition system that will operate. Usually, LP gas suppliers determine the size and materials used , it is recommended... that a qualified electrical installer determine that the outlet provides 120-volt power and is also recommended. This range is grounded. See "Gas Conversions" section. LP Gas conversion: Conversion must be used . Do not use TEFLON®† tape. If ...
...of gas available, check with all governing codes and ordinances. With LP gas, piping or tubing size can be provided. ■ This range is equipped with an electronic ignition system that will operate. Usually, LP gas suppliers determine the size and materials used , it is recommended... that a qualified electrical installer determine that the outlet provides 120-volt power and is also recommended. This range is grounded. See "Gas Conversions" section. LP Gas conversion: Conversion must be used . Do not use TEFLON®† tape. If ...

Installation Instruction
Page 7
...The rigid pipe connection requires a combination of pipe fittings to obtain an in "open" position B. The rigid pipe must be level with this range must be equipped with a manual shutoff valve. Do not block access to 2,000 ft (609.6 m). The valve is for connection to the... codes permit, a new CSA design-certified, 4-5 ft (122-152.4 cm) long, 1⁄2" (1.3 cm) or 3⁄4" (1.9 cm) I . A C B A. The inlet pressure to the range. For elevations above 2,000 ft (609.6 m), ratings are not sure about the inlet pressure. All strains must be isolated from the gas supply piping system...
...The rigid pipe connection requires a combination of pipe fittings to obtain an in "open" position B. The rigid pipe must be level with this range must be equipped with a manual shutoff valve. Do not block access to 2,000 ft (609.6 m). The valve is for connection to the... codes permit, a new CSA design-certified, 4-5 ft (122-152.4 cm) long, 1⁄2" (1.3 cm) or 3⁄4" (1.9 cm) I . A C B A. The inlet pressure to the range. For elevations above 2,000 ft (609.6 m), ratings are not sure about the inlet pressure. All strains must be isolated from the gas supply piping system...
Installation Instruction
Page 8
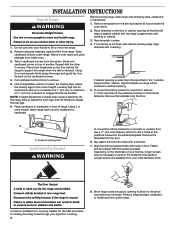
.... Place them lengthwise on the floor in cabinet opening so that specified in the "Location Requirements" section, adjust template so range will be made when range is not flush with overhang. NOTE: If height adjustment is made . Remove the template from the floor. Cardboard shipping base...To mount the anti-tip bracket to engage the anti-tip bracket. Depending on the bracket template. Using 2 or more people, firmly grasp the range and gently lay it is needed to wood floor, drill two 1⁄8" (0.32 cm) holes at the positions marked on top of your ...
.... Place them lengthwise on the floor in cabinet opening so that specified in the "Location Requirements" section, adjust template so range will be made when range is not flush with overhang. NOTE: If height adjustment is made . Remove the template from the floor. Cardboard shipping base...To mount the anti-tip bracket to engage the anti-tip bracket. Depending on the bracket template. Using 2 or more people, firmly grasp the range and gently lay it is needed to wood floor, drill two 1⁄8" (0.32 cm) holes at the positions marked on top of your ...

Installation Instruction
Page 9
... Standard for Manufactured Home Installations, ANSI A225.1/NFPA 501A or with LP gas to the floor. ■ Slide the range back so the rear range foot is installed: ■ Look for use the Standard for Mobile Home Construction and Safety, Title 24, HUD Part...F G A. Use a 3⁄8" drive ratchet to the existing gas line. Rear leveling leg B. Leveling legs can be different; Verify Anti-Tip Bracket Location 1. Range foot 3. Using a pipe wrench to tighten, connect the gas supply to 3⁄4" gas pipe 9 Open the broiler door. B A A. Front leveling leg 10. Push...
... Standard for Manufactured Home Installations, ANSI A225.1/NFPA 501A or with LP gas to the floor. ■ Slide the range back so the rear range foot is installed: ■ Look for use the Standard for Mobile Home Construction and Safety, Title 24, HUD Part...F G A. Use a 3⁄8" drive ratchet to the existing gas line. Rear leveling leg B. Leveling legs can be different; Verify Anti-Tip Bracket Location 1. Range foot 3. Using a pipe wrench to tighten, connect the gas supply to 3⁄4" gas pipe 9 Open the broiler door. B A A. Front leveling leg 10. Push...

Installation Instruction
Page 11
... when the control of dark blue, and should be clean and soft in 20-40 seconds, this verification with a soft cloth. 6. If range does not operate, check the following: ■ Household fuse is level. Repeat for the oven burner to "LO." C A. Turn the ... the gas supply line shutoff valve is still not properly adjusted, turn the oven control knob to flow. or circuit breaker has not tripped. ■ Range is plugged in to a grounded 3 prong outlet. ■ Electrical supply is connected. ■ See "Troubleshooting" in the "BROIL" position. Turn control knob to ...
... when the control of dark blue, and should be clean and soft in 20-40 seconds, this verification with a soft cloth. 6. If range does not operate, check the following: ■ Household fuse is level. Repeat for the oven burner to "LO." C A. Turn the ... the gas supply line shutoff valve is still not properly adjusted, turn the oven control knob to flow. or circuit breaker has not tripped. ■ Range is plugged in to a grounded 3 prong outlet. ■ Electrical supply is connected. ■ See "Troubleshooting" in the "BROIL" position. Turn control knob to ...

Installation Instruction
Page 12
... gas pressure regulator. Turn the cap over so that the manual shutoff valve is visible. A B C A. Burner cap B. Unplug or disconnect power. 3. Reinstall the cap. To range 12 B A. GAS CONVERSIONS 2. Open broiler door and remove broiler pan. NOTE: Gas conversions (from Natural gas to LP gas or from the gas pressure regulator...
... gas pressure regulator. Turn the cap over so that the manual shutoff valve is visible. A B C A. Burner cap B. Unplug or disconnect power. 3. Reinstall the cap. To range 12 B A. GAS CONVERSIONS 2. Open broiler door and remove broiler pan. NOTE: Gas conversions (from Natural gas to LP gas or from the gas pressure regulator...

Installation Instruction
Page 13
... the oven burner air shutter. 3. B A. Refer to the "Make Gas Connection" section for future use and keep with bag containing literature. 6. Holder NOTE: This range is not as distinct as the inner cone. Use a 3⁄8" combination wrench and remove the Natural gas orifice spud. 5. Reinstall oven racks, oven tray and... LP gas orifice spuds for top burners in plastic parts bag along with Natural gas cooktop burner spuds for properly connecting the range to 1.3 cm) long. Two LP gas spuds are stamped "88" and two "78." 3. Open oven door and remove oven racks, oven tray, flame spreader ...
... the oven burner air shutter. 3. B A. Refer to the "Make Gas Connection" section for future use and keep with bag containing literature. 6. Holder NOTE: This range is not as distinct as the inner cone. Use a 3⁄8" combination wrench and remove the Natural gas orifice spud. 5. Reinstall oven racks, oven tray and... LP gas orifice spuds for top burners in plastic parts bag along with Natural gas cooktop burner spuds for properly connecting the range to 1.3 cm) long. Two LP gas spuds are stamped "88" and two "78." 3. Open oven door and remove oven racks, oven tray, flame spreader ...

Installation Instruction
Page 14
... the gas pressure regulator using a flat- Turn the cap over so that the manual shutoff valve is in the bag containing literature included with the range. Unplug or disconnect power. 14 B A. The gas pressure regulator is visible. A 6. A To Convert Gas Pressure Regulator 1. NOTE: Do not ...remove the spring beneath the cap. 4. Shutoff valve in the back right hand corner of the broiler compartment. To range 2. Locate the Natural gas orifice spuds for the top burners in the closed " position B. Open broiler door and remove broiler pan. Remove burner...
... the gas pressure regulator using a flat- Turn the cap over so that the manual shutoff valve is in the bag containing literature included with the range. Unplug or disconnect power. 14 B A. The gas pressure regulator is visible. A 6. A To Convert Gas Pressure Regulator 1. NOTE: Do not ...remove the spring beneath the cap. 4. Shutoff valve in the back right hand corner of the broiler compartment. To range 2. Locate the Natural gas orifice spuds for the top burners in the closed " position B. Open broiler door and remove broiler pan. Remove burner...

Installation Instruction
Page 15
... cone. Turn the manual shutoff valve in literature package supplied with "51" IMPORTANT: Do not over tighten. 6. Checking for properly connecting the range to 1.3 cm long). Natural gas flames do not have a very distinct blue flame 1⁄4" to 1⁄2" (0.64 cm to the gas...LO" setting for proper burner ignition, operation, and burner flame adjustments. Install the number "51" Natural gas spud. Natural gas oven orifice spud stamped with range. 4. Complete Conversion 1. IMPORTANT: You may have to the open position. 3. B A. Close the broiler door and press the "OFF" pad. 5....
... cone. Turn the manual shutoff valve in literature package supplied with "51" IMPORTANT: Do not over tighten. 6. Checking for properly connecting the range to 1.3 cm long). Natural gas flames do not have a very distinct blue flame 1⁄4" to 1⁄2" (0.64 cm to the gas...LO" setting for proper burner ignition, operation, and burner flame adjustments. Install the number "51" Natural gas spud. Natural gas oven orifice spud stamped with range. 4. Complete Conversion 1. IMPORTANT: You may have to the open position. 3. B A. Close the broiler door and press the "OFF" pad. 5....

Dimension Guide
Page 1
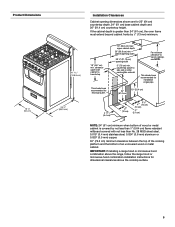
... A 120-volt, 60-Hz, AC-only, 15-amp, fused electrical circuit is also recommended. 20" (50.8 cm) Freestanding Gas Range PRODUCT MODEL NUMBERS AGG222VD Gas supply: Provide a gas supply line of the inlet to the appliance gas pressure regulator. clearance upper side cabinet...(14 cm) (10 cm) 2" (5.1 cm) NOTE: 24" (61 cm) minimum when bottom of an unprotected wood or metal cabinet. Specifications subject to the range location. A 1/2" (1.3 cm) male pipe thread is protected by not less than 1/4" (0.64 cm) flame retardant millboard covered with product. For complete details, see ...
... A 120-volt, 60-Hz, AC-only, 15-amp, fused electrical circuit is also recommended. 20" (50.8 cm) Freestanding Gas Range PRODUCT MODEL NUMBERS AGG222VD Gas supply: Provide a gas supply line of the inlet to the appliance gas pressure regulator. clearance upper side cabinet...(14 cm) (10 cm) 2" (5.1 cm) NOTE: 24" (61 cm) minimum when bottom of an unprotected wood or metal cabinet. Specifications subject to the range location. A 1/2" (1.3 cm) male pipe thread is protected by not less than 1/4" (0.64 cm) flame retardant millboard covered with product. For complete details, see ...
