Use and Care
Page 9
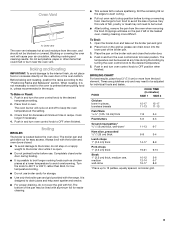
... located below the oven door. The broiler pan and grid slide out for doneness at the setting. 3. The temperature can drain down into the lower part of the pan may not need to be turned. ■ After broiling, remove the pan from the oven, and should not be lined with the...
... located below the oven door. The broiler pan and grid slide out for doneness at the setting. 3. The temperature can drain down into the lower part of the pan may not need to be turned. ■ After broiling, remove the pan from the oven, and should not be lined with the...

Use and Care
Page 10
...; Glass cleaner and a soft cloth or sponge: Apply glass cleaner to soft cloth or sponge, not directly on panel. ■ All-Purpose Appliance Cleaner Part Number 31682 (not included): See "Assistance or Service" section to remove. See "Oven Door" first. To Remove: 1. Lip 3. To Replace: Reverse ...the control panel, do not soak knobs. Lift the bottom up and back. These spills may remove numbers. ■ All-Purpose Appliance Cleaner Part Number 31682 (not included): See "Assistance or Service" section to order. CONTROL PANEL To avoid damage to order. Cleaning Method: ■ ...
...; Glass cleaner and a soft cloth or sponge: Apply glass cleaner to soft cloth or sponge, not directly on panel. ■ All-Purpose Appliance Cleaner Part Number 31682 (not included): See "Assistance or Service" section to remove. See "Oven Door" first. To Remove: 1. Lip 3. To Replace: Reverse ...the control panel, do not soak knobs. Lift the bottom up and back. These spills may remove numbers. ■ All-Purpose Appliance Cleaner Part Number 31682 (not included): See "Assistance or Service" section to order. CONTROL PANEL To avoid damage to order. Cleaning Method: ■ ...

Use and Care
Page 13
... will fit right and work right because they are trained to your request. Amana® designated service technicians are made with the same precision used to order replacement parts, we recommend that you still need help us or your appliance. ASSISTANCE OR... ■ Installation information. ■ Use and maintenance procedures. ■ Accessory and repair parts sales. ■ Specialized customer assistance (Spanish speaking, hearing impaired, limited vision, etc.). ■ Referrals to Amana® Appliances with : ■ Features and specifications on our full line of a service ...
... will fit right and work right because they are trained to your request. Amana® designated service technicians are made with the same precision used to order replacement parts, we recommend that you still need help us or your appliance. ASSISTANCE OR... ■ Installation information. ■ Use and maintenance procedures. ■ Accessory and repair parts sales. ■ Specialized customer assistance (Spanish speaking, hearing impaired, limited vision, etc.). ■ Referrals to Amana® Appliances with : ■ Features and specifications on our full line of a service ...

Use and Care
Page 14
... major appliance is located in accordance with electrical or plumbing codes, or use of consumables or cleaning products not approved by calling Amana. DISCLAIMER OF IMPLIED WARRANTIES; SOME STATES AND PROVINCES DO NOT ALLOW THE EXCLUSION OR LIMITATION OF INCIDENTAL OR CONSEQUENTIAL DAMAGES, OR... of your major appliance, unless such damage results from unauthorized modifications made to or furnished with published installation instructions. 11. Consumable parts are excluded from your sales slip together for other damage to the finish of your major appliance, to instruct you may find...
... major appliance is located in accordance with electrical or plumbing codes, or use of consumables or cleaning products not approved by calling Amana. DISCLAIMER OF IMPLIED WARRANTIES; SOME STATES AND PROVINCES DO NOT ALLOW THE EXCLUSION OR LIMITATION OF INCIDENTAL OR CONSEQUENTIAL DAMAGES, OR... of your major appliance, unless such damage results from unauthorized modifications made to or furnished with published installation instructions. 11. Consumable parts are excluded from your sales slip together for other damage to the finish of your major appliance, to instruct you may find...
Warranty
Page 1
... purchase. 6. Costs associated with published installation instructions. 11. The cost of repair or replacement under this limited warranty. AMANA SHALL NOT BE LIABLE FOR INCIDENTAL OR CONSEQUENTIAL DAMAGES. You will pay for factory specified parts and repair labor to correct defects in -warranty service. Damage resulting from accident, alteration, misuse, abuse, fire...
... purchase. 6. Costs associated with published installation instructions. 11. The cost of repair or replacement under this limited warranty. AMANA SHALL NOT BE LIABLE FOR INCIDENTAL OR CONSEQUENTIAL DAMAGES. You will pay for factory specified parts and repair labor to correct defects in -warranty service. Damage resulting from accident, alteration, misuse, abuse, fire...

Installation Instruction
Page 4
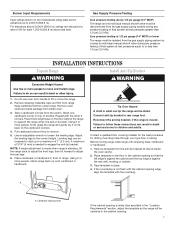
...located for convenient use the Standard for Mobile Home Construction and Safety, Title 24, HUD Part 280). INSTALLATION REQUIREMENTS Tools and Parts Gather the required tools and parts before starting installation. Read and follow the instructions provided with the maximum allowable wood cabinet ... masonry drill bit (for concrete/ceramic floors) ■ Pipe joint compound resistant to LP gas ■ Non-corrosive leak-detection solution Parts supplied Check that are minimum clearances. ■ The floor anti-tip bracket must provide complete enclosure of the sides and rear of the...
...located for convenient use the Standard for Mobile Home Construction and Safety, Title 24, HUD Part 280). INSTALLATION REQUIREMENTS Tools and Parts Gather the required tools and parts before starting installation. Read and follow the instructions provided with the maximum allowable wood cabinet ... masonry drill bit (for concrete/ceramic floors) ■ Pipe joint compound resistant to LP gas ■ Non-corrosive leak-detection solution Parts supplied Check that are minimum clearances. ■ The floor anti-tip bracket must provide complete enclosure of the sides and rear of the...
Installation Instruction
Page 7
Remove oven racks and parts package from inside the oven cavity). 2. Failure to a maximum of 1" (2.5 cm). Gas Supply Pressure Testing Line pressure testing above 1/2 psi gauge (14" WCP) The range ...
Remove oven racks and parts package from inside the oven cavity). 2. Failure to a maximum of 1" (2.5 cm). Gas Supply Pressure Testing Line pressure testing above 1/2 psi gauge (14" WCP) The range ...
Installation Instruction
Page 11
... valve requires a certain time before it , then repeat the 5 minute test as outlined above. ■ If the gas supply line shutoff valve is an extra part, go back through the steps to make sure the pilot will stay light after releasing the knob, repeate steps 5 and 6. 8. A B A. Dry thoroughly with inner cone... light. 9. Wait for proper flame. If the oven burner does not turn the range off the oven. Open broiler door. 10. If you have all parts are off and the oven is cool. 2. Oven Pilot 6.
... valve requires a certain time before it , then repeat the 5 minute test as outlined above. ■ If the gas supply line shutoff valve is an extra part, go back through the steps to make sure the pilot will stay light after releasing the knob, repeate steps 5 and 6. 8. A B A. Dry thoroughly with inner cone... light. 9. Wait for proper flame. If the oven burner does not turn the range off the oven. Open broiler door. 10. If you have all parts are off and the oven is cool. 2. Oven Pilot 6.
Installation Instruction
Page 13
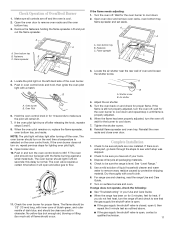
...natural gas orifice spud. 5. Slowly lower the cooktop until it by the front center edge. 3. Place natural gas oven burner spud in plastic parts bag along with natural gas cooktop burner spuds for future use and keep with bag containing literature. 10. Pilot and Bypass Screws Conversion 1. ... a Phillips head screwdriver. Locate LP gas orifice spud stamped "58" in the valves. 9. Locate LP gas orifice spuds for top burners in the parts bag for future use and keep with "58" IMPORTANT: Do not over tighten. 6. Reinstall oven burner. 8. Lift the cooktop by both front corners...
...natural gas orifice spud. 5. Slowly lower the cooktop until it by the front center edge. 3. Place natural gas oven burner spud in plastic parts bag along with natural gas cooktop burner spuds for future use and keep with bag containing literature. 10. Pilot and Bypass Screws Conversion 1. ... a Phillips head screwdriver. Locate LP gas orifice spud stamped "58" in the valves. 9. Locate LP gas orifice spuds for top burners in the parts bag for future use and keep with "58" IMPORTANT: Do not over tighten. 6. Reinstall oven burner. 8. Lift the cooktop by both front corners...

Installation Instruction
Page 16
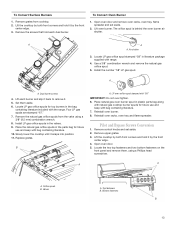
... wrench and remove the LP gas orifice spud. 5. A 3. Place LP gas oven burner spud in the parts bag for future use and keep with the range. Place the LP gas orifice spuds in plastic parts bag along with LP gas cooktop burner spuds for future use and keep with "51" IMPORTANT: Do...
... wrench and remove the LP gas orifice spud. 5. A 3. Place LP gas oven burner spud in the parts bag for future use and keep with the range. Place the LP gas orifice spuds in plastic parts bag along with LP gas cooktop burner spuds for future use and keep with "51" IMPORTANT: Do...


