
dimension
Page 1
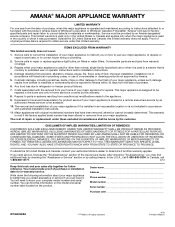
... Gas Connection" section. Do not use with Natural gas. Specifications subject to the range opening and closing. The model/serial rating plate located on the left side of the bottom of the broiler has information on the model/serial rating plate for connection to the female pipe threads of 2 Ref. A time-delay fuse or circuit breaker is required. 30"(76.2 cm) Freestanding Gas Ranges PRODUCT MODEL NUMBERS PRODUCT DIMENSIONS AGR5330BA ELECTRICAL REQUIREMENTS A 120-volt, 60 Hz., AC-only, 15-amp fused, electrical...
... Gas Connection" section. Do not use with Natural gas. Specifications subject to the range opening and closing. The model/serial rating plate located on the left side of the bottom of the broiler has information on the model/serial rating plate for connection to the female pipe threads of 2 Ref. A time-delay fuse or circuit breaker is required. 30"(76.2 cm) Freestanding Gas Ranges PRODUCT MODEL NUMBERS PRODUCT DIMENSIONS AGR5330BA ELECTRICAL REQUIREMENTS A 120-volt, 60 Hz., AC-only, 15-amp fused, electrical...

owners
Page 2
TABLE OF CONTENTS RANGE SAFETY 3 The Anti-Tip Bracket 4 COOKTOP USE 5 Cooktop Controls 5 Surface Burners 5 Home Canning 6 Cookware 6 ELECTRONIC OVEN CONTROL 7 Display 7 Oven Indicator Lights 7 Start 7 Off/Cancel 7 Clock 7 Tones 7 Fahrenheit and Celsius 7 Timer 8 Control Lock 8 Oven Temperature Control 8 OVEN USE 8 Aluminum Foil 8 Positioning Racks and Bakeware 9 Bakeware 9 Oven Vent 9 Baking and Roasting 10 Broiling 10 RANGE CARE 11 General Cleaning 11 Oven Light 11 Oven Door 12 Removing the Oven Bottom 12 TROUBLESHOOTING 13 ASSISTANCE OR SERVICE 15 In the ...
TABLE OF CONTENTS RANGE SAFETY 3 The Anti-Tip Bracket 4 COOKTOP USE 5 Cooktop Controls 5 Surface Burners 5 Home Canning 6 Cookware 6 ELECTRONIC OVEN CONTROL 7 Display 7 Oven Indicator Lights 7 Start 7 Off/Cancel 7 Clock 7 Tones 7 Fahrenheit and Celsius 7 Timer 8 Control Lock 8 Oven Temperature Control 8 OVEN USE 8 Aluminum Foil 8 Positioning Racks and Bakeware 9 Bakeware 9 Oven Vent 9 Baking and Roasting 10 Broiling 10 RANGE CARE 11 General Cleaning 11 Oven Light 11 Oven Door 12 Removing the Oven Bottom 12 TROUBLESHOOTING 13 ASSISTANCE OR SERVICE 15 In the ...

owners
Page 4
... INSTALLED ANTI-TIP DEVICES. Re-engage anti-tip bracket if range is under anti-tip bracket. • See installation instructions for your protection against shock hazard and should be killed. The range, when installed, must be electrically grounded in accordance with local codes or, in an oven or near surface units. ■ Top burner flame size should be seriously injured. ■ Proper Installation - The Anti-Tip Bracket The range will not tip during normal use this plug. ■ Disconnect power...
... INSTALLED ANTI-TIP DEVICES. Re-engage anti-tip bracket if range is under anti-tip bracket. • See installation instructions for your protection against shock hazard and should be killed. The range, when installed, must be electrically grounded in accordance with local codes or, in an oven or near surface units. ■ Top burner flame size should be seriously injured. ■ Proper Installation - The Anti-Tip Bracket The range will not tip during normal use this plug. ■ Disconnect power...
owners
Page 5
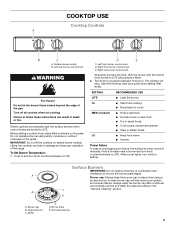
... flames. A Burner cap: Always keep the burner cap in death or fire. Alignment pins C. Electric igniters automatically light the surface burners when control knobs are turned to LITE will click. Lifting the cooktop can be lit manually. LO ■ Keep food warm. ■ Simmer Power failure In case of the range. Do not operate a burner using a surface burner. Right rear burner control knob All surface burners will produce a flame. 2. Use the following chart as a guide when setting heat levels. Burner base E. Push in and turn knob...
... flames. A Burner cap: Always keep the burner cap in death or fire. Alignment pins C. Electric igniters automatically light the surface burners when control knobs are turned to LITE will click. Lifting the cooktop can be lit manually. LO ■ Keep food warm. ■ Simmer Power failure In case of the range. Do not operate a burner using a surface burner. Right rear burner control knob All surface burners will produce a flame. 2. Use the following chart as a guide when setting heat levels. Burner base E. Push in and turn knob...
owners
Page 6
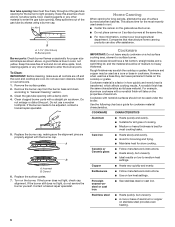
... proper size and shape as a guide for long periods, alternate the use oven cleaners, bleach or rust removers. 1. To Clean: IMPORTANT: Before cleaning, make sure all types of soil and do not allow spills, food, cleaning agents or any other material to enter the gas tube opening. Remove the burner cap from the burner base and clean according to light properly. A B A. Correct 6. Turn on a hot surface cooking area, element or surface burner...
... proper size and shape as a guide for long periods, alternate the use oven cleaners, bleach or rust removers. 1. To Clean: IMPORTANT: Before cleaning, make sure all types of soil and do not allow spills, food, cleaning agents or any other material to enter the gas tube opening. Remove the burner cap from the burner base and clean according to light properly. A B A. Correct 6. Turn on a hot surface cooking area, element or surface burner...

owners
Page 10
... cover for storage. ■ Broiling uses direct radiant heat to put food in the broiler drawer will light up . Ask for 5 seconds by varying factors such as yeast, baking powder, baking soda and eggs. Use tongs to turn food to be set broiling temperature can be affected by touching BROIL. 6. Very thin cuts of juices. To Broil: 1. Open the broiler door and pull the rack out to replace a rack. Place food on . Press START. The indicator light...
... cover for storage. ■ Broiling uses direct radiant heat to put food in the broiler drawer will light up . Ask for 5 seconds by varying factors such as yeast, baking powder, baking soda and eggs. Use tongs to turn food to be set broiling temperature can be affected by touching BROIL. 6. Very thin cuts of juices. To Broil: 1. Open the broiler door and pull the rack out to replace a rack. Place food on . Press START. The indicator light...

owners
Page 11
... label instructions. OVEN RACKS AND ROASTING RACKS Cleaning Method: ■ Steel-wool pad Oven Light The oven light is closed, press OVEN LIGHT to order. CONTROL PANEL To avoid damage to the control panel, do not apply a cool damp cloth to the inner door glass before going into a dishwasher. ■ Gas Grate and Drip Pan Cleaner Part Number 31617: See the "Assistance or Service" section to turn on burners while they are in range or reconnect power...
... label instructions. OVEN RACKS AND ROASTING RACKS Cleaning Method: ■ Steel-wool pad Oven Light The oven light is closed, press OVEN LIGHT to order. CONTROL PANEL To avoid damage to the control panel, do not apply a cool damp cloth to the inner door glass before going into a dishwasher. ■ Gas Grate and Drip Pan Cleaner Part Number 31617: See the "Assistance or Service" section to turn on burners while they are in range or reconnect power...
owners
Page 13
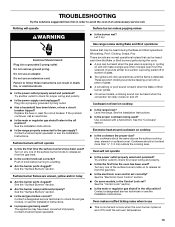
... remove ground prong. Do not use an extension cord. Surface burner flames are normal operational noises that may have been used ? Excessive heat around cookware on cooktop ■ Is the range level? Use cookware about the same size as the surface cooking area, element or surface burner. Turn any one of the surface burner knobs to hold the set correctly? Contact a designated service technician or see the Installation Instructions. Failure to release air from the gas lines. ■ Is the electronic oven control set ? Replace...
... remove ground prong. Do not use an extension cord. Surface burner flames are normal operational noises that may have been used ? Excessive heat around cookware on cooktop ■ Is the range level? Use cookware about the same size as the surface cooking area, element or surface burner. Turn any one of the surface burner knobs to hold the set correctly? Contact a designated service technician or see the Installation Instructions. Failure to release air from the gas lines. ■ Is the electronic oven control set ? Replace...

owners
Page 14
... the display. Oven temperature too high or too low ■ Does the oven temperature calibration need adjustment? See the Installation Instructions. ■ Does the oven temperature calibration need adjustment? See the "Oven Temperature Control" section. ■ Is the proper bakeware being used ? Increase baking or roasting time. ■ Is the proper temperature set to preheat before placing food in longer cooking times. Oven burner flames are uneven, yellow and/or noisy ■ Is propane gas being used ? The...
... the display. Oven temperature too high or too low ■ Does the oven temperature calibration need adjustment? See the Installation Instructions. ■ Does the oven temperature calibration need adjustment? See the "Oven Temperature Control" section. ■ Is the proper bakeware being used ? Increase baking or roasting time. ■ Is the proper temperature set to preheat before placing food in longer cooking times. Oven burner flames are uneven, yellow and/or noisy ■ Is propane gas being used ? The...
owners
Page 16
ITEMS EXCLUDED FROM WARRANTY This limited warranty does not cover: 1. Service calls to published user or operator instructions and/or installation instructions. 4. Repairs when your major appliance is used for other damage to the finish of your major appliance, unless such damage results from defects in accordance with electrical or plumbing codes, or use of consumables or cleaning products not approved by an Amana designated service company. Damage resulting...
ITEMS EXCLUDED FROM WARRANTY This limited warranty does not cover: 1. Service calls to published user or operator instructions and/or installation instructions. 4. Repairs when your major appliance is used for other damage to the finish of your major appliance, unless such damage results from defects in accordance with electrical or plumbing codes, or use of consumables or cleaning products not approved by an Amana designated service company. Damage resulting...
Installation Guide
Page 4
... "Gas Supply Requirements" section. ■■ Contact a qualified floor covering installer to the standards listed above the surface units should be available. Mobile home installations require: A A. The model/serial rating plate is not applicable, use in accordance with the requirements of burns or fire by installing a range hood that are minimum clearances. ■■ The anti-tip bracket must be installed. To install the anti-tip bracket shipped with the maximum allowable wood cabinet temperatures of...
... "Gas Supply Requirements" section. ■■ Contact a qualified floor covering installer to the standards listed above the surface units should be available. Mobile home installations require: A A. The model/serial rating plate is not applicable, use in accordance with the requirements of burns or fire by installing a range hood that are minimum clearances. ■■ The anti-tip bracket must be installed. To install the anti-tip bracket shipped with the maximum allowable wood cabinet temperatures of...

Installation Guide
Page 6
..., National Fuel Gas Code ANSI Z223.1 - A smaller size pipe on or shutting off valve. NOTE: Pipe-joint compounds that allows ease of gas available, check with Natural gas. It should be done by a qualified service technician. Gas supply line B. IMPORTANT: This installation must be in death, explosion, or fire. latest edition. Do not use with a manual shut-off gas to the regulator should be conducted according to the range location. Do...
..., National Fuel Gas Code ANSI Z223.1 - A smaller size pipe on or shutting off valve. NOTE: Pipe-joint compounds that allows ease of gas available, check with Natural gas. It should be done by a qualified service technician. Gas supply line B. IMPORTANT: This installation must be in death, explosion, or fire. latest edition. Do not use with a manual shut-off gas to the regulator should be conducted according to the range location. Do...
Installation Guide
Page 7
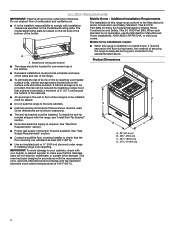
.../14" WCP). Gas Supply Pressure Testing Gas supply pressure for Canada). Line pressure testing above ½ psi gauge (14" WCP) The range and its individual manual shut-off valve must be at least 1" water column pressure above sea level (not applicable for testing regulator must be killed. Keep cardboard bottom and foam support under range. 3. Stack one cardboard corner on the model/serial rating plate. Leveling legs can tip the range and be...
.../14" WCP). Gas Supply Pressure Testing Gas supply pressure for Canada). Line pressure testing above ½ psi gauge (14" WCP) The range and its individual manual shut-off valve must be at least 1" water column pressure above sea level (not applicable for testing regulator must be killed. Keep cardboard bottom and foam support under range. 3. Stack one cardboard corner on the model/serial rating plate. Leveling legs can tip the range and be...

Installation Guide
Page 8
... screwdriver, mount anti-tip bracket to the wall or floor with LP gas to turn the gas pressure regulator. 3. Move range close enough to opening to allow the regulator to the smaller thread ends of the determined mounting method. Move range into its final location, making sure rear leveling leg slides into anti-tip bracket. 8. Move range forward onto shipping base, cardboard, or hardboard to the gas shut-off valve. A B D C A. Pressure regulator connection fitting B. Use pipe-joint...
... screwdriver, mount anti-tip bracket to the wall or floor with LP gas to turn the gas pressure regulator. 3. Move range close enough to opening to allow the regulator to the smaller thread ends of the determined mounting method. Move range into its final location, making sure rear leveling leg slides into anti-tip bracket. 8. Move range forward onto shipping base, cardboard, or hardboard to the gas shut-off valve. A B D C A. Pressure regulator connection fitting B. Use pipe-joint...
Installation Guide
Page 9
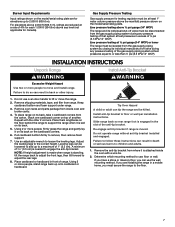
..., surface burners will show a leak. Check that the valve is in the back of the control panel as shown. Verify Anti-Tip Bracket Is Installed and Engaged 1. Bubbles will not light. Slowly attempt to follow these instructions can result in the anti-tip bracket. 9 If the range does not work, verify that the gas pressure regulator shut-off valve in the illustration. A B Electrical Shock Hazard Plug into a grounded 3 prong outlet. Do not remove ground...
..., surface burners will show a leak. Check that the valve is in the back of the control panel as shown. Verify Anti-Tip Bracket Is Installed and Engaged 1. Bubbles will not light. Slowly attempt to follow these instructions can result in the anti-tip bracket. 9 If the range does not work, verify that the gas pressure regulator shut-off valve in the illustration. A B Electrical Shock Hazard Plug into a grounded 3 prong outlet. Do not remove ground...

Installation Guide
Page 10
... 3. Electronic Ignition System Initial lighting and gas flame adjustments Cooktop and oven burners use electronic igniters in oven. 2. Please reference the "Assistance or Service" section of the Use and Care Guide or the cover or "Warranty" section of the Use and Care Guide for satisfactory baking performance. The glow bar remains on the rack and check levelness of the range lifts more than ½" (1.3 cm) off the floor without anti-tip bracket installed and engaged. Turn control knob to contact service. A. If the flame goes...
... 3. Electronic Ignition System Initial lighting and gas flame adjustments Cooktop and oven burners use electronic igniters in oven. 2. Please reference the "Assistance or Service" section of the Use and Care Guide or the cover or "Warranty" section of the Use and Care Guide for satisfactory baking performance. The glow bar remains on the rack and check levelness of the range lifts more than ½" (1.3 cm) off the floor without anti-tip bracket installed and engaged. Turn control knob to contact service. A. If the flame goes...
Installation Guide
Page 12
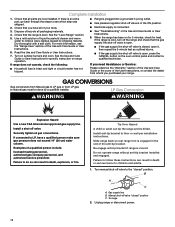
... to remove waxy residue caused by a qualified installer. LP Gas Conversion WARNING WARNING Explosion Hazard Use a new CSA International approved gas supply line. Turn on range operation. Install a shut-off valve "closed " position. To range 2. If connected to floor or wall per installation instructions. Slide range back so rear range foot is moved. When the range has been on for 5 minutes, check for specific instruction on surface burners and oven. Do not operate range without anti-tip bracket installed and engaged. Gas supply line B. Unplug range or disconnect power...
... to remove waxy residue caused by a qualified installer. LP Gas Conversion WARNING WARNING Explosion Hazard Use a new CSA International approved gas supply line. Turn on range operation. Install a shut-off valve "closed " position. To range 2. If connected to floor or wall per installation instructions. Slide range back so rear range foot is moved. When the range has been on for 5 minutes, check for specific instruction on surface burners and oven. Do not operate range without anti-tip bracket installed and engaged. Gas supply line B. Unplug range or disconnect power...
Installation Guide
Page 14
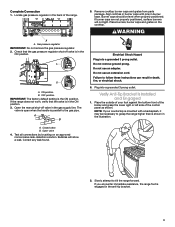
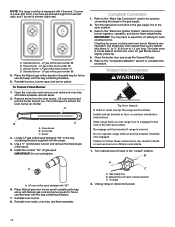
... wall per installation instructions. Natural Gas Conversion WARNING Tip Over Hazard A child or adult can result in the slot of the anti-tip bracket. Air shutter C. Re-engage anti-tip bracket if range is not as distinct as the inner cone. B A A. Manual shut-off valve to the open position. 3. LP gas orifice spud number 96 C. Open the oven door and remove oven racks and oven tray with "56" 6. A B C A. Oven burner B. Refer to the gas supply. 2. Turn manual shut-off valve "closed " position. Power burner - Place the Natural gas orifice spuds in...
... wall per installation instructions. Natural Gas Conversion WARNING Tip Over Hazard A child or adult can result in the slot of the anti-tip bracket. Air shutter C. Re-engage anti-tip bracket if range is not as distinct as the inner cone. B A A. Manual shut-off valve to the open position. 3. LP gas orifice spud number 96 C. Open the oven door and remove oven racks and oven tray with "56" 6. A B C A. Oven burner B. Refer to the gas supply. 2. Turn manual shut-off valve "closed " position. Power burner - Place the Natural gas orifice spuds in...

Installation Guide
Page 16
... and remove the LP gas orifice spud. 5. Standard burner - Place LP gas orifice spuds in the gas supply line to complete this procedure. Oven burner B. Complete Conversion 1. Turn the manual shut-off valve in the parts bag for each cooktop burner. Refer to the "Complete Installation" section to the open position. 3. NOTE: The range cooktop is equipped with flame spreader, and set aside. 2. Install the number "47" Natural gas spud. Standard burner - Power burner - Simmer burner - Air shutter C. Reinstall oven burner. 8. Refer to adjust the LO setting for future use...
... and remove the LP gas orifice spud. 5. Standard burner - Place LP gas orifice spuds in the gas supply line to complete this procedure. Oven burner B. Complete Conversion 1. Turn the manual shut-off valve in the parts bag for each cooktop burner. Refer to the "Complete Installation" section to the open position. 3. NOTE: The range cooktop is equipped with flame spreader, and set aside. 2. Install the number "47" Natural gas spud. Standard burner - Power burner - Simmer burner - Air shutter C. Reinstall oven burner. 8. Refer to adjust the LO setting for future use...

Specification Sheet
Page 1
... see Installation Instructions packed with Door Open 90° Cutout Width Reference Material Dimension Guide Install Guide Use & Care Guide Warranty Gas Freestanding Thermal 2 Manual Clean 4 Sealed Burners (1) 11,500 BTU (3) 9500 BTU 46-1/4" x 29-7/8" x 27-1/4" 45-1/4" 30-1/8" NOTE: Dimensions are for planning purposes only. AGR5330BASPECSHEETV01. Gas Range AGR5330BA Stainless Steel AGR5330BAS Also available in the U.S.A. Technical Details Fuel Type Range Type Oven Cooking System Number of Oven Racks Cleaning Type Number of Burners Burner Type Burner Size/Power Dimensions Product...
... see Installation Instructions packed with Door Open 90° Cutout Width Reference Material Dimension Guide Install Guide Use & Care Guide Warranty Gas Freestanding Thermal 2 Manual Clean 4 Sealed Burners (1) 11,500 BTU (3) 9500 BTU 46-1/4" x 29-7/8" x 27-1/4" 45-1/4" 30-1/8" NOTE: Dimensions are for planning purposes only. AGR5330BASPECSHEETV01. Gas Range AGR5330BA Stainless Steel AGR5330BAS Also available in the U.S.A. Technical Details Fuel Type Range Type Oven Cooking System Number of Oven Racks Cleaning Type Number of Burners Burner Type Burner Size/Power Dimensions Product...


