DimensionGuide
Page 1
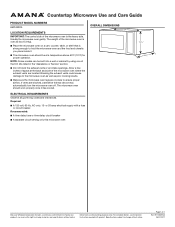
.... Countertop Microwave Use and Care Guide PRODUCT MODEL NUMBERS AMC4322G LOCATION REQUIREMENTS IMPORTANT: The control side of the microwave oven is over 35 lbs (15.9 kg). ■■ Place the microwave oven on a cart, counter, table, or shelf that is the heavy side. Handle the microwave oven gently. If vents are for proper operation. The microwave oven should work properly once it . ■■ The microwave oven should be built into a wall or cabinet by using one of 1 Ref. ELECTRICAL REQUIREMENTS...
.... Countertop Microwave Use and Care Guide PRODUCT MODEL NUMBERS AMC4322G LOCATION REQUIREMENTS IMPORTANT: The control side of the microwave oven is over 35 lbs (15.9 kg). ■■ Place the microwave oven on a cart, counter, table, or shelf that is the heavy side. Handle the microwave oven gently. If vents are for proper operation. The microwave oven should work properly once it . ■■ The microwave oven should be built into a wall or cabinet by using one of 1 Ref. ELECTRICAL REQUIREMENTS...

Installation Instructions
Page 1
..." (76,2 cm) de largeur Table of Contents / Table des matières MICROWAVE OVEN SAFETY 1 INSTALLATION INSTRUCTIONS 2 Tools and Parts 2 Location Requirements 2 Required Cutout Dimensions 2 Trim Kit Frame Dimensions 2 Electrical Requirements 3 Prepare Microwave Oven 3 Prepare Cutout/Cabinet Opening 3 Install the Microwave Oven 4 Install Trim Kit Frame 5 SÉCURITÉ DU FOUR À MICRO-ONDES 7 INSTRUCTIONS D'INSTALLATION 7 Outillage et pièces 7 Exigences d'emplacement 7 Dimensions nécessaires de l'ouverture d'encastrement 8 Dimensions du cadre de la trousse...
..." (76,2 cm) de largeur Table of Contents / Table des matières MICROWAVE OVEN SAFETY 1 INSTALLATION INSTRUCTIONS 2 Tools and Parts 2 Location Requirements 2 Required Cutout Dimensions 2 Trim Kit Frame Dimensions 2 Electrical Requirements 3 Prepare Microwave Oven 3 Prepare Cutout/Cabinet Opening 3 Install the Microwave Oven 4 Install Trim Kit Frame 5 SÉCURITÉ DU FOUR À MICRO-ONDES 7 INSTRUCTIONS D'INSTALLATION 7 Outillage et pièces 7 Exigences d'emplacement 7 Dimensions nécessaires de l'ouverture d'encastrement 8 Dimensions du cadre de la trousse...
Installation Instructions
Page 2
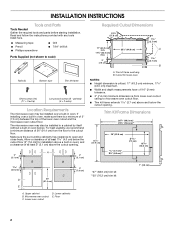
... screwdriver ■ Drill ■ 7/64" drill bit Parts Supplied (not shown to open and close freely. Trim kit frame overhang B. INSTALLATION INSTRUCTIONS Tools and Parts Tools Needed Gather the required tools and parts before starting installation. painted) (4 + 2 extra) Location Requirements The microwave oven may also be installed over a built-in oven below the cutout floor (3" [7.6 cm] for lower oven NOTES: ■ Height dimension is critical: 17" (43.2 cm) minimum, 17...
... screwdriver ■ Drill ■ 7/64" drill bit Parts Supplied (not shown to open and close freely. Trim kit frame overhang B. INSTALLATION INSTRUCTIONS Tools and Parts Tools Needed Gather the required tools and parts before starting installation. painted) (4 + 2 extra) Location Requirements The microwave oven may also be installed over a built-in oven below the cutout floor (3" [7.6 cm] for lower oven NOTES: ■ Height dimension is critical: 17" (43.2 cm) minimum, 17...

Installation Instructions
Page 3
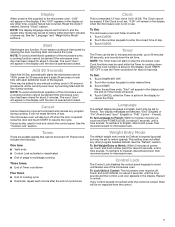
... forward and pointing up. If the power supply cord is equipped with a cord having a grounding wire with installation. 2. Secure the rails to whether the microwave oven is properly installed and grounded. Place the bottom duct in death, fire, or electrical shock. Do not use of electric shock. Rails (2) B. Prepare Cutout/Cabinet Opening 1. Do not remove ground prong. or 20-amp electrical supply with the flange resting against the...
... forward and pointing up. If the power supply cord is equipped with a cord having a grounding wire with installation. 2. Secure the rails to whether the microwave oven is properly installed and grounded. Place the bottom duct in death, fire, or electrical shock. Do not use of electric shock. Rails (2) B. Prepare Cutout/Cabinet Opening 1. Do not remove ground prong. or 20-amp electrical supply with the flange resting against the...
Installation Instructions
Page 5
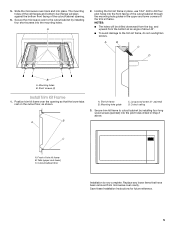
...) C. Replace any loose items that have been removed from the bottom at an angle of the cutout/cabinet opening so that the lower tabs rest on the cutout floor, as shown. Mounting holes B. Short screws (4) Install Trim Kit Frame 1. A B C D B A. 5. Holding the trim kit frame in place, use 7/64" drill to cutout/cabinet by installing four short screws into place. Cutout/cabinet floor Installation is now complete. Cutout ceiling 3. Secure the microwave oven to the trim kit...
...) C. Replace any loose items that have been removed from the bottom at an angle of the cutout/cabinet opening so that the lower tabs rest on the cutout floor, as shown. Mounting holes B. Short screws (4) Install Trim Kit Frame 1. A B C D B A. 5. Holding the trim kit frame in place, use 7/64" drill to cutout/cabinet by installing four short screws into place. Cutout/cabinet floor Installation is now complete. Cutout ceiling 3. Secure the microwave oven to the trim kit...
Owners Manual
Page 2
...6 MICROWAVE OVEN CONTROL 6 Display 7 Start 7 Add 30 Seconds 7 Cancel 7 Tones 7 Clock 7 Timer 7 Language 7 Weight Entry Mode 7 Control Lock 7 MICROWAVE OVEN USE 8 Food Characteristics 8 Cooking Guidelines 8 Cookware and Dinnerware 9 Aluminum Foil and Metal 9 Microwave Cooking Power 9 Manual Cooking 10 Cooking in Stages 10 Favorite 10 Sensor Cooking 10 Menu (sensor and non-sensor 11 Weight Defrost/Timed Defrost 12 MICROWAVE OVEN CARE 13 General Cleaning 13 TROUBLESHOOTING 14 ASSISTANCE OR SERVICE 15 In the U.S.A 15 Replacement Parts 15 Built-In Kits 15 WARRANTY 16...
...6 MICROWAVE OVEN CONTROL 6 Display 7 Start 7 Add 30 Seconds 7 Cancel 7 Tones 7 Clock 7 Timer 7 Language 7 Weight Entry Mode 7 Control Lock 7 MICROWAVE OVEN USE 8 Food Characteristics 8 Cooking Guidelines 8 Cookware and Dinnerware 9 Aluminum Foil and Metal 9 Microwave Cooking Power 9 Manual Cooking 10 Cooking in Stages 10 Favorite 10 Sensor Cooking 10 Menu (sensor and non-sensor 11 Weight Defrost/Timed Defrost 12 MICROWAVE OVEN CARE 13 General Cleaning 13 TROUBLESHOOTING 14 ASSISTANCE OR SERVICE 15 In the U.S.A 15 Replacement Parts 15 Built-In Kits 15 WARRANTY 16...

Owners Manual
Page 3
... very important. I See door surface cleaning instructions in the shell and sealed containers - I Use the microwave oven only for example, closed , turn oven off, and disconnect the power cord, or shut off power at the fuse or circuit breaker panel. - Call an authorized service company for industrial or laboratory use as whole eggs in the "Microwave Oven Care" section. for storage purposes. I Do not operate the microwave oven if it has a damaged...
... very important. I See door surface cleaning instructions in the shell and sealed containers - I Use the microwave oven only for example, closed , turn oven off, and disconnect the power cord, or shut off power at the fuse or circuit breaker panel. - Call an authorized service company for industrial or laboratory use as whole eggs in the "Microwave Oven Care" section. for storage purposes. I Do not operate the microwave oven if it has a damaged...

Owners Manual
Page 4
IMPORTANT SAFETY INSTRUCTIONS I Liquids, such as they may create a fire or risk of electric shock. I Oversized foods or oversized metal utensils should not be boiling. I Do not mount over a sink. Pieces can result in harmful exposure to stand in convection, combination, grill or "PAN BROWN" mode. - I Do not cover racks or any other reproductive harm. I Do not use paper products when appliance...
IMPORTANT SAFETY INSTRUCTIONS I Liquids, such as they may create a fire or risk of electric shock. I Oversized foods or oversized metal utensils should not be boiling. I Do not mount over a sink. Pieces can result in harmful exposure to stand in convection, combination, grill or "PAN BROWN" mode. - I Do not cover racks or any other reproductive harm. I Do not use paper products when appliance...
Owners Manual
Page 5
... INSTRUCTIONS 5 Clean the inside it. ■■ The microwave oven should work properly once it and made any needed repairs. If the power supply cord is not lined up correctly, ■■ damage around the door, or ■■ dents on a cart, counter, table, or shelf that is too short, have a qualified electrician or serviceman install an outlet near the microwave oven. Handle the microwave oven gently. If vents are located...
... INSTRUCTIONS 5 Clean the inside it. ■■ The microwave oven should work properly once it and made any needed repairs. If the power supply cord is not lined up correctly, ■■ damage around the door, or ■■ dents on a cart, counter, table, or shelf that is too short, have a qualified electrician or serviceman install an outlet near the microwave oven. Handle the microwave oven gently. If vents are located...

Owners Manual
Page 6
Door handle (on the microwave oven cavity bottom. 2. Microwave oven light E. Control panel G. Removable turntable support I H GF F. Glass turntable J. The appearance of the parts. Model and serial number plate K. Hub C. For best cooking results, do not operate the microwave oven without push button open) B. Place the support on models without having the turntable in either direction to reorder any of your particular model may cover several different models. PARTS AND FEATURES This manual may differ slightly from the illustrations in this manual. The ...
Door handle (on the microwave oven cavity bottom. 2. Microwave oven light E. Control panel G. Removable turntable support I H GF F. Glass turntable J. The appearance of the parts. Model and serial number plate K. Hub C. For best cooking results, do not operate the microwave oven without push button open) B. Place the support on models without having the turntable in either direction to reorder any of your particular model may cover several different models. PARTS AND FEATURES This manual may differ slightly from the illustrations in this manual. The ...
Owners Manual
Page 7
... Timer does not start or stop the microwave oven. Language The default display language is English, but may be off. 1. This setting does not affect any other program besides Defrost. To set back to English, disconnect power, then reconnect power to microwave oven. Repeat to enter desired time. 3. Reset the clock if needed. See the "Clock" section. The word "door" will be used to lock and unlock the control panel. NOTE: To avoid unintentional operation...
... Timer does not start or stop the microwave oven. Language The default display language is English, but may be off. 1. This setting does not affect any other program besides Defrost. To set back to English, disconnect power, then reconnect power to microwave oven. Repeat to enter desired time. 3. Reset the clock if needed. See the "Clock" section. The word "door" will be used to lock and unlock the control panel. NOTE: To avoid unintentional operation...

Owners Manual
Page 8
... of microwave oven cavity. Stir from microwave oven. ■■ Do not overcook potatoes. They will heat faster than frozen foods. Standing Time Food will cook more quickly than larger pieces, and uniformly shaped foods cook more food heated at one corner to provide an opening to the microwave oven, do not operate microwave oven when it does not absorb microwaves. ■■ Use oven mitts or pot holders when removing containers from outside to...
... of microwave oven cavity. Stir from microwave oven. ■■ Do not overcook potatoes. They will heat faster than frozen foods. Standing Time Food will cook more quickly than larger pieces, and uniformly shaped foods cook more food heated at one corner to provide an opening to the microwave oven, do not operate microwave oven when it does not absorb microwaves. ■■ Use oven mitts or pot holders when removing containers from outside to...

Owners Manual
Page 9
... to the microwave oven, do not allow aluminum foil or metal to touch the inside cavity walls, ceiling, or floor. ■■ Always use the turntable. ■■ To avoid damage to use cookware and dinnerware with the following chart as a general guide for use . If not used properly, arcing (a blue flash of specific foods. Percent/Name Use 100%, High, PL10 (default setting) Quick heating convenience foods and foods with...
... to the microwave oven, do not allow aluminum foil or metal to touch the inside cavity walls, ceiling, or floor. ■■ Always use the turntable. ■■ To avoid damage to use cookware and dinnerware with the following chart as a general guide for use . If not used properly, arcing (a blue flash of specific foods. Percent/Name Use 100%, High, PL10 (default setting) Quick heating convenience foods and foods with...
Owners Manual
Page 10
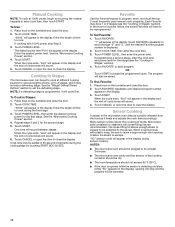
... "Microwave Cooking Power" section. 4. "1" will also be set the defrosting stage. If programming a second stage, enter the cook time and power level for various lengths of time to clear the display. Touch FAVORITE to save program OR Touch START to program, store, and recall the top 3 most frequently used manual cook programs. Each Favorite may have to clear the display. The program will appear in the display during sensor cooking. Place food on the turntable and close the door. 2. Touch COOK TIME. If cooking...
... "Microwave Cooking Power" section. 4. "1" will also be set the defrosting stage. If programming a second stage, enter the cook time and power level for various lengths of time to clear the display. Touch FAVORITE to save program OR Touch START to program, store, and recall the top 3 most frequently used manual cook programs. Each Favorite may have to clear the display. The program will appear in the display during sensor cooking. Place food on the turntable and close the door. 2. Touch COOK TIME. If cooking...

Owners Manual
Page 11
... its location). Menu (sensor and non-sensor) The following chart are preprogrammed for quick and easy cooking/reheating. For added convenience, the available/recommended amounts shown in microwave-safe container, place on the turntable and close the door. 2. For bag sizes not listed in this section, follow directions on a paper towel-lined microwave-safe plate in the display. 3. Listen for popping to slow to change...
... its location). Menu (sensor and non-sensor) The following chart are preprogrammed for quick and easy cooking/reheating. For added convenience, the available/recommended amounts shown in microwave-safe container, place on the turntable and close the door. 2. For bag sizes not listed in this section, follow directions on a paper towel-lined microwave-safe plate in the display. 3. Listen for popping to slow to change...

Owners Manual
Page 12
... the display. To Use Timed Defrost: 1. Touch CANCEL or open the door to clear the display. See the "Aluminum Foil and Metal" section first. Touch START. DEF2 - Timed Defrost Timed Defrost does not have a preset program but uses only 30% (PL3) cooking power. Place food, uncovered, on the turntable and close the door. 2. Close the door and touch START to resume the cycle. Weight can be used , or the microwave oven can be set to 2.86 kg). 4. The display will sound...
... the display. To Use Timed Defrost: 1. Touch CANCEL or open the door to clear the display. See the "Aluminum Foil and Metal" section first. Touch START. DEF2 - Timed Defrost Timed Defrost does not have a preset program but uses only 30% (PL3) cooking power. Place food, uncovered, on the turntable and close the door. 2. Close the door and touch START to resume the cycle. Weight can be used , or the microwave oven can be set to 2.86 kg). 4. The display will sound...
Owners Manual
Page 13
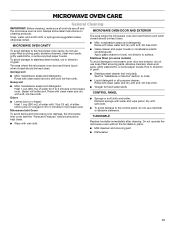
... detergents: Heat 1 cup (250 mL) of grain. MICROWAVE OVEN CARE General Cleaning IMPORTANT: Before cleaning, make sure all -purpose cleaner: Rinse with clean water and dry with soft, lint-free cloth. ■■ Vinegar for hard water spots CONTROL PANEL ■■ Sponge or soft cloth and water: Dampen sponge with water and wipe panel. The area where the microwave oven door and frame touch when...
... detergents: Heat 1 cup (250 mL) of grain. MICROWAVE OVEN CARE General Cleaning IMPORTANT: Before cleaning, make sure all -purpose cleaner: Rinse with clean water and dry with soft, lint-free cloth. ■■ Vinegar for hard water spots CONTROL PANEL ■■ Sponge or soft cloth and water: Dampen sponge with water and wipe panel. The area where the microwave oven door and frame touch when...
Owners Manual
Page 14
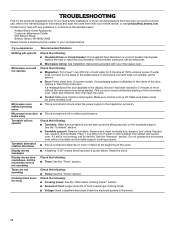
... unintended starting of the cycle. Display shows messages Display shows time countdown, but the microwave oven is off . If a message about the door appears in the home. 14 Make sure Control Lock is not operating Tones are not sounding Cooking times seem too long ■■ A flashing "0:00" means there has been a power failure. See the "Warranty" section. Reset the clock. Check the following : ■■ Household fuse or circuit...
... unintended starting of the cycle. Display shows messages Display shows time countdown, but the microwave oven is off . If a message about the door appears in the home. 14 Make sure Control Lock is not operating Tones are not sounding Cooking times seem too long ■■ A flashing "0:00" means there has been a power failure. See the "Warranty" section. Reset the clock. Check the following : ■■ Household fuse or circuit...

Owners Manual
Page 15
... order replacement parts, we recommend that you can be installed over any questions or concerns at www.amana.com. Built-In Kits This countertop microwave oven can be built in the United States. ■■ Features and specifications on . ASSISTANCE OR SERVICE If you need further assistance, you use only factory specified parts. In the U.S.A. Glass Turntable Part Number W10451786 Turntable Support and Rollers Part Number W10451792 Cleaning Supplies affresh® Kitchen Appliance Cleaner Part Number W10355010...
... order replacement parts, we recommend that you can be installed over any questions or concerns at www.amana.com. Built-In Kits This countertop microwave oven can be built in the United States. ■■ Features and specifications on . ASSISTANCE OR SERVICE If you need further assistance, you use only factory specified parts. In the U.S.A. Glass Turntable Part Number W10451786 Turntable Support and Rollers Part Number W10451792 Cleaning Supplies affresh® Kitchen Appliance Cleaner Part Number W10355010...
Owners Manual
Page 16
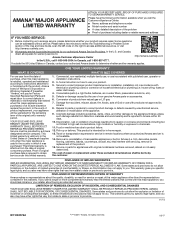
... without service. Repairs to parts or systems to arrange service, please determine whether your product requires repair. This product is intended for service in remote locations where an authorized Amana servicer is not available. 14. Travel or transportation expenses for in materials and workmanship and is installed, operated and maintained according to instructions attached to use of household electrical or plumbing (i.e. trim, decorative panels, flooring, cabinetry, islands, countertops...
... without service. Repairs to parts or systems to arrange service, please determine whether your product requires repair. This product is intended for service in remote locations where an authorized Amana servicer is not available. 14. Travel or transportation expenses for in materials and workmanship and is installed, operated and maintained according to instructions attached to use of household electrical or plumbing (i.e. trim, decorative panels, flooring, cabinetry, islands, countertops...


