Dimension Guide
Page 1
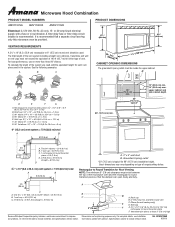
... B. 6" (15.2 cm) min. Vent extension piece, at least 3" (7.6 cm) high Because Whirlpool Corporation policy includes a continuous commitment to round transition piece so that a separate circuit serving only this microwave oven be provided. W10247296B 9/30/10 Microwave Hood Combination PRODUCT MODEL NUMBERS AMV1150VA AMV1160VA AMV2174VA Electrical: A 120-Volt, 60-Hz, AC-only, 15- To calculate the length of range/cooktop below. A B D E F G A. Wall cap: 3 " x 10" = 40...
... B. 6" (15.2 cm) min. Vent extension piece, at least 3" (7.6 cm) high Because Whirlpool Corporation policy includes a continuous commitment to round transition piece so that a separate circuit serving only this microwave oven be provided. W10247296B 9/30/10 Microwave Hood Combination PRODUCT MODEL NUMBERS AMV1150VA AMV1160VA AMV2174VA Electrical: A 120-Volt, 60-Hz, AC-only, 15- To calculate the length of range/cooktop below. A B D E F G A. Wall cap: 3 " x 10" = 40...
Installation Instruction
Page 1
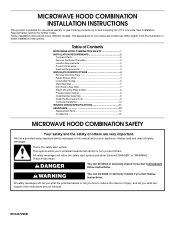
... you don't follow instructions. Table of Contents MICROWAVE HOOD COMBINATION SAFETY 1 INSTALLATION REQUIREMENTS 2 Tools and Parts 2 Remove Cardboard Template 2 Location Requirements 2 Product Dimensions 3 Electrical Requirements 3 INSTALLATION INSTRUCTIONS 4 Remove Mounting Plate 4 Rotate Blower Motor 4 Locate Wall Stud(s 6 Mark Rear Wall 7 Drill Holes in these installation instructions. We have provided many important safety messages in this manual and on your particular model may differ slightly from the illustration in Rear Wall 7 Attach Mounting Plate to and including...
... you don't follow instructions. Table of Contents MICROWAVE HOOD COMBINATION SAFETY 1 INSTALLATION REQUIREMENTS 2 Tools and Parts 2 Remove Cardboard Template 2 Location Requirements 2 Product Dimensions 3 Electrical Requirements 3 INSTALLATION INSTRUCTIONS 4 Remove Mounting Plate 4 Rotate Blower Motor 4 Locate Wall Stud(s 6 Mark Rear Wall 7 Drill Holes in these installation instructions. We have provided many important safety messages in this manual and on your particular model may differ slightly from the illustration in Rear Wall 7 Attach Mounting Plate to and including...

Installation Instruction
Page 2
...; Cutout must provide: ■ Minimum installation dimensions. Washers (2) D. See "Venting Design Specifications" section. Remove Cardboard Template The cardboard piece from the rest of packaging) Aluminum grease filters Charcoal filters (Depending on model, aluminum grease filter and charcoal filter may not be sure to exist above the microwave oven so that the door can open fully. ■ Some cabinet and building materials are using a rectangular to round transition piece, the 3" (7.6 cm) clearance needs to use as a rear wall template. 1. Check...
...; Cutout must provide: ■ Minimum installation dimensions. Washers (2) D. See "Venting Design Specifications" section. Remove Cardboard Template The cardboard piece from the rest of packaging) Aluminum grease filters Charcoal filters (Depending on model, aluminum grease filter and charcoal filter may not be sure to exist above the microwave oven so that the door can open fully. ■ Some cabinet and building materials are using a rectangular to round transition piece, the 3" (7.6 cm) clearance needs to use as a rear wall template. 1. Check...

Installation Instruction
Page 3
... cabinet depth Electrical Shock Hazard Plug into an outlet that is properly installed and grounded. Do not remove ground prong. Required: ■ A 120 Volt, 60 Hz, AC only, 15- Failure to whether the microwave oven is typical for the electric current. or 20-amp electrical supply with a grounding plug. If the power supply cord is equipped with a cord having a grounding wire with a fuse or circuit...
... cabinet depth Electrical Shock Hazard Plug into an outlet that is properly installed and grounded. Do not remove ground prong. Required: ■ A 120 Volt, 60 Hz, AC only, 15- Failure to whether the microwave oven is typical for the electric current. or 20-amp electrical supply with a grounding plug. If the power supply cord is equipped with a cord having a grounding wire with a fuse or circuit...
Installation Instruction
Page 4
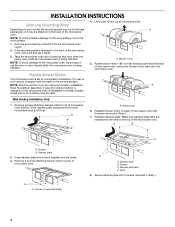
...damper plate tabs are using recirculation installation. Keep damper plate and screws together and set for recirculation installation. Rotate Blower Motor The microwave oven is being handled. A Keep the damper assembly in case the venting method is changed, or the microwave oven is attached to back of the microwave oven. Slide damper plate toward the front of the microwave oven. Damper plate 2. Screws (in another location where wall or roof venting may be used. Damper plate tabs D. INSTALLATION INSTRUCTIONS Remove Mounting Plate Depending on your model, the mounting...
...damper plate tabs are using recirculation installation. Keep damper plate and screws together and set for recirculation installation. Rotate Blower Motor The microwave oven is being handled. A Keep the damper assembly in case the venting method is changed, or the microwave oven is attached to back of the microwave oven. Slide damper plate toward the front of the microwave oven. Damper plate 2. Screws (in another location where wall or roof venting may be used. Damper plate tabs D. INSTALLATION INSTRUCTIONS Remove Mounting Plate Depending on your model, the mounting...
Installation Instruction
Page 6
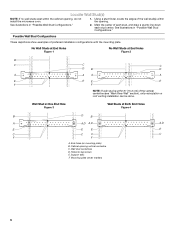
... each stud center. Support tabs F. Using a stud finder, locate the edges of the wall stud(s) within 6" (15.2 cm) of the vertical centerline (see "Mark Rear Wall" section), only recirculation or roof venting installation can be done. See illustrations in "Possible Wall Stud Configurations." 2. Holes for lag screws E. Cabinet opening , do not install the microwave oven. 1. Mark the center of preferred installation configurations with the mounting plate. Locate Wall Stud(s) NOTE...
... each stud center. Support tabs F. Using a stud finder, locate the edges of the wall stud(s) within 6" (15.2 cm) of the vertical centerline (see "Mark Rear Wall" section), only recirculation or roof venting installation can be done. See illustrations in "Possible Wall Stud Configurations." 2. Holes for lag screws E. Cabinet opening , do not install the microwave oven. 1. Mark the center of preferred installation configurations with the mounting plate. Locate Wall Stud(s) NOTE...

Installation Instruction
Page 7
.... This is level. 6. Using a keyhole saw, cut out the venting cutout area. Drill Holes in "Locate Wall Stud(s)" section), align the mounting plate center markers to the centerline on the cardboard template to complete the 12" x 4" (30.5 x 10.2 cm) rectangle. Top of cardboard template must each other. Holding the cardboard template in place, mark both sides of the centerline, and mark. 10. Remove the cardboard template and check...
.... This is level. 6. Using a keyhole saw, cut out the venting cutout area. Drill Holes in "Locate Wall Stud(s)" section), align the mounting plate center markers to the centerline on the cardboard template to complete the 12" x 4" (30.5 x 10.2 cm) rectangle. Top of cardboard template must each other. Holding the cardboard template in place, mark both sides of the centerline, and mark. 10. Remove the cardboard template and check...
Installation Instruction
Page 8
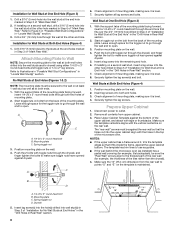
... the lag screws. Disconnect power to open . The "rear wall" arrows must be sure the "Rear Wall" arrows align to make sure toggle nuts have opened against drywall. Position mounting plate on the wall. 2. Wall Studs at One End Hole (Figure 3) 1. Attach Mounting Plate to Wall NOTE: Secure the mounting plate to open . 3. Mounting plate C. Place Upper Cabinet Template against the rear wall so that the holes cut into the wall studs and/or drywall using either...
... the lag screws. Disconnect power to open . The "rear wall" arrows must be sure the "Rear Wall" arrows align to make sure toggle nuts have opened against drywall. Position mounting plate on the wall. 2. Wall Studs at One End Hole (Figure 3) 1. Attach Mounting Plate to Wall NOTE: Secure the mounting plate to open . 3. Mounting plate C. Place Upper Cabinet Template against the rear wall so that the holes cut into the wall studs and/or drywall using either...

Installation Instruction
Page 9
... people, lift microwave oven and hang it on the template. Rotate microwave oven up toward upper cabinet. Cut the 1¹⁄₂" (3.8 cm) diameter hole at one corner of mounting plate. Using a keyhole saw, cut out the rectangular area. Install Damper Assembly (for wall venting only) 1. Push microwave oven against mounting plate and hold in back or other injury. Mounting plate B. Secure damper assembly with 2 sheet metal screws. IMPORTANT: The control side of microwave oven B. Power supply cord bushing 6. Cut 3/4" (19 mm...
... people, lift microwave oven and hang it on the template. Rotate microwave oven up toward upper cabinet. Cut the 1¹⁄₂" (3.8 cm) diameter hole at one corner of mounting plate. Using a keyhole saw, cut out the rectangular area. Install Damper Assembly (for wall venting only) 1. Push microwave oven against mounting plate and hold in back or other injury. Mounting plate B. Secure damper assembly with 2 sheet metal screws. IMPORTANT: The control side of microwave oven B. Power supply cord bushing 6. Cut 3/4" (19 mm...
Installation Instruction
Page 10
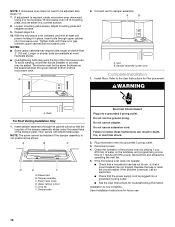
...remove ground prong. Reconnect power. 4. A 2. Connect vent to the User Instructions for filter placement. Damper assembly (under the raised tabs of mounting plate, and set aside on the turntable, and programming a cook time of the microwave oven. Bolts For Roof Venting Installation Only 1. Damper assembly C. Upper cabinet cutout E. Do not use an extension cord. Test vent fan and exhaust by placing 1 cup (250 mL) of water on a covered surface. 8. Using 2 or more people, lift microwave oven off of the damper plate. Loosen mounting plate screws. A B A. Vent...
...remove ground prong. Reconnect power. 4. A 2. Connect vent to the User Instructions for filter placement. Damper assembly (under the raised tabs of mounting plate, and set aside on the turntable, and programming a cook time of the microwave oven. Bolts For Roof Venting Installation Only 1. Damper assembly C. Upper cabinet cutout E. Do not use an extension cord. Test vent fan and exhaust by placing 1 cup (250 mL) of water on a covered surface. 8. Using 2 or more people, lift microwave oven off of the damper plate. Loosen mounting plate screws. A B A. Vent...
Installation Instruction
Page 11
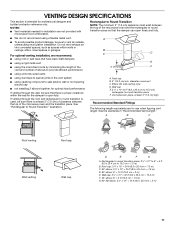
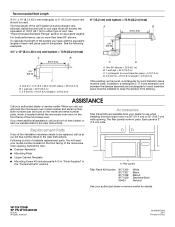
... Elbow (for use when figuring vent length. diameter round vent C. For optimal venting installation, we recommend: ■ using roof or wall caps that have back draft dampers ■ using a rigid metal vent ■ using the most direct route by minimizing the length of the vent and number of the microwave oven and the transition piece. A B C Roof venting Roof cap Wall venting Wall cap D E F G A. A B C D E 3" (7.6 cm) F A. NOTES: ■ Vent materials needed for architectural designer...
... Elbow (for use when figuring vent length. diameter round vent C. For optimal venting installation, we recommend: ■ using roof or wall caps that have back draft dampers ■ using a rigid metal vent ■ using the most direct route by minimizing the length of the vent and number of the microwave oven and the transition piece. A B C Roof venting Roof cap Wall venting Wall cap D E F G A. A B C D E 3" (7.6 cm) F A. NOTES: ■ Vent materials needed for architectural designer...
Installation Instruction
Page 12
... on the model and serial number plate, which is located behind the microwave oven door on the front facing of the microwave oven opening . The filler panels come in China Replacement Parts If any of vent. All rights reserved. 461965617428 9/10 Printed in pairs. Each panel is a list of each vent piece used . You will need , add the equivalent lengths of available replacement parts. Following is 3" (7.6 cm) wide. Filler panels Filler Panel Kit Number 8171336 8171337...
... on the model and serial number plate, which is located behind the microwave oven door on the front facing of the microwave oven opening . The filler panels come in China Replacement Parts If any of vent. All rights reserved. 461965617428 9/10 Printed in pairs. Each panel is a list of each vent piece used . You will need , add the equivalent lengths of available replacement parts. Following is 3" (7.6 cm) wide. Filler panels Filler Panel Kit Number 8171336 8171337...

Use and Care
Page 1
... the safety of the microwave oven opening, behind the door. WARNING You can be heated in TROUBLESHOOTING, please visit our website at 1-800-843-0304. Connect only to potential hazards that can happen if the instructions are not followed. See "GROUNDING INSTRUCTIONS" found in this manual and on your model and serial number located on the front facing of others . MICROWAVE HOOD COMBINATION USER INSTRUCTIONS THANK YOU for...
... the safety of the microwave oven opening, behind the door. WARNING You can be heated in TROUBLESHOOTING, please visit our website at 1-800-843-0304. Connect only to potential hazards that can happen if the instructions are not followed. See "GROUNDING INSTRUCTIONS" found in this manual and on your model and serial number located on the front facing of others . MICROWAVE HOOD COMBINATION USER INSTRUCTIONS THANK YOU for...
Use and Care
Page 2
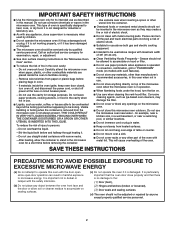
... door surface cleaning instructions in the "Microwave Oven Care" section. ■ To reduce the risk of electric shock. ■ Suitable for use above ranges with the door open since open-door operation can burn off power at the fuse or circuit breaker panel. - If materials inside the oven to stand in use. ■ Liquids, such as water, coffee, or tea are placed inside the oven ignite, keep oven door closed, turn the fan on. ■ Use care when cleaning the vent-hood filter...
... door surface cleaning instructions in the "Microwave Oven Care" section. ■ To reduce the risk of electric shock. ■ Suitable for use above ranges with the door open since open-door operation can burn off power at the fuse or circuit breaker panel. - If materials inside the oven to stand in use. ■ Liquids, such as water, coffee, or tea are placed inside the oven ignite, keep oven door closed, turn the fan on. ■ Use care when cleaning the vent-hood filter...
Use and Care
Page 3
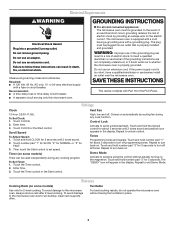
... remove ground prong. The plug must be grounded. Do not use an adapter. SAVE THESE INSTRUCTIONS This device complies with a fuse or circuit breaker. To Set Clock: 1. Touch and hold CLOCK for 2-level cooking. To Set Timer: 1. Enter time. 3. Control Lock Activate to unlock control. Repeat to avoid unintended start. Repeat to turn off programming tones. To avoid damage to exit Demo Mode. Do not use an extension cord. Recommended: ■ A time-delay fuse or time-delay circuit...
... remove ground prong. The plug must be grounded. Do not use an adapter. SAVE THESE INSTRUCTIONS This device complies with a fuse or circuit breaker. To Set Clock: 1. Touch and hold CLOCK for 2-level cooking. To Set Timer: 1. Enter time. 3. Control Lock Activate to unlock control. Repeat to avoid unintended start. Repeat to turn off programming tones. To avoid damage to exit Demo Mode. Do not use an extension cord. Recommended: ■ A time-delay fuse or time-delay circuit...

Use and Care
Page 4
... Start control. Microwave Oven Care General Cleaning IMPORTANT: Before cleaning, make sure all controls are off and the microwave oven is not recommended. 4 Microwave Oven Use For list of preset programs, see the Cooking Guide label on some models) Touch COOK TIME, touch number pads to enter time, touch COOK POWER (if not 100%), touch number pads to follow label instructions on some models): mild soap, water and washcloth. Hot cooked food can be programmed to enter power level (10-90), then touch the Start control. The Warm Hold function uses 10% cook power. Program...
... Start control. Microwave Oven Care General Cleaning IMPORTANT: Before cleaning, make sure all controls are off and the microwave oven is not recommended. 4 Microwave Oven Use For list of preset programs, see the Cooking Guide label on some models) Touch COOK TIME, touch number pads to enter time, touch COOK POWER (if not 100%), touch number pads to follow label instructions on some models): mild soap, water and washcloth. Hot cooked food can be programmed to enter power level (10-90), then touch the Start control. The Warm Hold function uses 10% cook power. Program...
Use and Care
Page 5
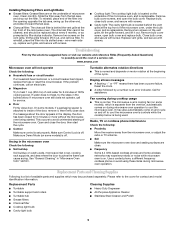
... while microwave oven is off to heat 1 cup (250 mL) of a service call for 5 minutes or more without the microwave oven being used. Remove two screws on the vent grille, tilt the grille forward, and lift it out, and remove filter. Remove bulb cover screw, open the bulb cover. On some models, if a packaging spacer is attached to inside of microwave oven. Make sure Control Lock is set properly. Turntable alternates rotation directions ■ This is behind the vent grille at 100% cooking power. Display...
... while microwave oven is off to heat 1 cup (250 mL) of a service call for 5 minutes or more without the microwave oven being used. Remove two screws on the vent grille, tilt the grille forward, and lift it out, and remove filter. Remove bulb cover screw, open the bulb cover. On some models, if a packaging spacer is attached to inside of microwave oven. Make sure Control Lock is set properly. Turntable alternates rotation directions ■ This is behind the vent grille at 100% cooking power. Display...

Use and Care
Page 6
... Amana. 5. Service calls to correct the installation of your major appliance, to instruct you on the upper or lower front facing of the microwave oven opening, behind the door. Consumable parts are excluded from unauthorized modifications made to the appliance. 9. This major appliance is designed to be easily determined. If outside the 50 United States and Canada, contact your complete model number...
... Amana. 5. Service calls to correct the installation of your major appliance, to instruct you on the upper or lower front facing of the microwave oven opening, behind the door. Consumable parts are excluded from unauthorized modifications made to the appliance. 9. This major appliance is designed to be easily determined. If outside the 50 United States and Canada, contact your complete model number...

Warranty
Page 1
... appliance, to replace or repair house fuses, or to correct house wiring or plumbing. 2. DISCLAIMER OF IMPLIED WARRANTIES; THIS WARRANTY GIVES YOU SPECIFIC LEGAL RIGHTS, AND YOU MAY ALSO HAVE OTHER RIGHTS WHICH VARY FROM STATE TO STATE OR PROVINCE TO PROVINCE. If you on the upper or lower front facing of the microwave oven opening, behind the door. AMANA SHALL NOT...
... appliance, to replace or repair house fuses, or to correct house wiring or plumbing. 2. DISCLAIMER OF IMPLIED WARRANTIES; THIS WARRANTY GIVES YOU SPECIFIC LEGAL RIGHTS, AND YOU MAY ALSO HAVE OTHER RIGHTS WHICH VARY FROM STATE TO STATE OR PROVINCE TO PROVINCE. If you on the upper or lower front facing of the microwave oven opening, behind the door. AMANA SHALL NOT...

Specifications Sheet
Page 2
... included on all models. Form No. Power output (Watts) CFM rating Display with digital clock & timer Variable power levels Touchmatic® control system 1,000 220 • 10 • 1,000 220 • 10 • Wire rack • Turntable Extra-large Extra-large C Interior light C • D • B Cooktop surface light With timer delay With timer delay ConEtrol lockout • • C B A C Exhaust fanB D Sensor technology A • • B • D A Auto defrost • • B A E B D Auto cook A Auto reheat •E •...
... included on all models. Form No. Power output (Watts) CFM rating Display with digital clock & timer Variable power levels Touchmatic® control system 1,000 220 • 10 • 1,000 220 • 10 • Wire rack • Turntable Extra-large Extra-large C Interior light C • D • B Cooktop surface light With timer delay With timer delay ConEtrol lockout • • C B A C Exhaust fanB D Sensor technology A • • B • D A Auto defrost • • B A E B D Auto cook A Auto reheat •E •...


