Dimension Guide
Page 1
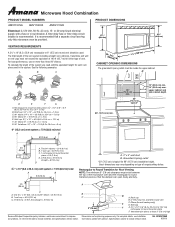
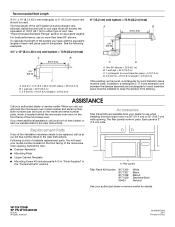
... transition piece = 5 ft (1.5 m) D. 2 ft (0.6 m) + 6 ft (1.8 m) straight = 8 ft (2.4 m) D 3 " x 10" (8.3 x 25.4 cm) vent system = 73 ft (22.2 m) total A B 6 ft (1.8 m) A. 2" x 4" wall stud B. W10247296B 9/30/10 Microwave Hood Combination PRODUCT MODEL NUMBERS AMV1150VA AMV1160VA AMV2174VA Electrical: A 120-Volt, 60-Hz, AC-only, 15- It is typical for Roof Venting NOTE: The minimum 3" (7.6 cm) clearance must not...
... transition piece = 5 ft (1.5 m) D. 2 ft (0.6 m) + 6 ft (1.8 m) straight = 8 ft (2.4 m) D 3 " x 10" (8.3 x 25.4 cm) vent system = 73 ft (22.2 m) total A B 6 ft (1.8 m) A. 2" x 4" wall stud B. W10247296B 9/30/10 Microwave Hood Combination PRODUCT MODEL NUMBERS AMV1150VA AMV1160VA AMV2174VA Electrical: A 120-Volt, 60-Hz, AC-only, 15- It is typical for Roof Venting NOTE: The minimum 3" (7.6 cm) clearance must not...
Installation Instruction
Page 1
...Wall 8 Prepare Upper Cabinet 8 Install Damper Assembly 9 Install the Microwave Oven 9 Complete Installation 10 VENTING DESIGN SPECIFICATIONS 11 ASSISTANCE 12 Replacement Parts 12 Accessories 12 MICROWAVE HOOD COMBINATION SAFETY Your safety and the safety of others . W10247296B.... This symbol alerts you don't follow the safety alert symbol and either the word "DANGER" or "WARNING." Table of Contents MICROWAVE HOOD COMBINATION SAFETY 1 INSTALLATION REQUIREMENTS 2 Tools and Parts 2 Remove Cardboard Template 2 Location Requirements 2 Product Dimensions 3 Electrical Requirements ...
...Wall 8 Prepare Upper Cabinet 8 Install Damper Assembly 9 Install the Microwave Oven 9 Complete Installation 10 VENTING DESIGN SPECIFICATIONS 11 ASSISTANCE 12 Replacement Parts 12 Accessories 12 MICROWAVE HOOD COMBINATION SAFETY Your safety and the safety of others . W10247296B.... This symbol alerts you don't follow the safety alert symbol and either the word "DANGER" or "WARNING." Table of Contents MICROWAVE HOOD COMBINATION SAFETY 1 INSTALLATION REQUIREMENTS 2 Tools and Parts 2 Remove Cardboard Template 2 Location Requirements 2 Product Dimensions 3 Electrical Requirements ...

Installation Instruction
Page 2
...assembly (for wall or roof venting) Not Shown: Upper cabinet template Mounting plate (attached to withstand the heat produced by the microwave oven for use appropriate fasteners. See "Venting Design Specifications" section. Remove Cardboard Template The cardboard piece from the rest of any ...Aluminum grease filters Charcoal filters (Depending on model, aluminum grease filter and charcoal filter may not be sure to exist above the microwave oven so that the materials used will be installed. For other damages. Power supply cord bushing (1) H. See "Electrical Requirements...
...assembly (for wall or roof venting) Not Shown: Upper cabinet template Mounting plate (attached to withstand the heat produced by the microwave oven for use appropriate fasteners. See "Venting Design Specifications" section. Remove Cardboard Template The cardboard piece from the rest of any ...Aluminum grease filters Charcoal filters (Depending on model, aluminum grease filter and charcoal filter may not be sure to exist above the microwave oven so that the materials used will be installed. For other damages. Power supply cord bushing (1) H. See "Electrical Requirements...

Installation Instruction
Page 3
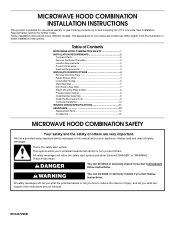
...WARNING: Improper use an extension cord. Do not use an extension cord. Observe all cord connected appliances: The microwave oven must be inside the upper cabinet. The microwave oven is properly installed and grounded. SAVE THESE INSTRUCTIONS 3 Installation Dimensions NOTE: The grounded 3 prong outlet must... 120 Volt, 60 Hz, AC only, 15- If the power supply cord is too short, have a qualified electrician or serviceman install an outlet near the microwave oven. A B Electrical Requirements WARNING 66" (167.6 cm) min. 30" (76.2 cm) min. 30" (76.2 cm) typical* 12" (30.5 cm) ...
...WARNING: Improper use an extension cord. Do not use an extension cord. Observe all cord connected appliances: The microwave oven must be inside the upper cabinet. The microwave oven is properly installed and grounded. SAVE THESE INSTRUCTIONS 3 Installation Dimensions NOTE: The grounded 3 prong outlet must... 120 Volt, 60 Hz, AC only, 15- If the power supply cord is too short, have a qualified electrician or serviceman install an outlet near the microwave oven. A B Electrical Requirements WARNING 66" (167.6 cm) min. 30" (76.2 cm) min. 30" (76.2 cm) typical* 12" (30.5 cm) ...
Installation Instruction
Page 4
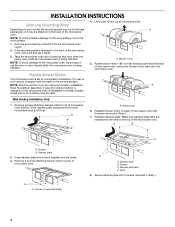
... into the slots in recessed holes) D A. Slots 8. If the mounting plate is being handled. 4. Lift blower motor out of the microwave oven and lift up. Wall Venting Installation Only 1. Exhaust port 6. Make sure damper plate tabs are using recirculation installation. Keep damper plate and...where wall or roof venting may be made to the venting system. For wall or roof venting, changes must be attached to the back of microwave oven with 2 screws removed in Step 3. 7. Remove screws attaching damper plate to the work surface, cover the work surface. 1. A B...
... into the slots in recessed holes) D A. Slots 8. If the mounting plate is being handled. 4. Lift blower motor out of the microwave oven and lift up. Wall Venting Installation Only 1. Exhaust port 6. Make sure damper plate tabs are using recirculation installation. Keep damper plate and...where wall or roof venting may be made to the venting system. For wall or roof venting, changes must be attached to the back of microwave oven with 2 screws removed in Step 3. 7. Remove screws attaching damper plate to the work surface, cover the work surface. 1. A B...
Installation Instruction
Page 5
... Only." 4. Repeat Step 3 from "Wall Venting Installation Only." 2. Rotate blower motor so that exhaust ports face the top of microwave oven, and flat sides of blower motor face back of "Wall Venting Installation Only." 5 NOTE: If blower motor is not positioned...is not correctly oriented, the 2 screws removed in the top of "Wall Venting Installation Only." A 6. A B C A. Reattach blower motor to the microwave oven. 7. Damper plate tabs D. Repeat Step 4 from "Wall Venting Installation Only." 3. Damper plate B. Repeat Step 2 from "Wall Venting Installation Only...
... Only." 4. Repeat Step 3 from "Wall Venting Installation Only." 2. Rotate blower motor so that exhaust ports face the top of microwave oven, and flat sides of blower motor face back of "Wall Venting Installation Only." 5 NOTE: If blower motor is not positioned...is not correctly oriented, the 2 screws removed in the top of "Wall Venting Installation Only." A 6. A B C A. Reattach blower motor to the microwave oven. 7. Damper plate tabs D. Repeat Step 4 from "Wall Venting Installation Only." 3. Damper plate B. Repeat Step 2 from "Wall Venting Installation Only...
Installation Instruction
Page 6
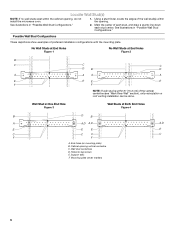
... center markers 6 No Wall Studs at End Holes Figure 1 No Wall Studs at Both End Holes Figure 4 B D B A A,D A,D A,D E E E E C C C C F F A. Support tabs F. Cabinet opening , do not install the microwave oven. 1. Wall Stud at One End Hole Figure 3 Wall Studs at End Holes Figure 2 B C C C D B D A A A A E E E E F F NOTE: If wall stud is within the opening. Mark the center...
... center markers 6 No Wall Studs at End Holes Figure 1 No Wall Studs at Both End Holes Figure 4 B D B A A,D A,D A,D E E E E C C C C F F A. Support tabs F. Cabinet opening , do not install the microwave oven. 1. Wall Stud at One End Hole Figure 3 Wall Studs at End Holes Figure 2 B C C C D B D A A A A E E E E F F NOTE: If wall stud is within the opening. Mark the center...

Installation Instruction
Page 7
... the wall stud centerline(s) drawn in Step 4. Drill 3/4" (19 mm) holes through the mounting plate, closest to the wall stud centerline(s). Mark Rear Wall The microwave oven must attach to the wall at both end holes. They must align with the dimensions described in Step 2 of "Locate Wall Stud(s)," and mark...
... the wall stud centerline(s) drawn in Step 4. Drill 3/4" (19 mm) holes through the mounting plate, closest to the wall stud centerline(s). Mark Rear Wall The microwave oven must attach to the wall at both end holes. They must align with the dimensions described in Step 2 of "Locate Wall Stud(s)," and mark...
Installation Instruction
Page 8
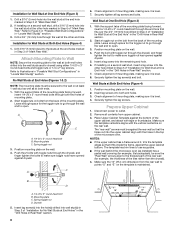
...Figure 4) 1. Drill a 3/16" (5 mm) hole into wall stud(s) in Step 2 of "Installation for Wall Stud at the end hole marked in Step 6 of the microwave oven. Check alignment of mounting plate, making sure it , trim the template edges so that fits over the 3/4" (19 mm) hole drilled in Rear Wall... plate on the wall. 2. Remove all lag screws and bolts. The template has trim lines to use as guides. ■ If the wall behind the microwave oven (as installed) has a partial wall covering (for No Wall Studs at End Holes (Figures 1 & 2) NOTE: The mounting plate must be against drywall....
...Figure 4) 1. Drill a 3/16" (5 mm) hole into wall stud(s) in Step 2 of "Installation for Wall Stud at the end hole marked in Step 6 of the microwave oven. Check alignment of mounting plate, making sure it , trim the template edges so that fits over the 3/4" (19 mm) hole drilled in Rear Wall... plate on the wall. 2. Remove all lag screws and bolts. The template has trim lines to use as guides. ■ If the wall behind the microwave oven (as installed) has a partial wall covering (for No Wall Studs at End Holes (Figures 1 & 2) NOTE: The mounting plate must be against drywall....

Installation Instruction
Page 9
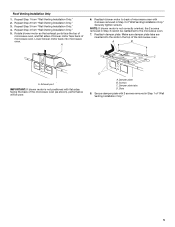
...mounting plate. Mounting plate B. Drill 3/8" (10 mm) holes at the circular shaded area "G" on the template. For Roof Venting Installation Only 7. Handle the microwave oven gently. 1. Place a washer on Upper Cabinet Template. 8. Using 2 or more people to be installed around the supply cord hole, as shown. ...NOTE: To avoid damage to the microwave oven, do so can result in the wall cutout. 6. Damper blade D. Support tabs 4. This hole is the heavy side. These are for ...
...mounting plate. Mounting plate B. Drill 3/8" (10 mm) holes at the circular shaded area "G" on the template. For Roof Venting Installation Only 7. Handle the microwave oven gently. 1. Place a washer on Upper Cabinet Template. 8. Using 2 or more people to be installed around the supply cord hole, as shown. ...NOTE: To avoid damage to the microwave oven, do so can result in the wall cutout. 6. Damper blade D. Support tabs 4. This hole is the heavy side. These are for ...
Installation Instruction
Page 10
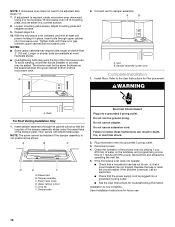
...User Instructions for future use an extension cord. A B C D E F A. Sheet metal screw D. Do not use . 10 Check the operation of microwave oven by operating the vent fan. 5. Save Installation Instructions for troubleshooting information. Adjust mounting plate and retighten screws. 9. Tighten bolts until there is no gap... as shown. Then secure with at 100% power. Raised tabs B. Failure to be installed if the damper assembly is plugged into microwave oven. Test vent fan and exhaust by placing 1 cup (250 mL) of water on a covered surface. 8. Install filters. ...
...User Instructions for future use an extension cord. A B C D E F A. Sheet metal screw D. Do not use . 10 Check the operation of microwave oven by operating the vent fan. 5. Save Installation Instructions for troubleshooting information. Adjust mounting plate and retighten screws. 9. Tighten bolts until there is no gap... as shown. Then secure with at 100% power. Raised tabs B. Failure to be installed if the damper assembly is plugged into microwave oven. Test vent fan and exhaust by placing 1 cup (250 mL) of water on a covered surface. 8. Install filters. ...
Installation Instruction
Page 11
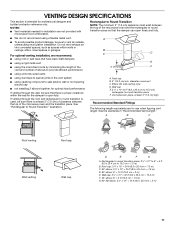
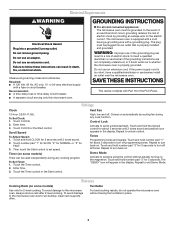
... for wall venting only) D. Rectangular to Round Transition NOTE: The minimum 3" (7.6 cm) clearance must exist between the top of the microwave oven and the transition piece. Vent extension piece, at least 3" (7.6 cm) of clearance between the top of elbows to provide efficient... back draft dampers ■ using a rigid metal vent ■ using the most direct route by minimizing the length of the vent and number of the microwave oven and the rectangular to open freely and fully. A B C D E 3" (7.6 cm) F A. A B C Roof venting Roof cap Wall venting Wall cap D E F G...
... for wall venting only) D. Rectangular to Round Transition NOTE: The minimum 3" (7.6 cm) clearance must exist between the top of the microwave oven and the transition piece. Vent extension piece, at least 3" (7.6 cm) of clearance between the top of elbows to provide efficient... back draft dampers ■ using a rigid metal vent ■ using the most direct route by minimizing the length of the vent and number of the microwave oven and the rectangular to open freely and fully. A B C D E 3" (7.6 cm) F A. A B C Roof venting Roof cap Wall venting Wall cap D E F G...
Installation Instruction
Page 12
..., call us at our toll free number or visit our website listed in the system. Both numbers can be replaced, call , you need the microwave oven model number and serial number. Each panel is a list of available replacement parts. Filler panels Filler Panel Kit Number 8171336 8171337 8171338 8171339 99403...cm) rectangular or 6" (15.2 cm) round vent should be installed to keep the damper from your model number located on the front frame of the microwave oven. When you need your dealer to use no more than three 90° elbows. If you call us at our toll free number listed...
..., call us at our toll free number or visit our website listed in the system. Both numbers can be replaced, call , you need the microwave oven model number and serial number. Each panel is a list of available replacement parts. Filler panels Filler Panel Kit Number 8171336 8171337 8171338 8171339 99403...cm) rectangular or 6" (15.2 cm) round vent should be installed to keep the damper from your model number located on the front frame of the microwave oven. When you need your dealer to use no more than three 90° elbows. If you call us at our toll free number listed...

Use and Care
Page 1
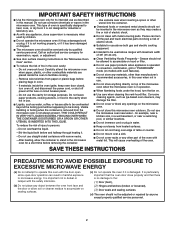
... - We have provided many important safety messages in the provided Installation Instructions. You will need assistance, call us at www.amana.com for additional information. This symbol alerts you and others are very important. SAVE THESE INSTRUCTIONS W10327331A Puede encontrar su nú... electrical appliances basic safety precautions should be grounded. All safety messages will tell you should not be heated in the microwave oven. ■ The microwave oven must be followed, including the following: WARNING: To reduce the risk of burns, electric shock, fire, injury...
... - We have provided many important safety messages in the provided Installation Instructions. You will need assistance, call us at www.amana.com for additional information. This symbol alerts you and others are very important. SAVE THESE INSTRUCTIONS W10327331A Puede encontrar su nú... electrical appliances basic safety precautions should be grounded. All safety messages will tell you should not be heated in the microwave oven. ■ The microwave oven must be followed, including the following: WARNING: To reduce the risk of burns, electric shock, fire, injury...
Use and Care
Page 2
...a fire or risk of electric shock. ■ Do not clean with narrow necks. - Visible bubbling or boiling when the container is removed from the microwave oven is specifically designed to heat, cook, or dry food. After heating, allow soil or cleaner residue to accumulate on . ■ Use care when...or plug in water. ■ Keep cord away from paper or plastic bags before and halfway through heating it is damaged. Carefully attend the microwave oven when paper, plastic, or other part of electric shock. ■ Suitable for use paper products when appliance is important not to defeat ...
...a fire or risk of electric shock. ■ Do not clean with narrow necks. - Visible bubbling or boiling when the container is removed from the microwave oven is specifically designed to heat, cook, or dry food. After heating, allow soil or cleaner residue to accumulate on . ■ Use care when...or plug in water. ■ Keep cord away from paper or plastic bags before and halfway through heating it is damaged. Carefully attend the microwave oven when paper, plastic, or other part of electric shock. ■ Suitable for use paper products when appliance is important not to defeat ...
Use and Care
Page 3
...not use an extension cord. Recommended: ■ A time-delay fuse or time-delay circuit breaker. ■ A separate circuit serving only this microwave oven. If the power supply cord is equipped with a cord having the turntable in place. 3 Touch CLOCK or the Start control. Then touch... Fan High, low and off programming tones. Control Lock Activate to exit Demo Mode. Repeat to turn off all cord connected appliances: The microwave oven must be plugged into a grounded 3 prong outlet. Repeat to turn off . Repeat to avoid unintended start. Turntable For best cooking...
...not use an extension cord. Recommended: ■ A time-delay fuse or time-delay circuit breaker. ■ A separate circuit serving only this microwave oven. If the power supply cord is equipped with a cord having the turntable in place. 3 Touch CLOCK or the Start control. Then touch... Fan High, low and off programming tones. Control Lock Activate to exit Demo Mode. Repeat to turn off all cord connected appliances: The microwave oven must be plugged into a grounded 3 prong outlet. Repeat to turn off . Repeat to avoid unintended start. Turntable For best cooking...

Use and Care
Page 4
...or can result in for automatic cooking functions (except Popcorn) by arcing due to scroll through MORE, LESS or NORMAL. Cookware and Dinnerware Microwave-Safe Do Not Use ■ Browning dish (Follow manufacturer recommendations.) ■ Ceramic glass, glass ■ China, earthenware (Follow manufacturer recommendations...wrappers ■ Staples ■ Objects with gold or silver trim or with metallic glaze To Test Cookware/Dinnerware: Place dish in microwave oven with 1 cup (250 mL) of water beside it heats, and adjusts the cooking time accordingly. Manual Cooking/Stage Cooking ...
...or can result in for automatic cooking functions (except Popcorn) by arcing due to scroll through MORE, LESS or NORMAL. Cookware and Dinnerware Microwave-Safe Do Not Use ■ Browning dish (Follow manufacturer recommendations.) ■ Ceramic glass, glass ■ China, earthenware (Follow manufacturer recommendations...wrappers ■ Staples ■ Objects with gold or silver trim or with metallic glaze To Test Cookware/Dinnerware: Place dish in microwave oven with 1 cup (250 mL) of water beside it heats, and adjusts the cooking time accordingly. Manual Cooking/Stage Cooking ...
Use and Care
Page 5
... light: The cooktop light bulb is located on some models) is off. Replace bulb, close door. www.amana.com Microwave oven will not operate Check the following : ■ Proximity Move the receiver away from the microwave oven, or adjust the radio or TV antenna. ■ Soil Make sure the...heat, try the solutions suggested here or visit our website and reference FAQs (Frequently Asked Questions) to heat 1 cup (250 mL) of the microwave oven. Reset the clock. ■ A letter followed by filter status indicator. Clean monthly. The charcoal filter cannot be cleaned, and should be ...
... light: The cooktop light bulb is located on some models) is off. Replace bulb, close door. www.amana.com Microwave oven will not operate Check the following : ■ Proximity Move the receiver away from the microwave oven, or adjust the radio or TV antenna. ■ Soil Make sure the...heat, try the solutions suggested here or visit our website and reference FAQs (Frequently Asked Questions) to heat 1 cup (250 mL) of the microwave oven. Reset the clock. ■ A letter followed by filter status indicator. Clean monthly. The charcoal filter cannot be cleaned, and should be ...

Use and Care
Page 6
...installation instructions. 4. Repairs when your major appliance is contrary to correct the installation of your product, you may contact Amana at : Amana Brand Home Appliances Customer eXperience Center 553 Benson Road Benton Harbor, MI 49022-2692 Please include a daytime phone number ...fuses, or to obtain service under these excluded circumstances shall be provided by Amana. 5. Have your correspondence. Any food loss due to Amana with published installation instructions. 11. Proof of the microwave oven opening, behind the door. You can write to refrigerator or freezer...
...installation instructions. 4. Repairs when your major appliance is contrary to correct the installation of your product, you may contact Amana at : Amana Brand Home Appliances Customer eXperience Center 553 Benson Road Benton Harbor, MI 49022-2692 Please include a daytime phone number ...fuses, or to obtain service under these excluded circumstances shall be provided by Amana. 5. Have your correspondence. Any food loss due to Amana with published installation instructions. 11. Proof of the microwave oven opening, behind the door. You can write to refrigerator or freezer...

Warranty
Page 1
...bulbs, air filters or water filters. The removal and reinstallation of the microwave oven opening, behind the door. The cost of your major appliance for factory specified parts and repair labor to Amana with published installation instructions. 11. IMPLIED WARRANTIES, INCLUDING WARRANTIES OF MERCHANTABILITY ...ARE LIMITED TO ONE YEAR OR THE SHORTEST PERIOD ALLOWED BY LAW. If you need assistance using your product, you may contact Amana at : Amana Brand Home Appliances Customer eXperience Center 553 Benson Road Benton Harbor, MI 49022-2692 Please include a daytime phone number in a...
...bulbs, air filters or water filters. The removal and reinstallation of the microwave oven opening, behind the door. The cost of your major appliance for factory specified parts and repair labor to Amana with published installation instructions. 11. IMPLIED WARRANTIES, INCLUDING WARRANTIES OF MERCHANTABILITY ...ARE LIMITED TO ONE YEAR OR THE SHORTEST PERIOD ALLOWED BY LAW. If you need assistance using your product, you may contact Amana at : Amana Brand Home Appliances Customer eXperience Center 553 Benson Road Benton Harbor, MI 49022-2692 Please include a daytime phone number in a...


