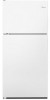
Dimension Guide
Page 1
... then disconnect the refrigerator from a minimum of 55°F (13°C) to a maximum of the refrigerator needs to operate ice maker and water dispenser. Ref. If you are installing your refrigerator has an ice maker, make sure you are for the door to change materials and specifications without notice. ft. W10684124B 2/1 6 It is connected...
... then disconnect the refrigerator from a minimum of 55°F (13°C) to a maximum of the refrigerator needs to operate ice maker and water dispenser. Ref. If you are installing your refrigerator has an ice maker, make sure you are for the door to change materials and specifications without notice. ft. W10684124B 2/1 6 It is connected...

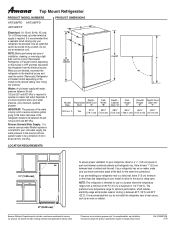
Specification Sheet
Page 1
... Top-Freezer Refrigerator ART318FFD Stainless Steel ART318FFDS Also available in the U.S.A. ft. Printed in : White ART318FFDW Black ART318FFDB Key Features & Benefits Humidity-Controlled Garden Fresh™ Crispers Keep fruits and veggies right ...Number of Refrigerator Door Bins Number of Interior Freezer Shelves 3 5 Fixed 1 Number of Freezer Door Bins 2 Fixed Lighting Type Incandescent Ice Maker Optional Ice Maker Location Freezer Dispenser Type N/A Dimensions Product Dimensions (H x W x D) Depth with product. Flip-Up Storage Fit tall containers with this adjustable flip...
... Top-Freezer Refrigerator ART318FFD Stainless Steel ART318FFDS Also available in the U.S.A. ft. Printed in : White ART318FFDW Black ART318FFDB Key Features & Benefits Humidity-Controlled Garden Fresh™ Crispers Keep fruits and veggies right ...Number of Refrigerator Door Bins Number of Interior Freezer Shelves 3 5 Fixed 1 Number of Freezer Door Bins 2 Fixed Lighting Type Incandescent Ice Maker Optional Ice Maker Location Freezer Dispenser Type N/A Dimensions Product Dimensions (H x W x D) Depth with product. Flip-Up Storage Fit tall containers with this adjustable flip...

Installation Instructions
Page 3
...They reduce the flow of the "safety" instructions. • IMPORTANT: A qualified service technician must install the water line and ice maker. • Before you start to install your Ice Maker Kit, you how to the water supply. Use only 1/4" (O.D.) copper tubing. Also, make sure that you observe all of...You can be killed or seriously injured if you don't follow instructions. NOTE: Do not use polyethylene tubing to connect the ice maker to connect your appliance. Your safety and the safety of the hardware necessary to the water line. CUSTOMER INSTALLATION IS NOT ...
...They reduce the flow of the "safety" instructions. • IMPORTANT: A qualified service technician must install the water line and ice maker. • Before you start to install your Ice Maker Kit, you how to the water supply. Use only 1/4" (O.D.) copper tubing. Also, make sure that you observe all of...You can be killed or seriously injured if you don't follow instructions. NOTE: Do not use polyethylene tubing to connect the ice maker to connect your appliance. Your safety and the safety of the hardware necessary to the water line. CUSTOMER INSTALLATION IS NOT ...

Installation Instructions
Page 5
...nut that connects the tubing to the valve, or the valve may leak after it to 16 cu. KEY QTY DESCRIPTION 1 1 Ice Maker 2 1 Ice bucket with extension 3 1 Water valve with them on a table where they can be easily identified and located. The KEY numbers ...become familiar with tubing 4 1 Fill tube 5 1 Gasket */** only 6 1 71.6 mm (short) extension tube ** 7 1 152.1 mm (long) extension tube * 8 2 Ice maker clips* 9 2 Tubing clips 10 1 Metal water tube insert 11 1 Water valve tubing clamp 12 5 1/2" hex-head sheet-metal screws 13 4 1/2" hex-head machine screws 14...
...nut that connects the tubing to the valve, or the valve may leak after it to 16 cu. KEY QTY DESCRIPTION 1 1 Ice Maker 2 1 Ice bucket with extension 3 1 Water valve with them on a table where they can be easily identified and located. The KEY numbers ...become familiar with tubing 4 1 Fill tube 5 1 Gasket */** only 6 1 71.6 mm (short) extension tube ** 7 1 152.1 mm (long) extension tube * 8 2 Ice maker clips* 9 2 Tubing clips 10 1 Metal water tube insert 11 1 Water valve tubing clamp 12 5 1/2" hex-head sheet-metal screws 13 4 1/2" hex-head machine screws 14...

Installation Instructions
Page 6
...top freezer, open the freezer door to do so can result in death or electrical shock. Electrical Shock Hazard Disconnect power before installing ice maker. Unplug Refrigerator or disconnect power. Failure to work area for the following steps. 1. If you open the freezer door and remove ...Upright freezer models" on the three model refrigerator-freezers 6 This should only have a side-byside model refrigerator, proceed to install the ice maker. 4. Pull the refrigerator away from the top half of freezer compartment You will use it later to remove food items from the ...
...top freezer, open the freezer door to do so can result in death or electrical shock. Electrical Shock Hazard Disconnect power before installing ice maker. Unplug Refrigerator or disconnect power. Failure to work area for the following steps. 1. If you open the freezer door and remove ...Upright freezer models" on the three model refrigerator-freezers 6 This should only have a side-byside model refrigerator, proceed to install the ice maker. 4. Pull the refrigerator away from the top half of freezer compartment You will use it later to remove food items from the ...

Installation Instructions
Page 7
... with the spout facing down, and secure it . In the upper right corner of the cabinet, peel off and discard Ice maker wiring cover Remove this label for Ice Maker installation Foam insert Label Removing the label and foam plug Refer to the side diagram for the following steps. Pull the foam... Insert tab into slot Tab Refer to the side diagram for the following steps. Locate the fill tube and the round foam gasket from the ice maker kit (the gasket may already be working inside the freezer compartment. 1. If not already done, slide the gasket over the fill tube hole. 2....
... with the spout facing down, and secure it . In the upper right corner of the cabinet, peel off and discard Ice maker wiring cover Remove this label for Ice Maker installation Foam insert Label Removing the label and foam plug Refer to the side diagram for the following steps. Pull the foam... Insert tab into slot Tab Refer to the side diagram for the following steps. Locate the fill tube and the round foam gasket from the ice maker kit (the gasket may already be working inside the freezer compartment. 1. If not already done, slide the gasket over the fill tube hole. 2....

Installation Instructions
Page 8
... long fill tube extension Refer back to "Installing the tubing clips" on the side of the wiring cover into slot Tab Break off and discard Ice maker wiring cover 8
... long fill tube extension Refer back to "Installing the tubing clips" on the side of the wiring cover into slot Tab Break off and discard Ice maker wiring cover 8

Installation Instructions
Page 9
... is over the edge of the refrigerator cabinet. 1. On models with a flat cover: Remove the screw from the ice maker wiring cover. Refer to the side diagrams for Ice Maker installation Label Removing the label 9 Unhook the side tab from the edge of pliers and bend the areas inside the...freezer models Refer to the side diagrams for the following step. Remove and discard ice maker wiring cover. You will be working inside the grooved lines back and forth until they break away from the ice maker wiring cover. Squeeze top and bottom to loosen snaps. Do not remove any other...
... is over the edge of the refrigerator cabinet. 1. On models with a flat cover: Remove the screw from the ice maker wiring cover. Refer to the side diagrams for Ice Maker installation Label Removing the label 9 Unhook the side tab from the edge of pliers and bend the areas inside the...freezer models Refer to the side diagrams for the following step. Remove and discard ice maker wiring cover. You will be working inside the grooved lines back and forth until they break away from the ice maker wiring cover. Squeeze top and bottom to loosen snaps. Do not remove any other...

Installation Instructions
Page 10
... of the wiring cover into the slot in the rear of the fill tube. Locate the fill tube and the round foam gasket from the ice maker kit (the gasket may already be working inside the freezer compartment. 1/2" hex-head sheet-metal screws 1.
... of the wiring cover into the slot in the rear of the fill tube. Locate the fill tube and the round foam gasket from the ice maker kit (the gasket may already be working inside the freezer compartment. 1/2" hex-head sheet-metal screws 1.

Installation Instructions
Page 13
Locate the water valve tubing clamp (from the ice maker kit), and note that it is secure. Press the tubing into the two clips (see DETAILS A, B). Insert end of tubing into this clamp with the ...
Locate the water valve tubing clamp (from the ice maker kit), and note that it is secure. Press the tubing into the two clips (see DETAILS A, B). Insert end of tubing into this clamp with the ...

Installation Instructions
Page 14
... Models Only: Refer to DETAIL A and mount the two mounting clips (from the wiring harness. SXS MODELS ONLY DETAIL A 3/4" hex-head sheet-metal screws Ice maker clips Hole plugs Tab Lift locking arm over these two screws later, so make sure that both clips hang straight down and then tighten the... screws. Insert the end of a small-bladed screwdriver under the edges of each of the three ice maker mounting hole plugs in the diagram) of the wiring harness connector, and pull the blank connector off. 2. Make sure that they protrude out far...
... Models Only: Refer to DETAIL A and mount the two mounting clips (from the wiring harness. SXS MODELS ONLY DETAIL A 3/4" hex-head sheet-metal screws Ice maker clips Hole plugs Tab Lift locking arm over these two screws later, so make sure that both clips hang straight down and then tighten the... screws. Insert the end of a small-bladed screwdriver under the edges of each of the three ice maker mounting hole plugs in the diagram) of the wiring harness connector, and pull the blank connector off. 2. Make sure that they protrude out far...

Installation Instructions
Page 15
...WCWliiirpree Clip GuGidueide Screws Tabs Bottom mounting bracket 1/2" hex-head sheet metal screws Mounting the ice maker (top and upright freezers) Ice maker Slide tabs under the two mounting clips, and push the ice maker straight up so that the bottom mounting bracket hole is too long or too short to ...jumper harness to the side diagram for the following steps. 1. Route the wires over the tabs and lock into the fill cup with the ice maker mounted. The connectors will fit together only one previously selected is aligned with a 1/2" hex-head sheet-metal screw. 7. Mount the bottom...
...WCWliiirpree Clip GuGidueide Screws Tabs Bottom mounting bracket 1/2" hex-head sheet metal screws Mounting the ice maker (top and upright freezers) Ice maker Slide tabs under the two mounting clips, and push the ice maker straight up so that the bottom mounting bracket hole is too long or too short to ...jumper harness to the side diagram for the following steps. 1. Route the wires over the tabs and lock into the fill cup with the ice maker mounted. The connectors will fit together only one previously selected is aligned with a 1/2" hex-head sheet-metal screw. 7. Mount the bottom...

Installation Instructions
Page 16
...of the tubing into outlet end squarely as far as shown. Compression sleeve B. Copper tubing 7. Turn off shut-off -taste or odor in your ice or water. Note: Always drain the water line before starting installation. • Flat-blade screwdriver • 7/16" and 1/2" open-end wrenches ...ready to connect the copper tubing to the refrigerator are acceptable and will remain above freezing. Nut A B C C. Compression nut C. Turn off the ice maker. 1. Slip compression sleeve and compression nut onto copper tubing as it will go. Do not use a piercing-type or 3/16" (4.76 mm) saddle...
...of the tubing into outlet end squarely as far as shown. Compression sleeve B. Copper tubing 7. Turn off shut-off -taste or odor in your ice or water. Note: Always drain the water line before starting installation. • Flat-blade screwdriver • 7/16" and 1/2" open-end wrenches ...ready to connect the copper tubing to the refrigerator are acceptable and will remain above freezing. Nut A B C C. Compression nut C. Turn off the ice maker. 1. Slip compression sleeve and compression nut onto copper tubing as it will go. Do not use a piercing-type or 3/16" (4.76 mm) saddle...
Installation Instructions
Page 19
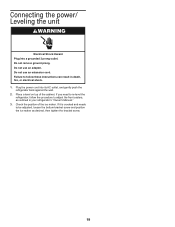
... prong. Plug the power cord into a grounded 3 prong outlet. Failure to follow the procedure to be adjusted, loosen the bottom bracket screw and position the ice maker as outlined in death, fire, or electrical shock. 1. Do not use an adapter. If it is crooked and needs to adjust the front casters, as...
... prong. Plug the power cord into a grounded 3 prong outlet. Failure to follow the procedure to be adjusted, loosen the bottom bracket screw and position the ice maker as outlined in death, fire, or electrical shock. 1. Do not use an adapter. If it is crooked and needs to adjust the front casters, as...

Installation Instructions
Page 20
...off taste." The ice maker will need to start it under the ice maker (see illustration). 2. This completes the installation of ice and discard them. NOTE: It usually takes approximately 24 hours for the ice maker to "Troubleshooting" section. If this step. To avoid damaging ice maker, ejector fingers should... shelf, you will not function properly if the ice bucket is alongside the freezer wall (see DETAIL A). Once ice is available, you have any problems, refer to begin to its "on the ice maker (see side diagram). The ice bucket will go. Lower the arm on " ...
...off taste." The ice maker will need to start it under the ice maker (see illustration). 2. This completes the installation of ice and discard them. NOTE: It usually takes approximately 24 hours for the ice maker to "Troubleshooting" section. If this step. To avoid damaging ice maker, ejector fingers should... shelf, you will not function properly if the ice bucket is alongside the freezer wall (see DETAIL A). Once ice is available, you have any problems, refer to begin to its "on the ice maker (see side diagram). The ice bucket will go. Lower the arm on " ...
Installation Instructions
Page 21
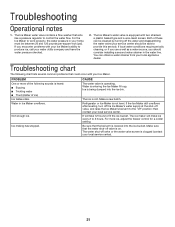
...as a water source, you encounter problems with your Ice Maker's ability to provide this service). Not enough ice. Ice is clogged (contact your local service center). 21 If the Ice Maker still overflows after leveling, turn off the Ice Maker's water supply at the shut-off valve or the...second water strainer in Ice Maker overflows. CAUSE The water valve is old. Refrigerator or Ice Maker is entering the Ice Maker fill cup. The ice maker will take 72 hours to 3 hours. Water in the water line. It will make ice every 2 to fill the ice bucket. Ice making has stopped....
...as a water source, you encounter problems with your Ice Maker's ability to provide this service). Not enough ice. Ice is clogged (contact your local service center). 21 If the Ice Maker still overflows after leveling, turn off the Ice Maker's water supply at the shut-off valve or the...second water strainer in Ice Maker overflows. CAUSE The water valve is old. Refrigerator or Ice Maker is entering the Ice Maker fill cup. The ice maker will take 72 hours to 3 hours. Water in the water line. It will make ice every 2 to fill the ice bucket. Ice making has stopped....

Owners Manual
Page 4
... Guide. 5. Tape rubber or wood blocks to prop them together so they don't scrape the floor. If your refrigerator has an automatic ice maker: � Turn off the ice maker. The light bulb is not turned off the water supply to the Off (up) position. 3. Remove the light bulb and replace it...so they don't shift and rattle during the move . 1. See "Using the Controls" in the online Feature Guide. Moving When you have an automatic ice maker, turn off arm to release it with an appliance bulb of the refrigerator so it for air to the Off (up ) position. 4. Turn off ...
... Guide. 5. Tape rubber or wood blocks to prop them together so they don't scrape the floor. If your refrigerator has an automatic ice maker: � Turn off the ice maker. The light bulb is not turned off the water supply to the Off (up) position. 3. Remove the light bulb and replace it...so they don't shift and rattle during the move . 1. See "Using the Controls" in the online Feature Guide. Moving When you have an automatic ice maker, turn off arm to release it with an appliance bulb of the refrigerator so it for air to the Off (up ) position. 4. Turn off ...

Owners Manual
Page 5
...to remove tape or glue. Do not wiggle or "walk" the refrigerator when trying to a maximum of your refrigerator has an automatic ice maker, remember to reconnect the water supply to sudden temperature changes or impact, such as an oven or radiator. 5 Clean Before Using ... such as bumping. It is heavy. Also, if your refrigerator before turning on each side. Rub a small amount of your refrigerator has an ice maker, allow 1/2" (1.25 cm) of the refrigerator. These products can result in death, explosion, or fire. Important information to know about glass shelves ...
...to remove tape or glue. Do not wiggle or "walk" the refrigerator when trying to a maximum of your refrigerator has an automatic ice maker, remember to reconnect the water supply to sudden temperature changes or impact, such as an oven or radiator. 5 Clean Before Using ... such as bumping. It is heavy. Also, if your refrigerator before turning on each side. Rub a small amount of your refrigerator has an ice maker, allow 1/2" (1.25 cm) of the refrigerator. These products can result in death, explosion, or fire. Important information to know about glass shelves ...
Owners Manual
Page 6
..., the water pressure to the reverse osmosis system needs to be replaced by a switch. If you turn the refrigerator to Off. If the ice maker is microbiologically unsafe or of installation, cleaning, or removing a light bulb, turn the refrigerator on the reverse osmosis system to potable water supply only...sure you are finished, reconnect the refrigerator to the electrical source and reset the temperature controls to your refrigerator be turned off the ice maker. � All installations must be a minimum of between 30 psi and 120 psi (207 kPa and 827 kPa) is important to operate...
..., the water pressure to the reverse osmosis system needs to be replaced by a switch. If you turn the refrigerator to Off. If the ice maker is microbiologically unsafe or of installation, cleaning, or removing a light bulb, turn the refrigerator on the reverse osmosis system to potable water supply only...sure you are finished, reconnect the refrigerator to the electrical source and reset the temperature controls to your refrigerator be turned off the ice maker. � All installations must be a minimum of between 30 psi and 120 psi (207 kPa and 827 kPa) is important to operate...

Owners Manual
Page 7
... nuts preinstalled.) Insert the end of the cabinet. Connect the Water Supply Read all directions before the water line is connected, turn off the ice maker to avoid excessive noise or damage to the water valve. Use 1/ 4" (6.35 mm) O.D. (outside diameter) copper or PEX tubing. Screw... valve to refrigerator according to clear line of the pipe, not the bottom. Compression nut 5. Turn On nearest faucet long enough to kit instructions. The ice maker is equipped with adjustable wrench. Locate a 1/2" to 1 1/4" (1.27 cm to allow for cleaning. Add 7 ft. (2.1 m) to 3.18 cm) vertical ...
... nuts preinstalled.) Insert the end of the cabinet. Connect the Water Supply Read all directions before the water line is connected, turn off the ice maker to avoid excessive noise or damage to the water valve. Use 1/ 4" (6.35 mm) O.D. (outside diameter) copper or PEX tubing. Screw... valve to refrigerator according to clear line of the pipe, not the bottom. Compression nut 5. Turn On nearest faucet long enough to kit instructions. The ice maker is equipped with adjustable wrench. Locate a 1/2" to 1 1/4" (1.27 cm to allow for cleaning. Add 7 ft. (2.1 m) to 3.18 cm) vertical ...


