
Installation Instructions
Page 2
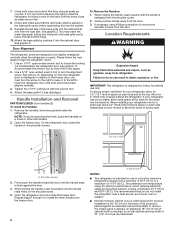
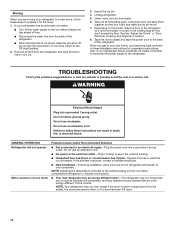
... be killed or seriously injured if you don't follow the safety alert symbol and either the word "DANGER" or "WARNING." Always read and obey all parts and panels before operating. All safety messages will follow instructions. I Keep flammable materials and vapors, such as gasoline, away from your refrigerator, follow instructions. I This...
... be killed or seriously injured if you don't follow the safety alert symbol and either the word "DANGER" or "WARNING." Always read and obey all parts and panels before operating. All safety messages will follow instructions. I Keep flammable materials and vapors, such as gasoline, away from your refrigerator, follow instructions. I This...

Installation Instructions
Page 4
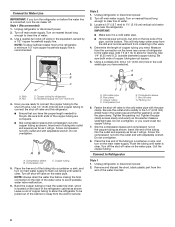
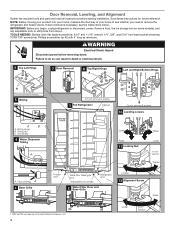
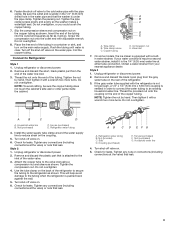
... your home, measure the doorway of your home to remove the refrigerator and freezer doors. Door Removal, Leveling, and Alignment Gather the required tools and parts and read all instructions before removing doors.
... your home, measure the doorway of your home to remove the refrigerator and freezer doors. Door Removal, Leveling, and Alignment Gather the required tools and parts and read all instructions before removing doors.
Installation Instructions
Page 6
... graphic 3. Accommodate the wrench tool so that the technician sheet is between 60°F (15°C) and 90°F (32°C). Handle Installation and Removal PARTS INCLUDED: Door handles (2) To Install the Handles: 1. While holding the handle, push downward until the handle is misaligned in a location where the temperature ranges from...
... graphic 3. Accommodate the wrench tool so that the technician sheet is between 60°F (15°C) and 90°F (32°C). Handle Installation and Removal PARTS INCLUDED: Door handles (2) To Install the Handles: 1. While holding the handle, push downward until the handle is misaligned in a location where the temperature ranges from...

Installation Instructions
Page 7
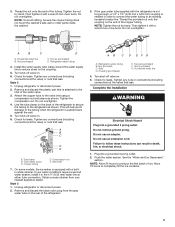
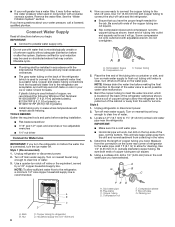
...system going to the water inlet valve of the refrigerator needs to be provided. Check for suggestions. TOOLS NEEDED: Gather the required tools and parts before starting installation. ■■ Flat-blade screwdriver ■■ 7/16" and 1/2" open -end or two adjustable wrenches ■■...meets the minimum requirement. ■■ If it may further reduce the water pressure when used instead of copper, we recommend the following Whirlpool Part Numbers: W10505928RP (7 ft [2.14 m] jacketed PEX), 8212547RP (5 ft [1.52 m] PEX), or W10267701RP (25 ft [7.62 m] PEX). ■...
...system going to the water inlet valve of the refrigerator needs to be provided. Check for suggestions. TOOLS NEEDED: Gather the required tools and parts before starting installation. ■■ Flat-blade screwdriver ■■ 7/16" and 1/2" open -end or two adjustable wrenches ■■...meets the minimum requirement. ■■ If it may further reduce the water pressure when used instead of copper, we recommend the following Whirlpool Part Numbers: W10505928RP (7 ft [2.14 m] jacketed PEX), 8212547RP (5 ft [1.52 m] PEX), or W10267701RP (25 ft [7.62 m] PEX). ■...
Installation Instructions
Page 8
... onto the outlet end with adjustable wrench. Turn off the shut-off valve. Unplug refrigerator or disconnect power. 2. Remove and discard the short, black plastic part from the connection on nearest faucet long enough to clear line of copper tubing are ready to connect the copper tubing to clear line of...
... onto the outlet end with adjustable wrench. Turn off the shut-off valve. Unplug refrigerator or disconnect power. 2. Remove and discard the short, black plastic part from the connection on nearest faucet long enough to clear line of copper tubing are ready to connect the copper tubing to clear line of...
Installation Instructions
Page 9
Do not overtighten. Household water line B. Remove and discard the plastic part that leak. Tube clamp screw C. Compression nut E. AB C D EFG A. Ferrule (purchased) F. Turn shut-off valve on . 6. Tighten any nuts or connections... back against the wall. 5. Household water line 4. NOTE: To avoid rattling, be sure the copper tubing does not touch the cabinet's side wall or other parts inside the cabinet. 3. A B C D A. This will help avoid damage to completely fill the ice container. 9 Nut (purchased) G. Flush the water system. 3. Then...
Do not overtighten. Household water line B. Remove and discard the plastic part that leak. Tube clamp screw C. Compression nut E. AB C D EFG A. Ferrule (purchased) F. Turn shut-off valve on . 6. Tighten any nuts or connections... back against the wall. 5. Household water line 4. NOTE: To avoid rattling, be sure the copper tubing does not touch the cabinet's side wall or other parts inside the cabinet. 3. A B C D A. This will help avoid damage to completely fill the ice container. 9 Nut (purchased) G. Flush the water system. 3. Then...

Installation Instructions
Page 11
... the front surface area of the condenser. ■■ Replace the base grille when finished. 5. Hand wash, rinse, and dry removable parts and interior surfaces thoroughly. If you have an automatic ice maker, turn off the ice maker. Remove light bulb and replace with a clean...■■ Remove the base grille. If you need for air to Turn Refrigerator Off Before You Leave: 1. NOTE: Depending on plastic parts, interior and door liners or gaskets. REFRIGERATOR CARE Cleaning WARNING Explosion Hazard Use nonflammable cleaner. To Clean Your Refrigerator: NOTE: Do not use...
... the front surface area of the condenser. ■■ Replace the base grille when finished. 5. Hand wash, rinse, and dry removable parts and interior surfaces thoroughly. If you have an automatic ice maker, turn off the ice maker. Remove light bulb and replace with a clean...■■ Remove the base grille. If you need for air to Turn Refrigerator Off Before You Leave: 1. NOTE: Depending on plastic parts, interior and door liners or gaskets. REFRIGERATOR CARE Cleaning WARNING Explosion Hazard Use nonflammable cleaner. To Clean Your Refrigerator: NOTE: Do not use...
Installation Instructions
Page 12
... ice maker at lower speeds that are opened often, or if a door has been left open. 12 Empty the ice bin. 4. Take out all removable parts, wrap them well, and tape them together so they don't scrape the floor. When you get to your refrigerator has an automatic ice maker: ■...
... ice maker at lower speeds that are opened often, or if a door has been left open. 12 Empty the ice bin. 4. Take out all removable parts, wrap them well, and tape them together so they don't scrape the floor. When you get to your refrigerator has an automatic ice maker: ■...
Installation Instructions
Page 17
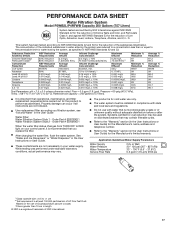
Flow = 0.5 gpm (1.9 Lpm). Order Part # EDR1RXD1 Water Filtration System Style 2 - Systems certified for cyst reduction may be carried out for the product to the "Warranty" section (in NSF/ANSI Standards ... = 7.5 ± 0.5 unless otherwise noted. Property damage can occur if all instructions are not necessarily in the User Guide Water Filter: Water Filtration System Style 1 - Order Part # EDR2RXD1 When the water filter status changes from TURN OFF to the permissible limit for water leaving the system, as advertised. See "Water and Ice...
Flow = 0.5 gpm (1.9 Lpm). Order Part # EDR1RXD1 Water Filtration System Style 2 - Systems certified for cyst reduction may be carried out for the product to the "Warranty" section (in NSF/ANSI Standards ... = 7.5 ± 0.5 unless otherwise noted. Property damage can occur if all instructions are not necessarily in the User Guide Water Filter: Water Filtration System Style 1 - Order Part # EDR2RXD1 When the water filter status changes from TURN OFF to the permissible limit for water leaving the system, as advertised. See "Water and Ice...

Owners Manual
Page 2
Always read and obey all parts and panels before operating. Remove doors from your old refrigerator. Connect only to the potable water supply. Use non-flammable cleaner. ...
Always read and obey all parts and panels before operating. Remove doors from your old refrigerator. Connect only to the potable water supply. Use non-flammable cleaner. ...
Owners Manual
Page 4
... the doorway of Acument Intellectual Properties, LLC. 4 (B) (C) Lower 5/16" wrench Raise TOOLS NEEDED: Bubble level; Door Removal, Leveling, and Alignment Gather the required tools and parts and read all instructions before removing doors. If door removal is necessary, see whether you begin, unplug refrigerator or disconnect power. flat-blade screwdriver; 5/16...
... the doorway of Acument Intellectual Properties, LLC. 4 (B) (C) Lower 5/16" wrench Raise TOOLS NEEDED: Bubble level; Door Removal, Leveling, and Alignment Gather the required tools and parts and read all instructions before removing doors. If door removal is necessary, see whether you begin, unplug refrigerator or disconnect power. flat-blade screwdriver; 5/16...

Owners Manual
Page 6
... your refrigerator next to loosen the locking nut of the base grille first, and then the right side. See graphic 11. Handle Installation and Removal PARTS INCLUDED: Door handles (2) To Install the Handles: 1. A A. Firmly push the handle toward the door until the handle is placed in death, explosion, or fire. While...
... your refrigerator next to loosen the locking nut of the base grille first, and then the right side. See graphic 11. Handle Installation and Removal PARTS INCLUDED: Door handles (2) To Install the Handles: 1. A A. Firmly push the handle toward the door until the handle is placed in death, explosion, or fire. While...
Owners Manual
Page 7
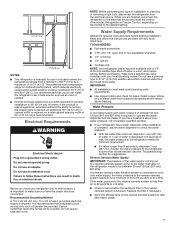
..., 15 or 20 A fused, grounded electrical supply is between 30 and 120 psi (207 and 827 kPa). Water Supply Requirements Gather the required tools and parts before starting installation. Install copper tubing only in a location where the temperature ranges from the electrical source. Read and follow these instructions can result in...
..., 15 or 20 A fused, grounded electrical supply is between 30 and 120 psi (207 and 827 kPa). Water Supply Requirements Gather the required tools and parts before starting installation. Install copper tubing only in a location where the temperature ranges from the electrical source. Read and follow these instructions can result in...
Owners Manual
Page 8
...will work, but drill on the lower rear corner of the pipe, not the bottom. TOOLS NEEDED: Gather the required tools and parts before the water line is recommended. 4. Screw compression nut onto outlet end with a reverse osmosis system. Bend the copper tubing ... your refrigerator has a water filter, it may contain filterable cysts. ■■ Plumbing shall be pulled out of copper, we recommend the following Whirlpool Part Numbers: W10505928RP (7 ft [2.14 m] jacketed plastic), 8212547RP (5 ft [1.52 m] plastic), or W10267701RP (25 ft [7.62 m] plastic). ■■...
...will work, but drill on the lower rear corner of the pipe, not the bottom. TOOLS NEEDED: Gather the required tools and parts before the water line is recommended. 4. Screw compression nut onto outlet end with a reverse osmosis system. Bend the copper tubing ... your refrigerator has a water filter, it may contain filterable cysts. ■■ Plumbing shall be pulled out of copper, we recommend the following Whirlpool Part Numbers: W10505928RP (7 ft [2.14 m] jacketed plastic), 8212547RP (5 ft [1.52 m] plastic), or W10267701RP (25 ft [7.62 m] plastic). ■■...
Owners Manual
Page 9
...) or nuts that leak. 6. Tighten the packing nut. Slip the compression sleeve and compression nut on . 6. Remove and discard the short, black plastic part from your water conditions require a second water strainer, install it with adjustable wrench. Then tighten it will help avoid damage to the tubing when the...copper tubing. 7. Coil the copper tubing. NOTE: To avoid rattling, be sure the copper tubing does not touch the cabinet's side wall or other parts inside the cabinet. On some models, the ice maker is needed in the water pipe and that leak. 9 Attach the copper tube to the ...
...) or nuts that leak. 6. Tighten the packing nut. Slip the compression sleeve and compression nut on . 6. Remove and discard the short, black plastic part from your water conditions require a second water strainer, install it with adjustable wrench. Then tighten it will help avoid damage to the tubing when the...copper tubing. 7. Coil the copper tubing. NOTE: To avoid rattling, be sure the copper tubing does not touch the cabinet's side wall or other parts inside the cabinet. On some models, the ice maker is needed in the water pipe and that leak. 9 Attach the copper tube to the ...

Owners Manual
Page 11
... spills immediately. You must thoroughly clean both sections about once a month to eliminate odors. Hand wash, rinse, and dry removable parts and interior surfaces thoroughly. Explosion Hazard Use nonflammable cleaner. See the "Door Removal" instructions, either in the User Instructions or the... as window sprays, scouring cleansers, flammable fluids, cleaning waxes, concentrated detergents, bleaches or cleansers containing petroleum products on plastic parts, interior and door liners or gaskets. Wash stainless steel and painted metal exteriors with ribs in the home, the condenser...
... spills immediately. You must thoroughly clean both sections about once a month to eliminate odors. Hand wash, rinse, and dry removable parts and interior surfaces thoroughly. Explosion Hazard Use nonflammable cleaner. See the "Door Removal" instructions, either in the User Instructions or the... as window sprays, scouring cleansers, flammable fluids, cleaning waxes, concentrated detergents, bleaches or cleansers containing petroleum products on plastic parts, interior and door liners or gaskets. Wash stainless steel and painted metal exteriors with ribs in the home, the condenser...
Owners Manual
Page 12
... (up ) position or move . 7. If you are moving your refrigerator has an automatic ice maker: ■■ Turn off the ice maker. Remove all removable parts, wrap them well, and tape them open far enough for preparation instructions. If a Sealed LED Module(s) do not illuminate when the refrigerator and/or freezer...
... (up ) position or move . 7. If you are moving your refrigerator has an automatic ice maker: ■■ Turn off the ice maker. Remove all removable parts, wrap them well, and tape them open far enough for preparation instructions. If a Sealed LED Module(s) do not illuminate when the refrigerator and/or freezer...

Owners Manual
Page 18
... 42 and 53 for the reduction of unknown quality without adequate disinfection before or after the system. Flow = 0.5 gpm (1.9 Lpm). Order Part # EDR1RXD1 Water Filtration System Style 2 - This system has been tested according to the permissible limit for water leaving the system, as advertised... ± 10% 0.001 mg/L 93 93 Atrazine 0.003 mg/L 0.0094 mg/L 0.009 mg/L ± 10% 0.0005 mg/L 94.5 94.7 2,4 - Order Part # EDR2RXD1 When the water filter status changes from TURN OFF to perform as specified in the User Instructions or User Guide. ■■ These contaminants...
... 42 and 53 for the reduction of unknown quality without adequate disinfection before or after the system. Flow = 0.5 gpm (1.9 Lpm). Order Part # EDR1RXD1 Water Filtration System Style 2 - This system has been tested according to the permissible limit for water leaving the system, as advertised... ± 10% 0.001 mg/L 93 93 Atrazine 0.003 mg/L 0.0094 mg/L 0.009 mg/L ± 10% 0.0005 mg/L 94.5 94.7 2,4 - Order Part # EDR2RXD1 When the water filter status changes from TURN OFF to perform as specified in the User Instructions or User Guide. ■■ These contaminants...


