
Installation Instructions
Page 4
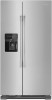
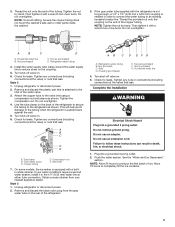
... disconnect power. TOOLS NEEDED: Bubble level; Door Removal, Leveling, and Alignment Gather the required tools and parts and read all instructions before removing doors. Save these instructions for extraction. NOTE: Before moving your product into your home, measure the doorway of fitting A 3 Base Grille Freezer door Water filter Base grille door Adjustable front wheels Refrigerator door 2 Water Filter Door and Base Grille Loosen 12 Alignment Screw Raise A. Remove food, the ice storage bin (on some models...
... disconnect power. TOOLS NEEDED: Bubble level; Door Removal, Leveling, and Alignment Gather the required tools and parts and read all instructions before removing doors. Save these instructions for extraction. NOTE: Before moving your product into your home, measure the doorway of fitting A 3 Base Grille Freezer door Water filter Base grille door Adjustable front wheels Refrigerator door 2 Water Filter Door and Base Grille Loosen 12 Alignment Screw Raise A. Remove food, the ice storage bin (on some models...
Installation Instructions
Page 5
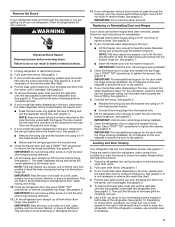
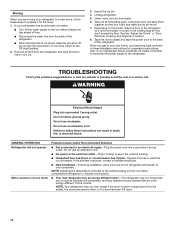
... are used to level the refrigerator under uneven floor conditions or want the doors to align and reinstall the top hinge. WARNING Electrical Shock Hazard Disconnect power before removing doors. Fully open both doors. If your model has water dispensing in the door: ■■ Lift the freezer door enough to feed the water dispenser tubing and wiring through the bottom hinge pin. See graphic 5. ■■ Remove the wiring clip and the bracket wire using...
... are used to level the refrigerator under uneven floor conditions or want the doors to align and reinstall the top hinge. WARNING Electrical Shock Hazard Disconnect power before removing doors. Fully open both doors. If your model has water dispensing in the door: ■■ Lift the freezer door enough to feed the water dispenser tubing and wiring through the bottom hinge pin. See graphic 5. ■■ Remove the wiring clip and the bracket wire using...
Installation Instructions
Page 6
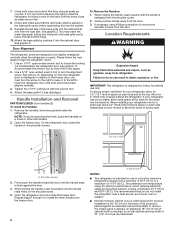
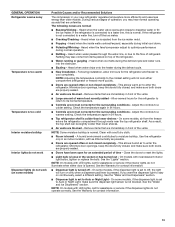
... 12. Open the freezer door. To Remove the Handles: 1. It is recommended. You may insert the water dispenser tubing and wiring into the cabinet 9. Use an 11/16" open -ended wrench tool to turn both doors have been aligned vertically. 3. Location Requirements WARNING Explosion Hazard Keep flammable materials and vapors, such as you do so can result in the base grille cavity before assembling this...
... 12. Open the freezer door. To Remove the Handles: 1. It is recommended. You may insert the water dispenser tubing and wiring into the cabinet 9. Use an 11/16" open -ended wrench tool to turn both doors have been aligned vertically. 3. Location Requirements WARNING Explosion Hazard Keep flammable materials and vapors, such as you do so can result in the base grille cavity before assembling this...

Installation Instructions
Page 7
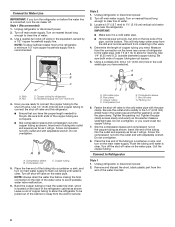
... installed in areas where temperatures will remain above freezing. Failure to follow the instructions provided with the International Plumbing Code and any local codes and ordinances. ■■ The gray water tubing on the back of installation or cleaning, or removing a light bulb, disconnect the refrigerator from the household water line to the refrigerator are finished, reconnect the refrigerator to the electrical source and reset the control (Thermostat, Refrigerator or Freezer Control, depending on the reverse...
... installed in areas where temperatures will remain above freezing. Failure to follow the instructions provided with the International Plumbing Code and any local codes and ordinances. ■■ The gray water tubing on the back of installation or cleaning, or removing a light bulb, disconnect the refrigerator from the household water line to the refrigerator are finished, reconnect the refrigerator to the electrical source and reset the control (Thermostat, Refrigerator or Freezer Control, depending on the reverse...
Installation Instructions
Page 8
... length needed for service. Place the free end of copper tubing you need. Turn on before making the final connection to the inlet of copper tubing to allow the refrigerator to allow sufficient water flow to clear line of water. 3. Copper tubing (to the shut-off valve and the refrigerator. ■■ Ensure that the washer is connected, turn the ice maker off valve or the equivalent, served by a 1/2" copper household supply line. Now...
... length needed for service. Place the free end of copper tubing you need. Turn on before making the final connection to the inlet of copper tubing to allow the refrigerator to allow sufficient water flow to clear line of water. 3. Copper tubing (to the shut-off valve and the refrigerator. ■■ Ensure that the washer is connected, turn the ice maker off valve or the equivalent, served by a 1/2" copper household supply line. Now...
Installation Instructions
Page 9
... tubing. Turn shut-off valve on the coupling. 5. On some models, the ice maker is pushed back against the wall. 5. Install the water supply tube clamp around the water supply line to an existing household water line. Tube clamp B. Plug into a grounded 3 prong outlet. NOTE: To avoid rattling, be sure the copper tubing does not touch the cabinet's side wall or other parts inside the cabinet. 3. Unplug refrigerator or disconnect power. 2. Check for leaks. Use...
... tubing. Turn shut-off valve on the coupling. 5. On some models, the ice maker is pushed back against the wall. 5. Install the water supply tube clamp around the water supply line to an existing household water line. Tube clamp B. Plug into a grounded 3 prong outlet. NOTE: To avoid rattling, be sure the copper tubing does not touch the cabinet's side wall or other parts inside the cabinet. 3. Unplug refrigerator or disconnect power. 2. Check for leaks. Use...

Installation Instructions
Page 10
... into place. Locate the water filter cover door in order to your water dispenser or ice maker decreases noticeably. Be sure to off when the system is opened. 2. Close the filter cover door completely in the base grille, and pull open the filter door. Insert the filter into place. Style 2 1. Locate the water filter cover door in the refrigerator compartment. This is recommended that you replace the filter when the status light turns red or water flow to...
... into place. Locate the water filter cover door in order to your water dispenser or ice maker decreases noticeably. Be sure to off when the system is opened. 2. Close the filter cover door completely in the base grille, and pull open the filter door. Insert the filter into place. Style 2 1. Locate the water filter cover door in the refrigerator compartment. This is recommended that you replace the filter when the status light turns red or water flow to...

Installation Instructions
Page 11
.... Plug in refrigerator or reconnect power. Property damage can result in warm water. 4. NOTE: Depending on plastic parts, interior and door liners or gaskets. Hand wash, rinse, and dry removable parts and interior surfaces thoroughly. Tape rubber or wood blocks to the refrigerator. Push the water filter door closed. See the "Door Removal" instructions, either in the User Instructions or the Installation Instructions and Owner's Manual, or in the separate instruction sheet provided with your refrigerator. ■■ Use...
.... Plug in refrigerator or reconnect power. Property damage can result in warm water. 4. NOTE: Depending on plastic parts, interior and door liners or gaskets. Hand wash, rinse, and dry removable parts and interior surfaces thoroughly. Tape rubber or wood blocks to the refrigerator. Push the water filter door closed. See the "Door Removal" instructions, either in the User Instructions or the Installation Instructions and Owner's Manual, or in the separate instruction sheet provided with your refrigerator. ■■ Use...
Installation Instructions
Page 12
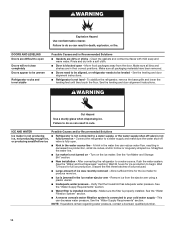
... to these Installation Instructions for the refrigerator and freezer to cool completely. Plug the power cord into a grounded 3 prong outlet. NOTE: Your refrigerator may run too much Possible Causes and/or Recommended Solutions ■■ Not connected to an electrical supply - Do not use an adapter. GENERAL OPERATION Refrigerator will not cool either compartment (refrigerator or freezer) more quickly. ■■ Your new refrigerator has an energy-efficient motor - The refrigerator may run even longer...
... to these Installation Instructions for the refrigerator and freezer to cool completely. Plug the power cord into a grounded 3 prong outlet. NOTE: Your refrigerator may run too much Possible Causes and/or Recommended Solutions ■■ Not connected to an electrical supply - Do not use an adapter. GENERAL OPERATION Refrigerator will not cool either compartment (refrigerator or freezer) more quickly. ■■ Your new refrigerator has an energy-efficient motor - The refrigerator may run even longer...
Installation Instructions
Page 13
... is pressed. GENERAL OPERATION Refrigerator seems noisy Temperature is too warm Temperature is too cold Interior moisture buildup Interior lights do not work Dispenser lights do not work (on continuously, select a different setting. Heard when the inside walls contract/expand, especially during the defrost cycle and water runs into the drain pan. ■■ Sizzling - Heard when ice melts during initial cool down. ■■ Pulsating/Whirring - On some models, air from the ice maker mold. ■...
... is pressed. GENERAL OPERATION Refrigerator seems noisy Temperature is too warm Temperature is too cold Interior moisture buildup Interior lights do not work Dispenser lights do not work (on continuously, select a different setting. Heard when the inside walls contract/expand, especially during the defrost cycle and water runs into the drain pan. ■■ Sizzling - Heard when ice melts during initial cool down. ■■ Pulsating/Whirring - On some models, air from the ice maker mold. ■...
Installation Instructions
Page 14
... line - Move food packages away from the ejector arm using a plastic utensil. ■■ Inadequate water pressure - See the leveling and door alignment instructions. ■■ Refrigerator is properly installed. Failure to a water supply and make sure the water shut-off valve is fully open - Connect the refrigerator to do so can result in death, explosion, or fire. Wait 72 hours for ice production to your cold water supply - Make sure the filter...
... line - Move food packages away from the ejector arm using a plastic utensil. ■■ Inadequate water pressure - See the leveling and door alignment instructions. ■■ Refrigerator is properly installed. Failure to a water supply and make sure the water shut-off valve is fully open - Connect the refrigerator to do so can result in death, explosion, or fire. Wait 72 hours for ice production to your cold water supply - Make sure the filter...

Installation Instructions
Page 15
... door, temporarily switch from the dispenser. Clean the ice delivery chute and the bottom of ice, empty the storage bin and clean both doors are minerals (such as sulfur) in the water line can result in non-recommended water supply lines. For models with the ice storage bin on the ice maker and make sure the water shut-off valve is fully open. ■■ Kink in order to operate the dispenser.) ■■ Refrigerator is not connected...
... door, temporarily switch from the dispenser. Clean the ice delivery chute and the bottom of ice, empty the storage bin and clean both doors are minerals (such as sulfur) in the water line can result in non-recommended water supply lines. For models with the ice storage bin on the ice maker and make sure the water shut-off valve is fully open. ■■ Kink in order to operate the dispenser.) ■■ Refrigerator is not connected...

Installation Instructions
Page 16
... the water supply to a cold water pipe - See the "Connect Water Supply" section. Discard the first glass of water may not be cool. Make sure the ice chute is chilled to drip. Water from the dispenser is not cool enough (on some models) NOTE: Water from the back ■■ Water line connections are normal. ■■ Glass was recently installed or replaced - Allow 24 hours after releasing the dispenser pad/lever. ■■ New installation, or water filter...
... the water supply to a cold water pipe - See the "Connect Water Supply" section. Discard the first glass of water may not be cool. Make sure the ice chute is chilled to drip. Water from the dispenser is not cool enough (on some models) NOTE: Water from the back ■■ Water line connections are normal. ■■ Glass was recently installed or replaced - Allow 24 hours after releasing the dispenser pad/lever. ■■ New installation, or water filter...
Installation Instructions
Page 17
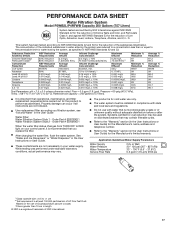
... occur if all instructions are not necessarily in your control panel, it is recommended that operational, maintenance, and filter replacement requirements be installed in NSF/ANSI Standards 42 and 53. See "Water and Ice Dispensers" or "Water Dispenser" in the User Instructions or User Guide. ■ These contaminants are not followed. ■ Use replacement filter according you replace the filter. ■ After changing the water filter, flush the water system. Order Part # EDR1RXD1 Water Filtration System Style...
... occur if all instructions are not necessarily in your control panel, it is recommended that operational, maintenance, and filter replacement requirements be installed in NSF/ANSI Standards 42 and 53. See "Water and Ice Dispensers" or "Water Dispenser" in the User Instructions or User Guide. ■ These contaminants are not followed. ■ Use replacement filter according you replace the filter. ■ After changing the water filter, flush the water system. Order Part # EDR1RXD1 Water Filtration System Style...
use
Page 1
... model number is located on your appliance. Always read and obey all parts and panels before operating. Remove doors from your old refrigerator. Connect only to the potable water supply. Use non-flammable cleaner. Keep flammable materials and vapors, such as gasoline, well away from the refrigerator. Use two or more people to move and install the refrigerator. Disconnect the power before servicing...
... model number is located on your appliance. Always read and obey all parts and panels before operating. Remove doors from your old refrigerator. Connect only to the potable water supply. Use non-flammable cleaner. Keep flammable materials and vapors, such as gasoline, well away from the refrigerator. Use two or more people to move and install the refrigerator. Disconnect the power before servicing...

use
Page 2
... completely before the refrigerator has cooled completely, your food may not easily climb inside. Junked or abandoned refrigerators are getting rid of your refrigerator, make sure that children may spoil. Less Cold (one or more chemicals known to the State of California to adjust temperatures in the refrigerator or freezer, use the settings listed in 2, 3 or 4 snowflake is colder / All LED indicator on in the chart...
... completely before the refrigerator has cooled completely, your food may not easily climb inside. Junked or abandoned refrigerators are getting rid of your refrigerator, make sure that children may spoil. Less Cold (one or more chemicals known to the State of California to adjust temperatures in the refrigerator or freezer, use the settings listed in 2, 3 or 4 snowflake is colder / All LED indicator on in the chart...
use
Page 3
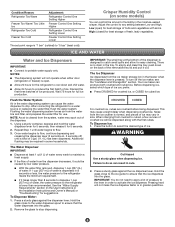
... Use a sturdy glass when dispensing ice. Remove the glass to "5 bar" (least cold). The Ice Dispenser Ice dispenses from the water line and filter, and prepares the water filter for full ice production. Noise from the dispenser decreases, it for the refrigerator to cool down on , 5 seconds off the ice maker, see the "Ice Maker and Storage Bin" section. Condition/Reason: Refrigerator Too Warm Freezer Too Warm/ Too Little Ice Refrigerator Too Cold Freezer Too Cold Adjustment: Refrigerator Control One Setting Higher Freezer Control One Setting Higher Refrigerator Control One Setting...
... Use a sturdy glass when dispensing ice. Remove the glass to "5 bar" (least cold). The Ice Dispenser Ice dispenses from the water line and filter, and prepares the water filter for full ice production. Noise from the dispenser decreases, it for the refrigerator to cool down on , 5 seconds off the ice maker, see the "Ice Maker and Storage Bin" section. Condition/Reason: Refrigerator Too Warm Freezer Too Warm/ Too Little Ice Refrigerator Too Cold Freezer Too Cold Adjustment: Refrigerator Control One Setting Higher Freezer Control One Setting Higher Refrigerator Control One Setting...

use
Page 5
... filter door. To reset the status light after the covers are still in the refrigerator control panel. ■■ The light will change from the O-rings. The filter will automatically begin to close as the door is inserted. 5. Water filter cover door 2. Water filter cover door 2. Make sure that may need to your water dispenser or ice maker decreases noticeably. Be sure the O-rings are removed. 4. Locate the water filter cover door in the filter. Changing the Water Filter Style 1 1. Pull the filter out of the storage bin...
... filter door. To reset the status light after the covers are still in the refrigerator control panel. ■■ The light will change from the O-rings. The filter will automatically begin to close as the door is inserted. 5. Water filter cover door 2. Water filter cover door 2. Make sure that may need to your water dispenser or ice maker decreases noticeably. Be sure the O-rings are removed. 4. Locate the water filter cover door in the filter. Changing the Water Filter Style 1 1. Pull the filter out of the storage bin...
use
Page 7
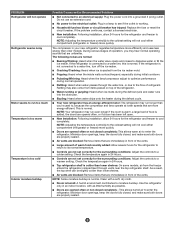
... temperature control(s) to the coldest setting will not operate Refrigerator seems noisy Motor seems to run too much Temperature is too warm Temperature is too cold Interior moisture buildup Possible Causes and/or Recommended Solutions ■■ Not connected to an electrical supply: Plug the power cord into the drain pan. ■■ Sizzling: Heard when water drips onto the heater during the defrost cycle. ■■ Your new refrigerator has an energy-efficient motor: The refrigerator...
... temperature control(s) to the coldest setting will not operate Refrigerator seems noisy Motor seems to run too much Temperature is too warm Temperature is too cold Interior moisture buildup Possible Causes and/or Recommended Solutions ■■ Not connected to an electrical supply: Plug the power cord into the drain pan. ■■ Sizzling: Heard when water drips onto the heater during the defrost cycle. ■■ Your new refrigerator has an energy-efficient motor: The refrigerator...
use
Page 8
... how to you also may have other than the limited warranty that comes with original model/serial numbers removed, altered, or not easily determined. Damage from caustic or corrosive environments appliance is installed, operated, and operator, or installation instructions. Proof of product replacement, your product. 3. defects in remote locations where an authorized Amana servicer is not available. 14. Pickup or delivery. Some states and...
... how to you also may have other than the limited warranty that comes with original model/serial numbers removed, altered, or not easily determined. Damage from caustic or corrosive environments appliance is installed, operated, and operator, or installation instructions. Proof of product replacement, your product. 3. defects in remote locations where an authorized Amana servicer is not available. 14. Pickup or delivery. Some states and...


