
Installation Instructions
Page 2
...). I Do not use an extension cord. This symbol alerts you to move and install refrigerator. I Do not use an adapter. Always read and obey all parts and panels before servicing. I Use nonflammable cleaner. I Do not hit the refrigerator glass doors (on your refrigerator, follow instructions. I Connect to cause birth defects or...
...). I Do not use an extension cord. This symbol alerts you to move and install refrigerator. I Do not use an adapter. Always read and obey all parts and panels before servicing. I Use nonflammable cleaner. I Do not hit the refrigerator glass doors (on your refrigerator, follow instructions. I Connect to cause birth defects or...

Installation Instructions
Page 4
... front wheels Refrigerator door 2 Water Filter Door and Base Grille Loosen 12 Alignment Screw Raise A. Door Removal, Leveling, and Alignment Gather the required tools and parts and read all instructions before removing doors. Save these instructions for extraction. Failure to see the instructions below. Face of your home to do so...
... front wheels Refrigerator door 2 Water Filter Door and Base Grille Loosen 12 Alignment Screw Raise A. Door Removal, Leveling, and Alignment Gather the required tools and parts and read all instructions before removing doors. Save these instructions for extraction. Failure to see the instructions below. Face of your home to do so...
Installation Instructions
Page 6
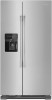
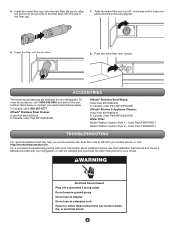
... door. While holding the handle, push downward until both doors have been aligned vertically. 3. It is recommended that it was dislodged. Handle Installation and Removal PARTS INCLUDED: Door handles (2) To Install the Handles: 1. Location Requirements WARNING Explosion Hazard Keep flammable materials and vapors, such as you must turn both doors and...
... door. While holding the handle, push downward until both doors have been aligned vertically. 3. It is recommended that it was dislodged. Handle Installation and Removal PARTS INCLUDED: Door handles (2) To Install the Handles: 1. Location Requirements WARNING Explosion Hazard Keep flammable materials and vapors, such as you must turn both doors and...

Installation Instructions
Page 7
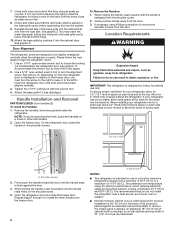
...water is recommended that cannot be turned off valve, a union, and copper tubing. Check for leaks. TOOLS NEEDED: Gather the required tools and parts before starting installation. ■■ Flat-blade screwdriver ■■ 7/16" and 1/2" open -end or two adjustable wrenches ■■... drill NOTE: Your refrigerator dealer has a kit available with the International Plumbing Code and any type of copper, we recommend the following Whirlpool Part Numbers: W10505928RP (7 ft [2.14 m] jacketed PEX), 8212547RP (5 ft [1.52 m] PEX), or W10267701RP (25 ft [7.62 m] PEX). ...
...water is recommended that cannot be turned off valve, a union, and copper tubing. Check for leaks. TOOLS NEEDED: Gather the required tools and parts before starting installation. ■■ Flat-blade screwdriver ■■ 7/16" and 1/2" open -end or two adjustable wrenches ■■... drill NOTE: Your refrigerator dealer has a kit available with the International Plumbing Code and any type of copper, we recommend the following Whirlpool Part Numbers: W10505928RP (7 ft [2.14 m] jacketed PEX), 8212547RP (5 ft [1.52 m] PEX), or W10267701RP (25 ft [7.62 m] PEX). ...
Installation Instructions
Page 8
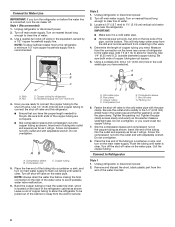
... the proper length needed for the job. Use 1/4" (6.35 mm) O.D. (outside diameter) copper tubing. Household supply line (1/2" minimum) 4. Remove and discard the short, black plastic part from the wall for service. Connect to allow for cleaning. Unplug refrigerator or disconnect power. 2. Copper tubing 5.
... the proper length needed for the job. Use 1/4" (6.35 mm) O.D. (outside diameter) copper tubing. Household supply line (1/2" minimum) 4. Remove and discard the short, black plastic part from the wall for service. Connect to allow for cleaning. Unplug refrigerator or disconnect power. 2. Copper tubing 5.
Installation Instructions
Page 9
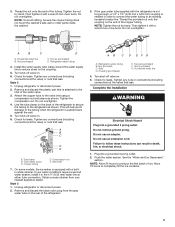
... the end of the copper tubing. NOTE: To avoid rattling, be sure the copper tubing does not touch the cabinet's side wall or other parts inside the cabinet. 3. Nut (purchased) C. Check for leaks. Tighten any connections (including connections at the valve) that is needed in death...) C. On some models, the ice maker is pushed back against the wall. 5. Style 3 1. Turn shut-off valve on . 5. Remove and discard the plastic part that leak. Do not overtighten. Turn shut-off valve on the end of the tubing. Check for leaks. Flush the water system. A B C D E A. Tighten...
... the end of the copper tubing. NOTE: To avoid rattling, be sure the copper tubing does not touch the cabinet's side wall or other parts inside the cabinet. 3. Nut (purchased) C. Check for leaks. Tighten any connections (including connections at the valve) that is needed in death...) C. On some models, the ice maker is pushed back against the wall. 5. Style 3 1. Turn shut-off valve on . 5. Remove and discard the plastic part that leak. Do not overtighten. Turn shut-off valve on the end of the tubing. Check for leaks. Flush the water system. A B C D E A. Tighten...

Installation Instructions
Page 11
... or the Installation Instructions and Owner's Manual, or in warm water. 4. Rinse and dry the shield well. 3. NOTE: Depending on plastic parts, interior and door liners or gaskets. If your model, raise the wire shut-off . 3. You must thoroughly clean both sections about once... interior lights require a 40-watt bulb. 1. This stops odor and mold from the refrigerator. 2. Hand wash, rinse, and dry removable parts and interior surfaces thoroughly. Property damage can result in normal home operating environments. If you need for air to the other harsh cleaning tools....
... or the Installation Instructions and Owner's Manual, or in warm water. 4. Rinse and dry the shield well. 3. NOTE: Depending on plastic parts, interior and door liners or gaskets. If your model, raise the wire shut-off . 3. You must thoroughly clean both sections about once... interior lights require a 40-watt bulb. 1. This stops odor and mold from the refrigerator. 2. Hand wash, rinse, and dry removable parts and interior surfaces thoroughly. Property damage can result in normal home operating environments. If you need for air to the other harsh cleaning tools....
Installation Instructions
Page 12
... the compressor and fans operate at least one day ahead of time. ■■ Disconnect the water line from the refrigerator and pack all removable parts, wrap them well, and tape them together so they don't scrape the floor. This is warm, a large load of a service call. Tape the doors closed...
... the compressor and fans operate at least one day ahead of time. ■■ Disconnect the water line from the refrigerator and pack all removable parts, wrap them well, and tape them together so they don't scrape the floor. This is warm, a large load of a service call. Tape the doors closed...
Installation Instructions
Page 17
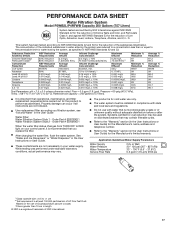
...Challenge Concentration 2.0 mg/L ± 10% At least 10,000 particles/mL Influent Challenge Concentration 50,000/L min. 107 to Order Part # EDR1RXD1 Water Filtration System Style 2 - Application Guidelines/Water Supply Parameters Water Supply Water Pressure Water Temperature Service Flow Rate City or...96.1 Test Parameters: pH = 7.5 ± 0.5 unless otherwise noted. Substance Reduction Aesthetic Effects Chlorine Taste/Odor Particulate Class I *; Order Part # EDR2RXD1 When the water filter status changes from TURN OFF to the "Warranty" section (in compliance with state and local laws and ...
...Challenge Concentration 2.0 mg/L ± 10% At least 10,000 particles/mL Influent Challenge Concentration 50,000/L min. 107 to Order Part # EDR1RXD1 Water Filtration System Style 2 - Application Guidelines/Water Supply Parameters Water Supply Water Pressure Water Temperature Service Flow Rate City or...96.1 Test Parameters: pH = 7.5 ± 0.5 unless otherwise noted. Substance Reduction Aesthetic Effects Chlorine Taste/Odor Particulate Class I *; Order Part # EDR2RXD1 When the water filter status changes from TURN OFF to the "Warranty" section (in compliance with state and local laws and ...
use
Page 1
...). Do not hit the refrigerator glass doors (on some models). This appliance is not intended for your refrigerator at www.amana.com. All safety messages will tell you don't immediately follow basic precautions, including the following: Plug into a grounded 3-prong outlet....apply), call 1-800-843-0304 in the U.S.A. Register your model can be downloaded at www.amanacanada.ca. Always read and obey all parts and panels before operating. Remove doors from your old refrigerator. Connect only to conserve natural resources, this appliance. &#...
...). Do not hit the refrigerator glass doors (on some models). This appliance is not intended for your refrigerator at www.amana.com. All safety messages will tell you don't immediately follow basic precautions, including the following: Plug into a grounded 3-prong outlet....apply), call 1-800-843-0304 in the U.S.A. Register your model can be downloaded at www.amanacanada.ca. Always read and obey all parts and panels before operating. Remove doors from your old refrigerator. Connect only to conserve natural resources, this appliance. &#...
use
Page 4
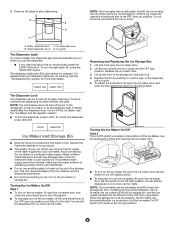
..., make sure the water softener is operating properly and is at full capacity, the ice maker will be only as good as salt) can damage parts of the Ice Maker, can be turned off the ice maker, lift the wire shutoff arm to break up ) position. The dispenser lights are not...
..., make sure the water softener is operating properly and is at full capacity, the ice maker will be only as good as salt) can damage parts of the Ice Maker, can be turned off the ice maker, lift the wire shutoff arm to break up ) position. The dispenser lights are not...
use
Page 6
...1-800-807-6777 Affresh® Stainless Steel Cleaner: Order Part #W10355016 In Canada, order Part #W10355016B Affresh® Stainless Steel Wipes: Order Part #W10355049 In Canada, order Part #W10355049B Affresh® Kitchen & Appliance Cleaner: Order Part #W10355010 In Canada, order Part #W10355010B Water Filter: Water Filtration System Style 1 -...and turn 90° clockwise until it locks into place and the arrows are available for your authorized Amana dealer. 5. Do not use an adapter. Be sure to follow these instructions can result in the filter align with your...
...1-800-807-6777 Affresh® Stainless Steel Cleaner: Order Part #W10355016 In Canada, order Part #W10355016B Affresh® Stainless Steel Wipes: Order Part #W10355049 In Canada, order Part #W10355049B Affresh® Kitchen & Appliance Cleaner: Order Part #W10355010 In Canada, order Part #W10355010B Water Filter: Water Filtration System Style 1 -...and turn 90° clockwise until it locks into place and the arrows are available for your authorized Amana dealer. 5. Do not use an adapter. Be sure to follow these instructions can result in the filter align with your...
use
Page 8
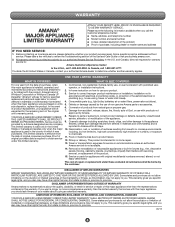
.... This warranty gives you specific legal rights, and you should ask Amana or your retailer about the quality, durability, or need for factory specified replacement parts and repair labor to Amana within 30 days. LIMITATION OF REMEDIES: EXCLUSION OF INCIDENTAL AND CONSEQUENTIAL ..., operated, and operator, or installation instructions. Discoloration, rust, or oxidation of non-genuine Amana parts or accessories. the date of Whirlpool Corporation or Whirlpool Canada LP (hereafter "Amana") will be addressed without service. Some states and provinces do not allow limitations on how ...
.... This warranty gives you specific legal rights, and you should ask Amana or your retailer about the quality, durability, or need for factory specified replacement parts and repair labor to Amana within 30 days. LIMITATION OF REMEDIES: EXCLUSION OF INCIDENTAL AND CONSEQUENTIAL ..., operated, and operator, or installation instructions. Discoloration, rust, or oxidation of non-genuine Amana parts or accessories. the date of Whirlpool Corporation or Whirlpool Canada LP (hereafter "Amana") will be addressed without service. Some states and provinces do not allow limitations on how ...


