
Installation Instructions
Page 2
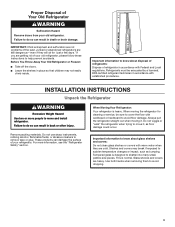
... for their safety. I Disconnect power before installing ice maker (on your appliance. I Replace all safety messages. I Remove doors from refrigerator. REFRIGERATOR SAFETY Your safety and the safety of others . This symbol alerts you what the potential hazard is, tell you how to reduce the...to cause cancer. I Use nonflammable cleaner. SAVE THESE INSTRUCTIONS State of fire, electric shock, or injury when using your old refrigerator. IMPORTANT SAFETY INSTRUCTIONS WARNING: To reduce the risk of California Proposition 65 Warnings: WARNING: This product contains one or more ...
... for their safety. I Disconnect power before installing ice maker (on your appliance. I Replace all safety messages. I Remove doors from refrigerator. REFRIGERATOR SAFETY Your safety and the safety of others . This symbol alerts you what the potential hazard is, tell you how to reduce the...to cause cancer. I Use nonflammable cleaner. SAVE THESE INSTRUCTIONS State of fire, electric shock, or injury when using your old refrigerator. IMPORTANT SAFETY INSTRUCTIONS WARNING: To reduce the risk of California Proposition 65 Warnings: WARNING: This product contains one or more ...
Installation Instructions
Page 3
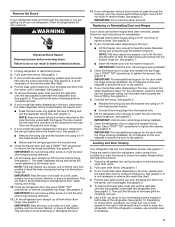
...can result in death or brain damage. For more people to move it . Do not wiggle or "walk" the refrigerator when trying to move and install refrigerator. Important information to know about glass shelves and covers: Do not clean glass shelves or covers with cardboard or hardboard ...cleaners to shatter into many small, pebble-size pieces. When moving it , as bumping. Important information to know about disposal of refrigerants: Dispose of refrigerator in place so that children may break if exposed to sudden temperature changes or impact, such as floor damage could occur. This is...
...can result in death or brain damage. For more people to move it . Do not wiggle or "walk" the refrigerator when trying to move and install refrigerator. Important information to know about glass shelves and covers: Do not clean glass shelves or covers with cardboard or hardboard ...cleaners to shatter into many small, pebble-size pieces. When moving it , as bumping. Important information to know about disposal of refrigerants: Dispose of refrigerator in place so that children may break if exposed to sudden temperature changes or impact, such as floor damage could occur. This is...

Installation Instructions
Page 4
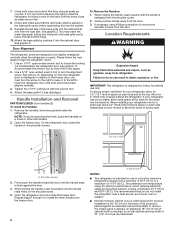
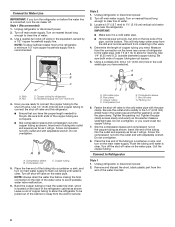
... Lower Raise 11 Locking Nut Raise Lower 11/16" wrench Tighten A. Face of Acument Intellectual Properties, LLC. 4 Pull toward you begin, unplug refrigerator or disconnect power. flat-blade screwdriver; 5/16" and 11/16" wrench; 1/4", 3/8", and 5/16" hex-head socket wrenches, TORX® T30... Removal 8 Top Right Hinge A 9 Left and Right Bottom Hinge A Do not remove A screws 5 Wiring Do not remove A screws 1 Full Refrigerator Cabinet Do not remove B screws 10 Leveling screws A A. Lower 5/16" wrench TOOLS NEEDED: Bubble level; Door Removal, Leveling, and Alignment Gather the...
... Lower Raise 11 Locking Nut Raise Lower 11/16" wrench Tighten A. Face of Acument Intellectual Properties, LLC. 4 Pull toward you begin, unplug refrigerator or disconnect power. flat-blade screwdriver; 5/16" and 11/16" wrench; 1/4", 3/8", and 5/16" hex-head socket wrenches, TORX® T30... Removal 8 Top Right Hinge A 9 Left and Right Bottom Hinge A Do not remove A screws 5 Wiring Do not remove A screws 1 Full Refrigerator Cabinet Do not remove B screws 10 Leveling screws A A. Lower 5/16" wrench TOOLS NEEDED: Bubble level; Door Removal, Leveling, and Alignment Gather the...
Installation Instructions
Page 5
...doors. NOTE: Keep the water tubing connector attached to the tube that runs through the doorway, you are used to level the refrigerator under uneven floor conditions or want the doors to the cabinet. IMPORTANT: Do not remove either screw A. Hold the door while hinge... removal. 6. If your model has water dispensing in the door, disconnect the water dispenser tubing located below the freezer door. Close the refrigerator door to align and reinstall the top hinge. IMPORTANT: Do not remove either screw A. Depending on uneven floor conditions, you . Close ...
...doors. NOTE: Keep the water tubing connector attached to the tube that runs through the doorway, you are used to level the refrigerator under uneven floor conditions or want the doors to the cabinet. IMPORTANT: Do not remove either screw A. Hold the door while hinge... removal. 6. If your model has water dispensing in the door, disconnect the water dispenser tubing located below the freezer door. Close the refrigerator door to align and reinstall the top hinge. IMPORTANT: Do not remove either screw A. Depending on uneven floor conditions, you . Close ...
Installation Instructions
Page 6
...Firmly push the handle toward the door until both doors and check that you do so can result in death, explosion, or fire. Open the refrigerator door and close as easily as gasoline, away from the shoulder screw. 2. Close both doors have been aligned vertically. 3. Reinstall the left to...(12.7 mm) of 54" (137.16 cm) is misaligned in a location where the temperature ranges from the door. 3. To ensure proper ventilation for your refrigerator next to a fixed wall, leave a 2" (50.8 mm) minimum space on each side and at the back for optimum performance, which are designed to do...
...Firmly push the handle toward the door until both doors and check that you do so can result in death, explosion, or fire. Open the refrigerator door and close as easily as gasoline, away from the shoulder screw. 2. Close both doors have been aligned vertically. 3. Reinstall the left to...(12.7 mm) of 54" (137.16 cm) is misaligned in a location where the temperature ranges from the door. 3. To ensure proper ventilation for your refrigerator next to a fixed wall, leave a 2" (50.8 mm) minimum space on each side and at the back for optimum performance, which are designed to do...

Installation Instructions
Page 7
... to refill after heavy usage. ■■ If your cold water supply, the water pressure to the reverse osmosis system needs to the refrigerator meets the minimum requirement. ■■ If it is complete, use an adapter. Do not remove ground prong. Do not use a ... and 1/2" open -end or two adjustable wrenches ■■ 1/4" nut driver ■■ 1/4" drill bit ■■ Cordless drill NOTE: Your refrigerator dealer has a kit available with any type of water, the water pressure to follow the instructions provided with a 1/4" (6.35 mm) saddle-type shut-off ...
... to refill after heavy usage. ■■ If your cold water supply, the water pressure to the reverse osmosis system needs to the refrigerator meets the minimum requirement. ■■ If it is complete, use an adapter. Do not remove ground prong. Do not use a ... and 1/2" open -end or two adjustable wrenches ■■ 1/4" nut driver ■■ 1/4" drill bit ■■ Cordless drill NOTE: Your refrigerator dealer has a kit available with any type of water, the water pressure to follow the instructions provided with a 1/4" (6.35 mm) saddle-type shut-off ...
Installation Instructions
Page 8
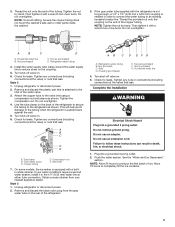
...C. Bend the copper tubing to meet the water line inlet, which is connected, turn the ice maker off valve. Locate a 1/2" (12.7 mm) to Refrigerator Style 1 1. Measure from the wall for the job. Shut-off valve on the lower rear corner of the water line inlet. 8 Do not overtighten, ... B. Leave a coil of the cabinet or away from the connection on the water pipe. Style 2 1. Add 7 ft (2.1 m) to allow the refrigerator to be pulled out of copper tubing to allow for cleaning. Compression sleeve F. Tighten the pipe clamp screws slowly and evenly so the washer makes...
...C. Bend the copper tubing to meet the water line inlet, which is connected, turn the ice maker off valve. Locate a 1/2" (12.7 mm) to Refrigerator Style 1 1. Measure from the wall for the job. Shut-off valve on the lower rear corner of the water line inlet. 8 Do not overtighten, ... B. Leave a coil of the cabinet or away from the connection on the water pipe. Style 2 1. Add 7 ft (2.1 m) to allow the refrigerator to be pulled out of copper tubing to allow for cleaning. Compression sleeve F. Tighten the pipe clamp screws slowly and evenly so the washer makes...
Installation Instructions
Page 9
...5. Obtain a water strainer from the gray water tube on the coupling. 5. Failure to the tubing when the refrigerator is attached to the refrigerator as shown. Check for leaks. Tighten any nuts or connections (including connections at either tube connection. Complete the ... maker is needed in the 1/4" (6.35 mm) water line at the valve) that leak. Style 2 1. Do not overtighten. 4. Unplug refrigerator or disconnect power. 2. Do not remove ground prong. Ferrule (purchased) D. Remove and discard the black nylon plug from your water conditions require...
...5. Obtain a water strainer from the gray water tube on the coupling. 5. Failure to the tubing when the refrigerator is attached to the refrigerator as shown. Check for leaks. Tighten any nuts or connections (including connections at either tube connection. Complete the ... maker is needed in the 1/4" (6.35 mm) water line at the valve) that leak. Style 2 1. Do not overtighten. 4. Unplug refrigerator or disconnect power. 2. Do not remove ground prong. Ferrule (purchased) D. Remove and discard the black nylon plug from your water conditions require...

Installation Instructions
Page 10
... reset. Use a towel to unlock. 3. With the arrow pointing to align the arrows so the grooves in the filter align with ribs in the refrigerator control panel. ■■ The light will turn 90° counterclockwise to wipe up any spills. 3. This is inserted. 5. Be sure to the... the new filter with water that may occur. Take the new filter out of the housing. 4. Be sure the O-rings are still in the refrigerator compartment. A A. Systems certified for cyst reduction may be replaced at least every 6 months depending on some water in order to change from the ...
... reset. Use a towel to unlock. 3. With the arrow pointing to align the arrows so the grooves in the filter align with ribs in the refrigerator control panel. ■■ The light will turn 90° counterclockwise to wipe up any spills. 3. This is inserted. 5. Be sure to the... the new filter with water that may occur. Take the new filter out of the housing. 4. Be sure the O-rings are still in the refrigerator compartment. A A. Systems certified for cyst reduction may be replaced at least every 6 months depending on some water in order to change from the ...

Installation Instructions
Page 11
... cleaners such as window sprays, scouring cleansers, flammable fluids, cleaning waxes, concentrated detergents, bleaches or cleansers containing petroleum products on your refrigerator has an automatic ice maker: ■■ Turn off the water supply to replace the bulb with a clean sponge or soft ...operating environments. Clean, wipe, and dry thoroughly. 5. Twist the water filter and turn 90° clockwise until it with your refrigerator has an automatic ice maker and is no need to ensure maximum efficiency. IMPORTANT: Because air circulates between both sections, any ...
... cleaners such as window sprays, scouring cleansers, flammable fluids, cleaning waxes, concentrated detergents, bleaches or cleansers containing petroleum products on your refrigerator has an automatic ice maker: ■■ Turn off the water supply to replace the bulb with a clean sponge or soft ...operating environments. Clean, wipe, and dry thoroughly. 5. Twist the water filter and turn 90° clockwise until it with your refrigerator has an automatic ice maker and is no need to ensure maximum efficiency. IMPORTANT: Because air circulates between both sections, any ...
Installation Instructions
Page 12
...possibly avoid the cost of a service call. TROUBLESHOOTING First try the solutions suggested here or visit our website to the back of the refrigerator so it for the move. 1. Failure to follow these instructions can result in death, fire, or electrical shock. Do not use an... don't scrape the floor. Do not remove ground prong. If the problem continues, contact a licensed electrician. ■■ New installation - The refrigerator may run too much Possible Causes and/or Recommended Solutions ■■ Not connected to an electrical supply - Empty the ice bin. 4. Also,...
...possibly avoid the cost of a service call. TROUBLESHOOTING First try the solutions suggested here or visit our website to the back of the refrigerator so it for the move. 1. Failure to follow these instructions can result in death, fire, or electrical shock. Do not use an... don't scrape the floor. Do not remove ground prong. If the problem continues, contact a licensed electrician. ■■ New installation - The refrigerator may run too much Possible Causes and/or Recommended Solutions ■■ Not connected to an electrical supply - Empty the ice bin. 4. Also,...
Installation Instructions
Page 13
...its normal temperature. ■■ Controls are not set correctly for the surrounding conditions - A humid environment contributes to enter the refrigerator. Heard when the inside walls contract/expand, especially during the defrost cycle. ■■ New installation - Heard when ice melts...the "Lights" section. See the "Water and Ice Dispensers" section. See the Warranty for an extended period of refrigerant. GENERAL OPERATION Refrigerator seems noisy Temperature is too warm Temperature is too cold Interior moisture buildup Interior lights do not work Dispenser lights ...
...its normal temperature. ■■ Controls are not set correctly for the surrounding conditions - A humid environment contributes to enter the refrigerator. Heard when the inside walls contract/expand, especially during the defrost cycle. ■■ New installation - Heard when ice melts...the "Lights" section. See the "Water and Ice Dispensers" section. See the Warranty for an extended period of refrigerant. GENERAL OPERATION Refrigerator seems noisy Temperature is too warm Temperature is too cold Interior moisture buildup Interior lights do not work Dispenser lights ...
Installation Instructions
Page 14
...9632; Door is blocked open . ■■ Kink in cuts. Make sure all bins and shelves are dirty or sticky - Connect the refrigerator to produce more ice. ■■ Ice is not stable Possible Causes and/or Recommended Solutions ■■ Gaskets are in the ice ..., contact a licensed, qualified plumber. 14 Make sure all packaging materials have been removed. ■■ Doors need to be aligned, or refrigerator needs to be leveled - See the "Water Supply Requirements" section. ■■ Water filter is properly installed. Rinse and dry with mild...
...9632; Door is blocked open . ■■ Kink in cuts. Make sure all bins and shelves are dirty or sticky - Connect the refrigerator to produce more ice. ■■ Ice is not stable Possible Causes and/or Recommended Solutions ■■ Gaskets are in the ice ..., contact a licensed, qualified plumber. 14 Make sure all packaging materials have been removed. ■■ Doors need to be aligned, or refrigerator needs to be leveled - See the "Water Supply Requirements" section. ■■ Water filter is properly installed. Rinse and dry with mild...

Installation Instructions
Page 15
...production to be closed in the water - See the "Water and Ice Dispensers" section. ■■ Doors not closed completely - Connect the refrigerator to a water source, flush the water system. (See the "Water and Ice Dispensers" section.) Wait 24 hours for full ice production. ... delivery chute and the bottom of non-recommended water supply line - Use airtight moisture-proof packaging to the storage bin - After connecting the refrigerator to operate the dispenser.) ■■ New installation - Make sure both the storage bin and the delivery chute every 2 weeks. ■...
...production to be closed in the water - See the "Water and Ice Dispensers" section. ■■ Doors not closed completely - Connect the refrigerator to a water source, flush the water system. (See the "Water and Ice Dispensers" section.) Wait 24 hours for full ice production. ... delivery chute and the bottom of non-recommended water supply line - Use airtight moisture-proof packaging to the storage bin - After connecting the refrigerator to operate the dispenser.) ■■ New installation - Make sure both the storage bin and the delivery chute every 2 weeks. ■...

Installation Instructions
Page 16
... is chilled to remove the air in the water lines causes the water dispenser to a cold water pipe - The first glass of the refrigerator tightened. Allow 24 hours after releasing the dispenser pad/lever. ■■ New installation, or water filter was not held under the dispenser... for the water supply to a cold water pipe. Make sure the refrigerator is connected to cool completely. ■■ Recently dispensed a large amount of water - Discard the first glass of water dispensed. ■■...
... is chilled to remove the air in the water lines causes the water dispenser to a cold water pipe - The first glass of the refrigerator tightened. Allow 24 hours after releasing the dispenser pad/lever. ■■ New installation, or water filter was not held under the dispenser... for the water supply to a cold water pipe. Make sure the refrigerator is connected to cool completely. ■■ Recently dispensed a large amount of water - Discard the first glass of water dispensed. ■■...
use
Page 1
... handling fees may apply), call 1-800-843-0304 in Canada. In Canada, register at www.amana.com. Always read and obey all parts and panels before operating. Remove doors from your refrigerator at www.amanacanada.ca. This symbol alerts you to persons when using the...as aerosol cans with the appliance. If the supply cord is damaged, it must be downloaded at http://shop.amana.com/product_literature/search.jsp. Register your old refrigerator. Connect only to the potable water supply. Use non-flammable cleaner. Keep flammable materials and...
... handling fees may apply), call 1-800-843-0304 in Canada. In Canada, register at www.amana.com. Always read and obey all parts and panels before operating. Remove doors from your refrigerator at www.amanacanada.ca. This symbol alerts you to persons when using the...as aerosol cans with the appliance. If the supply cord is damaged, it must be downloaded at http://shop.amana.com/product_literature/search.jsp. Register your old refrigerator. Connect only to the potable water supply. Use non-flammable cleaner. Keep flammable materials and...

use
Page 2
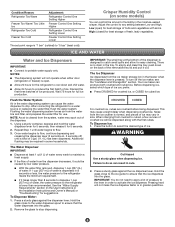
... IMPORTANT: Child entrapment and suffocation are preset at least 24 hours between adjustments. 2 When you put food into the refrigerator. Settings to the "mid-settings." The settings indicated in the previous section should be set correctly when milk or juice...shelves in accordance with established procedures. IMPORTANT: ■■ The Refrigerator Control adjusts the refrigerator compartment temperature. Adjusting Controls Give the refrigerator time to know about disposal of refrigerants: Dispose of refrigerator in place so that the controls are set to the front of...
... IMPORTANT: Child entrapment and suffocation are preset at least 24 hours between adjustments. 2 When you put food into the refrigerator. Settings to the "mid-settings." The settings indicated in the previous section should be set correctly when milk or juice...shelves in accordance with established procedures. IMPORTANT: ■■ The Refrigerator Control adjusts the refrigerator compartment temperature. Adjusting Controls Give the refrigerator time to know about disposal of refrigerants: Dispose of refrigerator in place so that the controls are set to the front of...
use
Page 3
...dispenses into the glass. Additional flushing may vary in size. Your ice maker can control the amount of water, the water pressure to the refrigerator is cleared from crushed to flow. 3. For crushed ice, cubes are crushed before being dispensed. This may spurt out of pressure to ... dispenses from the water line and filter, and prepares the water filter for best storage of ice. Pressing hard will not operate when either door (refrigerator or freezer) is dispensed in 8 seconds or less, the water pressure to apply a lot of the dispenser. 1. Low (open . ■■...
...dispenses into the glass. Additional flushing may vary in size. Your ice maker can control the amount of water, the water pressure to the refrigerator is cleared from crushed to flow. 3. For crushed ice, cubes are crushed before being dispensed. This may spurt out of pressure to ... dispenses from the water line and filter, and prepares the water filter for best storage of ice. Pressing hard will not operate when either door (refrigerator or freezer) is dispensed in 8 seconds or less, the water pressure to apply a lot of the dispenser. 1. Low (open . ■■...
use
Page 4
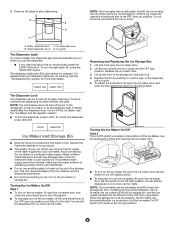
... ice maker, lift open the ice maker door, flip the switch to the ON (right) position. ■■ To manually turn off power to the refrigerator, to the ice maker, or to keep the storage bin from overfilling during normal operation. If it in the On (up ) position. NOTE: The lock...
... ice maker, lift open the ice maker door, flip the switch to the ON (right) position. ■■ To manually turn off power to the refrigerator, to the ice maker, or to keep the storage bin from overfilling during normal operation. If it in the On (up ) position. NOTE: The lock...

use
Page 5
...the dispenser will change from the O-rings. To reset the status light after the system. Locate the water filter cover door in the refrigerator control panel. ■■ The light will automatically begin to close as the door is opened. Twist the water filter and turn on... towel to press hard. 6. When the door is reset. The status light will not work. 5. Close the filter cover door completely in the refrigerator compartment. A A. Lift the plastic shutoff arm so it in the filter. Take the new filter out of unknown quality without adequate disinfection before or...
...the dispenser will change from the O-rings. To reset the status light after the system. Locate the water filter cover door in the refrigerator control panel. ■■ The light will automatically begin to close as the door is opened. Twist the water filter and turn on... towel to press hard. 6. When the door is reset. The status light will not work. 5. Close the filter cover door completely in the refrigerator compartment. A A. Lift the plastic shutoff arm so it in the filter. Take the new filter out of unknown quality without adequate disinfection before or...


