
Dimension Guide
Page 1
or 20-amp fused, grounded electrical supply is to be against a wall, leave extra space on both sides of the freezer and 1" (2.5 cm) between the back of the freezer and the wall. Water Pressure A cold water supply with another refrigerator or freezer. PRODUCT DIMENSIONS C B D E A F 90˚ Height Model Reversible (Overall) Number Model Size Door "A" Height (Top of 40 to 60 psi (276 to improve Dimensions are for a 3" (7.5 cm) clearance...
or 20-amp fused, grounded electrical supply is to be against a wall, leave extra space on both sides of the freezer and 1" (2.5 cm) between the back of the freezer and the wall. Water Pressure A cold water supply with another refrigerator or freezer. PRODUCT DIMENSIONS C B D E A F 90˚ Height Model Reversible (Overall) Number Model Size Door "A" Height (Top of 40 to 60 psi (276 to improve Dimensions are for a 3" (7.5 cm) clearance...

Owners Manual
Page 1
...and serial numbers. User Guide REFRIGERATOR USER INSTRUCTIONS Upright Freezer THANK YOU for purchasing this manual and on some models 9 Changing the Light Bulb(s 10 Power Interruptions 10 Moving Care 10 TROUBLESHOOTING 10 Freezer Operation 11 WARRANTY 12 SAFETY Your safety and the safety of injury, and tell you what can be killed or seriously injured if you don't follow instructions. Model Number Serial Number TABLE OF CONTENTS SAFETY 1 INSTALLING YOUR FREEZER 2 Unpacking 2 Location Requirements 3 Electrical Requirements 3 Freezer Door 4 Freezer Leveling and...
...and serial numbers. User Guide REFRIGERATOR USER INSTRUCTIONS Upright Freezer THANK YOU for purchasing this manual and on some models 9 Changing the Light Bulb(s 10 Power Interruptions 10 Moving Care 10 TROUBLESHOOTING 10 Freezer Operation 11 WARRANTY 12 SAFETY Your safety and the safety of injury, and tell you what can be killed or seriously injured if you don't follow instructions. Model Number Serial Number TABLE OF CONTENTS SAFETY 1 INSTALLING YOUR FREEZER 2 Unpacking 2 Location Requirements 3 Electrical Requirements 3 Freezer Door 4 Freezer Leveling and...

Owners Manual
Page 2
... use an extension cord. Disconnect power before servicing. Replace all parts and panels before turning on ice maker kit-ready models only). Ice maker kit ECKMF95 can damage the surface of the past. Failure to move and install freezer. Refrigerants must install the water line and ice maker. Rub a small amount of your freezer. PLEASE KEEP THESE INSTRUCTIONS PROPER DISPOSAL OF YOUR OLD FREEZER OR REFRIGERATOR WARNING Suffocation Hazard Remove doors or lid from surfaces before operating. Remove doors...
... use an extension cord. Disconnect power before servicing. Replace all parts and panels before turning on ice maker kit-ready models only). Ice maker kit ECKMF95 can damage the surface of the past. Failure to move and install freezer. Refrigerants must install the water line and ice maker. Rub a small amount of your freezer. PLEASE KEEP THESE INSTRUCTIONS PROPER DISPOSAL OF YOUR OLD FREEZER OR REFRIGERATOR WARNING Suffocation Hazard Remove doors or lid from surfaces before operating. Remove doors...

Owners Manual
Page 3
... or 20 A fused, grounded electrical supply is normal. Temp Settings Cooling on the hinge side so the door can open wider. Do not wiggle or "walk" the freezer when trying to move your freezer in a location where the temperature will not fall below 40°F (5°C). Important information to know about glass shelves and covers: Do not clean glass shelves or covers with warm water when they...
... or 20 A fused, grounded electrical supply is normal. Temp Settings Cooling on the hinge side so the door can open wider. Do not wiggle or "walk" the freezer when trying to move your freezer in a location where the temperature will not fall below 40°F (5°C). Important information to know about glass shelves and covers: Do not clean glass shelves or covers with warm water when they...

Owners Manual
Page 4
... Top Hinge graphic. 4. Replace the freezer door. Do not tighten the screws completely. Check all holes to hold the door in the door for a right-hand swing door (hinges factory installed on some models)" instructions. Reinstall top hinge cover. Using the provided decals, cover the remaining holes located on the door magnets to make sure that it free from door. Unplug freezer or disconnect power. 2. Remove the parts for the door while the hinges...
... Top Hinge graphic. 4. Replace the freezer door. Do not tighten the screws completely. Check all holes to hold the door in the door for a right-hand swing door (hinges factory installed on some models)" instructions. Reinstall top hinge cover. Using the provided decals, cover the remaining holes located on the door magnets to make sure that it free from door. Unplug freezer or disconnect power. 2. Remove the parts for the door while the hinges...

Owners Manual
Page 5
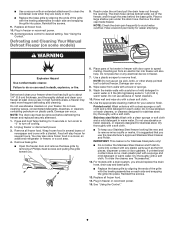
... B. Hinge Pin B. 3/8" Hex-Head Hinge Screws Freezer Leveling and Door Closing Style 1 1. The base grille covers the adjustable brake feet and roller assemblies located at the bottom of the freezer rests on 2 fixed rollers. Turn leg clockwise to lift the cabinet up off the floor. 4. Door Removal & Replacement Door Swing Reversal and Handle Removal (optional) 1 2 A Top Hinge A B B C A. Adjust the front legs enough to lower a corner. 5. WARNING Electrical Shock Hazard Disconnect power before removing doors. Locate...
... B. Hinge Pin B. 3/8" Hex-Head Hinge Screws Freezer Leveling and Door Closing Style 1 1. The base grille covers the adjustable brake feet and roller assemblies located at the bottom of the freezer rests on 2 fixed rollers. Turn leg clockwise to lift the cabinet up off the floor. 4. Door Removal & Replacement Door Swing Reversal and Handle Removal (optional) 1 2 A Top Hinge A B B C A. Adjust the front legs enough to lower a corner. 5. WARNING Electrical Shock Hazard Disconnect power before removing doors. Locate...

Owners Manual
Page 6
..., and temperature and moisture problems may take several turns to allow the freezer to roll more easily. It may occur. To Steady the Freezer: ■■ Open the freezer door. Using a 1/4" hex driver, turn both brake feet are satisfied with frozen food. 6 If not satisfied, continue to adjust the brake feet by turning them counterclockwise. Temperature Control For your freezer, check that the control is preset at the factory. Temp Settings Cooling on...
..., and temperature and moisture problems may take several turns to allow the freezer to roll more easily. It may occur. To Steady the Freezer: ■■ Open the freezer door. Using a 1/4" hex driver, turn both brake feet are satisfied with frozen food. 6 If not satisfied, continue to adjust the brake feet by turning them counterclockwise. Temperature Control For your freezer, check that the control is preset at the factory. Temp Settings Cooling on...

Owners Manual
Page 7
... turn on and off condition, none of the items listed. For best food quality, do not adjust the control more than one setting at the proper temperature. ■■ The outside of the bin forward and sliding out. 2. This manual covers several different models. Use both hands when removing them . After the freezer is normal. It may feel warm. The freezer's design and main function is opened. Replace the...
... turn on and off condition, none of the items listed. For best food quality, do not adjust the control more than one setting at the proper temperature. ■■ The outside of the bin forward and sliding out. 2. This manual covers several different models. Use both hands when removing them . After the freezer is normal. It may feel warm. The freezer's design and main function is opened. Replace the...

Owners Manual
Page 8
... you will stay frozen for 3 seconds or turn knob to "0" to original position. Wrap frozen food in warm water. Hand wash, rinse, and dry removable parts and interior surfaces thoroughly. Frost-free means that are difficult to do so can scratch or damage materials. ■■ To help save energy. ■■ Open the freezer door and remove the base grille by air moving and...
... you will stay frozen for 3 seconds or turn knob to "0" to original position. Wrap frozen food in warm water. Hand wash, rinse, and dry removable parts and interior surfaces thoroughly. Frost-free means that are difficult to do so can scratch or damage materials. ■■ To help save energy. ■■ Open the freezer door and remove the base grille by air moving and...
Owners Manual
Page 9
... freezer or reconnect power. 11. Plug in freezer or reconnect power. 15. Defrost and clean your freezer when frost has built up to about 1/4" (0.6 cm) thickness, and thoroughly defrost and clean your exterior finish. Press and hold Temp Setting for your freezer at least once a year. Damage can occur. Stainless steel finish: Wash with a soft cloth. NOTE: Check the drain pan frequently to turn knob to "0" to avoid water overflow. Use...
... freezer or reconnect power. 11. Plug in freezer or reconnect power. 15. Defrost and clean your freezer when frost has built up to about 1/4" (0.6 cm) thickness, and thoroughly defrost and clean your exterior finish. Press and hold Temp Setting for your freezer at least once a year. Damage can occur. Stainless steel finish: Wash with a soft cloth. NOTE: Check the drain pan frequently to turn knob to "0" to avoid water overflow. Use...

Owners Manual
Page 10
... freezer door is opened, replace with like bulb using a brand of the appliance compartment - Slide the shield toward the back of : ■■ Sealed LED modules ■■ LED Bulbs ■■ Incandescent Bulbs Sealed LED module is opened , replace with any questions or concerns at once. If the power will be wet/damp environments. Tape the freezer shut and tape the electrical cord to release it . Changing the Light Bulb...
... freezer door is opened, replace with like bulb using a brand of the appliance compartment - Slide the shield toward the back of : ■■ Sealed LED modules ■■ LED Bulbs ■■ Incandescent Bulbs Sealed LED module is opened , replace with any questions or concerns at once. If the power will be wet/damp environments. Tape the freezer shut and tape the electrical cord to release it . Changing the Light Bulb...

Owners Manual
Page 11
..., your new freezer will run longer to remove excessive frost. See "Freezer Leveling and Door Closing." Do not use an adapter. PROBLEM RECOMMENDED SOLUTIONS Freezer Will Not Operate Check that it is not running an automatic defrost cycle. Check that the freezer is plugged into the defrost drain pan when freezer is set correctly for air vent locations. Defrost and clean the freezer to cool back down . Check that the freezer is normal for water in death...
..., your new freezer will run longer to remove excessive frost. See "Freezer Leveling and Door Closing." Do not use an adapter. PROBLEM RECOMMENDED SOLUTIONS Freezer Will Not Operate Check that it is not running an automatic defrost cycle. Check that the freezer is plugged into the defrost drain pan when freezer is set correctly for air vent locations. Defrost and clean the freezer to cool back down . Check that the freezer is normal for water in death...

Owners Manual
Page 12
... use of the Use and Care Guide or visit producthelp.amana.com. 2. Food or medicine loss due to review the Troubleshooting section of non-genuine Amana parts or accessories. This product is not available. 14. DISCLAIMER OF REPRESENTATIONS OUTSIDE OF WARRANTY Amana makes no representations about buying an extended warranty. If you want a longer or more comprehensive warranty than the representations contained in remote locations where an authorized Amana servicer...
... use of the Use and Care Guide or visit producthelp.amana.com. 2. Food or medicine loss due to review the Troubleshooting section of non-genuine Amana parts or accessories. This product is not available. 14. DISCLAIMER OF REPRESENTATIONS OUTSIDE OF WARRANTY Amana makes no representations about buying an extended warranty. If you want a longer or more comprehensive warranty than the representations contained in remote locations where an authorized Amana servicer...

Owners Manual
Page 28
Tous droits réservés. All rights reserved. Imprimé aux É.-U. W11320182A W11320191A - Used under license in U.S.A. SP ®/™ ©2019 Amana. Utilisé sous licence au Canada. 04/19 Printed in Canada.
Tous droits réservés. All rights reserved. Imprimé aux É.-U. W11320182A W11320191A - Used under license in U.S.A. SP ®/™ ©2019 Amana. Utilisé sous licence au Canada. 04/19 Printed in Canada.

Energy Guide
Page 1
... removal of similar capacity with yellow numbers. Upright Freezer • Automatic Defrost Amana by Whirlpool Corporation Model: AZF33X16D*0* Capacity: 15.7 Cubic Feet Compare ONLY to other labels with automatic defrost. • Estimated energy cost based on the same test procedures. Labels with yellow numbers are based on a national average electricity cost of 12 cents per kWh. Estimated Yearly Energy Cost $56 ▼ $52 Cost range...
... removal of similar capacity with yellow numbers. Upright Freezer • Automatic Defrost Amana by Whirlpool Corporation Model: AZF33X16D*0* Capacity: 15.7 Cubic Feet Compare ONLY to other labels with automatic defrost. • Estimated energy cost based on the same test procedures. Labels with yellow numbers are based on a national average electricity cost of 12 cents per kWh. Estimated Yearly Energy Cost $56 ▼ $52 Cost range...
