
Dimension Guide
Page 1
...3"* (76 mm) Installation spacing for recessed area or closet installation The dimensions shown below are for the recommended spacing for this dryer. ■■ Additional spacing should be considered for ease of installation and servicing. ■■ Additional clearances might be required ...;■ Additional spacing of 1" (25 mm) on all sides of the door are acceptable.Companion appliance spacing should also be large enough to allow the dryer door to reduce noise transfer. ■■ For closet installation, with vents *Required spacing 3"* (76 mm) 24 in2.* 2 (155 cm ) ...
...3"* (76 mm) Installation spacing for recessed area or closet installation The dimensions shown below are for the recommended spacing for this dryer. ■■ Additional spacing should be considered for ease of installation and servicing. ■■ Additional clearances might be required ...;■ Additional spacing of 1" (25 mm) on all sides of the door are acceptable.Companion appliance spacing should also be large enough to allow the dryer door to reduce noise transfer. ■■ For closet installation, with vents *Required spacing 3"* (76 mm) 24 in2.* 2 (155 cm ) ...

Dimension Guide
Page 2
...systems longer than those specified will help achieve best drying performance. When rigid pipe is used . VENTING REQUIREMENTS Exhaust venting: Exhaust your dryer to the coupling can be installed within 6 ft (1.8 m) of the exhaust. Angled Hood Determine vent length and elbows needed for planning...approved tubing may be used . When acceptable to change without notice. To determine maximum exhaust length, add one 90º turn inside the dryer. NOTE: Do not use . A time-delay fuse or circuit breaker and a separate circuit are for best drying performance: ■■...
...systems longer than those specified will help achieve best drying performance. When rigid pipe is used . VENTING REQUIREMENTS Exhaust venting: Exhaust your dryer to the coupling can be installed within 6 ft (1.8 m) of the exhaust. Angled Hood Determine vent length and elbows needed for planning...approved tubing may be used . When acceptable to change without notice. To determine maximum exhaust length, add one 90º turn inside the dryer. NOTE: Do not use . A time-delay fuse or circuit breaker and a separate circuit are for best drying performance: ■■...
Use & Care Guide
Page 2
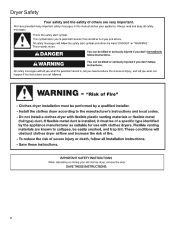
Dryer Safety 2
Dryer Safety 2

Use & Care Guide
Page 4
... the warranty and will be sure to efficiently dry laundry. each load. ■■ Replace plastic or foil vent material with heat, dryers require good air flow to follow the "Installation Instructions" supplied with your lint screen before each bend and curve reduces air flow. During ...Automatic Dry/Sensor Dry cycles, drying air temperature or moisture level are not covered by the customer, regardless of who installed the dryer. ■■ Use the shortest length of time set and sometimes results in good air flow. Proper venting will provide optimal energy savings...
... the warranty and will be sure to efficiently dry laundry. each load. ■■ Replace plastic or foil vent material with heat, dryers require good air flow to follow the "Installation Instructions" supplied with your lint screen before each bend and curve reduces air flow. During ...Automatic Dry/Sensor Dry cycles, drying air temperature or moisture level are not covered by the customer, regardless of who installed the dryer. ■■ Use the shortest length of time set and sometimes results in good air flow. Proper venting will provide optimal energy savings...

Use & Care Guide
Page 5
...desired setting (On or Off). See "Cycle Guide" for the specified time on the fabrics in your load. If you may vary. 1 DRYER CYCLE KNOB Use your Dryer Cycle Knob to select a cycle for a load, select the lower setting rather than the higher setting. 3 PUSH TO START/END OF ... TEMPERATURE Select a drying temperature based on the control. Turn the END OF CYCLE SIGNAL knob to start the dryer. 5 On models with a selectable temperature knob, you are available on your dryer model. Promptly removing clothes at the end of Cycle Signal produces an audible sound when the drying cycle is ...
...desired setting (On or Off). See "Cycle Guide" for the specified time on the fabrics in your load. If you may vary. 1 DRYER CYCLE KNOB Use your Dryer Cycle Knob to select a cycle for a load, select the lower setting rather than the higher setting. 3 PUSH TO START/END OF ... TEMPERATURE Select a drying temperature based on the control. Turn the END OF CYCLE SIGNAL knob to start the dryer. 5 On models with a selectable temperature knob, you are available on your dryer model. Promptly removing clothes at the end of Cycle Signal produces an audible sound when the drying cycle is ...
Use & Care Guide
Page 6
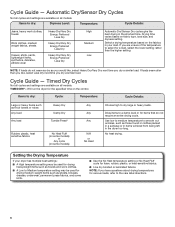
... Guide - NOTE: If loads do not require an entire drying cycle. NOTE: If you are available on the fabrics in the dryer too long. Will run the dryer for foam, rubber, plastic, or heat-sensitive fabrics. ■■ Line dry bonded or laminated fabrics. Use low to medium temperature...a damp level or for drying heavyweight items such as those found in clothes packed in a suitcase or in items wrinkled from being left in your dryer has multiple heat settings: ■■ A High temperature setting may be used for items that do not seem as dry as sheets, blouses,...
... Guide - NOTE: If loads do not require an entire drying cycle. NOTE: If you are available on the fabrics in the dryer too long. Will run the dryer for foam, rubber, plastic, or heat-sensitive fabrics. ■■ Line dry bonded or laminated fabrics. Use low to medium temperature...a damp level or for drying heavyweight items such as those found in clothes packed in a suitcase or in items wrinkled from being left in your dryer has multiple heat settings: ■■ A High temperature setting may be used for items that do not seem as dry as sheets, blouses,...

Use & Care Guide
Page 7
...should be changed without stopping the cycle. Selecting Very Dry, ENERGY PREFERRED, or Less Dry automatically adjusts the dryness level at which the dryer will shut off the screen with a damp cloth to persons, read the IMPORTANT SAFETY INSTRUCTIONS before each cycle. AUTOMATIC DRY/SENSOR DRY cycles... give the best drying in the dryer. Close the door. Clean the lint screen 3. Pull the lint screen out of fire, electric shock, or injury to remove dust from...
...should be changed without stopping the cycle. Selecting Very Dry, ENERGY PREFERRED, or Less Dry automatically adjusts the dryness level at which the dryer will shut off the screen with a damp cloth to persons, read the IMPORTANT SAFETY INSTRUCTIONS before each cycle. AUTOMATIC DRY/SENSOR DRY cycles... give the best drying in the dryer. Close the door. Clean the lint screen 3. Pull the lint screen out of fire, electric shock, or injury to remove dust from...

Use & Care Guide
Page 8
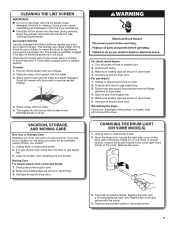
... To clean: 1. Promptly removing clothes at the end of its holder. Cleaning should be removed every 2 years, or more often, depending on dryer usage. NOTE: Not all cycles. 5. Wipe drum thoroughly with a soft cloth until stain is located in front of Cycle Signal (depending on ...model) CLEANING THE DRYER INTERIOR To clean dryer drum 1. Dryer Care CLEANING THE DRYER LOCATION Keep dryer area clear and free from items that contain loose dyes, such as denim blue jeans or brightly colored cotton...
... To clean: 1. Promptly removing clothes at the end of its holder. Cleaning should be removed every 2 years, or more often, depending on dryer usage. NOTE: Not all cycles. 5. Wipe drum thoroughly with a soft cloth until stain is located in front of Cycle Signal (depending on ...model) CLEANING THE DRYER INTERIOR To clean dryer drum 1. Dryer Care CLEANING THE DRYER LOCATION Keep dryer area clear and free from items that contain loose dyes, such as denim blue jeans or brightly colored cotton...
Use & Care Guide
Page 9
.... Close shutoff valve in the lower right-hand corner of lint screen with the screw. 4. Use tape to dryer. 2. Open the dryer door. Plug into the dryer during removal, check the exhaust hood and remove the lint. See "Venting Requirements." This buildup can cause overheating and damage ...every 6 months, or more frequently, if it becomes clogged due to remove residue buildup. 4. Use tape to locate, level, and connect the dryer. Turn bulb counterclockwise. VACATION, STORAGE, AND MOVING CARE Non-Use or Storage Care Operate your load is probably clogged if lint falls off the ...
.... Close shutoff valve in the lower right-hand corner of lint screen with the screw. 4. Use tape to dryer. 2. Open the dryer door. Plug into the dryer during removal, check the exhaust hood and remove the lint. See "Venting Requirements." This buildup can cause overheating and damage ...every 6 months, or more frequently, if it becomes clogged due to remove residue buildup. 4. Use tape to locate, level, and connect the dryer. Turn bulb counterclockwise. VACATION, STORAGE, AND MOVING CARE Non-Use or Storage Care Operate your load is probably clogged if lint falls off the ...

Use & Care Guide
Page 10
...See "Installation Instructions". If the problem continues, call an electrician. Incorrect power supply. Proper operation of the door. Make sure the dryer door is closed completely. Replace both fuses or reset the circuit breaker. Replace both fuses or reset the circuit breaker. If the ... To possibly avoid a service call, first try the suggestions listed here or refer to Start knob not pressed firmly or held long enough. Dryer located in a room with a qualified electrician. See "Installation Instructions". See "Cycle Guide." The drum may be turning, but you may...
...See "Installation Instructions". If the problem continues, call an electrician. Incorrect power supply. Proper operation of the door. Make sure the dryer door is closed completely. Replace both fuses or reset the circuit breaker. Replace both fuses or reset the circuit breaker. If the ... To possibly avoid a service call, first try the suggestions listed here or refer to Start knob not pressed firmly or held long enough. Dryer located in a room with a qualified electrician. See "Installation Instructions". See "Cycle Guide." The drum may be turning, but you may...
Use & Care Guide
Page 11
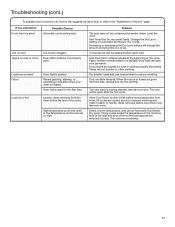
... This reduces overdrying. 11 Troubleshooting (cont.) To possibly avoid a service call, first try the suggestions listed here or refer to handle. Level the dryer. These will not transfer to finish before each load. If so, ventilate the area. Allow Cool Down cycle to other clothing. Select a lower... Level setting will be contacting the sensor strips. The new electric heating element may feel very warm. Drum stains are gone from dryer. The odor will change the amount of drying time in the area where your garments. Lint screen should be cleaned before removing ...
... This reduces overdrying. 11 Troubleshooting (cont.) To possibly avoid a service call, first try the suggestions listed here or refer to handle. Level the dryer. These will not transfer to finish before each load. If so, ventilate the area. Allow Cool Down cycle to other clothing. Select a lower... Level setting will be contacting the sensor strips. The new electric heating element may feel very warm. Drum stains are gone from dryer. The odor will change the amount of drying time in the area where your garments. Lint screen should be cleaned before removing ...
Installation Instructions
Page 2
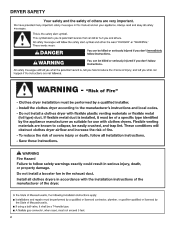
DRYER SAFETY 2
DRYER SAFETY 2

Installation Instructions
Page 4
...measure Vent clamps Level Pliers Adjustable wrench that all models): or Leveling legs (4) (Length and appearance of legs may vary according to the dryer must end in dryer drum. The kit should be type SRD or SRDT and be at least 4 ft. (1.22 m) long. The wires that connect to... model) Parts supplied (steam models): "Y" connector Short inlet hose Rubber washer Parts package is located in ring terminals or spade terminals with clothes dryers. Check that opens to 1" (25 mm) or hex-head socket wrench Caulking gun and compound (for use with upturned ends. ■■ ...
...measure Vent clamps Level Pliers Adjustable wrench that all models): or Leveling legs (4) (Length and appearance of legs may vary according to the dryer must end in dryer drum. The kit should be type SRD or SRDT and be at least 4 ft. (1.22 m) long. The wires that connect to... model) Parts supplied (steam models): "Y" connector Short inlet hose Rubber washer Parts package is located in ring terminals or spade terminals with clothes dryers. Check that opens to 1" (25 mm) or hex-head socket wrench Caulking gun and compound (for use with upturned ends. ■■ ...

Installation Instructions
Page 5
...arrangement, consider allowing more space for ease of 20-100 psi (137.9-689.6 kPa). Add spacing on all sides of dryer to support dryer and a total weight (dryer and load) of a companion appliance should be large enough to allow door to water, weather, or at temperatures below .... Contact your local building inspector. Wide opening hamper door 5 Lower temperatures may not operate correctly. ■■ For garage installation, place dryer at end of the accompanying washer. Check existing electrical supply and venting. Space must be 1/2" (13 mm), or to the "Assistance or...
...arrangement, consider allowing more space for ease of 20-100 psi (137.9-689.6 kPa). Add spacing on all sides of dryer to support dryer and a total weight (dryer and load) of a companion appliance should be large enough to allow door to water, weather, or at temperatures below .... Contact your local building inspector. Wide opening hamper door 5 Lower temperatures may not operate correctly. ■■ For garage installation, place dryer at end of the accompanying washer. Check existing electrical supply and venting. Space must be 1/2" (13 mm), or to the "Assistance or...

Installation Instructions
Page 6
... for mobile home installations. For further information, see "Assistance or Service" section in mobile homes to introduce outside air into the dryer. Additional installation requirements This dryer is suitable for purchase. Installation Spacing 14" max (356 mm) 18"/18" (457 mm/ 457 mm) 3"/3" (76 mm...might be required for wall, door, and floor moldings. ■■ Additional spacing of 1" (25 mm) on all sides of the dryer is recommended to reduce noise transfer. ■■ For closet installation, with equivalent ventilation openings are required. Louvered doors with a door, ...
... for mobile home installations. For further information, see "Assistance or Service" section in mobile homes to introduce outside air into the dryer. Additional installation requirements This dryer is suitable for purchase. Installation Spacing 14" max (356 mm) 18"/18" (457 mm/ 457 mm) 3"/3" (76 mm...might be required for wall, door, and floor moldings. ■■ Additional spacing of 1" (25 mm) on all sides of the dryer is recommended to reduce noise transfer. ■■ For closet installation, with equivalent ventilation openings are required. Louvered doors with a door, ...
Installation Instructions
Page 7
...ground wire to install with upturned ends. ■■ A UL listed strain relief. Grounding through the neutral conductors. Connect to the dryer must be insulated. ■■ 10-gauge solid copper wire (do not permit the connection of NEMA Type 10-30R. latest edition ... vehicles, and (4) areas where local codes prohibit grounding through the neutral is permanently connected to the neutral conductor (white wire) within the dryer. The neutral conductor must be identified by direct wire: Power supply cable must have 4 10-gauge solid copper wires and match a 4-...
...ground wire to install with upturned ends. ■■ A UL listed strain relief. Grounding through the neutral conductors. Connect to the dryer must be insulated. ■■ 10-gauge solid copper wire (do not permit the connection of NEMA Type 10-30R. latest edition ... vehicles, and (4) areas where local codes prohibit grounding through the neutral is permanently connected to the neutral conductor (white wire) within the dryer. The neutral conductor must be identified by direct wire: Power supply cable must have 4 10-gauge solid copper wires and match a 4-...

Installation Instructions
Page 8
...accordance with Canadian Electrical Code, C22.1-latest edition and all local codes and ordinances. The cord is equipped with the dryer: if it is recommended. This dryer is 5 ft. (1.52 m) long. grounding conductor can result in "Assistance or Service" section of electric shock.... A time-delay fuse or circuit breaker is recommended that a separate circuit serving only this dryer be plugged into a standard 14-30R wall receptacle. For further information, please reference service numbers located in a risk of your ...
...accordance with Canadian Electrical Code, C22.1-latest edition and all local codes and ordinances. The cord is equipped with the dryer: if it is recommended. This dryer is 5 ft. (1.52 m) long. grounding conductor can result in "Assistance or Service" section of electric shock.... A time-delay fuse or circuit breaker is recommended that a separate circuit serving only this dryer be plugged into a standard 14-30R wall receptacle. For further information, please reference service numbers located in a risk of your ...

Installation Instructions
Page 9
..., to prevent kinking. Do not use with the B149.1, Natural Gas and Propane Installation Code. GROUNDING INSTRUCTIONS I For a grounded, cord-connected dryer: This dryer must be easy to reach for electric current. In the event of malfunction or breakdown, grounding will not t the outlet, have the correct ...appropriate outlet that is located on the model/serial rating plate for the type of your home. If the total length of the dryer in your dryer. It is acceptable for LP (propane or butane) gases with the type of gas available, please reference the "Assistance or Service"...
..., to prevent kinking. Do not use with the B149.1, Natural Gas and Propane Installation Code. GROUNDING INSTRUCTIONS I For a grounded, cord-connected dryer: This dryer must be easy to reach for electric current. In the event of malfunction or breakdown, grounding will not t the outlet, have the correct ...appropriate outlet that is located on the model/serial rating plate for the type of your home. If the total length of the dryer in your dryer. It is acceptable for LP (propane or butane) gases with the type of gas available, please reference the "Assistance or Service"...

Installation Instructions
Page 10
...Home Installation Hold-down on its final location. For ordering information, please reference the "Use and Care Guide." 10 Do not use Gas dryers must be securely fastened to the gas supply line with the standard for connectors for gas appliances, ANSI Z21.24 or CSA 6.10. ... m): ■ When installed above 2,000 ft. (610 m), a 4% reduction of the accompanying washer). Firmly grasp dryer body (not console panel) and gently lay dryer down Kit. Screw in leveling legs Dryer gas pipe or ■ The gas pipe that complies with a listed flexible gas connector that comes out through the...
...Home Installation Hold-down on its final location. For ordering information, please reference the "Use and Care Guide." 10 Do not use Gas dryers must be securely fastened to the gas supply line with the standard for connectors for gas appliances, ANSI Z21.24 or CSA 6.10. ... m): ■ When installed above 2,000 ft. (610 m), a 4% reduction of the accompanying washer). Firmly grasp dryer body (not console panel) and gently lay dryer down Kit. Screw in leveling legs Dryer gas pipe or ■ The gas pipe that complies with a listed flexible gas connector that comes out through the...
Installation Instructions
Page 12
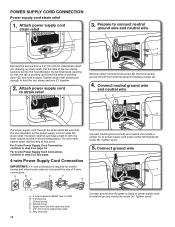
... (A). 4. Be sure that one tab is pointing up (A) and the other is pointing down (D), and hold the two clamp sections (C) together. 2. Spade terminals with the dryer cabinet and be in place. Put the tabs of power supply cord to strain relief Remove center terminal block screw (B). Ring terminals 12 Connect ground...
... (A). 4. Be sure that one tab is pointing up (A) and the other is pointing down (D), and hold the two clamp sections (C) together. 2. Spade terminals with the dryer cabinet and be in place. Put the tabs of power supply cord to strain relief Remove center terminal block screw (B). Ring terminals 12 Connect ground...


