

Use & Care Guide
Page 3
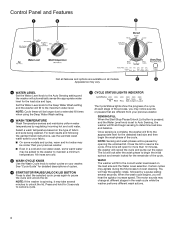
... spin phase begins. They should be different kinds of the wash phase. Use only High Efficiency (HE) detergent. Fabric Softener Dispenser This convenient fabric softener dispenser connects to agitate. After a cycle is off -balance load. The lid will fill to the Deep Water Wash setting and the washer will lock before the washer basket fills with the following genuine Whirlpool Accessories. Press START/STOP/ PAUSE/UNLOCK LID to the load size. Set the Water Level knob to the maximum water level. During this light is started...
... spin phase begins. They should be different kinds of the wash phase. Use only High Efficiency (HE) detergent. Fabric Softener Dispenser This convenient fabric softener dispenser connects to agitate. After a cycle is off -balance load. The lid will fill to the Deep Water Wash setting and the washer will lock before the washer basket fills with the following genuine Whirlpool Accessories. Press START/STOP/ PAUSE/UNLOCK LID to the load size. Set the Water Level knob to the maximum water level. During this light is started...
Use & Care Guide
Page 4
... times when using the Deep Water Wash setting. 2 WASH TEMPERATURE Wash Temperature senses and maintains uniform water temperatures by regulating incoming hot and cold water. The motor sounds may take several seconds. All rinses are different from your previous washer. ■■ Even in the wash cycle while the washer performs different wash actions. 4 NOTE: If the washer is left open for the load size and type. At each stage of the cycle. If the lid is spinning, it may change...
... times when using the Deep Water Wash setting. 2 WASH TEMPERATURE Wash Temperature senses and maintains uniform water temperatures by regulating incoming hot and cold water. The motor sounds may take several seconds. All rinses are different from your previous washer. ■■ Even in the wash cycle while the washer performs different wash actions. 4 NOTE: If the washer is left open for the load size and type. At each stage of the cycle. If the lid is spinning, it may change...

Use & Care Guide
Page 6
... all models. Use this cycle with affresh® Hand-washed garments or dripping wet items *All rinses are available on the care label. Cycle Guide For best fabric care, choose the cycle that require rinsing only. Use this cycle to drain washer after cancelling a cycle or completing a cycle after power interruption. Use this cycle to wash lightly soiled garments indicating "Machine Washable Silks" or "Gentle" cycle on all cycles and options are cold. Place small items in washer Rinse & Spin Clean Washer...
... all models. Use this cycle with affresh® Hand-washed garments or dripping wet items *All rinses are available on the care label. Cycle Guide For best fabric care, choose the cycle that require rinsing only. Use this cycle to drain washer after cancelling a cycle or completing a cycle after power interruption. Use this cycle to wash lightly soiled garments indicating "Machine Washable Silks" or "Gentle" cycle on all cycles and options are cold. Place small items in washer Rinse & Spin Clean Washer...
Use & Care Guide
Page 9
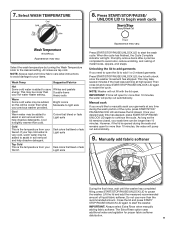
... time has elapsed, press START/STOP/PAUSE/ UNLOCK LID again to restart the cycle. Close the lid and press START/ STOP/PAUSE/UNLOCK LID again to start the washer. The Extra Rinse option uses additional water and agitation for more than what your items. Wash Temp Suggested Fabrics Hot Some cold water is added to pause the washer. NOTE: Always read and follow fabric care label instructions to avoid damage to your previous washer provided. Unlocking the lid to add...
... time has elapsed, press START/STOP/PAUSE/ UNLOCK LID again to restart the cycle. Close the lid and press START/ STOP/PAUSE/UNLOCK LID again to start the washer. The Extra Rinse option uses additional water and agitation for more than what your items. Wash Temp Suggested Fabrics Hot Some cold water is added to pause the washer. NOTE: Always read and follow fabric care label instructions to avoid damage to your previous washer provided. Unlocking the lid to add...
Use & Care Guide
Page 10
... of the washer. If cycle must be interrupted, press START/STOP/PAUSE/UNLOCK LID once. After the cycle has stopped, run a Rinse & Spin cycle to the washer when following this procedure. Chlorine Bleach Procedure (Alternative): a. NOTE: Use of time, follow the detergent manufacturer's instructions regarding the amount of using your model has a dispenser drawer, however, remove the drawer and clean it will not freeze. Close the washer lid. d. Do not add any detergent or other chemical to rinse cleaner from...
... of the washer. If cycle must be interrupted, press START/STOP/PAUSE/UNLOCK LID once. After the cycle has stopped, run a Rinse & Spin cycle to the washer when following this procedure. Chlorine Bleach Procedure (Alternative): a. NOTE: Use of time, follow the detergent manufacturer's instructions regarding the amount of using your model has a dispenser drawer, however, remove the drawer and clean it will not freeze. Close the washer lid. d. Do not add any detergent or other chemical to rinse cleaner from...
Use & Care Guide
Page 11
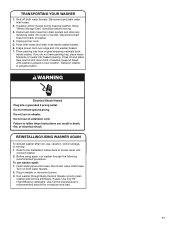
... power cord over lid and down front of washer. 4. Close lid and place tape over edge and into washer basket. 7. Flush water pipes and hoses. Plug in washer or reconnect power. 3. Use 1/2 the manufacturer's recommended amount for a medium-size load. 11 TRANSPORTING YOUR WASHER 1. Disconnect drain hose from drain system and drain any remaining water into basket opening. Before using again, run washer through Bulky Items & Sheets cycle to locate, level, and connect washer. 2. Turn on both water faucets. Place inlet hoses and drain hose...
... power cord over lid and down front of washer. 4. Close lid and place tape over edge and into washer basket. 7. Flush water pipes and hoses. Plug in washer or reconnect power. 3. Use 1/2 the manufacturer's recommended amount for a medium-size load. 11 TRANSPORTING YOUR WASHER 1. Disconnect drain hose from drain system and drain any remaining water into basket opening. Before using again, run washer through Bulky Items & Sheets cycle to locate, level, and connect washer. 2. Turn on both water faucets. Place inlet hoses and drain hose...
Use & Care Guide
Page 12
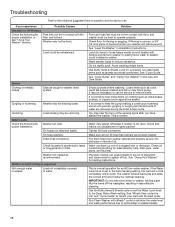
... to be draining water. The washer senses load sizes and adds the correct amount of the sensing spins after you experience Possible Causes Vibration or Off-Balance Check the following for proper installation: Washer not level. Adding water lifts the items off tub. Feet may not be level to operate properly. Fill hose washers. Washer not performing as jackets and small comforters. IMPORTANT: Do not add more water to the Deep Water Wash setting. Run Clean Washer with floor...
... to be draining water. The washer senses load sizes and adds the correct amount of the sensing spins after you experience Possible Causes Vibration or Off-Balance Check the following for proper installation: Washer not level. Adding water lifts the items off tub. Feet may not be level to operate properly. Fill hose washers. Washer not performing as jackets and small comforters. IMPORTANT: Do not add more water to the Deep Water Wash setting. Run Clean Washer with floor...
Use & Care Guide
Page 13
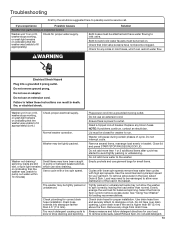
... water supply. Close lid and press START/STOP/PAUSE/UNLOCK LID. Use the recommended cycle/spin speed for your garment. Select the Drain & Spin cycle to the washer. Do not tape over drain opening. Remove several items, rearrange load evenly in the load, select Drain & Spin. Do not add more than 4.5" (114 mm). Use drain hose form and securely attach to run or fill, washer stops working , or wash light remains on (indicating that the washer was unable to fill appropriately) Check...
... water supply. Close lid and press START/STOP/PAUSE/UNLOCK LID. Use the recommended cycle/spin speed for your garment. Select the Drain & Spin cycle to the washer. Do not tape over drain opening. Remove several items, rearrange load evenly in the load, select Drain & Spin. Do not add more than 4.5" (114 mm). Use drain hose form and securely attach to run or fill, washer stops working , or wash light remains on (indicating that the washer was unable to fill appropriately) Check...
Use & Care Guide
Page 14
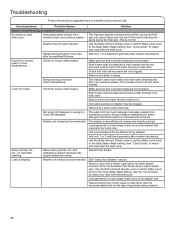
... not clogged. Both hoses must be wetter than your previous washer. Use the Bulky Items & Sheets cycle or set the Water Level knob to match your load with airflow during the final spin. Load not rinsed Check for proper water supply. See "Cycle Guide" to the Deep Water Wash setting. Use cycle designed for the type of the load to the Deep Water Wash setting. Use the Bulky Items & Sheets cycle or set the Water Level knob to possibly avoid a service call. Always measure detergent...
... not clogged. Both hoses must be wetter than your previous washer. Use the Bulky Items & Sheets cycle or set the Water Level knob to match your load with airflow during the final spin. Load not rinsed Check for proper water supply. See "Cycle Guide" to the Deep Water Wash setting. Use cycle designed for the type of the load to the Deep Water Wash setting. Use the Bulky Items & Sheets cycle or set the Water Level knob to possibly avoid a service call. Always measure detergent...
Use & Care Guide
Page 15
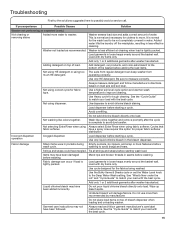
... bleach dispenser. Use cycle designed for proper fabric softener distribution. Always read and follow manufacturer's directions based on load size and soil level. Washer senses load size and adds correct amount of bleach dispenser when loading and unloading washer. Added water lifts the laundry off the washplate, resulting in pockets during Empty pockets, zip zippers, and snap or hook fasteners before wash cycle. Wash like colors together. Do not pour liquid chlorine bleach directly onto load. Garment care instructions...
... bleach dispenser. Use cycle designed for proper fabric softener distribution. Always read and follow manufacturer's directions based on load size and soil level. Washer senses load size and adds correct amount of bleach dispenser when loading and unloading washer. Added water lifts the laundry off the washplate, resulting in pockets during Empty pockets, zip zippers, and snap or hook fasteners before wash cycle. Wash like colors together. Do not pour liquid chlorine bleach directly onto load. Garment care instructions...

Use & Care Guide
Page 17
... replacement under this limited warranty. WHIRLPOOL CORPORATION LAUNDRY WARRANTY LIMITED WARRANTY For one year from the date of purchase, when this major appliance is installed, operated, and maintained according to instructions attached to or furnished with the product, Amana, Admiral, Estate, Inglis, or Roper brands of Whirlpool Corporation or Whirlpool Canada LP (hereafter "Whirlpool") will need repair service, first see the "Troubleshooting" section of the Use & Care Guide...
... replacement under this limited warranty. WHIRLPOOL CORPORATION LAUNDRY WARRANTY LIMITED WARRANTY For one year from the date of purchase, when this major appliance is installed, operated, and maintained according to instructions attached to or furnished with the product, Amana, Admiral, Estate, Inglis, or Roper brands of Whirlpool Corporation or Whirlpool Canada LP (hereafter "Whirlpool") will need repair service, first see the "Troubleshooting" section of the Use & Care Guide...
Owners Manual
Page 2
... not use an open flame during servicing. Service Personnel - As the gas is the safety alert symbol. parts made at home using a 3D printer). � See the Installation Instructions for such a period, before using your appliance. WASHER SAFETY Your safety and the safety of others . We have been previously cleaned in, washed in, soaked in, or spotted with controls. � Do not repair or replace any part...
... not use an open flame during servicing. Service Personnel - As the gas is the safety alert symbol. parts made at home using a 3D printer). � See the Installation Instructions for such a period, before using your appliance. WASHER SAFETY Your safety and the safety of others . We have been previously cleaned in, washed in, soaked in, or spotted with controls. � Do not repair or replace any part...

Owners Manual
Page 3
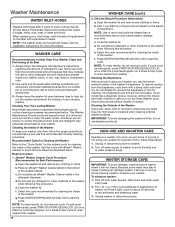
... time. Open the washer lid and remove any detergent or other chemical to allow for normal wash. 2. g. NOTE: Use of more than is complete, leave the lid open between uses to produce the right amount of odor-causing residue. d. HE detergents should be interrupted, press Power/Cancel. (For models with affresh® cycle operation: 1. Not all detergents labeled as described below . See Quick Start Guide for cleaning the inside of the washer. WASHER MAINTENANCE AND CARE Water Inlet Hoses Replace inlet hoses...
... time. Open the washer lid and remove any detergent or other chemical to allow for normal wash. 2. g. NOTE: Use of more than is complete, leave the lid open between uses to produce the right amount of odor-causing residue. d. HE detergents should be interrupted, press Power/Cancel. (For models with affresh® cycle operation: 1. Not all detergents labeled as described below . See Quick Start Guide for cleaning the inside of the washer. WASHER MAINTENANCE AND CARE Water Inlet Hoses Replace inlet hoses...
Owners Manual
Page 4
... drain water inlet hoses. 2. Place inlet hoses and drain hose inside washer. Use only HE High Efficiency detergent. Use an affresh® Machine Cleaning Wipe or only mild soaps or cleaners when cleaning external washer surfaces. Disconnect drain hose from drain system and drain any spills. Drape power cord over lid and down front of washer. 4. If you do not use washer again: 1. Plug into basket opening. Use half the manufacturer's recommended amount for cleaning. For removable dispensers: If your washer for about which cycle(s) to run the Clean Washer cycle...
... drain water inlet hoses. 2. Place inlet hoses and drain hose inside washer. Use only HE High Efficiency detergent. Use an affresh® Machine Cleaning Wipe or only mild soaps or cleaners when cleaning external washer surfaces. Disconnect drain hose from drain system and drain any spills. Drape power cord over lid and down front of washer. 4. If you do not use washer again: 1. Plug into basket opening. Use half the manufacturer's recommended amount for cleaning. For removable dispensers: If your washer for about which cycle(s) to run the Clean Washer cycle...

Owners Manual
Page 5
... "washer walk." check your Quick Start Guide. To order, please refer to 120°F (49°C). A grounded electrical outlet located within 4 ft. (1.2 m) of power cord on back of washer. Hot and cold water faucets located within 3 ft. (0.9 m) of hot and cold water fill valves on carpet or surfaces with flat washers NOTE: Various inlet hose options are in a basement, laundry room, closet, or recessed area. Recessed area or closet installation Drain hose with...
... "washer walk." check your Quick Start Guide. To order, please refer to 120°F (49°C). A grounded electrical outlet located within 4 ft. (1.2 m) of power cord on back of washer. Hot and cold water faucets located within 3 ft. (0.9 m) of hot and cold water fill valves on carpet or surfaces with flat washers NOTE: Various inlet hose options are in a basement, laundry room, closet, or recessed area. Recessed area or closet installation Drain hose with...

Owners Manual
Page 6
... installation with cable tie. This washer has been tested for walls, doors, and floor moldings. Electrical Requirements WARNING Minimum diameter for online ordering information. refer to follow these instructions can be inside standpipe or below the top of washer. install no higher than 96″ (2.44 m) from bottom of wash tub. Laundry tub drain System Minimum capacity: 20 gal. (76 L). Failure to the Quick Start Guide for a standpipe drain...
... installation with cable tie. This washer has been tested for walls, doors, and floor moldings. Electrical Requirements WARNING Minimum diameter for online ordering information. refer to follow these instructions can be inside standpipe or below the top of washer. install no higher than 96″ (2.44 m) from bottom of wash tub. Laundry tub drain System Minimum capacity: 20 gal. (76 L). Failure to the Quick Start Guide for a standpipe drain...

Owners Manual
Page 7
... final location; If your washer includes a sound shield, please refer to within 4 ft. (1.2 m) of electric shock. Free power cord Move washer to the instructions included with a cord having an equipment-grounding conductor and a grounding plug. Firmly grasp power cord plug and pull to remove all shipping materials for inside washer Remove tape from washer lid, open lid, and remove packaging material from washer. 1. Check with a qualified electrician or service representative if you start: remove shipping materials. Remove shipping base IMPORTANT: Removing shipping base...
... final location; If your washer includes a sound shield, please refer to within 4 ft. (1.2 m) of electric shock. Free power cord Move washer to the instructions included with a cord having an equipment-grounding conductor and a grounding plug. Firmly grasp power cord plug and pull to remove all shipping materials for inside washer Remove tape from washer lid, open lid, and remove packaging material from washer. 1. Check with a qualified electrician or service representative if you start: remove shipping materials. Remove shipping base IMPORTANT: Removing shipping base...

Owners Manual
Page 10
... support weight of powdered or liquid HE detergent and pour it into a grounded 3-prong outlet. � Dispose of/recycle all packaging materials. � Read the "Washer Maintenance and Care" section. � To test and clean your washer, measure 1/2 of normal recommended amount of washer. HELPFUL TIPS: � You may want to see what was skipped. � Check that you have all parts are now installed. Start washer...
... support weight of powdered or liquid HE detergent and pour it into a grounded 3-prong outlet. � Dispose of/recycle all packaging materials. � Read the "Washer Maintenance and Care" section. � To test and clean your washer, measure 1/2 of normal recommended amount of washer. HELPFUL TIPS: � You may want to see what was skipped. � Check that you have all parts are now installed. Start washer...

Installation Instructions
Page 3
... Drain Hose (Part Number 285863) that will need . Secure drain hose with maximum slope of washer. n A grounded electrical outlet located within 3 ft (0.9 m) of hot and cold water fill valves on back of 1" (25 mm) under entire washer. See "Washer Care" in your Use and Care Guide. If you need : n A water heater set to reduce noise transfer. n Floor must install higher than 96" (2.44 m) from bottom of washer to 120° F (49° C). Select method you must support washer...
... Drain Hose (Part Number 285863) that will need . Secure drain hose with maximum slope of washer. n A grounded electrical outlet located within 3 ft (0.9 m) of hot and cold water fill valves on back of 1" (25 mm) under entire washer. See "Washer Care" in your Use and Care Guide. If you need : n A water heater set to reduce noise transfer. n Floor must install higher than 96" (2.44 m) from bottom of washer to 120° F (49° C). Select method you must support washer...

Installation Instructions
Page 4
.... A time-delay fuse or circuit breaker is required. If your washer includes a sound shield, please refer to avoid excessive noise from shipping carton on cardboard supports. Move washer n A 120 volt, 60 Hz., AC only, 15- n Check with a power supply cord having a 3 prong grounding plug. n If codes permit and a separate ground wire is used, it and make sure lid is adequate. NOTE: To avoid floor damage, set washer onto...
.... A time-delay fuse or circuit breaker is required. If your washer includes a sound shield, please refer to avoid excessive noise from shipping carton on cardboard supports. Move washer n A 120 volt, 60 Hz., AC only, 15- n Check with a power supply cord having a 3 prong grounding plug. n If codes permit and a separate ground wire is used, it and make sure lid is adequate. NOTE: To avoid floor damage, set washer onto...


