
Installation Instructions
Page 1
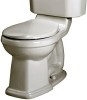
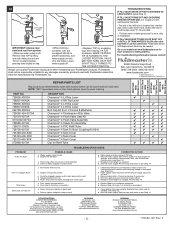
...™ Champion® 4 2-piece Toilets Models - 2058, 2074, 2076, 2473 Doral Classic™ Champion® 4 2-piece Toilets Models - 2367, 2368, 2369, 2443 Oakmont™ Champion® 4 2-piece Toilets Models - 2625, 2627, 2738 Portsmouth® Champion® 4 2-piece Toilets Models - 2733, 2735 Thank you begin. (Certain installations may require professional help.) Also be clean and level before you for selecting American Standard - NOTE: If replacing valve, first...
...™ Champion® 4 2-piece Toilets Models - 2058, 2074, 2076, 2473 Doral Classic™ Champion® 4 2-piece Toilets Models - 2367, 2368, 2369, 2443 Oakmont™ Champion® 4 2-piece Toilets Models - 2625, 2627, 2738 Portsmouth® Champion® 4 2-piece Toilets Models - 2733, 2735 Thank you begin. (Certain installations may require professional help.) Also be clean and level before you for selecting American Standard - NOTE: If replacing valve, first...
Installation Instructions
Page 2
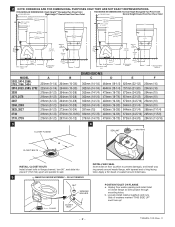
... Right Height™ Elongated Two Piece Toilet FINISHED WALL Right Height™ Round Front Two Piece Toilet ROUGHING-IN DIMENSIONS: Normal Height Elongated Two Piece Toilet FINISHED WALL Normal Height Round Front Two Piece Toilet ...152mm (6") FINISHED FLOOR F B 305mm (12") 16mm (5/8") C 152mm (6") FINISHED FLOOR F * ROUND FRONT MODELS MODEL 2002, 2414, 2586, 2793, 3186, 3404 2018, 2023, 2585, 2792 2058 2074, 2076 2367 2368,...4 CLOSET FLANGE SEALANT WAX RING A CLOSET BOLTS INSTALL CLOSET BOLTS Install closet bolts in flange channel, turn 90°, and slide into place ...
... Right Height™ Elongated Two Piece Toilet FINISHED WALL Right Height™ Round Front Two Piece Toilet ROUGHING-IN DIMENSIONS: Normal Height Elongated Two Piece Toilet FINISHED WALL Normal Height Round Front Two Piece Toilet ...152mm (6") FINISHED FLOOR F B 305mm (12") 16mm (5/8") C 152mm (6") FINISHED FLOOR F * ROUND FRONT MODELS MODEL 2002, 2414, 2586, 2793, 3186, 3404 2018, 2023, 2585, 2792 2058 2074, 2076 2367 2368,...4 CLOSET FLANGE SEALANT WAX RING A CLOSET BOLTS INSTALL CLOSET BOLTS Install closet bolts in flange channel, turn 90°, and slide into place ...
Installation Instructions
Page 3
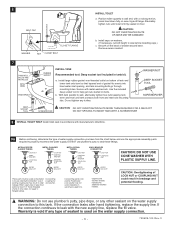
...of existing coupling nut may not seal completely on washers. (If necessary, cut bolt height to help get nuts started on floor. ! If the connection leaks after hand tightening, replace the supply line. If the connection continues to flanged tubing). b. a. Secure with ... These parts must extend at least 1/2" inside threaded shank of sealant around base. Fluidmaster cone washer may result in tank kit. BOLTS PREINSTALLED MTG. WASHER/NUT DEEP SOCKET TOOL SCREWDRIVER ! SCREWDRIVER DO NOT SPIN BOLTS INSIDE TANK WITH A SCREWDRIVER 8 INSTALL TOILET SEAT Install toilet seat ...
...of existing coupling nut may not seal completely on washers. (If necessary, cut bolt height to help get nuts started on floor. ! If the connection leaks after hand tightening, replace the supply line. If the connection continues to flanged tubing). b. a. Secure with ... These parts must extend at least 1/2" inside threaded shank of sealant around base. Fluidmaster cone washer may result in tank kit. BOLTS PREINSTALLED MTG. WASHER/NUT DEEP SOCKET TOOL SCREWDRIVER ! SCREWDRIVER DO NOT SPIN BOLTS INSIDE TANK WITH A SCREWDRIVER 8 INSTALL TOILET SEAT Install toilet seat ...
Installation Instructions
Page 4
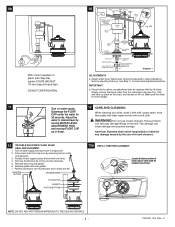
...Replace gasket with one hand. 4. NOTE: DO NOT ADD ANY FOREIGN MATERIALS TO THE SEALING SURFACE. - 4 - 730529-100 Rev. These products can cause leakage and property damage. American Standard... level should be required with a soft cloth. Parially lift and support piston bottom with new gasket. 7. Make sure the chain is...REPLACEMENT: Locate bottom portion of in-tank cleaners. 13 TROUBLE SHOOTING FLUSH VALVE SEAL REPLACEMENT: 1. VALVE BODY SHANK WASHER WATER LEVEL ADJUSTMENT ROD ADJUSTABLE HEIGHT LOCK NUT CONE WASHER COUPLING NUT (HAND TIGHT ONLY) THREADED SHANK PARTS...
...Replace gasket with one hand. 4. NOTE: DO NOT ADD ANY FOREIGN MATERIALS TO THE SEALING SURFACE. - 4 - 730529-100 Rev. These products can cause leakage and property damage. American Standard... level should be required with a soft cloth. Parially lift and support piston bottom with new gasket. 7. Make sure the chain is...REPLACEMENT: Locate bottom portion of in-tank cleaners. 13 TROUBLE SHOOTING FLUSH VALVE SEAL REPLACEMENT: 1. VALVE BODY SHANK WASHER WATER LEVEL ADJUSTMENT ROD ADJUSTABLE HEIGHT LOCK NUT CONE WASHER COUPLING NUT (HAND TIGHT ONLY) THREADED SHANK PARTS...
Installation Instructions
Page 5
...10004;✔ ✔ ✔ ✔ ✔ ✔ ✔ ✔✔ TROUBLESHOOTING GUIDE PROBLEM Does not flush Poor or sluggish flush Toilet leaks Toilet does not shut off . • Replace TOP by toilet tank number which can be needed . Water supply valve closed . c. Flush valve chain too ...americanstandard.ca In Mexico: American Standard B&K Mexico S. Mexico Toll Free: 01-800-839-1200 www.americanstandard.com.mx - 5 - 730529-100 Rev. Go to our website at least 20 psi. a. a. Remove obstruction. Review Step 9 of installation procedure. NOTE: "XXX"...
...10004;✔ ✔ ✔ ✔ ✔ ✔ ✔ ✔✔ TROUBLESHOOTING GUIDE PROBLEM Does not flush Poor or sluggish flush Toilet leaks Toilet does not shut off . • Replace TOP by toilet tank number which can be needed . Water supply valve closed . c. Flush valve chain too ...americanstandard.ca In Mexico: American Standard B&K Mexico S. Mexico Toll Free: 01-800-839-1200 www.americanstandard.com.mx - 5 - 730529-100 Rev. Go to our website at least 20 psi. a. a. Remove obstruction. Review Step 9 of installation procedure. NOTE: "XXX"...

Valve Replacement
Page 1
... plus an additional 3/4 turn. 9 Align the lock nut "flat" parallel to 1 inch below the overflow tube. ISPN 7301121-100 PART# 5-1835 REV.1 01/07 Adjust the water level to back edge of the refill tube to the bowl and tighten the tank mounting... valve overflow at the location shown. AMERICAN STANDARD COMPANIES Champion4 Valve Replacement Instructions r Turn off and disconnect the supply line. Remove the hook from the new Clevis Pin assembly. Place the tank on a stable work top. Ob I • •, • Install a New Champion4 Flush valve with the...
... plus an additional 3/4 turn. 9 Align the lock nut "flat" parallel to 1 inch below the overflow tube. ISPN 7301121-100 PART# 5-1835 REV.1 01/07 Adjust the water level to back edge of the refill tube to the bowl and tighten the tank mounting... valve overflow at the location shown. AMERICAN STANDARD COMPANIES Champion4 Valve Replacement Instructions r Turn off and disconnect the supply line. Remove the hook from the new Clevis Pin assembly. Place the tank on a stable work top. Ob I • •, • Install a New Champion4 Flush valve with the...


