
User Guide
Page 30
.... 6 Follow the instructions on your computer. 7 Click Restart. The software is now installed and the display is complete. IMPORTANT The Installer checks to make sure you have the correct system software, you use the Installer to install the software. Note: Make sure you can purchase a new version from an Apple-authorized dealer. 5 Click Install. If a dialog box says you don't have the system software you need . You...
.... 6 Follow the instructions on your computer. 7 Click Restart. The software is now installed and the display is complete. IMPORTANT The Installer checks to make sure you have the correct system software, you use the Installer to install the software. Note: Make sure you can purchase a new version from an Apple-authorized dealer. 5 Click Install. If a dialog box says you don't have the system software you need . You...

User Guide
Page 32
... to create an image on setting screen resolution. Note: Not all the control panels. 2 Double-click the Monitors icon to open Macintosh Guide, choose Macintosh Guide from the Apple (K) menu. In this case, instructions in for instructions on the screen. To open the Monitors control panel. For more information, see how your computer. A window opens showing all Macintosh computers can change your screen resolution, follow these steps: 1 Choose Control Panels from the Guide menu (marked with your monitors are numbered.
... to create an image on setting screen resolution. Note: Not all the control panels. 2 Double-click the Monitors icon to open Macintosh Guide, choose Macintosh Guide from the Apple (K) menu. In this case, instructions in for instructions on the screen. To open the Monitors control panel. For more information, see how your computer. A window opens showing all Macintosh computers can change your screen resolution, follow these steps: 1 Choose Control Panels from the Guide menu (marked with your monitors are numbered.

User Guide
Page 38
... can use the AppleVision Setup control panel to adjust the screen image. You can use the AppleVision Setup control panel to lock out the contrast and brightness buttons. Opening and closing the AppleVision Setup control panel 1 Choose Control Panels from the Apple (K) menu. A window opens showing all the control panels. 2 Locate the AppleVision Setup icon in Chapter 4. If an adjustment is locked out, the indicator looks like this: Using the AppleVision Setup control panel In addition to show the current setting. For example, pressing a Brightness button displays the Brightness...
... can use the AppleVision Setup control panel to adjust the screen image. You can use the AppleVision Setup control panel to lock out the contrast and brightness buttons. Opening and closing the AppleVision Setup control panel 1 Choose Control Panels from the Apple (K) menu. A window opens showing all the control panels. 2 Locate the AppleVision Setup icon in Chapter 4. If an adjustment is locked out, the indicator looks like this: Using the AppleVision Setup control panel In addition to show the current setting. For example, pressing a Brightness button displays the Brightness...
User Guide
Page 41
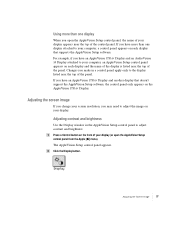
... of the control panel. Adjusting the screen image If you change your screen resolution, you have an AppleVision 1710AV Display and an AudioVision 14 Display attached to adjust the image on your computer, a control panel appears on the front of the panel. For example, if you open the AppleVision Setup control panel from the Apple [K] menu). Adjusting contrast and brightness Use the Display window in a control panel apply only to your display. Using more than one display attached to the display listed near...
... of the control panel. Adjusting the screen image If you change your screen resolution, you have an AppleVision 1710AV Display and an AudioVision 14 Display attached to adjust the image on your computer, a control panel appears on the front of the panel. For example, if you open the AppleVision Setup control panel from the Apple [K] menu). Adjusting contrast and brightness Use the Display window in a control panel apply only to your display. Using more than one display attached to the display listed near...

User Guide
Page 54
...-tune the color on your display. However, if you may need to provide the best color match. Your display comes with detailed color graphics, you 're working with a general profile, called a ColorSync profile, that characterizes your AppleVision 1710AV Display. About color Your Apple computer system uses an additive process (a combination of the differences in the AppleVision Setup control panel to further characterize your specific display and lighting conditions...
...-tune the color on your display. However, if you may need to provide the best color match. Your display comes with detailed color graphics, you 're working with a general profile, called a ColorSync profile, that characterizes your AppleVision 1710AV Display. About color Your Apple computer system uses an additive process (a combination of the differences in the AppleVision Setup control panel to further characterize your specific display and lighting conditions...
User Guide
Page 55
... adjust colors on your display. 1 Press a Control button on your display sets the mix of your display (or open the AppleVision Setup control panel from the Apple [K] menu). Opening the Color window Use the Color window in the AppleVision Setup control panel to change. The AppleVision Setup control panel appears. 42 Chapter 4 With the AppleVision 1710AV Display, you select for your display may appear. m Gamma curve: The relationship between the input value and output luminance on the front of red, green, and blue lights...
... adjust colors on your display. 1 Press a Control button on your display sets the mix of your display (or open the AppleVision Setup control panel from the Apple [K] menu). Opening the Color window Use the Color window in the AppleVision Setup control panel to change. The AppleVision Setup control panel appears. 42 Chapter 4 With the AppleVision 1710AV Display, you select for your display may appear. m Gamma curve: The relationship between the input value and output luminance on the front of red, green, and blue lights...
User Guide
Page 87
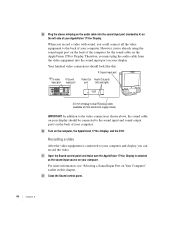
... the video. 1 Open the Sound control panel and make sure the AppleVision 1710AV Display is connected to your computer and display, you 're already using the sound input port on the back of the computer for the sound cable on your computer. Recording a video After the video equipment is selected as the sound input source on the AppleVision 1710AV Display. Your finished video connections should look like this: ≈ Sound input port æ S-video ≈ Sound input port input port Video Out Audio Out ports port...
... the video. 1 Open the Sound control panel and make sure the AppleVision 1710AV Display is connected to your computer and display, you 're already using the sound input port on the back of the computer for the sound cable on your computer. Recording a video After the video equipment is selected as the sound input source on the AppleVision 1710AV Display. Your finished video connections should look like this: ≈ Sound input port æ S-video ≈ Sound input port input port Video Out Audio Out ports port...

User Guide
Page 103
... 16 inches apart, you do not have a video card installed in Chapter 2. There are father apart. The screen flickers. If after moving your computer. m Make sure the display cable is set the displays at an angle, so their screens are close and their back panels are one or two very thin gray lines across the screen, one another computer. You may flicker. Tips and Troubleshooting for the video card. The...
... 16 inches apart, you do not have a video card installed in Chapter 2. There are father apart. The screen flickers. If after moving your computer. m Make sure the display cable is set the displays at an angle, so their screens are close and their back panels are one or two very thin gray lines across the screen, one another computer. You may flicker. Tips and Troubleshooting for the video card. The...
User Guide
Page 117
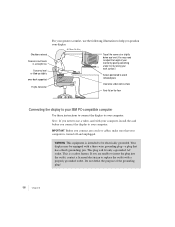
... under work surface Feet flat on the floor Connecting the display to your IBM PC-compatible computer Use these instructions to connect the display to help you position your display. 45-70 cm (18-28 in a straight line Forearms level or tilted up slightly ower back supported Thighs horizontal For your greatest comfort, use a video card with your computer, install the card before you need to adjust the height of the grounding plug! 120...
... under work surface Feet flat on the floor Connecting the display to your IBM PC-compatible computer Use these instructions to connect the display to help you position your display. 45-70 cm (18-28 in a straight line Forearms level or tilted up slightly ower back supported Thighs horizontal For your greatest comfort, use a video card with your computer, install the card before you need to adjust the height of the grounding plug! 120...
User Guide
Page 133
... and Troubleshooting for IBM PC-Compatible Users 137 See "Adjusting Color Temperature and Overscan" in Chapter 9. See "Adjusting Screen Geometry" in Chapter 9. m Adjust the horizontal or vertical convergence of the screen image. You hear no sound on your screen appear too blue, too yellow, or too red. m Increase the volume. To change resolutions, see the manual that came with your AppleVision 1710AV speakers or headphones. Images or text on your computer or video card...
... and Troubleshooting for IBM PC-Compatible Users 137 See "Adjusting Color Temperature and Overscan" in Chapter 9. See "Adjusting Screen Geometry" in Chapter 9. m Adjust the horizontal or vertical convergence of the screen image. You hear no sound on your screen appear too blue, too yellow, or too red. m Increase the volume. To change resolutions, see the manual that came with your AppleVision 1710AV speakers or headphones. Images or text on your computer or video card...

User Guide
Page 139
... red, but your System Folder. Next, ColorSync converts device-specific colors into standard colors. Using ColorSync The default ColorSync profile for the AppleVision 1710AV Display is located in your printer inks may not be able to closely matching colors that color. This profile is named AppleVision 1710-9300 and is selected automatically. 2 Choose Control Panels from the Apple (K) menu and open the ColorSync System Profile control panel...
... red, but your System Folder. Next, ColorSync converts device-specific colors into standard colors. Using ColorSync The default ColorSync profile for the AppleVision 1710AV Display is located in your printer inks may not be able to closely matching colors that color. This profile is named AppleVision 1710-9300 and is selected automatically. 2 Choose Control Panels from the Apple (K) menu and open the ColorSync System Profile control panel...
User Guide
Page 144
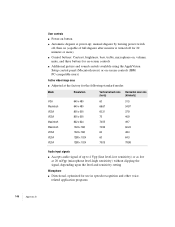
...B manual degauss by turning power switch off, then on (capable of full degauss after monitor is turned off for 20 minutes or more) m Control buttons: Contrast, brightness, bass, treble, microphone on, volume, mute, and three buttons for on-screen controls m Additional picture and sound controls available using the AppleVision Setup control panel (Macintosh users) or on button m Automatic degauss at the factory for the following standard modes: Mode Resolution Vertical refresh rate Horizontal scan rate (hertz) (kilohertz) VGA Macintosh VESA VESA Macintosh Macintosh VESA VESA VESA 640...
...B manual degauss by turning power switch off, then on (capable of full degauss after monitor is turned off for 20 minutes or more) m Control buttons: Contrast, brightness, bass, treble, microphone on, volume, mute, and three buttons for on-screen controls m Additional picture and sound controls available using the AppleVision Setup control panel (Macintosh users) or on button m Automatic degauss at the factory for the following standard modes: Mode Resolution Vertical refresh rate Horizontal scan rate (hertz) (kilohertz) VGA Macintosh VESA VESA Macintosh Macintosh VESA VESA VESA 640...

User Guide
Page 147
...-ROM sound input port 68-69 centering screen image Macintosh users 31-32 PC users 128-129 characterizing color 41-42 CIE color standard ColorSync 142 using to create a white point 47-50 cleaners, damage from 102, 133 cleaning instructions Macintosh users 1-3, 101-102 PC users 115-116, 133-134 climate, operating 148 CMYK colors, printer mix 141 color compatibility, technical information 147 color depth, changing in volume control 75-77 buttons (Macintosh users) control 5 disabling...
...-ROM sound input port 68-69 centering screen image Macintosh users 31-32 PC users 128-129 characterizing color 41-42 CIE color standard ColorSync 142 using to create a white point 47-50 cleaners, damage from 102, 133 cleaning instructions Macintosh users 1-3, 101-102 PC users 115-116, 133-134 climate, operating 148 CMYK colors, printer mix 141 color compatibility, technical information 147 color depth, changing in volume control 75-77 buttons (Macintosh users) control 5 disabling...

User Guide
Page 148
...using control buttons 5, 23-24 contrast (PC users) problems 136 using control buttons 126 control panels vs. Control Strip 92 controls (Macintosh users) diagram of 5 headphone volume 78-79 sound 65 speaker volume 78-79 volume 74-77 controls (PC users) diagram of 126 on-screen 128 using 143-144 color temperature (PC users), adjusting 130. See also colors (Macintosh Users) Color window, opening the Color window 42-43 problems 107-108 saving settings 43, 58-60 setting a white point 44-45 using ColorSync 141-144 using existing settings 60-61 using factory settings 59 colors (PC users) adjusting...
...using control buttons 5, 23-24 contrast (PC users) problems 136 using control buttons 126 control panels vs. Control Strip 92 controls (Macintosh users) diagram of 5 headphone volume 78-79 sound 65 speaker volume 78-79 volume 74-77 controls (PC users) diagram of 126 on-screen 128 using 143-144 color temperature (PC users), adjusting 130. See also colors (Macintosh Users) Color window, opening the Color window 42-43 problems 107-108 saving settings 43, 58-60 setting a white point 44-45 using ColorSync 141-144 using existing settings 60-61 using factory settings 59 colors (PC users) adjusting...

User Guide
Page 149
...image problems 137 sound problems 137-138 turning on 14 using more than one 7 using speakers 88-90 "waking up" 22 display (PC users). setup cleaning 115-116, 133-134 compatibility 117 connecting to computer 8-12 connectors 5 control buttons 5 description 1 diagrams 4-5 electrical hazards 2-3, 102 installing software 15-16 ports 9 positioning for comfort 120 problems starting 103-104 recalibrating 57-58 screen image problems 107-108 sound problems 109-111 turning on 124 display port icon 9 display power cord (Macintosh users) connecting 8-9 provided 4-5 display power cord (PC users...
...image problems 137 sound problems 137-138 turning on 14 using more than one 7 using speakers 88-90 "waking up" 22 display (PC users). setup cleaning 115-116, 133-134 compatibility 117 connecting to computer 8-12 connectors 5 control buttons 5 description 1 diagrams 4-5 electrical hazards 2-3, 102 installing software 15-16 ports 9 positioning for comfort 120 problems starting 103-104 recalibrating 57-58 screen image problems 107-108 sound problems 109-111 turning on 124 display port icon 9 display power cord (Macintosh users) connecting 8-9 provided 4-5 display power cord (PC users...
User Guide
Page 150
... using color settings 58-60 using control panels 42-43 flickering screen Macintosh users 105 PC users 136 G gain setting 87-88, 90 gamma curve (Macintosh users) 42-43, 55-58 adjusting 55-56 gamma values 42, 55 Geometry button 29 grounding plug 8, 120 Guide menu xiii H headphones, output level for jack 147 headphones (Macintosh users) adjusting volume 25 plugging in 5, 13 problems 109 headphones (PC users) plugging in 123 problems 137 Headphone Volume control 78 height, adjusting screen image Macintosh users...
... using color settings 58-60 using control panels 42-43 flickering screen Macintosh users 105 PC users 136 G gain setting 87-88, 90 gamma curve (Macintosh users) 42-43, 55-58 adjusting 55-56 gamma values 42, 55 Geometry button 29 grounding plug 8, 120 Guide menu xiii H headphones, output level for jack 147 headphones (Macintosh users) adjusting volume 25 plugging in 5, 13 problems 109 headphones (PC users) plugging in 123 problems 137 Headphone Volume control 78 height, adjusting screen image Macintosh users...
User Guide
Page 151
... desktop not displayed 17 system software required 15 Macintosh Guide getting help from xiii instructions for adjusting screen image 25 menu font, changing 98-99 menus Guide xiii hidden by overscan 38 messages "AppleVision Setup failed to load" 1-6 "This software only works with an AppleVision display" 106 microphones, technical information 146 microphones (Macintosh users) built-in 5, 11 connecting external 12-13 control buttons 5, 65 indicator light 5 problems 110 sound input source for display 70-71 using to...
... desktop not displayed 17 system software required 15 Macintosh Guide getting help from xiii instructions for adjusting screen image 25 menu font, changing 98-99 menus Guide xiii hidden by overscan 38 messages "AppleVision Setup failed to load" 1-6 "This software only works with an AppleVision display" 106 microphones, technical information 146 microphones (Macintosh users) built-in 5, 11 connecting external 12-13 control buttons 5, 65 indicator light 5 problems 110 sound input source for display 70-71 using to...

User Guide
Page 152
... power button Macintosh users 5, 14, 23 PC users 124 power cord. Monitors control panel (Macintosh users) display doesn't appear 17, 26, 106 uses of 18-20 Monitors icon 18 mouse, connecting 11-12 multimedia application programs, support for color accuracy 57 recording sounds (Macintosh users) alert 81-82 problems 110 and a video 82-88 recording sounds (PC users), problems 137-138 repair service 103, 134 resolution (Macintosh users) adjusting screen image in control panel 27 changing in control panel 18-20 changing in Control Strip. See display power cord power indicator light Macintosh users...
... power button Macintosh users 5, 14, 23 PC users 124 power cord. Monitors control panel (Macintosh users) display doesn't appear 17, 26, 106 uses of 18-20 Monitors icon 18 mouse, connecting 11-12 multimedia application programs, support for color accuracy 57 recording sounds (Macintosh users) alert 81-82 problems 110 and a video 82-88 recording sounds (PC users), problems 137-138 repair service 103, 134 resolution (Macintosh users) adjusting screen image in control panel 27 changing in control panel 18-20 changing in Control Strip. See display power cord power indicator light Macintosh users...

User Guide
Page 153
...-38 screen image adjustment (PC users) color temperature and overscan 129-130 control buttons 125-126 convergence 131 default 126, 129 on display speakers 88-90 problems 109-111 recording alert sounds 81-82 recording sound and video 82-88 routing display sound 73-74 selecting a sound input source for display 119 connecting external sound equipment 123 connecting the display 120-123 diagram of display 118 positioning display 119-120 safety and cleaning instructions 115-116 software, installing AppleVision 15-16 sound (Macintosh users) adjusting...
...-38 screen image adjustment (PC users) color temperature and overscan 129-130 control buttons 125-126 convergence 131 default 126, 129 on display speakers 88-90 problems 109-111 recording alert sounds 81-82 recording sound and video 82-88 routing display sound 73-74 selecting a sound input source for display 119 connecting external sound equipment 123 connecting the display 120-123 diagram of display 118 positioning display 119-120 safety and cleaning instructions 115-116 software, installing AppleVision 15-16 sound (Macintosh users) adjusting...

User Guide
Page 154
See colors turning power on display 88-90 problems Macintosh users 109 PC users 137 technical information 147 specifications, display 145-149 starting up 103-104 troubleshooting (PC users) contrast and brightness 136 eyestrain 136-137 flickering screen 136 gray lines 136 problems starting the Macintosh 16 stereo miniplug connector 12 support and service 103, 134 S-video formats connectors 84 input and output ports 83 ports in AppleVision Setup control panel 25 muting internal 77 playing audio CD on or off...
See colors turning power on display 88-90 problems Macintosh users 109 PC users 137 technical information 147 specifications, display 145-149 starting up 103-104 troubleshooting (PC users) contrast and brightness 136 eyestrain 136-137 flickering screen 136 gray lines 136 problems starting the Macintosh 16 stereo miniplug connector 12 support and service 103, 134 S-video formats connectors 84 input and output ports 83 ports in AppleVision Setup control panel 25 muting internal 77 playing audio CD on or off...


