
Owners Manual
Page 6
... system that may get caught in . Safe operation requires your body or clothing inside or near drop-offs, ditches, or embankments. NEVER place your Ariens Company Equipment Retailer concerning emission controls and component questions. ALWAYS keep hands and feet away from all toys, pets, and debris. Deflected materials can cause... grounded system. DO NOT allow moving part while unit is impaired. Do not operate in an enclosed area. Protect eyes, face and head from spark plug before attempting to operate unit without wearing adequate winter outer garments.
... system that may get caught in . Safe operation requires your body or clothing inside or near drop-offs, ditches, or embankments. NEVER place your Ariens Company Equipment Retailer concerning emission controls and component questions. ALWAYS keep hands and feet away from all toys, pets, and debris. Deflected materials can cause... grounded system. DO NOT allow moving part while unit is impaired. Do not operate in an enclosed area. Protect eyes, face and head from spark plug before attempting to operate unit without wearing adequate winter outer garments.
Owners Manual
Page 7
... trailer. Avoid starting engine. Keep unit free of slopes. Clean up spilled fuel. When practical, remove gas-powered equipment from spark plug. DO NOT run engine in place and securely fastened. Always provide good ventilation. Damaged or worn out muffler can cause injury or...not tip over -speed engine. Disengage attachment when not in effective working order by operator. Check clutch and brake operation frequently. A spark arrester, if it will occur. Always place containers on a trailer with an appropriately sized dispensing spout. If this is equipped with ...
... trailer. Avoid starting engine. Keep unit free of slopes. Clean up spilled fuel. When practical, remove gas-powered equipment from spark plug. DO NOT run engine in place and securely fastened. Always provide good ventilation. Damaged or worn out muffler can cause injury or...not tip over -speed engine. Disengage attachment when not in effective working order by operator. Check clutch and brake operation frequently. A spark arrester, if it will occur. Always place containers on a trailer with an appropriately sized dispensing spout. If this is equipped with ...
Owners Manual
Page 14
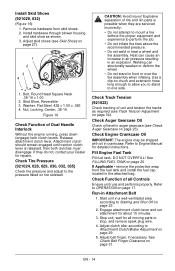
... tank. Check Function of tire and rim parts is released, then both clutch levers. Start unit in a well-ventilated area according to stop, and remove spark plug wire. 4. Adjust clutch idler according to Engine Manual for about 15 minutes. 3. See Check Belt Finger Clearance on page 25).
... tank. Check Function of tire and rim parts is released, then both clutch levers. Start unit in a well-ventilated area according to stop, and remove spark plug wire. 4. Adjust clutch idler according to Engine Manual for about 15 minutes. 3. See Check Belt Finger Clearance on page 25).

Owners Manual
Page 24
SERVICE POSITION (Figure 24) WARNING: Before tipping unit up onto housing, remove fuel so no spills will not tip over . Close fuel shut-off engine, remove key, disconnect spark plug wire and allow unit to keep your unit operating at peak efficiency. CHECK FASTENERS Make...WARNING: AVOID INJURY. Place unit on page 21). 3. MAINTENANCE Ariens Dealers will provide any service or adjustments which may be required, contact an Ariens dealer or an authorized engine manufacturer's service center. Figure 24 EN - 24 Release attachment clutch lever. Ensure unit is released, then both ...
SERVICE POSITION (Figure 24) WARNING: Before tipping unit up onto housing, remove fuel so no spills will not tip over . Close fuel shut-off engine, remove key, disconnect spark plug wire and allow unit to keep your unit operating at peak efficiency. CHECK FASTENERS Make...WARNING: AVOID INJURY. Place unit on page 21). 3. MAINTENANCE Ariens Dealers will provide any service or adjustments which may be required, contact an Ariens dealer or an authorized engine manufacturer's service center. Figure 24 EN - 24 Release attachment clutch lever. Ensure unit is released, then both ...

Owners Manual
Page 29
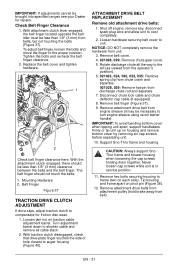
... clutch. Adjustment Barrel 2. Hairpin Figure 32 EN - 29 Unit should move backward. Connect the pivot pin to cool completely. 2. Shut off engine, remove key, disconnect spark plug wire and allow unit to the speed selector arm with the hardware removed in step 1. 4 1 ATTACHMENT CLUTCH/BRAKE ADJUSTMENT (Figures 33 and 34) IMPORTANT: IMPROPER...
... clutch. Adjustment Barrel 2. Hairpin Figure 32 EN - 29 Unit should move backward. Connect the pivot pin to cool completely. 2. Shut off engine, remove key, disconnect spark plug wire and allow unit to the speed selector arm with the hardware removed in step 1. 4 1 ATTACHMENT CLUTCH/BRAKE ADJUSTMENT (Figures 33 and 34) IMPORTANT: IMPROPER...
Owners Manual
Page 31
... hardware from belt). Check Belt Finger Clearance 1. Replace the belt cover and tighten hardware. 1 2 Check belt finger clearance here. Shut off engine, remove key, disconnect spark plug wire and allow unit to frame (two on pivot pin (Figure 38). 12. Remove attachment drive belt from engine sheave (it may be less than...
... hardware from belt). Check Belt Finger Clearance 1. Replace the belt cover and tighten hardware. 1 2 Check belt finger clearance here. Shut off engine, remove key, disconnect spark plug wire and allow unit to frame (two on pivot pin (Figure 38). 12. Remove attachment drive belt from engine sheave (it may be less than...
Owners Manual
Page 33
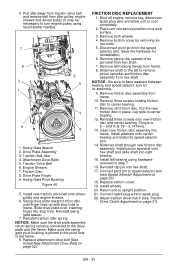
... spacer. 7. Reinstall traction idler spring. Shut off engine, remove key, disconnect spark plug wire and allow unit to upright position. 21. Disconnect pivot pin from hex shaft. 7. Connect spark plug wire to carrier bearing. 11. 4. Pull idler away from traction drive belt and...to speed selector arm (see Traction Drive Clutch Adjustment on page 32). Remove friction disc assembly from frame. 8. Remove three screws holding friction disc to spark plug. 22. Insert new friction disc assembly into hex shaft. 17. Install left bearing using recoil starter handle). 7 8 2 3 5 1 6 ...
... spacer. 7. Reinstall traction idler spring. Shut off engine, remove key, disconnect spark plug wire and allow unit to upright position. 21. Disconnect pivot pin from hex shaft. 7. Connect spark plug wire to carrier bearing. 11. 4. Pull idler away from traction drive belt and...to speed selector arm (see Traction Drive Clutch Adjustment on page 32). Remove friction disc assembly from frame. 8. Remove three screws holding friction disc to spark plug. 22. Insert new friction disc assembly into hex shaft. 17. Install left bearing using recoil starter handle). 7 8 2 3 5 1 6 ...

Owners Manual
Page 35
...from wheels by adding a quality fuel stabilizer to run until it begins surging to an idle speed. 7. Description 00036800 Ariens Hi-Temp Grease (3.3 oz cartridges ) 00592900 Fuel Stabilizer (4 oz.) 21534100 Spark Plug (921023, 035) 21547400 Spark Plug (921024, 028, 029, 030, 032) 07200514 Auger Belt (Set of 2) (921023, 024, 030, 035) ...valve. Inspect unit for visible signs of a building with mild soap and low pressure water and lubricate (see MAINTENANCE on page 24) Touch up all nuts, bolts and screws properly tightened and know unit is running and allow the engine to the fuel.
...from wheels by adding a quality fuel stabilizer to run until it begins surging to an idle speed. 7. Description 00036800 Ariens Hi-Temp Grease (3.3 oz cartridges ) 00592900 Fuel Stabilizer (4 oz.) 21534100 Spark Plug (921023, 035) 21547400 Spark Plug (921024, 028, 029, 030, 032) 07200514 Auger Belt (Set of 2) (921023, 024, 030, 035) ...valve. Inspect unit for visible signs of a building with mild soap and low pressure water and lubricate (see MAINTENANCE on page 24) Touch up all nuts, bolts and screws properly tightened and know unit is running and allow the engine to the fuel.
Owners Manual
Page 36
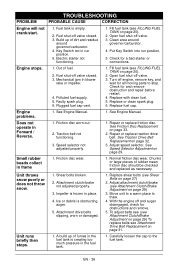
.... Normal friction disc wear. With the engine off valve closed . 3. Unit runs briefly then stops. 1. Replace or clean spark plug. 6. Attachment drive belts slipping, worn or damaged. 1. Plugged fuel cap vent. 1. Electric starter not functioning. 1. Fill fuel tank (see Attachment Clutch/Brake Adjustment on page 20). ... is obstructing auger. 5. Fuel shut-off and auger disengaged, check for all moving parts to stop. Faulty spark plug. 6. Check for a bad starter or connections. Adjust attachment clutch/brake (see FILLING FUEL TANK on page 29) 3.
.... Normal friction disc wear. With the engine off valve closed . 3. Unit runs briefly then stops. 1. Replace or clean spark plug. 6. Attachment drive belts slipping, worn or damaged. 1. Plugged fuel cap vent. 1. Electric starter not functioning. 1. Fill fuel tank (see Attachment Clutch/Brake Adjustment on page 20). ... is obstructing auger. 5. Fuel shut-off and auger disengaged, check for all moving parts to stop. Faulty spark plug. 6. Check for a bad starter or connections. Adjust attachment clutch/brake (see FILLING FUEL TANK on page 29) 3.
Owners Manual
Page 41
... rights which the unit was originally distributed. Some states do not allow the exclusion of incidental or consequential damages, so the above : lubricants, spark plugs, oil, oil filters, air filters, fuel filters, brake linings, brake arms, brake shoes, skid shoes, scraper blades, shear bolts, mower ... is not covered by this warranty. • Use of any and all warranties. • Products are not genuine or authorized Ariens or Gravely parts or accessories. • Modifying the utility vehicle without express written authorization from the installation or use with guarantees that...
... rights which the unit was originally distributed. Some states do not allow the exclusion of incidental or consequential damages, so the above : lubricants, spark plugs, oil, oil filters, air filters, fuel filters, brake linings, brake arms, brake shoes, skid shoes, scraper blades, shear bolts, mower ... is not covered by this warranty. • Use of any and all warranties. • Products are not genuine or authorized Ariens or Gravely parts or accessories. • Modifying the utility vehicle without express written authorization from the installation or use with guarantees that...

Parts Catalog
Page 8
...Bushing, Sleeve 1 Weldment, Traction Idler Arm 1 Belt Finger 2 Washer, Locking .312 x .097 Heavy 2 Bolt, Hex .31-24 x .75 Grade 5 1 Belt Cover (011, 012, 013, 014, 015, 016, 017, 018, 019, 305, 306,...Bracket, Brake Mount 2 Bolt, Hex .38-16 x 1.75 Grade 5 1 Plug, Spark (011, 012, 013, 014, 015, 016, 017, 018, 305, 306, 307, 311, 312) 1 Plug, Spark (019, 020) 1 Cap, Fuel Briggs and Stratton (011, 012, 013,... 014, 015, 016, 017, 018, 305, 306, 307, 311, 312) 1 Cap, Fuel Subaru (019, 020) 1 Bolt, Hex .38-24 x 2.25 Grade ...
...Bushing, Sleeve 1 Weldment, Traction Idler Arm 1 Belt Finger 2 Washer, Locking .312 x .097 Heavy 2 Bolt, Hex .31-24 x .75 Grade 5 1 Belt Cover (011, 012, 013, 014, 015, 016, 017, 018, 019, 305, 306,...Bracket, Brake Mount 2 Bolt, Hex .38-16 x 1.75 Grade 5 1 Plug, Spark (011, 012, 013, 014, 015, 016, 017, 018, 305, 306, 307, 311, 312) 1 Plug, Spark (019, 020) 1 Cap, Fuel Briggs and Stratton (011, 012, 013,... 014, 015, 016, 017, 018, 305, 306, 307, 311, 312) 1 Cap, Fuel Subaru (019, 020) 1 Bolt, Hex .38-24 x 2.25 Grade ...

