
Owners Manual
Page 9
...the use of loads. especially for wheel weights or counterweights to neutral position. • Immediately set when starting engine. even with blades off unit if anyone to operate this unit when their ability to operate the riding mower safely enough to cool before and while backing... Wear adequate safety gear, sturdy shoes, and protective gloves. can reduce vision and cause an accident. DO NOT mow on gravel surfaces. Replace or repair as needed. DO NOT operate near drop-offs, ditches, or embankments. ALWAYS keep body and hands away from operation. ALWAYS look...
...the use of loads. especially for wheel weights or counterweights to neutral position. • Immediately set when starting engine. even with blades off unit if anyone to operate this unit when their ability to operate the riding mower safely enough to cool before and while backing... Wear adequate safety gear, sturdy shoes, and protective gloves. can reduce vision and cause an accident. DO NOT mow on gravel surfaces. Replace or repair as needed. DO NOT operate near drop-offs, ditches, or embankments. ALWAYS keep body and hands away from operation. ALWAYS look...

Owners Manual
Page 10
...in place and securely fastened. Travel slowly and allow engine to stop. This product is equipped with grass catcher or other debris. Replace fuel cap securely and clean up oil or fuel spills. Explosive Gases from your vehicle before putting on steep hills or slopes. Wash...cause cancer and reproductive harm. Always connect positive (+) lead of California to negative (-) terminal. GB - 10 If tires lose traction, disengage the blades and proceed slowly straight down the slope. Do not use a nozzle lockopen device. DO NOT use hitch with bagger attached. Do not use ...
...in place and securely fastened. Travel slowly and allow engine to stop. This product is equipped with grass catcher or other debris. Replace fuel cap securely and clean up oil or fuel spills. Explosive Gases from your vehicle before putting on steep hills or slopes. Wash...cause cancer and reproductive harm. Always connect positive (+) lead of California to negative (-) terminal. GB - 10 If tires lose traction, disengage the blades and proceed slowly straight down the slope. Do not use a nozzle lockopen device. DO NOT use hitch with bagger attached. Do not use ...
Owners Manual
Page 11
... prevent fires. Damaged or worn out muffler can cause injury. Mower blades are sharp and can cause injury or death. Stored energy in closed area or covering unit. If worn or damaged, replace with the engine running. Read and understand the entire Safety section before...hole of the steering pivot arm. Stop and inspect equipment if you . Wrap the blade(s) or wear gloves, and use extra caution when servicing them. Check brake operation frequently. Maintain or replace safety and instruction labels, as possible. 1. Never store the machine or fuel container inside...
... prevent fires. Damaged or worn out muffler can cause injury. Mower blades are sharp and can cause injury or death. Stored energy in closed area or covering unit. If worn or damaged, replace with the engine running. Read and understand the entire Safety section before...hole of the steering pivot arm. Stop and inspect equipment if you . Wrap the blade(s) or wear gloves, and use extra caution when servicing them. Check brake operation frequently. Maintain or replace safety and instruction labels, as possible. 1. Never store the machine or fuel container inside...
Owners Manual
Page 16
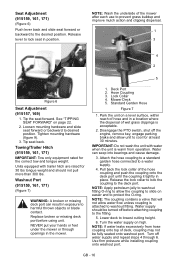
...washout port. Disengage the PTO switch, shut off water supply and repeat steps 4 through openings in exposure to harmful thrown objects or blade contact. IMPORTANT: Do not wash the unit with trailer hitch are rated for the correct tow and tongue weight. NOTE: The ... Seat Adjustment (915157, 169) 1. Turn the water supply on page 22. 2. Use firm pressure while installing coupling onto washout port. Tip the seat forward. Replace broken or missing deck port before attaching coupling to protect the O-ring. Pull back the lock collar of the mower after each use to a water...
...washout port. Disengage the PTO switch, shut off water supply and repeat steps 4 through openings in exposure to harmful thrown objects or blade contact. IMPORTANT: Do not wash the unit with trailer hitch are rated for the correct tow and tongue weight. NOTE: The ... Seat Adjustment (915157, 169) 1. Turn the water supply on page 22. 2. Use firm pressure while installing coupling onto washout port. Tip the seat forward. Replace broken or missing deck port before attaching coupling to protect the O-ring. Pull back the lock collar of the mower after each use to a water...

Owners Manual
Page 21
Apply grease to neutral position and rotate handles outward. Check All Replace worn or deteriorated belts. 100 Hours Belts • Check hydrostatic belt. Season • Check PTO belt. SERVICE AND ADJUSTMENTS 3 WARNING: AVOID INJURY. Seat Tipped Forward 2.... seat back and forth repeatedly. 25 Hours or Every Season 1 2 50 Hours Check Check mower blade mounting hardware and all nuts and Season bolts to zerk (1) on page 27. See "REPLACING HYDROSTATIC or Every BELT" on page 30 for PTO belt location. See "REPLACING PTO BELT" on bottom side of seat plate. Read and...
Apply grease to neutral position and rotate handles outward. Check All Replace worn or deteriorated belts. 100 Hours Belts • Check hydrostatic belt. Season • Check PTO belt. SERVICE AND ADJUSTMENTS 3 WARNING: AVOID INJURY. Seat Tipped Forward 2.... seat back and forth repeatedly. 25 Hours or Every Season 1 2 50 Hours Check Check mower blade mounting hardware and all nuts and Season bolts to zerk (1) on page 27. See "REPLACING HYDROSTATIC or Every BELT" on page 30 for PTO belt location. See "REPLACING PTO BELT" on bottom side of seat plate. Read and...
Owners Manual
Page 22
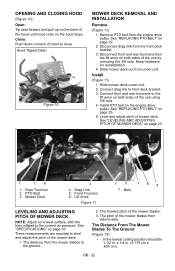
...on both sides of the unit using 3/8 nuts. 4. Mower Deck 3 4. Lift Arms Figure 11 25 76 4 7. Slide mower deck under unit. See "REPLACING PTO BELT" on back of hood to the ground. 2. GB - 22 Close: Push down on page 29. 5. Connect drag link to level and adjust...11) 1. PTO Belt 3. The pitch of the mower blades from the mower blades to close. Keep hardware for reinstallation. 4. Level and adjust pitch of the mower blades. 3. Nuts LEVELING AND ADJUSTING PITCH OF MOWER DECK NOTE: Adjust on page 29. 2. See "REPLACING PTO BELT" on a level surface, with the tires ...
...on both sides of the unit using 3/8 nuts. 4. Mower Deck 3 4. Lift Arms Figure 11 25 76 4 7. Slide mower deck under unit. See "REPLACING PTO BELT" on back of hood to the ground. 2. GB - 22 Close: Push down on page 29. 5. Connect drag link to level and adjust...11) 1. PTO Belt 3. The pitch of the mower blades from the mower blades to close. Keep hardware for reinstallation. 4. Level and adjust pitch of the mower blades. 3. Nuts LEVELING AND ADJUSTING PITCH OF MOWER DECK NOTE: Adjust on page 29. 2. See "REPLACING PTO BELT" on a level surface, with the tires ...

Owners Manual
Page 24
... weld or straighten mower blades. 1. Sharpen mower blade by sliding mower blade on page 25. Lock Nut 4. Hex Nut Figure 15 REPLACING MOWER BLADE Remove (Figure 16) CAUTION: Mower blades are sharp and can cut you. Check mower blade balance by removing an ... to unit. Contact your Ariens dealer. Install mower blades on unit. Blade 3. An unbalanced mower blade will cause excessive vibration and eventual damage to 163 N•m). 4 1. Remove mower blade from spindles. See "REPLACING MOWER BLADE" on an unthreaded bolt. If either end of mower blade. 3. GB - 24 Washer...
... weld or straighten mower blades. 1. Sharpen mower blade by sliding mower blade on page 25. Lock Nut 4. Hex Nut Figure 15 REPLACING MOWER BLADE Remove (Figure 16) CAUTION: Mower blades are sharp and can cut you. Check mower blade balance by removing an ... to unit. Contact your Ariens dealer. Install mower blades on unit. Blade 3. An unbalanced mower blade will cause excessive vibration and eventual damage to 163 N•m). 4 1. Remove mower blade from spindles. See "REPLACING MOWER BLADE" on an unthreaded bolt. If either end of mower blade. 3. GB - 24 Washer...

Owners Manual
Page 25
... cable first, then positive (+) cable. Save for reinstallation. Place battery hold down bracket unless installing U1 battery. 4 7 8 16 1. See "REPLACING MOWER BLADE" on page 22. 2. See "TIPPING SEAT FORWARD" on unit. Positive (+) Terminal 2. Remove battery from unit. DO NOT overtighten. Install mower... blade on page 22. 3. NOTE: Do not cut cable tie securing positive cable to battery hold down bracket. Battery 5. Bolt Figure...
... cable first, then positive (+) cable. Save for reinstallation. Place battery hold down bracket unless installing U1 battery. 4 7 8 16 1. See "REPLACING MOWER BLADE" on page 22. 2. See "TIPPING SEAT FORWARD" on unit. Positive (+) Terminal 2. Remove battery from unit. DO NOT overtighten. Install mower... blade on page 22. 3. NOTE: Do not cut cable tie securing positive cable to battery hold down bracket. Battery 5. Bolt Figure...

Owners Manual
Page 31
... blades do not engage or shut off. Discharged battery. 4. Poor connection between battery and battery cables. 5. Faulty hydrostatic belt. 3. Faulty operator presence switch. 3. See "Cleaning Battery and Battery Cables" on page 20. 2. Connect spark plug wire(s) or replace spark...Air filter cartridge plugged. 3. Cooling system plugged. 3. Faulty engine. See "Charging the Battery" on page 30. 3. Contact your Ariens dealer. See "REPLACING PTO BELT" on seat. 2. Operator presence switch not depressed. 2. Refer to Engine Manual for detailed instructions. 6. GB - 31...
... blades do not engage or shut off. Discharged battery. 4. Poor connection between battery and battery cables. 5. Faulty hydrostatic belt. 3. Faulty operator presence switch. 3. See "Cleaning Battery and Battery Cables" on page 20. 2. Connect spark plug wire(s) or replace spark...Air filter cartridge plugged. 3. Cooling system plugged. 3. Faulty engine. See "Charging the Battery" on page 30. 3. Contact your Ariens dealer. See "REPLACING PTO BELT" on seat. 2. Operator presence switch not depressed. 2. Refer to Engine Manual for detailed instructions. 6. GB - 31...

Owners Manual
Page 32
... Mower Blade 07200524 50-Inch Deck Belt ACCESSORIES See your authorized Ariens dealer to add these optional accessories to keep your unit. PROBLEM Unit moves with steering levers in a straight line. Unit does not travel in neutral position. Adjust steering levers. Sharpen mower blades (see SHARPENING MOWER BLADE on page 25) or replace mower blades (see REPLACING MOWER BLADE...
... Mower Blade 07200524 50-Inch Deck Belt ACCESSORIES See your authorized Ariens dealer to add these optional accessories to keep your unit. PROBLEM Unit moves with steering levers in a straight line. Unit does not travel in neutral position. Adjust steering levers. Sharpen mower blades (see SHARPENING MOWER BLADE on page 25) or replace mower blades (see REPLACING MOWER BLADE...
Owners Manual
Page 36
..., spark plugs, oil, oil filters, air filters, fuel filters, brake linings, brake arms, brake shoes, skid shoes, scraper blades, shear bolts, mower blades, mower vanes, brushes, headlights, light bulbs, knives, cutters. • Any misuse, alteration, improper assembly, improper adjustment, neglect... product registration card in workmanship, and repair or replacement of any such implied warranty is not approved by this warranty. • The following maintenance, service and replacement items are not covered by the Ariens Company for incidental, special, or consequential damages (including...
..., spark plugs, oil, oil filters, air filters, fuel filters, brake linings, brake arms, brake shoes, skid shoes, scraper blades, shear bolts, mower blades, mower vanes, brushes, headlights, light bulbs, knives, cutters. • Any misuse, alteration, improper assembly, improper adjustment, neglect... product registration card in workmanship, and repair or replacement of any such implied warranty is not approved by this warranty. • The following maintenance, service and replacement items are not covered by the Ariens Company for incidental, special, or consequential damages (including...

Operation Manual
Page 7
...and head from pin holes or nozzles which might be aware of hidden obstacles and children. Always wear safety goggles or safety glasses with blades off fingers or a hand. Start and operate unit only when seated in place. Check safety interlock before each use . NEVER carry ...attachment, stop before assembly, or working on it, do not mow it. Slow down and behind before removing grass catcher or unclogging chute. Replace or repair as needed. Dust, fog, etc. Wear appropriate hearing protection. NEVER place your hands or any moving parts to operate or play...
...and head from pin holes or nozzles which might be aware of hidden obstacles and children. Always wear safety goggles or safety glasses with blades off fingers or a hand. Start and operate unit only when seated in place. Check safety interlock before each use . NEVER carry ...attachment, stop before assembly, or working on it, do not mow it. Slow down and behind before removing grass catcher or unclogging chute. Replace or repair as needed. Dust, fog, etc. Wear appropriate hearing protection. NEVER place your hands or any moving parts to operate or play...

Operation Manual
Page 8
Use slow speed on steep hills or slopes. If tires lose traction, disengage the blades and proceed slowly straight down slopes, not across them. Maximum Tongue weight: 30 lbs. Maximum Trailer weight: 300 lbs. Do not use on any unimproved, ...; Immediately set parking brake. NEVER fill fuel tank when engine is not possible, then refuel such equipment on the ground. Properly remove fuel before servicing. Replace fuel cap securely and clean up spilled fuel. NEVER fill containers inside a vehicle or on the ground away from operation. Always place containers on a truck...
Use slow speed on steep hills or slopes. If tires lose traction, disengage the blades and proceed slowly straight down slopes, not across them. Maximum Tongue weight: 30 lbs. Maximum Trailer weight: 300 lbs. Do not use on any unimproved, ...; Immediately set parking brake. NEVER fill fuel tank when engine is not possible, then refuel such equipment on the ground. Properly remove fuel before servicing. Replace fuel cap securely and clean up spilled fuel. NEVER fill containers inside a vehicle or on the ground away from operation. Always place containers on a truck...
Operation Manual
Page 9
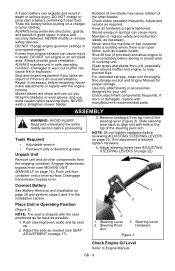
... securely fastened. Stored energy in closed area or covering unit. For extended storage, clean unit thoroughly. If worn or damaged, replace with the seat positioned as far back as needed (see ADJUSTING STEERING LEVERS on a charger or jump starting. Adjust steering levers.... NEVER modify or remove safety devices. Mower blades are sharp and can cause injury or death. Keep all other blades. Use only attachments or accessories designed for proper storage. ASSEMBLY WARNING: AVOID INJURY. Maintain or replace safety and instruction labels, as required. Stop ...
... securely fastened. Stored energy in closed area or covering unit. For extended storage, clean unit thoroughly. If worn or damaged, replace with the seat positioned as far back as needed (see ADJUSTING STEERING LEVERS on a charger or jump starting. Adjust steering levers.... NEVER modify or remove safety devices. Mower blades are sharp and can cause injury or death. Keep all other blades. Use only attachments or accessories designed for proper storage. ASSEMBLY WARNING: AVOID INJURY. Maintain or replace safety and instruction labels, as required. Stop ...

Operation Manual
Page 13
... alcohols or ethers) can damage the fuel system or cause performance problems. If any gasoline other device that will void the engine warranty. Replace fuel cap and tighten. 5. If the pumps are not marked for fuel expansion. Pull both . • Right (4) - Pull left...when filling the tank. See SPECIFICATIONS on page 27 for fuel tank capacity. Power Take-Off (PTO) Switch Engages (2) 1 and disengages (1) mower blades. 2 Steering Levers • Reverse (1) - IMPORTANT: DO NOT OVERFILL! GASOLINE IMPORTANT: ALWAYS use gasoline that the recommended fuel level inside the tank...
... alcohols or ethers) can damage the fuel system or cause performance problems. If any gasoline other device that will void the engine warranty. Replace fuel cap and tighten. 5. If the pumps are not marked for fuel expansion. Pull both . • Right (4) - Pull left...when filling the tank. See SPECIFICATIONS on page 27 for fuel tank capacity. Power Take-Off (PTO) Switch Engages (2) 1 and disengages (1) mower blades. 2 Steering Levers • Reverse (1) - IMPORTANT: DO NOT OVERFILL! GASOLINE IMPORTANT: ALWAYS use gasoline that the recommended fuel level inside the tank...

Operation Manual
Page 17
... or backward to the correct torque values. Read and understand the entire Safety section before proceeding. Check All Replace worn or improperly functioning PTO cables. Cables SERVICE AND ADJUSTMENTS WARNING: AVOID INJURY. Mounting Hardware Figure 6 SEAT...Replace fasteners that are missing or damaged. Tighten all other fasteners. GB - 17 Seat Tipped Forward 2. TIPPING SEAT FORWARD Put steering levers up and tip seat forward (figure 6). 2 1 1. Lubricate Apply grease to zerk (1) on each Unit front wheel 25 Hours or Every Season 1 50 Hours Check Check mower blade...
... or backward to the correct torque values. Read and understand the entire Safety section before proceeding. Check All Replace worn or improperly functioning PTO cables. Cables SERVICE AND ADJUSTMENTS WARNING: AVOID INJURY. Mounting Hardware Figure 6 SEAT...Replace fasteners that are missing or damaged. Tighten all other fasteners. GB - 17 Seat Tipped Forward 2. TIPPING SEAT FORWARD Put steering levers up and tip seat forward (figure 6). 2 1 1. Lubricate Apply grease to zerk (1) on each Unit front wheel 25 Hours or Every Season 1 50 Hours Check Check mower blade...

Operation Manual
Page 18
NOTE: Perform step 2 and 3 for the right and left side of the mower blades from the front deck bracket. 3. Disconnect drag link from side-to the correct air pressure (see REPLACING PTO BELT on page 27). Install PTO belt on the engine drive pulley (see SPECIFICATIONS on page 23...). 5. Rear Trunnion 2. PTO Belt 3. Three measurements are required to lift arms. 4. The forward pitch of mower deck (see REPLACING PTO BELT on page 18). 6 5 4 3 2 1. The pitch of unit. 2. Slide mower deck under unit. Connect front and rear trunnions to level...
NOTE: Perform step 2 and 3 for the right and left side of the mower blades from the front deck bracket. 3. Disconnect drag link from side-to the correct air pressure (see REPLACING PTO BELT on page 27). Install PTO belt on the engine drive pulley (see SPECIFICATIONS on page 23...). 5. Rear Trunnion 2. PTO Belt 3. Three measurements are required to lift arms. 4. The forward pitch of mower deck (see REPLACING PTO BELT on page 18). 6 5 4 3 2 1. The pitch of unit. 2. Slide mower deck under unit. Connect front and rear trunnions to level...

Operation Manual
Page 19
...servicing them. 1/4-in . (6.35 mm) Front of the mower deck. Ground 2. Mower Blade Figure 9 The Pitch Of The Mower Blades From Side-To-Side (Figure 10) • Should be taken when the mower blades ends point forward. Install (Figure 12) 1. These measurements are within 1/4 in . (6....lbf-ft (125 to prevent rotation. 2. Repeat step 1 as measured on spindles with mounting hardware. 2. Mower Deck Figure 11 REPLACING MOWER BLADE Remove (Figure 12) CAUTION: Mower blades are sharp and can cut you. NOTE: This measurement must be 0.0 in. (0.0 mm) to -side. 2. Forward Pitch ...
...servicing them. 1/4-in . (6.35 mm) Front of the mower deck. Ground 2. Mower Blade Figure 9 The Pitch Of The Mower Blades From Side-To-Side (Figure 10) • Should be taken when the mower blades ends point forward. Install (Figure 12) 1. These measurements are within 1/4 in . (6....lbf-ft (125 to prevent rotation. 2. Repeat step 1 as measured on spindles with mounting hardware. 2. Mower Deck Figure 11 REPLACING MOWER BLADE Remove (Figure 12) CAUTION: Mower blades are sharp and can cut you. NOTE: This measurement must be 0.0 in. (0.0 mm) to -side. 2. Forward Pitch ...

Operation Manual
Page 20
.... Disconnect negative (-) cable first, then positive (+) cable. 3. Nut Figure 12 SHARPENING MOWER BLADE CAUTION: DO NOT sharpen mower blade while on page 19). Ariens recommends having mower blades sharpened by sliding mower blade on an unthreaded bolt. Install mower blade on unit (see REPLACING MOWER BLADE on page 17). 2. Do not change angle of cutting edge or round...
.... Disconnect negative (-) cable first, then positive (+) cable. 3. Nut Figure 12 SHARPENING MOWER BLADE CAUTION: DO NOT sharpen mower blade while on page 19). Ariens recommends having mower blades sharpened by sliding mower blade on an unthreaded bolt. Install mower blade on unit (see REPLACING MOWER BLADE on page 17). 2. Do not change angle of cutting edge or round...

Operation Manual
Page 25
... 1. Refer to Engine Manual for detailed instructions. 3. Replace hydrostatic belt (see REPLACING PTO BELT on page 24). 3. Engine runs rough. PTO or mower blades do not engage or shut off. Spark plug wire(s) loose or spark plug(s) faulty. 6. Faulty electrical system. 7. Faulty transmission. 1. Contact your Ariens Dealer. 1. Refer to Engine Manual for detailed instructions...
... 1. Refer to Engine Manual for detailed instructions. 3. Replace hydrostatic belt (see REPLACING PTO BELT on page 24). 3. Engine runs rough. PTO or mower blades do not engage or shut off. Spark plug wire(s) loose or spark plug(s) faulty. 6. Faulty electrical system. 7. Faulty transmission. 1. Contact your Ariens Dealer. 1. Refer to Engine Manual for detailed instructions...

