
User manual 8092851 Asko T784 EN
Page 2
... Air exhaust 24 tumble dry 8 Electrical installation 27 Materials that can be tumble dried 8 Reversing the door 30 Materials that should not be tumble dried Follow these instructions: 8 31 Static electricity 8 Quick guide 32 Operating instructions 9 Sort your fabrics 9 Select the program 10 Selecting Options 13 Press the Start button 14 Drying program finished 14 Settings 15 You can alter the following settings: 15 Language 15 Child-safe Start 15 Care and maintenance instructions...
... Air exhaust 24 tumble dry 8 Electrical installation 27 Materials that can be tumble dried 8 Reversing the door 30 Materials that should not be tumble dried Follow these instructions: 8 31 Static electricity 8 Quick guide 32 Operating instructions 9 Sort your fabrics 9 Select the program 10 Selecting Options 13 Press the Start button 14 Drying program finished 14 Settings 15 You can alter the following settings: 15 Language 15 Child-safe Start 15 Care and maintenance instructions...

User manual 8092851 Asko T784 EN
Page 3
... you have connected your machine for the first time. This noise is completely normal and will be prompted to download. ¿Necesita esta Instrucciones de uso y cuidado en español? Language selection You will disappear after a long period without use, you tumble dry" chapter. Before using your machine and start it for the first time Do you need this Use&Care Guide in...
... you have connected your machine for the first time. This noise is completely normal and will be prompted to download. ¿Necesita esta Instrucciones de uso y cuidado en español? Language selection You will disappear after a long period without use, you tumble dry" chapter. Before using your machine and start it for the first time Do you need this Use&Care Guide in...

User manual 8092851 Asko T784 EN
Page 4
... the appliance is removed from service or discarded, remove the door to the drying compartment. • Do not reach into the appliance if the drum is moving. • Do not install or store this guide. • Do not use fabric softeners or dryer sheets unless the manufacturer gives written assurance that could cause a load to catch fire. • Electrical installation, if required, must be drawn...
... the appliance is removed from service or discarded, remove the door to the drying compartment. • Do not reach into the appliance if the drum is moving. • Do not install or store this guide. • Do not use fabric softeners or dryer sheets unless the manufacturer gives written assurance that could cause a load to catch fire. • Electrical installation, if required, must be drawn...

User manual 8092851 Asko T784 EN
Page 5
... be run with a cord having an equipment-grounding conductor and a grounding plug. Do not exhaust into an appropriate outlet that may occur. To reduce the risk of service. Customer Care Center 5 1-800-898-1879 www.askousa.com Do not modify the plug provided with a qualified electrician or service representative or personnel if you are in a building. This manual does not cover...
... be run with a cord having an equipment-grounding conductor and a grounding plug. Do not exhaust into an appropriate outlet that may occur. To reduce the risk of service. Customer Care Center 5 1-800-898-1879 www.askousa.com Do not modify the plug provided with a qualified electrician or service representative or personnel if you are in a building. This manual does not cover...
User manual 8092851 Asko T784 EN
Page 6
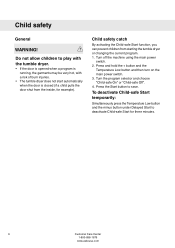
... machine using the main power switch. 2. Turn the program selector and choose "Child-safe On" or "Child-safe Off". 4. Child safety catch By activating the Child-safe Start function, you can prevent children from the inside, for three minutes. 6 Customer Care Center 1-800-898-1879 www.askousa.com Press the Start button to play with the tumble dryer. • If the door is opened when...
... machine using the main power switch. 2. Turn the program selector and choose "Child-safe On" or "Child-safe Off". 4. Child safety catch By activating the Child-safe Start function, you can prevent children from the inside, for three minutes. 6 Customer Care Center 1-800-898-1879 www.askousa.com Press the Start button to play with the tumble dryer. • If the door is opened when...
User manual 8092851 Asko T784 EN
Page 8
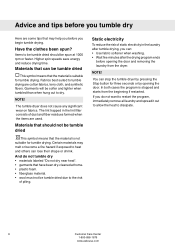
... tumble drying are used. Higher spin speeds save energy and reduce drying time. Materials that can : • Use fabric softener when washing. • Wait five minutes after the drying program ends before you begin tumble drying. Certain materials may help you before opening the door. The lint trapped in the laundry after tumble drying, you can be tumble dried This symbol means that have been dry-cleaned...
... tumble drying are used. Higher spin speeds save energy and reduce drying time. Materials that can : • Use fabric softener when washing. • Wait five minutes after the drying program ends before you begin tumble drying. Certain materials may help you before opening the door. The lint trapped in the laundry after tumble drying, you can be tumble dried This symbol means that have been dry-cleaned...
User manual 8092851 Asko T784 EN
Page 10
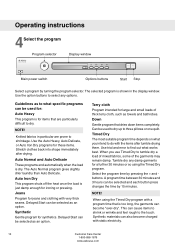
... can be used for: Auto Heavy This program is dry. The Auto Normal program gives slightly drier laundry than Auto Delicate. Down Gentle program that are prone to dry. Can be selected and each button press changes the time by pressing the + and buttons. Operating instructions 4Select the program Program selector Display window Main power switch Options buttons Start Stop Select a program by turning the...
... can be used for: Auto Heavy This program is dry. The Auto Normal program gives slightly drier laundry than Auto Delicate. Down Gentle program that are prone to dry. Can be selected and each button press changes the time by pressing the + and buttons. Operating instructions 4Select the program Program selector Display window Main power switch Options buttons Start Stop Select a program by turning the...
User manual 8092851 Asko T784 EN
Page 14
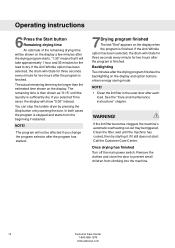
... Turn off the main power switch. Operating instructions 6Press the Start button Remaining drying time An estimate of the remaining drying time will be shown on the display. The remaining time is then shown as "0:15" until the machine has cooled, then try starting it still does not start: Call the Customer Care Center. NOTE! Backlighting Two minutes after the program is sufficiently dry. See the "Care and maintenance instructions...
... Turn off the main power switch. Operating instructions 6Press the Start button Remaining drying time An estimate of the remaining drying time will be shown on the display. The remaining time is then shown as "0:15" until the machine has cooled, then try starting it still does not start: Call the Customer Care Center. NOTE! Backlighting Two minutes after the program is sufficiently dry. See the "Care and maintenance instructions...

User manual 8092851 Asko T784 EN
Page 16
... of the machine and the program panel with a towel. 2. Do not use a damp sponge and a small amount of washing-up liquid to remove the lint from the holder in the door.Close the lint filter before closing the door. Keep the area around the machine. Care and maintenance instructions Cleaning the lint filter The lint filter must be cleaned after each load. 1. Open the lint filter. Do not allow dust to...
... of the machine and the program panel with a towel. 2. Do not use a damp sponge and a small amount of washing-up liquid to remove the lint from the holder in the door.Close the lint filter before closing the door. Keep the area around the machine. Care and maintenance instructions Cleaning the lint filter The lint filter must be cleaned after each load. 1. Open the lint filter. Do not allow dust to...
User manual 8092851 Asko T784 EN
Page 17
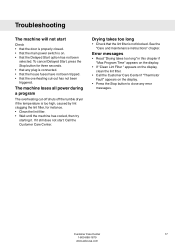
... cancel Delayed Start, press the Stop button for instance. • Clean the lint filter. • Wait until the machine has cooled, then try starting it still does not start Check • that the door is properly closed. • that the main power switch is on the display. • Press the Stop button to close any plug is connected. • that the house fuses have not been...
... cancel Delayed Start, press the Stop button for instance. • Clean the lint filter. • Wait until the machine has cooled, then try starting it still does not start Check • that the door is properly closed. • that the main power switch is on the display. • Press the Stop button to close any plug is connected. • that the house fuses have not been...

User manual 8092851 Asko T784 EN
Page 20
... units operated outside the continental United States. • Pickup and delivery. P.O. Instruct how to : 1. Replace house fuses or correct house wiring. 5. This warranty gives you specific legal rights and you . Correct the installation of the model, type name, and serial number. Clean or service air device in drain line. • Repair and/or replacement parts for failure of product if appliance is used for service or contacting ASKO Appliances Inc. Service and guarantee Warranty ASKO Appliances...
... units operated outside the continental United States. • Pickup and delivery. P.O. Instruct how to : 1. Replace house fuses or correct house wiring. 5. This warranty gives you specific legal rights and you . Correct the installation of the model, type name, and serial number. Clean or service air device in drain line. • Repair and/or replacement parts for failure of product if appliance is used for service or contacting ASKO Appliances Inc. Service and guarantee Warranty ASKO Appliances...

User manual 8092851 Asko T784 EN
Page 21
..., the door where the tumble dryer is too small. How to the limited quantity of a ASKO washing machine. Install the clothes dryer according to the bottom left open when the dryer is in a room that the tumble dryer produces heat and should be freestanding or stacked. Positioning the tumble dryer The tumble dryer can be located in use with flexible plastic venting materials. Installation instructions WARNING! Customer Care Center...
..., the door where the tumble dryer is too small. How to the limited quantity of a ASKO washing machine. Install the clothes dryer according to the bottom left open when the dryer is in a room that the tumble dryer produces heat and should be freestanding or stacked. Positioning the tumble dryer The tumble dryer can be located in use with flexible plastic venting materials. Installation instructions WARNING! Customer Care Center...

User manual 8092851 Asko T784 EN
Page 23
... will need a drain outlet behind the unit. Customer Care Center 23 1-800-898-1879 www.askousa.com Do not raise it higher than 34-1/2" (876 mm). Installation instructions Adjusting the feet Screw the feet in ASKO dryers can be installed beneath a cabinet or worktop with a minimum height of 34" (864 mm). The condensing models work best when they have good air...
... will need a drain outlet behind the unit. Customer Care Center 23 1-800-898-1879 www.askousa.com Do not raise it higher than 34-1/2" (876 mm). Installation instructions Adjusting the feet Screw the feet in ASKO dryers can be installed beneath a cabinet or worktop with a minimum height of 34" (864 mm). The condensing models work best when they have good air...

User manual 8092851 Asko T784 EN
Page 24
... the duct and catch lint. 24 Customer Care Center 1-800-898-1879 www.askousa.com VeVnetnt TT--tutubbee RReeaarrEExxhhaauusstt Outlet Outlet SidSeidEexhEaxuhsatuOsut tlet Outlet SStutubb ClaCmlapmp DDuucct t (no(nt ostuspupplipeldie)d) The duct must be assembled with the stub pipe attached to the rear exhaust outlet, though the exhaust duct can be attached to purchase a UL-CSA-approved 4" ridged metal exhaust duct. Installation instructions Install in a closet ASKO's front panel controls make...
... the duct and catch lint. 24 Customer Care Center 1-800-898-1879 www.askousa.com VeVnetnt TT--tutubbee RReeaarrEExxhhaauusstt Outlet Outlet SidSeidEexhEaxuhsatuOsut tlet Outlet SStutubb ClaCmlapmp DDuucct t (no(nt ostuspupplipeldie)d) The duct must be assembled with the stub pipe attached to the rear exhaust outlet, though the exhaust duct can be attached to purchase a UL-CSA-approved 4" ridged metal exhaust duct. Installation instructions Install in a closet ASKO's front panel controls make...

User manual 8092851 Asko T784 EN
Page 25
...-driver, turn the exhaust outlet cover you plan to use . 4. It should snap into place. 6. Never cover the end of duct for UL approved vent basket. It should snap into place. 3. We recommend that you removed from the rear exhaust outlet and place it in place. 2. Use the exhaust outlet cover you cut off any necessary bends as gentle as possible. Remove the exhaust outlet cover. 3. Installation instructions To connect the exhaust duct to the rear outlet To connect...
...-driver, turn the exhaust outlet cover you plan to use . 4. It should snap into place. 6. Never cover the end of duct for UL approved vent basket. It should snap into place. 3. We recommend that you removed from the rear exhaust outlet and place it in place. 2. Use the exhaust outlet cover you cut off any necessary bends as gentle as possible. Remove the exhaust outlet cover. 3. Installation instructions To connect the exhaust duct to the rear outlet To connect...

User manual 8092851 Asko T784 EN
Page 26
... any excess exhaust duct and run the duct with as few bends as possible. If more bends and the longer the duct, the less air will need a UL-CSA-approved, 4-inch ridged metal exhaust duct. Installation instructions Connecting to the point of discharge. Subject 2158A and maximum length of 60 feet and 4 elbows are allowed. Subtract 4 feet of duct for Clothes Dryer Transition Duct. Run the duct with the...
... any excess exhaust duct and run the duct with as few bends as possible. If more bends and the longer the duct, the less air will need a UL-CSA-approved, 4-inch ridged metal exhaust duct. Installation instructions Connecting to the point of discharge. Subject 2158A and maximum length of 60 feet and 4 elbows are allowed. Subtract 4 feet of duct for Clothes Dryer Transition Duct. Run the duct with the...

User manual 8092851 Asko T784 EN
Page 27
.... The power supply cord must be made with a four-prong plug intended for a 3-wire connection system. Electric models of the above connections can be used when the appliance is prohibited for all 4-wire installations. Customer Care Center 27 1-800-898-1879 www.askousa.com The dryer frame is designed to access terminal box. (Requires a 20-Torx screwdriver.) Electrical Connections WARNING! The receptacle on the rear of 15 A each. Installation instructions Electrical installation WARNING! If...
.... The power supply cord must be made with a four-prong plug intended for a 3-wire connection system. Electric models of the above connections can be used when the appliance is prohibited for all 4-wire installations. Customer Care Center 27 1-800-898-1879 www.askousa.com The dryer frame is designed to access terminal box. (Requires a 20-Torx screwdriver.) Electrical Connections WARNING! The receptacle on the rear of 15 A each. Installation instructions Electrical installation WARNING! If...
User manual 8092851 Asko T784 EN
Page 28
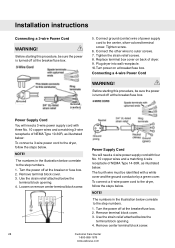
... turned off at breaker/fuse box. Ground Ground (center) 5. Connect ground (center) wire of NEMA Type 14-30R, as illustrated below: To connect a 3-wire power cord to outer screws. 7. Connecting a 4-wire Power Cord WARNING! NOTE! The numbers in the illustration below . Remove terminal block cover. 3. Loosen or remove center terminal block screw. 4 5 6 Power Supply Cord You will need a 4-wire power supply cord with three No. 10 copper wires and a matching 3-wire receptacle of dryer. 9. NOTE! The numbers in the illustration below the terminal block opening . 4. Remove...
... turned off at breaker/fuse box. Ground Ground (center) 5. Connect ground (center) wire of NEMA Type 14-30R, as illustrated below: To connect a 3-wire power cord to outer screws. 7. Connecting a 4-wire Power Cord WARNING! NOTE! The numbers in the illustration below . Remove terminal block cover. 3. Loosen or remove center terminal block screw. 4 5 6 Power Supply Cord You will need a 4-wire power supply cord with three No. 10 copper wires and a matching 3-wire receptacle of dryer. 9. NOTE! The numbers in the illustration below the terminal block opening . 4. Remove...
User manual 8092851 Asko T784 EN
Page 29
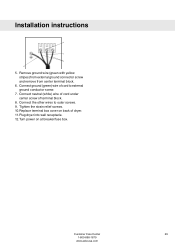
Connect ground (green) wire of terminal block. 8. Connect neutral (white) wire of cord under center screw of cord to outer screws. 9. Installation instructions 4 7 8 6 5. Remove ground wire (green with yellow stripes) from external ground connector screw and remove from center terminal block. 6. Replace terminal box cover on at breaker/fuse box. Customer Care Center 29 1-800-898-1879 www.askousa.com Connect the other wires to external ground conductor screw. 7. Turn power on back of dryer. 11. Tighten the...
Connect ground (green) wire of terminal block. 8. Connect neutral (white) wire of cord under center screw of cord to outer screws. 9. Installation instructions 4 7 8 6 5. Remove ground wire (green with yellow stripes) from external ground connector screw and remove from center terminal block. 6. Replace terminal box cover on at breaker/fuse box. Customer Care Center 29 1-800-898-1879 www.askousa.com Connect the other wires to external ground conductor screw. 7. Turn power on back of dryer. 11. Tighten the...

User manual 8092851 Asko T784 EN
Page 32
... lint filter after each load. 7Once drying has finished • Turn off the main power switch and close the door. Quick guide 1Fabrics • Dry fabrics of the same type together to ensure they dry as evenly as possible. 2Turn on the main power switch 3Load the garments • Close the door. 4Select a program and any options • Turn the program selector to make changes. 32 Customer Care...
... lint filter after each load. 7Once drying has finished • Turn off the main power switch and close the door. Quick guide 1Fabrics • Dry fabrics of the same type together to ensure they dry as evenly as possible. 2Turn on the main power switch 3Load the garments • Close the door. 4Select a program and any options • Turn the program selector to make changes. 32 Customer Care...


