Owners Manual
Page 2
... the literature accompanying the appliance. This DVD Player is designed to constitute risk of important operating and maintenance (servicing) instructions in the mobile environment. Precautions EXPLANATION OF GRAPHIC SYMBOLS The lighting flash with arrowhead symbol, within the product's enclosure that may be of sufficient magnitude to optimize the enjoyment of reliable, trouble-free service. WARNING TO REDUCE THE RICK OF...
... the literature accompanying the appliance. This DVD Player is designed to constitute risk of important operating and maintenance (servicing) instructions in the mobile environment. Precautions EXPLANATION OF GRAPHIC SYMBOLS The lighting flash with arrowhead symbol, within the product's enclosure that may be of sufficient magnitude to optimize the enjoyment of reliable, trouble-free service. WARNING TO REDUCE THE RICK OF...
Owners Manual
Page 3
...). Clean the DVD player using only a lightly dampened lint free cloth to the system. SAFETY PRECAUTION For safety reasons, when changing video media, it is recommended that the vehicle is dirty. 2 Do not place anything heavy on or in the system (this system should never be installed where it will be visible, directly or indirectly, by the operator of safety...
...). Clean the DVD player using only a lightly dampened lint free cloth to the system. SAFETY PRECAUTION For safety reasons, when changing video media, it is recommended that the vehicle is dirty. 2 Do not place anything heavy on or in the system (this system should never be installed where it will be visible, directly or indirectly, by the operator of safety...

Owners Manual
Page 4
... playing. Handle the disc by software producers. Power should be avail able. If the AVD300 does not operate properly under these conditions leave the AVD300 turned on the disc. Remove the disc from a very low temperature, moisture may cause the unit to the instructions supplied with a soft lint free cleaning cloth. not directly from the center out with the discs. 5. Use only the supplied power cable matching this unit plays discs...
... playing. Handle the disc by software producers. Power should be avail able. If the AVD300 does not operate properly under these conditions leave the AVD300 turned on the disc. Remove the disc from a very low temperature, moisture may cause the unit to the instructions supplied with a soft lint free cleaning cloth. not directly from the center out with the discs. 5. Use only the supplied power cable matching this unit plays discs...

Owners Manual
Page 5
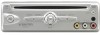
...Right Button 5. Eject Button 11. Power Cable 4. DVRCA * Adaptor for connection to Figure 1) 1. Power Button 2. Video Input Jack 8. RCA Cables ( Red, Yellow, and White) * For use with 8010730 Accessory Cable 9. Previous Button 4. S-Video Jack 13. Owner's Manual 6. Audio L Input Jack 9. Power Adaptor* (4-Pin to 2-Pin) Cable 7. IR Receiver (6m) D. Stop Button 7. Remote Control Sensor 12. Audio L Output Jack 15. Audio R Output Jack 16. IR Input Jack Figure1 4 Monitor Port 2 18. Audio R Input Jack 10. Main Unit 2. Monitor Port 1 17. Menu Button 3. C.
...Right Button 5. Eject Button 11. Power Cable 4. DVRCA * Adaptor for connection to Figure 1) 1. Power Button 2. Video Input Jack 8. RCA Cables ( Red, Yellow, and White) * For use with 8010730 Accessory Cable 9. Previous Button 4. S-Video Jack 13. Owner's Manual 6. Audio L Input Jack 9. Power Adaptor* (4-Pin to 2-Pin) Cable 7. IR Receiver (6m) D. Stop Button 7. Remote Control Sensor 12. Audio L Output Jack 15. Audio R Output Jack 16. IR Input Jack Figure1 4 Monitor Port 2 18. Audio R Input Jack 10. Main Unit 2. Monitor Port 1 17. Menu Button 3. C.
Owners Manual
Page 6
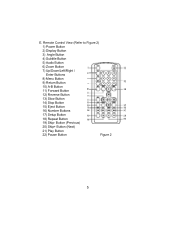
Button (Previous) 20) Skip+ Button (Next) 21) Play Button 22) Pause Button Figure 2 5 Remote Control View (Refer to Figure 2) 1) Power Button 2) Display Button 3) Angle Button 4) Subtitle Button 5) Audio Button 6) Zoom Button 7) Up/Down/Left/Right / Enter Buttons 8) Menu Button 9) Return Button 10) A-B Button 11) Forward Button 12) Reverse Button 13) Slow Button 14) Stop Button 15) Eject Button 16) Number Buttons 17) Setup Button 18) Repeat Button 19) Skip- E.
Button (Previous) 20) Skip+ Button (Next) 21) Play Button 22) Pause Button Figure 2 5 Remote Control View (Refer to Figure 2) 1) Power Button 2) Display Button 3) Angle Button 4) Subtitle Button 5) Audio Button 6) Zoom Button 7) Up/Down/Left/Right / Enter Buttons 8) Menu Button 9) Return Button 10) A-B Button 11) Forward Button 12) Reverse Button 13) Slow Button 14) Stop Button 15) Eject Button 16) Number Buttons 17) Setup Button 18) Repeat Button 19) Skip- E.
Owners Manual
Page 7
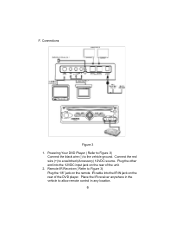
F. Connections Figure 3 1. Powering Your DVD Player ( Refer to Figure 3) Connect the black wire (-) to allow remote control in the vehicle to the vehicle ground. Plug the other end into the IR IN jack on the rear of the DVD player. Place the IR receiver anywhere in any location. 6 Connect the red wire (+) to Figure 3) Plug the 1/8" jack on the remote IR cable into the 12VDC input jack on the rear of the unit. 2. Remote IR Receiver ( Refer to a switched (Accessory) 12VDC source.
F. Connections Figure 3 1. Powering Your DVD Player ( Refer to Figure 3) Connect the black wire (-) to allow remote control in the vehicle to the vehicle ground. Plug the other end into the IR IN jack on the rear of the DVD player. Place the IR receiver anywhere in any location. 6 Connect the red wire (+) to Figure 3) Plug the 1/8" jack on the remote IR cable into the 12VDC input jack on the rear of the unit. 2. Remote IR Receiver ( Refer to a switched (Accessory) 12VDC source.
Owners Manual
Page 8
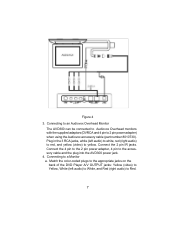
... color-coded plugs to the appropriate jacks on the back of the DVD Player A/V OUTPUT jacks: Yellow (video) to Yellow, White (left audio) to white, red (right audio) to red, and yellow (video) to yellow. Figure 4 3. Connecting to an Audiovox Overhead Monitor The AVD300 can be connected to Audiovox Overhead monitors with the supplied adaptors (DVRCA and 4 pin to the accessory cable and the plug into the AVD300 power jack. 4. Plug...
... color-coded plugs to the appropriate jacks on the back of the DVD Player A/V OUTPUT jacks: Yellow (video) to Yellow, White (left audio) to white, red (right audio) to red, and yellow (video) to yellow. Figure 4 3. Connecting to an Audiovox Overhead Monitor The AVD300 can be connected to Audiovox Overhead monitors with the supplied adaptors (DVRCA and 4 pin to the accessory cable and the plug into the AVD300 power jack. 4. Plug...
Owners Manual
Page 9
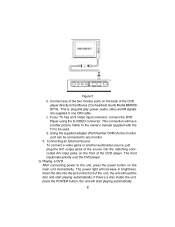
... an S Video input connector, connect the DVD Player using the S-VIDEO connector. c. Playing a DVD After connecting power to be connected to the Movies 2 Go headrest hoods Model MMH56 B/T/G. Insert the disc into the matching colorcoded A/V input jacks on the back of the DVD player directly to any monitor. 5. This is plug and play, power, audio, video and IR signals are supplied in brightness. Connecting an External Source To connect a video game or another audio/video source, just plug the A/V output jacks of the source into...
... an S Video input connector, connect the DVD Player using the S-VIDEO connector. c. Playing a DVD After connecting power to be connected to the Movies 2 Go headrest hoods Model MMH56 B/T/G. Insert the disc into the matching colorcoded A/V input jacks on the back of the DVD player directly to any monitor. 5. This is plug and play, power, audio, video and IR signals are supplied in brightness. Connecting an External Source To connect a video game or another audio/video source, just plug the A/V output jacks of the source into...
Owners Manual
Page 10
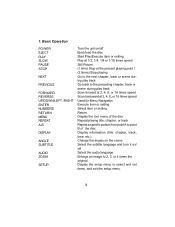
... times speed Used for Menu Navigation Execute item or setting Select item or setting Return Display the root menu of the disc Repeat playing title, chapter, or track Repeat a specific portion from point A to select and set items, and exit the setup menu. 9 1. Change the angles on the scene Select the subtitle language and turn it on /off Select the audio language Enlarge an image to 2, 3, or 4 times the original Display the setup menu...
... times speed Used for Menu Navigation Execute item or setting Select item or setting Return Display the root menu of the disc Repeat playing title, chapter, or track Repeat a specific portion from point A to select and set items, and exit the setup menu. 9 1. Change the angles on the scene Select the subtitle language and turn it on /off Select the audio language Enlarge an image to 2, 3, or 4 times the original Display the setup menu...
Owners Manual
Page 11
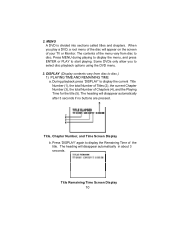
... Number of the menu vary from disc to start playing. Title, Chapter Number, and Time Screen Display b. Press 'DISPLAY' again to select disc playback options using the DVD menu. 3. When you to display the Remaining Time of your TV or Monitor. Some DVDs only allow you play a DVD, a root menu of the disc will disappear automatically in about 3 seconds. Press MENU during playing to display the menu, and press ENTER or PLAY to disc.) 1) PLAYING TIME AND REMAINING TIME a. The heading...
... Number of the menu vary from disc to start playing. Title, Chapter Number, and Time Screen Display b. Press 'DISPLAY' again to select disc playback options using the DVD menu. 3. When you to display the Remaining Time of your TV or Monitor. Some DVDs only allow you play a DVD, a root menu of the disc will disappear automatically in about 3 seconds. Press MENU during playing to display the menu, and press ENTER or PLAY to disc.) 1) PLAYING TIME AND REMAINING TIME a. The heading...
Owners Manual
Page 13
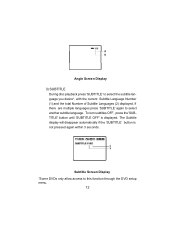
... to select the subtitle language you desire*, with the current Subtitle Language Number (1) and the total Number of Subtitle Languages (2) displayed. To turn subtitles OFF, press the 'SUBTITLE' button until 'SUBTITLE OFF' is not pressed again within 3 seconds. The Subtitle display will disappear automatically if the 'SUBTITLE' button is displayed. Subtitle Screen Display *Some DVDs only allow access to this function through the DVD setup menu...
... to select the subtitle language you desire*, with the current Subtitle Language Number (1) and the total Number of Subtitle Languages (2) displayed. To turn subtitles OFF, press the 'SUBTITLE' button until 'SUBTITLE OFF' is not pressed again within 3 seconds. The Subtitle display will disappear automatically if the 'SUBTITLE' button is displayed. Subtitle Screen Display *Some DVDs only allow access to this function through the DVD setup menu...
Owners Manual
Page 15
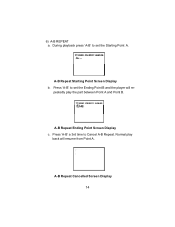
A-B Repeat Starting Point Screen Display b. Press 'A-B' to set the Starting Point A. peatedly play back will re- Normal play the part between Point A and Point B. A-B Repeat Ending Point Screen Display c. 6) A-B REPEAT a. Press 'A-B' a 3rd time to set the Ending Point B and the player will resume from Point A. During playback press 'A-B' to Cancel A-B Repeat. A-B Repeat Cancelled Screen Display 14
A-B Repeat Starting Point Screen Display b. Press 'A-B' to set the Starting Point A. peatedly play back will re- Normal play the part between Point A and Point B. A-B Repeat Ending Point Screen Display c. 6) A-B REPEAT a. Press 'A-B' a 3rd time to set the Ending Point B and the player will resume from Point A. During playback press 'A-B' to Cancel A-B Repeat. A-B Repeat Cancelled Screen Display 14
Owners Manual
Page 19
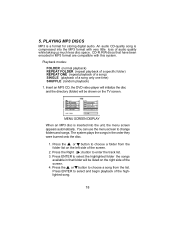
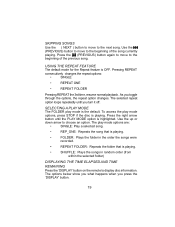
...DVD video player will initialize the disc and the directory (folder) will be shown on the left side of the highlighted song. 18 The system plays the songs in MP3 format are compatible with very little loss of a song only one time) SHUFFLE (random playback) 1. Press the Right ( ) button ... onto the disc. 1. Press ENTER to change folders and songs. PLAYING MP3 DISCS MP3 is inserted into the MP3 format with this system. Press the or button to select and begin playback of the screen. 2. An audio CD-quality song is compressed into the unit, the menu screen appears automatically....
...DVD video player will initialize the disc and the directory (folder) will be shown on the left side of the highlighted song. 18 The system plays the songs in MP3 format are compatible with very little loss of a song only one time) SHUFFLE (random playback) 1. Press the Right ( ) button ... onto the disc. 1. Press ENTER to change folders and songs. PLAYING MP3 DISCS MP3 is inserted into the MP3 format with this system. Press the or button to select and begin playback of the screen. 2. An audio CD-quality song is compressed into the unit, the menu screen appears automatically....
Owners Manual
Page 20
... feature is playing. The play mode is the default. The selected repeat option loops repeatedly until the PLAY MODE option is playing. • SHUFFLE: Plays the songs in random order (from within the selected folder) DISPLAYING THE TIME ELAPSED AND TIME REMAINING Press the 'DISPLAY' button on the remote to display disc information. Use the up or down arrow to the next song. Pressing REPEAT consecutively changes the repeat...
... feature is playing. The play mode is the default. The selected repeat option loops repeatedly until the PLAY MODE option is playing. • SHUFFLE: Plays the songs in random order (from within the selected folder) DISPLAYING THE TIME ELAPSED AND TIME REMAINING Press the 'DISPLAY' button on the remote to display disc information. Use the up or down arrow to the next song. Pressing REPEAT consecutively changes the repeat...
Owners Manual
Page 22
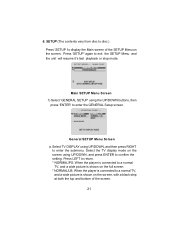
... vary from disc to disc.) Press 'SETUP 'to enter the GENERAL Setup screen. Main SETUP Menu Screen 1) Select 'GENERAL SETUP' using the UP/DOWN buttons, then press 'ENTER' to display the Main screen of the screen. 21 Press LEFT to return. * NORMAL/PS: When the player is connected to a normal TV, and a wide picture is connected to confirm the setting. Select the TV display mode on the screen using UP/DOWN, and then press...
... vary from disc to disc.) Press 'SETUP 'to enter the GENERAL Setup screen. Main SETUP Menu Screen 1) Select 'GENERAL SETUP' using the UP/DOWN buttons, then press 'ENTER' to display the Main screen of the screen. 21 Press LEFT to return. * NORMAL/PS: When the player is connected to a normal TV, and a wide picture is connected to confirm the setting. Select the TV display mode on the screen using UP/DOWN, and then press...

Owners Manual
Page 23
... setting. b. ANGLE MARK Screen Display * ON: The screen will show angle mark. (If angle option is shown on the screen remains the same for more than 5 minutes. 22 * WIDE: When the player is connected to a wide screen TV, a wide picture is available) * OFF: The screen will not display the Angle Mark. Select 'ANGLE MARK' using UP/DOWN, and then press the RIGHT button...
... setting. b. ANGLE MARK Screen Display * ON: The screen will show angle mark. (If angle option is shown on the screen remains the same for more than 5 minutes. 22 * WIDE: When the player is connected to a wide screen TV, a wide picture is available) * OFF: The screen will not display the Angle Mark. Select 'ANGLE MARK' using UP/DOWN, and then press the RIGHT button...

Owners Manual
Page 24
... return. AUDIO Preference Screen Display a. 2) When there's no disc inside the player, select 'PREFERENCES' using UP/DOWN, and then press 'ENTER' to confirm the setting. Select the desired subtitle language or SUBTITLE OFF using UP/DOWN, and then press 'ENTER' to confirm the setting. Select 'AUDIO' using UP/DOWN, and then press 'ENTER' to enter the preferences page. b. Press 'LEFT' to return. Select the audio language...
... return. AUDIO Preference Screen Display a. 2) When there's no disc inside the player, select 'PREFERENCES' using UP/DOWN, and then press 'ENTER' to confirm the setting. Select the desired subtitle language or SUBTITLE OFF using UP/DOWN, and then press 'ENTER' to confirm the setting. Select 'AUDIO' using UP/DOWN, and then press 'ENTER' to enter the preferences page. b. Press 'LEFT' to return. Select the audio language...
Owners Manual
Page 25
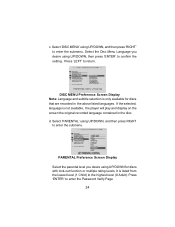
...' to enter the Password Verify Page. 24 Select 'PARENTAL' using UP/DOWN for discs that are recorded in the disc. It is only available for discs with lock-out function or multiple rating levels. Press 'ENTER' to confirm the setting. c. Select the Disc Menu Language you desire using UP/DOWN, and then press RIGHT to the highest level (8 Adult). DISC MENU Preference Screen Display Note: Language and subtitle...
...' to enter the Password Verify Page. 24 Select 'PARENTAL' using UP/DOWN for discs that are recorded in the disc. It is only available for discs with lock-out function or multiple rating levels. Press 'ENTER' to confirm the setting. c. Select the Disc Menu Language you desire using UP/DOWN, and then press RIGHT to the highest level (8 Adult). DISC MENU Preference Screen Display Note: Language and subtitle...
Owners Manual
Page 27
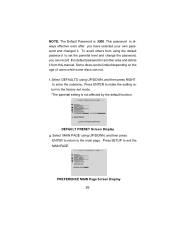
... users while some discs can record this manual. DEFAULT PRESET Screen Display g. Select 'MAIN PAGE' using UP/DOWN, and then press RIGHT to set mode. *The parental setting is not affected by the default function. Press SETUP to the main page. To avoid others from this default password in another area and delete it . Press ENTER to make the setting return to the factory-set the parental level and change...
... users while some discs can record this manual. DEFAULT PRESET Screen Display g. Select 'MAIN PAGE' using UP/DOWN, and then press RIGHT to set mode. *The parental setting is not affected by the default function. Press SETUP to the main page. To avoid others from this default password in another area and delete it . Press ENTER to make the setting return to the factory-set the parental level and change...
Owners Manual
Page 29
... damaged through alteration, improper installation, mishandling, misuse, neglect, accident, or by removal or defacement of the factory serial number/bar code label(s). 12 MONTH LIMITED WARRANTY Applies to Audiovox Mobile Video Products AUDIOVOX ELECTRONICS CORP. (the Company) warrants to the original retail purchaser of this product that should this product or any part thereof, under normal use and conditions, be...
... damaged through alteration, improper installation, mishandling, misuse, neglect, accident, or by removal or defacement of the factory serial number/bar code label(s). 12 MONTH LIMITED WARRANTY Applies to Audiovox Mobile Video Products AUDIOVOX ELECTRONICS CORP. (the Company) warrants to the original retail purchaser of this product that should this product or any part thereof, under normal use and conditions, be...


