
Owners Manual
Page 5
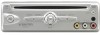
... * Adaptor for connection to 2-Pin) Cable 7. Power Button 2. Play & NAV Up, Down, Left, Right Button 5. Audio R Input Jack 10. Eject Button 11. Video Output Jack 14. Monitor Port 2 18. Owner's Manual 6. Audio L Input Jack 9. Next Button 6. Stop Button 7....Pin to a second monitor 8. RCA Cables ( Red, Yellow, and White) * For use with 8010730 Accessory Cable 9. Menu Button 3. Audio R Output Jack 16. Contents 1. Controls Main Unit (Refer to Figure 1) 1. Video Input Jack 8. Previous Button 4. C. IR Receiver (6m) D. S-Video Jack 13. DC 12V Jack 19....
... * Adaptor for connection to 2-Pin) Cable 7. Power Button 2. Play & NAV Up, Down, Left, Right Button 5. Audio R Input Jack 10. Eject Button 11. Video Output Jack 14. Monitor Port 2 18. Owner's Manual 6. Audio L Input Jack 9. Next Button 6. Stop Button 7....Pin to a second monitor 8. RCA Cables ( Red, Yellow, and White) * For use with 8010730 Accessory Cable 9. Menu Button 3. Audio R Output Jack 16. Contents 1. Controls Main Unit (Refer to Figure 1) 1. Video Input Jack 8. Previous Button 4. C. IR Receiver (6m) D. S-Video Jack 13. DC 12V Jack 19....
Owners Manual
Page 8
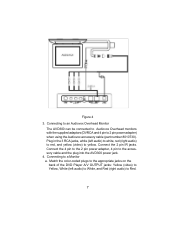
Connecting to an Audiovox Overhead Monitor The AVD300 can be connected to Audiovox Overhead monitors with the supplied adaptors (DVRCA and 4 pin to a Monitor a. Connecting to 2 pin power adapter) when using the Audiovox accessory cable (part number 8010730). Plug in the 3 RCA jacks, white (left audio) to White, ...appropriate jacks on the back of the DVD Player A/V OUTPUT jacks: Yellow (video) to Yellow, White (left audio) to white, red (right audio) to red, and yellow (video) to the accessory cable and the plug into the AVD300 power jack. 4. Figure 4 3. Connect the 4 pin to the 2 ...
Connecting to an Audiovox Overhead Monitor The AVD300 can be connected to Audiovox Overhead monitors with the supplied adaptors (DVRCA and 4 pin to a Monitor a. Connecting to 2 pin power adapter) when using the Audiovox accessory cable (part number 8010730). Plug in the 3 RCA jacks, white (left audio) to White, ...appropriate jacks on the back of the DVD Player A/V OUTPUT jacks: Yellow (video) to Yellow, White (left audio) to white, red (right audio) to red, and yellow (video) to the accessory cable and the plug into the AVD300 power jack. 4. Figure 4 3. Connect the 4 pin to the 2 ...
Owners Manual
Page 9
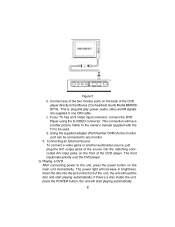
... or another audio/video source, just plug the A/V output jacks of the DVD player directly to the unit, press the power button on the front of the unit, the unit will increase in one DIN cable. G. Insert the disc into the slot on the back of the source into the matching colorcoded... A/V input jacks on the main unit momentarily. if there's a disc inside the unit, press the POWER button, the unit will have a better picture. This is plug and play, power, audio, video and IR...
... or another audio/video source, just plug the A/V output jacks of the DVD player directly to the unit, press the power button on the front of the unit, the unit will increase in one DIN cable. G. Insert the disc into the slot on the back of the source into the matching colorcoded... A/V input jacks on the main unit momentarily. if there's a disc inside the unit, press the POWER button, the unit will have a better picture. This is plug and play, power, audio, video and IR...

