Owners Manual
Page 3
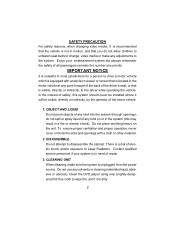
... of the back of the driver's seat, or that you do not spill or spray liquid of the motor vehicle. 1. CLEANING UNIT When cleaning, make any kind on the unit. Do not place anything heavy on or in the system (this system should never be installed where it will be visible, directly... push objects of electric shock and/or exposure to disassemble the cabinet. IMPORTANT NOTICE It is unlawful in most jurisdictions for a person to wipe the unit if it is in a fire or electric shock).
... of the back of the driver's seat, or that you do not spill or spray liquid of the motor vehicle. 1. CLEANING UNIT When cleaning, make any kind on the unit. Do not place anything heavy on or in the system (this system should never be installed where it will be visible, directly... push objects of electric shock and/or exposure to disassemble the cabinet. IMPORTANT NOTICE It is unlawful in most jurisdictions for a person to wipe the unit if it is in a fire or electric shock).

Owners Manual
Page 4
Do not expose the disc to direct sunlight or heat sources such as they may cause the unit to malfunction. Some playback operations of discs may condense inside the AVD300 and cause the DVD player to the instructions supplied with a soft lint free cleaning cloth. Also refer to malfunction.... stick paper, tape or glue on for about half an hour until the moisture evaporates. 3 Use only the supplied power cable matching this unit plays discs according to the disc contents the software producers designed, some playback features may not be powered from a very low temperature, moisture ...
Do not expose the disc to direct sunlight or heat sources such as they may cause the unit to malfunction. Some playback operations of discs may condense inside the AVD300 and cause the DVD player to the instructions supplied with a soft lint free cleaning cloth. Also refer to malfunction.... stick paper, tape or glue on for about half an hour until the moisture evaporates. 3 Use only the supplied power cable matching this unit plays discs according to the disc contents the software producers designed, some playback features may not be powered from a very low temperature, moisture ...

Owners Manual
Page 5
Main Unit 2. Remote control with four (4) Screws 5. Two (2) Brackets with one CR2025 Battery 3. RCA Cables ( Red, Yellow, and White) * For use with 8010730 Accessory Cable 9. IR Receiver (...* (4-Pin to a second monitor 8. Audio R Input Jack 10. Contents 1. Eject Button 11. Power Cable 4. Menu Button 3. C. DVRCA * Adaptor for connection to 2-Pin) Cable 7. Controls Main Unit (Refer to Figure 1) 1. Play & NAV Up, Down, Left, Right Button 5. Video Output Jack 14.
Main Unit 2. Remote control with four (4) Screws 5. Two (2) Brackets with one CR2025 Battery 3. RCA Cables ( Red, Yellow, and White) * For use with 8010730 Accessory Cable 9. IR Receiver (...* (4-Pin to a second monitor 8. Audio R Input Jack 10. Contents 1. Eject Button 11. Power Cable 4. Menu Button 3. C. DVRCA * Adaptor for connection to 2-Pin) Cable 7. Controls Main Unit (Refer to Figure 1) 1. Play & NAV Up, Down, Left, Right Button 5. Video Output Jack 14.
Owners Manual
Page 7
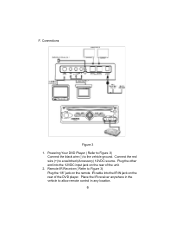
F. Connect the red wire (+) to allow remote control in any location. 6 Plug the other end into the IR IN jack on the rear of the DVD player. Place the IR receiver anywhere in the vehicle to a switched (Accessory) 12VDC source. Remote IR Receiver ( Refer to the vehicle ground. Connections Figure 3 1. Powering Your DVD Player ( Refer to Figure 3) Connect the black wire (-) to Figure 3) Plug the 1/8" jack on the remote IR cable into the 12VDC input jack on the rear of the unit. 2.
F. Connect the red wire (+) to allow remote control in any location. 6 Plug the other end into the IR IN jack on the rear of the DVD player. Place the IR receiver anywhere in the vehicle to a switched (Accessory) 12VDC source. Remote IR Receiver ( Refer to the vehicle ground. Connections Figure 3 1. Powering Your DVD Player ( Refer to Figure 3) Connect the black wire (-) to Figure 3) Plug the 1/8" jack on the remote IR cable into the 12VDC input jack on the rear of the unit. 2.
Owners Manual
Page 9
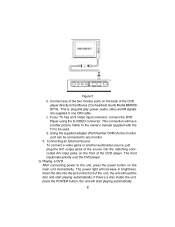
...DVD player. Figure 5 b. Refer to the owner's manual supplied with the TV to be connected to any of the two monitor ports on the main unit momentarily. Connecting an External Source To connect a video game or another audio/video source, just plug the A/V output jacks of the source into the slot... on the front of the DVD player directly to the unit, press the power button on the back of the unit, the unit will start playing automatically; The front inputs take priority over the DVD player. if there's a disc inside the...
...DVD player. Figure 5 b. Refer to the owner's manual supplied with the TV to be connected to any of the two monitor ports on the main unit momentarily. Connecting an External Source To connect a video game or another audio/video source, just plug the A/V output jacks of the source into the slot... on the front of the DVD player directly to the unit, press the power button on the back of the unit, the unit will start playing automatically; The front inputs take priority over the DVD player. if there's a disc inside the...
Owners Manual
Page 10
... PLAY SLOW PAUSE STOP NEXT PREVIOUS FORWARD REVERSE UP/DOWN/LEFT /RIGHT ENTER NUMBERS RETURN MENU REPEAT A-B DISPLAY ANGLE SUBTITLE AUDIO ZOOM SETUP Turn the unit on / off Eject/load the disc Start Play/Execute item or setting Play at 1/2, 1/4, 1/8 or 1/16 times speed Still Picture (1 time) Stop at the present...
... PLAY SLOW PAUSE STOP NEXT PREVIOUS FORWARD REVERSE UP/DOWN/LEFT /RIGHT ENTER NUMBERS RETURN MENU REPEAT A-B DISPLAY ANGLE SUBTITLE AUDIO ZOOM SETUP Turn the unit on / off Eject/load the disc Start Play/Execute item or setting Play at 1/2, 1/4, 1/8 or 1/16 times speed Still Picture (1 time) Stop at the present...
Owners Manual
Page 19
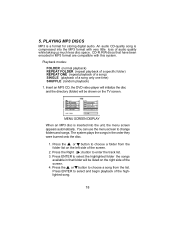
... the songs available in that have been encoded in the order they were burned onto the disc. 1. 5. PLAYING MP3 DISCS MP3 is compressed into the unit, the menu screen appears automatically. CD-R /RW discs that folder will be listed on the TV screen. MENU SCREEN DISPLAY When an MP3 disc is...
... the songs available in that have been encoded in the order they were burned onto the disc. 1. 5. PLAYING MP3 DISCS MP3 is compressed into the unit, the menu screen appears automatically. CD-R /RW discs that folder will be listed on the TV screen. MENU SCREEN DISPLAY When an MP3 disc is...
Owners Manual
Page 22
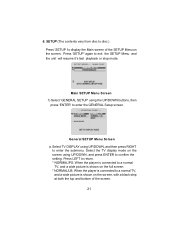
... the screen. 21 Main SETUP Menu Screen 1) Select 'GENERAL SETUP' using the UP/DOWN buttons, then press 'ENTER' to exit the SETUP Menu and the unit will resume it's last playback or stop mode. General SETUP Menu Screen a.
... the screen. 21 Main SETUP Menu Screen 1) Select 'GENERAL SETUP' using the UP/DOWN buttons, then press 'ENTER' to exit the SETUP Menu and the unit will resume it's last playback or stop mode. General SETUP Menu Screen a.

