
User Guide
Page 1
D1705 PORTABLE 7" LCD MONITOR AND DVD PLAYER For Customer Service Visit Our Website At WWW .audiovox.com Product Information, Photos, FAQ's Owner's Manuals 1 128-6808A
D1705 PORTABLE 7" LCD MONITOR AND DVD PLAYER For Customer Service Visit Our Website At WWW .audiovox.com Product Information, Photos, FAQ's Owner's Manuals 1 128-6808A
User Guide
Page 3
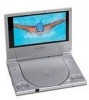
... the system (this manual for selecting the D1705 portable DVD player. When you for later use in hotels, offices or your system is compact so that the D1705 is a risk of reliable, trouble-free service, and is in installing the system properly to operation. do not expose this product prior to obtain the best equipment performance. Contact qualified service personnel if your home. A. The main...
... the system (this manual for selecting the D1705 portable DVD player. When you for later use in hotels, offices or your system is compact so that the D1705 is a risk of reliable, trouble-free service, and is in installing the system properly to operation. do not expose this product prior to obtain the best equipment performance. Contact qualified service personnel if your home. A. The main...
User Guide
Page 4
... the 110V AC power socket. 2. Do not use irregularly shaped discs such as heart or star-shaped discs as hot air ducts. Some playback operations of disc. Contents 1. 1 x 7.0'' LCD Monitor & DVD Player Combo 2. 1 x AC to malfunction. Do not expose the disc to direct sunlight or heat sources such as they may cause the unit to DC Adapter 3. 1 x Rechargeable Battery 4. 1 x Remote Control 5. 1 x Instruction Manual 6. 1 x Audio/Video Cable 7. 1 x Cigarette Lighter Adapter D. Remove the disc from the...
... the 110V AC power socket. 2. Do not use irregularly shaped discs such as heart or star-shaped discs as hot air ducts. Some playback operations of disc. Contents 1. 1 x 7.0'' LCD Monitor & DVD Player Combo 2. 1 x AC to malfunction. Do not expose the disc to direct sunlight or heat sources such as they may cause the unit to DC Adapter 3. 1 x Rechargeable Battery 4. 1 x Remote Control 5. 1 x Instruction Manual 6. 1 x Audio/Video Cable 7. 1 x Cigarette Lighter Adapter D. Remove the disc from the...
User Guide
Page 7
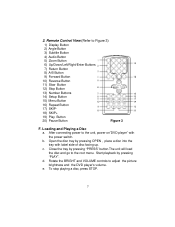
... up. To stop playing a disc, press STOP. 7 2. Remote Control View (Refer to adjust the picture brightness and the DVD player's volume. After connecting power to the root menu. c. Loading and Playing a Disc a. e. Rotate the BRIGHT and VOLUME controls to Figure 3) 1) Display Button 2) Angle Button 3) Subtitle Button 4) Audio Button 5) Zoom Button 6) Up/Down/Left/Right/Enter Buttons 7) Return Button 8) A-B Button 9) Forward Button 10) Reverse Button 11) Slow Button 12) Stop Button 13) Number Buttons 14) Setup Button 15) Menu Button 16) Repeat Button 17) SKIP...
... up. To stop playing a disc, press STOP. 7 2. Remote Control View (Refer to adjust the picture brightness and the DVD player's volume. After connecting power to the root menu. c. Loading and Playing a Disc a. e. Rotate the BRIGHT and VOLUME controls to Figure 3) 1) Display Button 2) Angle Button 3) Subtitle Button 4) Audio Button 5) Zoom Button 6) Up/Down/Left/Right/Enter Buttons 7) Return Button 8) A-B Button 9) Forward Button 10) Reverse Button 11) Slow Button 12) Stop Button 13) Number Buttons 14) Setup Button 15) Menu Button 16) Repeat Button 17) SKIP...
User Guide
Page 8
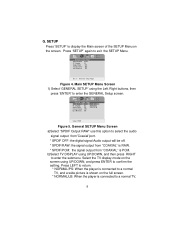
... SETUP Menu Screen 1) Select 'GENERAL SETUP' using UP/DOWN, and press ENTER to confirm the setting. Select the TV display mode on the screen using the Left /Right buttons, then press 'ENTER' to a normal TV, 8 G. General SETUP Menu Screen a)Select "SPDIF Output RAW" use this option to select the audio signal output from"Coaxial"port. * SPDIF OFF: the digital signal Audio output will be off. * SPDIF/RAW: the signal output from "COAXIAL" is RAW. * SPDIF/PCM: the signal output from "COAXIAL" is connected...
... SETUP Menu Screen 1) Select 'GENERAL SETUP' using UP/DOWN, and press ENTER to confirm the setting. Select the TV display mode on the screen using the Left /Right buttons, then press 'ENTER' to a normal TV, 8 G. General SETUP Menu Screen a)Select "SPDIF Output RAW" use this option to select the audio signal output from"Coaxial"port. * SPDIF OFF: the digital signal Audio output will be off. * SPDIF/RAW: the signal output from "COAXIAL" is RAW. * SPDIF/PCM: the signal output from "COAXIAL" is connected...
User Guide
Page 9
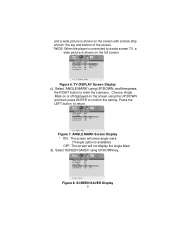
... 8. SCREEN SAVER Display 9 and a wide picture is shown on the screen with a black strip at both the top and bottom of the screen. * WIDE: When the player is connected to return. .. SPDIF Output RAW TV Display PS Nomal/PS Angle Mark Off Normal/LB Screen Saver Off Wide Last Memory Off Set TV Display Mode Figure 6. Select 'ANGLE MARK' using UP/DOWN key, .. Press the LEFT button...
... 8. SCREEN SAVER Display 9 and a wide picture is shown on the screen with a black strip at both the top and bottom of the screen. * WIDE: When the player is connected to return. .. SPDIF Output RAW TV Display PS Nomal/PS Angle Mark Off Normal/LB Screen Saver Off Wide Last Memory Off Set TV Display Mode Figure 6. Select 'ANGLE MARK' using UP/DOWN key, .. Press the LEFT button...

User Guide
Page 10
SPDIF Output RAW TV Display PS Angle Mark Off Screen Saver Off Last Memory Off O n Off Set Last Memory STATE Figure 9. Video Quality Setup .. Adjust can change the Brightness by using the Up/Down buttons,then press "Enter". Brightness 00 Contrast 00 Hue 00 Saturation 00 Go To Video Setup Page Figure 10. LAST MEMORY Screen Display *on: The unit will enter the Screen Saver mode after...
SPDIF Output RAW TV Display PS Angle Mark Off Screen Saver Off Last Memory Off O n Off Set Last Memory STATE Figure 9. Video Quality Setup .. Adjust can change the Brightness by using the Up/Down buttons,then press "Enter". Brightness 00 Contrast 00 Hue 00 Saturation 00 Go To Video Setup Page Figure 10. LAST MEMORY Screen Display *on: The unit will enter the Screen Saver mode after...

User Guide
Page 12
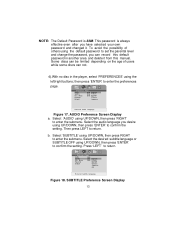
... Figure 14. SATURATION Screen Display When complete, press "Enter"again to return to enter the "Change Pass word" page. .. then press Enter to the "Video Quality" setup page. PREFERENCE PAGE Screen Display 12 PASSWORD CHANGE Screen Display a) Press the right shift button to exit "Video Quality" setup page. Password Setup Page .. b) Press Setup button to enter the Password Change Submenu. Video Quality Setup .. .. With no disc in the player, select "password" using the left/ right buttons; Password Change Change Password Figure 15.
... Figure 14. SATURATION Screen Display When complete, press "Enter"again to return to enter the "Change Pass word" page. .. then press Enter to the "Video Quality" setup page. PREFERENCE PAGE Screen Display 12 PASSWORD CHANGE Screen Display a) Press the right shift button to exit "Video Quality" setup page. Password Setup Page .. b) Press Setup button to enter the Password Change Submenu. Video Quality Setup .. .. With no disc in the player, select "password" using the left/ right buttons; Password Change Change Password Figure 15.
User Guide
Page 13
... LEFT to confirm the setting. Select 'SUBTITLE' using UP/DOWN, then press 'ENTER' to confirm the setting. Select 'AUDIO' using UP/DOWN, then press 'ENTER' to return. This password is 3308. To avoid the possibility of users while some discs can record this manual. Preference Page .. Select the audio language you have selected your own password and changed it from this default password in the player, select 'PREFERENCES' using the left/right buttons; SUBTITLE Preference Screen Display 13
... LEFT to confirm the setting. Select 'SUBTITLE' using UP/DOWN, then press 'ENTER' to confirm the setting. Select 'AUDIO' using UP/DOWN, then press 'ENTER' to return. This password is 3308. To avoid the possibility of users while some discs can record this manual. Preference Page .. Select the audio language you have selected your own password and changed it from this default password in the player, select 'PREFERENCES' using the left/right buttons; SUBTITLE Preference Screen Display 13

User Guide
Page 14
... .. Audio ENG 1 KID SAF Subtitle ENG 2 G Disc Menu ENG 3 PG Parental 4 PG 13 Default 6 R 7 Nc17 8 ADULT Set Parental Control Figure 20. Select the Disc Menu Language you desire using UP/DOWN, then press 'RIGHT' to return. .. Select 'PARENTAL' using UP/DOWN, then press 'ENTER' to enter the submenu. .. c. If the selected, language is only available for discs with lock-out function or multiple rating levels. d. These are recorded in the disc. Preference Page .. PARENTAL Preference Screen Display Select...
... .. Audio ENG 1 KID SAF Subtitle ENG 2 G Disc Menu ENG 3 PG Parental 4 PG 13 Default 6 R 7 Nc17 8 ADULT Set Parental Control Figure 20. Select the Disc Menu Language you desire using UP/DOWN, then press 'RIGHT' to return. .. Select 'PARENTAL' using UP/DOWN, then press 'ENTER' to enter the submenu. .. c. If the selected, language is only available for discs with lock-out function or multiple rating levels. d. These are recorded in the disc. Preference Page .. PARENTAL Preference Screen Display Select...
User Guide
Page 15
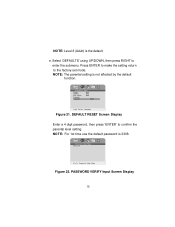
...3308. .. DEFAULT RESET Screen Display Enter a 4 digit password, then press 'ENTER' to enter the submenu. NOTE: For 1st time use the default password is not affected by the default function. .. Password Go To Password Setup Page Figure 22. Select 'DEFAULTS' using UP/DOWN, then press RIGHT to confirm the parental level setting. Preference Page .. e. PASSWORD VERIFY Input Screen Display 15 Press ENTER to make the setting return to the factory-set mode. Password Setup Page .. Audio ENG Subtitle ENG Disc Menu ENG Parental Parental RESET Load Factory Language Figure...
...3308. .. DEFAULT RESET Screen Display Enter a 4 digit password, then press 'ENTER' to enter the submenu. NOTE: For 1st time use the default password is not affected by the default function. .. Password Go To Password Setup Page Figure 22. Select 'DEFAULTS' using UP/DOWN, then press RIGHT to confirm the parental level setting. Preference Page .. e. PASSWORD VERIFY Input Screen Display 15 Press ENTER to make the setting return to the factory-set mode. Password Setup Page .. Audio ENG Subtitle ENG Disc Menu ENG Parental Parental RESET Load Factory Language Figure...

User Guide
Page 16
... Select the audio language Enlarge an image to 2, 3, or 4 times the original Display the setup menu to point B of the disc Display information (title, chapter, track, time, etc.). Basic Operation POWER OPEN PLAY SLOW PAUSE STOP NEXT PREVIOUS FORWARD REVERSE UP/DOWN/LEFT /RIGHT ENTER NUMBERS RETURN MENU REPEAT A-B DISPLAY ANGLE SUBTITLE AUDIO ZOOM SETUP Turn the unit on / off Remove/load the disc Start Play/Execute item or setting Play at 1/2, 1/4, 1/8 or 1/16 times speed Still Picture (1 time) Stop at the present playing point / (2 times) Stop playing...
... Select the audio language Enlarge an image to 2, 3, or 4 times the original Display the setup menu to point B of the disc Display information (title, chapter, track, time, etc.). Basic Operation POWER OPEN PLAY SLOW PAUSE STOP NEXT PREVIOUS FORWARD REVERSE UP/DOWN/LEFT /RIGHT ENTER NUMBERS RETURN MENU REPEAT A-B DISPLAY ANGLE SUBTITLE AUDIO ZOOM SETUP Turn the unit on / off Remove/load the disc Start Play/Execute item or setting Play at 1/2, 1/4, 1/8 or 1/16 times speed Still Picture (1 time) Stop at the present playing point / (2 times) Stop playing...

User Guide
Page 17
... Chapter Number (3), the total Number of the menu vary from disc to select disc playback options using the DVD menu. 3. Press MENU during playback to display the menu, and press ENTER or PLAY to disc. The heading will disappear automatically after 3 seconds if no buttons are pressed. Title Remaining Time Screen Display 17 The contents of Chapters (4), and the Playing Time for the title (5). Figure 24. When you to disc.) 1) PLAYING TIME AND REMAINING TIME a. The...
... Chapter Number (3), the total Number of the menu vary from disc to select disc playback options using the DVD menu. 3. Press MENU during playback to display the menu, and press ENTER or PLAY to disc. The heading will disappear automatically after 3 seconds if no buttons are pressed. Title Remaining Time Screen Display 17 The contents of Chapters (4), and the Playing Time for the title (5). Figure 24. When you to disc.) 1) PLAYING TIME AND REMAINING TIME a. The...

User Guide
Page 20
... normal. 4) AUDIO During playback press 'AUDIO' to select the audio language you desire*, with the current zoom multiple. (1) Press "zoom" once; Figure 30. The audio display will return to select another audio language. Figure 29 Audio Language Screen Display * Some DVDs only allow access to this function through the DVD menu. 5) ZOOM During playback press 'ZOOM' to enlarge the picture by 2x, 3x or 4X with the current Audio Channel Number (1) and the total number of Audio Channels (2) displayed.
... normal. 4) AUDIO During playback press 'AUDIO' to select the audio language you desire*, with the current zoom multiple. (1) Press "zoom" once; Figure 30. The audio display will return to select another audio language. Figure 29 Audio Language Screen Display * Some DVDs only allow access to this function through the DVD menu. 5) ZOOM During playback press 'ZOOM' to enlarge the picture by 2x, 3x or 4X with the current Audio Channel Number (1) and the total number of Audio Channels (2) displayed.

User Guide
Page 25
... (repeat playback of a song) REPEAT FOLDER (repeat playback of audio quality while taking up much less disc space. The system plays the songs in that have been encoded in MP3 format are compatible with very little loss of a specific folder) 1. Figure 42. PLAYING MP3 DISCS MP3 is inserted into the MP3 format with this system. MENU Screen Display When an MP3 disc is a format for storing digital audio. You can use the menu screen...
... (repeat playback of a song) REPEAT FOLDER (repeat playback of audio quality while taking up much less disc space. The system plays the songs in that have been encoded in MP3 format are compatible with very little loss of a specific folder) 1. Figure 42. PLAYING MP3 DISCS MP3 is inserted into the MP3 format with this system. MENU Screen Display When an MP3 disc is a format for storing digital audio. You can use the menu screen...
User Guide
Page 29
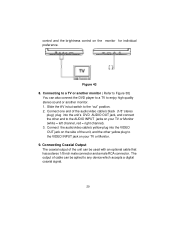
... to any device which accepts a digital coaxial signal. 29 Connecting Coaxial Output The coaxial output of cable can be used with an optional cable that has a stereo 1/8 inch male connector and a male RCA connector. The output of the unit can also connect the DVD player to a TV to the "out" position. 2. Slide the AV in/out switch to enjoy high quality stereo sound or another...
... to any device which accepts a digital coaxial signal. 29 Connecting Coaxial Output The coaxial output of cable can be used with an optional cable that has a stereo 1/8 inch male connector and a male RCA connector. The output of the unit can also connect the DVD player to a TV to the "out" position. 2. Slide the AV in/out switch to enjoy high quality stereo sound or another...

User Guide
Page 30
Specifications Disc format: DVD/CD/MP3 Color system: NTSC Screen size: 7.0'' DVD video format: Horizontal 720 pixel, vertical 480 pixel (NTSC) Frequency response: DVD (PCM 96 kHz/24 bits ): 20 Hz to 44 kHz DVD (PCM 48 kHz): 20 Hz to 22 kHz CD: 20 Hz to first use. 30 Li-ION batteries feature high storage capacity and low level of long-life NiMH batteries for purchasing...
Specifications Disc format: DVD/CD/MP3 Color system: NTSC Screen size: 7.0'' DVD video format: Horizontal 720 pixel, vertical 480 pixel (NTSC) Frequency response: DVD (PCM 96 kHz/24 bits ): 20 Hz to 44 kHz DVD (PCM 48 kHz): 20 Hz to 22 kHz CD: 20 Hz to first use. 30 Li-ION batteries feature high storage capacity and low level of long-life NiMH batteries for purchasing...

User Guide
Page 31
... power input will light up red. Please remove battery from the player and store properly if the player is used for approximately 3 hours. Please under no circumstances short out the battery, store the battery in a metal container, or leave the battery in the off position. Please make sure you may remove the wall plug and cease charging. To charge the battery, please connect the power jack directly into the D1705...
... power input will light up red. Please remove battery from the player and store properly if the player is used for approximately 3 hours. Please under no circumstances short out the battery, store the battery in a metal container, or leave the battery in the off position. Please make sure you may remove the wall plug and cease charging. To charge the battery, please connect the power jack directly into the D1705...
User Guide
Page 32
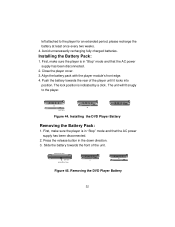
... the battery towards the rear of the unit. Close the player cover. 3. Avoid unnecessarily recharging fully charged batteries. Installing the Battery Pack: 1. Push the battery towards the front of the player until it locks into position. Align the battery pack with the player module's front edge. 4. The lock position is in the down direction. 3. Installing the DVD Player Battery Removing the Battery Pack: 1. Press the release button in "Stop" mode and that the AC power...
... the battery towards the rear of the unit. Close the player cover. 3. Avoid unnecessarily recharging fully charged batteries. Installing the Battery Pack: 1. Push the battery towards the front of the player until it locks into position. Align the battery pack with the player module's front edge. 4. The lock position is in the down direction. 3. Installing the DVD Player Battery Removing the Battery Pack: 1. Press the release button in "Stop" mode and that the AC power...
User Guide
Page 33
... charge for the Company any part thereof, under normal use and conditions, be proven defective in material or workmanship within the terms of this Warranty, the product is in the opinion of the Company, has suffered or been damaged through alteration, improper installation, mishandling, misuse, neglect, accident, or by removal or defacement of the factory serial number/bar code label...
... charge for the Company any part thereof, under normal use and conditions, be proven defective in material or workmanship within the terms of this Warranty, the product is in the opinion of the Company, has suffered or been damaged through alteration, improper installation, mishandling, misuse, neglect, accident, or by removal or defacement of the factory serial number/bar code label...


