User Guide
Page 4
... to DC adapter into the cigarette lighter socket. 4 Some playback operations of the system only. 6. Contents 1. 1 x 7.0'' LCD Monitor & DVD Player Combo 2. 1 x AC to the instructions supplied with the discs. Handle the disc by software producers. C. 5. Do not use irregularly shaped ... with water for cleaning the exterior of discs may not be intentionally fixed by its case after playing. Also refer to DC Adapter 3. 1 x Rechargeable Battery 4. 1 x Remote Control 5. 1 x Instruction Manual 6. 1 x Audio/Video Cable 7. 1 x Cigarette Lighter Adapter D. Disc Do not use liquid...
... to DC adapter into the cigarette lighter socket. 4 Some playback operations of the system only. 6. Contents 1. 1 x 7.0'' LCD Monitor & DVD Player Combo 2. 1 x AC to the instructions supplied with the discs. Handle the disc by software producers. C. 5. Do not use irregularly shaped ... with water for cleaning the exterior of discs may not be intentionally fixed by its case after playing. Also refer to DC Adapter 3. 1 x Rechargeable Battery 4. 1 x Remote Control 5. 1 x Instruction Manual 6. 1 x Audio/Video Cable 7. 1 x Cigarette Lighter Adapter D. Disc Do not use liquid...

User Guide
Page 6
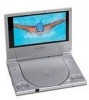
1) Menu 2) Up button 3) Left Button 4) OK Button 5) Down Button 6) Right Button 7) Close disc cover point 8) Open Button 9) Previous Button 10) Stop Button 11) Next Button 12) Play Button 13) Pause Button 14) Screen Mode ( wide) Button 15) Remote Control Sensor 16) Power LED 17) DC 9V Input Jack 18) Audio Jack (L+R) 19) Video Jack 20) AV Input /Output Switch 21) Brightness Up/Down Thumbwheel 22) Power On/ Off Switch 23) Volume Up/Down Thumbwheel 24) Hi-Fi Headphone Jack 25) Coaxial Jack 26) Power Saving Mode Switch (Screen closed shut off switch) 27) Battery Catch 28) Battery Port 6
1) Menu 2) Up button 3) Left Button 4) OK Button 5) Down Button 6) Right Button 7) Close disc cover point 8) Open Button 9) Previous Button 10) Stop Button 11) Next Button 12) Play Button 13) Pause Button 14) Screen Mode ( wide) Button 15) Remote Control Sensor 16) Power LED 17) DC 9V Input Jack 18) Audio Jack (L+R) 19) Video Jack 20) AV Input /Output Switch 21) Brightness Up/Down Thumbwheel 22) Power On/ Off Switch 23) Volume Up/Down Thumbwheel 24) Hi-Fi Headphone Jack 25) Coaxial Jack 26) Power Saving Mode Switch (Screen closed shut off switch) 27) Battery Catch 28) Battery Port 6

User Guide
Page 30
10. Rechargeable Battery Installation and Use The player utilizes a set of whether the battery is specially designed for your player, please consult your dealer for portable power supply. Please fully charge the battery prior to 20 kHz Video output: 1.0 Vp-p/75 Ohm, unbalanced Video S/N: Better than 35 dB ...life NiMH batteries for purchasing the battery pack. Li-ION batteries feature high storage capacity and low level of degradation. The Li-ION battery pack is fully or only partially spent. Specifications Disc format: DVD/CD/MP3 Color system: NTSC Screen size: 7.0'' DVD video ...
10. Rechargeable Battery Installation and Use The player utilizes a set of whether the battery is specially designed for your player, please consult your dealer for portable power supply. Please fully charge the battery prior to 20 kHz Video output: 1.0 Vp-p/75 Ohm, unbalanced Video S/N: Better than 35 dB ...life NiMH batteries for purchasing the battery pack. Li-ION batteries feature high storage capacity and low level of degradation. The Li-ION battery pack is fully or only partially spent. Specifications Disc format: DVD/CD/MP3 Color system: NTSC Screen size: 7.0'' DVD video ...

User Guide
Page 31
... (35oC). 3. For periods of whether you first fully charge the battery and store it to the DVD player. Please under no circumstances short out the battery, store the battery in a metal container, or leave the battery in order to use battery power again soon) in a humid or damp environment. At this ...point you always use the battery for at least once every two months to avoid irreparable damage to the battery. To charge the battery, please connect the power jack directly into the D1705 and leave the POWER switch in the off position. Please make...
... (35oC). 3. For periods of whether you first fully charge the battery and store it to the DVD player. Please under no circumstances short out the battery, store the battery in a metal container, or leave the battery in order to use battery power again soon) in a humid or damp environment. At this ...point you always use the battery for at least once every two months to avoid irreparable damage to the battery. To charge the battery, please connect the power jack directly into the D1705 and leave the POWER switch in the off position. Please make...
User Guide
Page 32
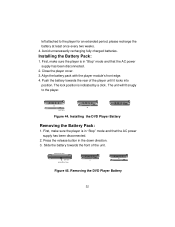
... been disconnected. 2. Removing the DVD Player Battery 32 The unit will fit snugly to the player for an extended period, please recharge the battery at least once every two weeks. 4. FRONT OF PLAYER BATTERY RELEASE BUTTON Figure 45. Push the battery towards the front of the player until it locks into position. Installing the DVD Player Battery Removing the Battery Pack: 1. left attached...
... been disconnected. 2. Removing the DVD Player Battery 32 The unit will fit snugly to the player for an extended period, please recharge the battery at least once every two weeks. 4. FRONT OF PLAYER BATTERY RELEASE BUTTON Figure 45. Push the battery towards the front of the player until it locks into position. Installing the DVD Player Battery Removing the Battery Pack: 1. left attached...


