
User Manual
Page 2
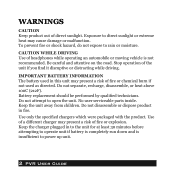
... open the unit. IMPORTANT BATTERY INFORMATION The battery used as directed. Do not attempt to rain or moisture. WARNINGS CAUTION Keep product out of headphones while operating an automobile or moving vehicle is insufficient to power up unit. 2 PVR User Guide Be careful and attentive on the road. Battery replacement should be performed by qualified technicians. No user serviceable parts inside. Use...
... open the unit. IMPORTANT BATTERY INFORMATION The battery used as directed. Do not attempt to rain or moisture. WARNINGS CAUTION Keep product out of headphones while operating an automobile or moving vehicle is insufficient to power up unit. 2 PVR User Guide Be careful and attentive on the road. Battery replacement should be performed by qualified technicians. No user serviceable parts inside. Use...
User Manual
Page 3
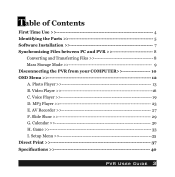
MP3 Player 23 E. Game 33 I. Video Player 16 C. Calendar 30 H. Table of Contents First Time Use 4 Identifying the Parts 5 Software Installation 7 Synchronizing Files between PC and PVR 8 Converting and Transferring Files 8 Mass Storage Mode 9 Disconnecting the PVR from your COMPUTER 10 OSD Menu 12 A. Voice Player 19 D. AV Recorder 27 F. Slide Show 29 G. Setup Menu 35 Direct Print 37 Specifications 40 PVR User Guide 3 Photo Player 13 B.
MP3 Player 23 E. Game 33 I. Video Player 16 C. Calendar 30 H. Table of Contents First Time Use 4 Identifying the Parts 5 Software Installation 7 Synchronizing Files between PC and PVR 8 Converting and Transferring Files 8 Mass Storage Mode 9 Disconnecting the PVR from your COMPUTER 10 OSD Menu 12 A. Voice Player 19 D. AV Recorder 27 F. Slide Show 29 G. Setup Menu 35 Direct Print 37 Specifications 40 PVR User Guide 3 Photo Player 13 B.
User Manual
Page 4
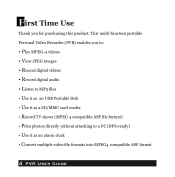
... product. First Time Use Thank you to: • Play MPEG-4 videos • View JPEG images • Record digital videos • Record digital audio • Listen to MP3 files • Use it as an USB Portable Disk • Use it as a SD/MMC card reader • Record TV shows (MPEG 4 compatible ASF file format) • Print photos directly without attaching to a PC (DPS-ready) • Use it as an alarm clock • Convert multiple video...
... product. First Time Use Thank you to: • Play MPEG-4 videos • View JPEG images • Record digital videos • Record digital audio • Listen to MP3 files • Use it as an USB Portable Disk • Use it as a SD/MMC card reader • Record TV shows (MPEG 4 compatible ASF file format) • Print photos directly without attaching to a PC (DPS-ready) • Use it as an alarm clock • Convert multiple video...

User Manual
Page 5
DC IN jack [Power Supply] : Connect the power adapter to DC IN jack while using PVR. [Charge] : Connect the power adapter to DC IN jack to lock/unlock the buttons (including the scroller) on the PVR front panel. Note: The center button of the scroller serves as the OK button on the PVR. 3. Hold Switch to / to charge the battery. PVR User Guide 5 You may press the OK button when you...
DC IN jack [Power Supply] : Connect the power adapter to DC IN jack while using PVR. [Charge] : Connect the power adapter to DC IN jack to lock/unlock the buttons (including the scroller) on the PVR front panel. Note: The center button of the scroller serves as the OK button on the PVR. 3. Hold Switch to / to charge the battery. PVR User Guide 5 You may press the OK button when you...

User Manual
Page 6
Battery Cover 10. Microphone A built-in microphone for voice record. 14. Menu/Stop button Use this AV IN jack while recording TV programs. 6. Earphone jack 7. USB port 8. Speaker 12. Power button 15. Play/Pause/OK button 6 PVR User Guide 4. Record/Vol button 13. SD/MMC CARD slot 9. Mode button Press the Mode button to switch to call up the menu under each mode. 16. AV IN jack Connect the AV cable to this button to different modes. 11. Strap Holder 5.
Battery Cover 10. Microphone A built-in microphone for voice record. 14. Menu/Stop button Use this AV IN jack while recording TV programs. 6. Earphone jack 7. USB port 8. Speaker 12. Power button 15. Play/Pause/OK button 6 PVR User Guide 4. Record/Vol button 13. SD/MMC CARD slot 9. Mode button Press the Mode button to switch to call up the menu under each mode. 16. AV IN jack Connect the AV cable to this button to different modes. 11. Strap Holder 5.
User Manual
Page 7
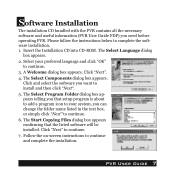
... need before operating PVR. Software Installation The installation CD bundled with the PVR contains all the necessary software and useful information (PVR User Guide PDF) you want to install and then click "Next". 5. Insert the Installation CD into CD-ROM. A Welcome dialog box appears. Click "Next" to continue and complete the installation. Follow the on-screen instructions to continue. 7. The Start Copying Files dialog box appears confirming that setup program...
... need before operating PVR. Software Installation The installation CD bundled with the PVR contains all the necessary software and useful information (PVR User Guide PDF) you want to install and then click "Next". 5. Insert the Installation CD into CD-ROM. A Welcome dialog box appears. Click "Next" to continue and complete the installation. Follow the on-screen instructions to continue. 7. The Start Copying Files dialog box appears confirming that setup program...
User Manual
Page 9
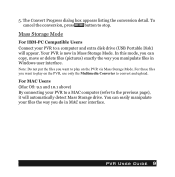
... manipulate files in Windows user interface. In this mode, you can easily manipulate your PVR to stop. You can copy, move or delete files (pictures) exactly the way you do in Mass Storage Mode. The Convert Progress dialog box appears listing the conversion detail. PVR User Guide 9 To cancel the conversion, press button to a computer and extra disk drive (USB Portable Disk) will automatically detect...
... manipulate files in Windows user interface. In this mode, you can easily manipulate your PVR to stop. You can copy, move or delete files (pictures) exactly the way you do in Mass Storage Mode. The Convert Progress dialog box appears listing the conversion detail. PVR User Guide 9 To cancel the conversion, press button to a computer and extra disk drive (USB Portable Disk) will automatically detect...

User Manual
Page 10
... "Eject" from the menu. Select "Stop USB Disk" from the menu (Windows 2000). Drag and drop the drive to the player. 2. Mac OS 9.1 and 10.X above 1. Windows 98SE 1. Select the player icon (shown as 'NO_NAME'or 'untitled' drive) on the removable disk corresponding to the Trash. 10 PVR User Guide Click "Unplug or Eject Hardware" ( ) icon in the taskbar. 2. Select "Stop USB Mass Storage Device" from the menu (Windows ME). Windows 2000...
... "Eject" from the menu. Select "Stop USB Disk" from the menu (Windows 2000). Drag and drop the drive to the player. 2. Mac OS 9.1 and 10.X above 1. Windows 98SE 1. Select the player icon (shown as 'NO_NAME'or 'untitled' drive) on the removable disk corresponding to the Trash. 10 PVR User Guide Click "Unplug or Eject Hardware" ( ) icon in the taskbar. 2. Select "Stop USB Mass Storage Device" from the menu (Windows ME). Windows 2000...

User Manual
Page 12
... screen appears, then the OSD (onscreen display) menu comes up to the year 2036. • The timer record and alarm clock setting can be preset within 24 hours. • Only one for alarm clock music. • It's strongly recommended to turn off the LCD display and plug in the AC adapter while using the PVR for timer record. • When you choose to format the data in...
... screen appears, then the OSD (onscreen display) menu comes up to the year 2036. • The timer record and alarm clock setting can be preset within 24 hours. • Only one for alarm clock music. • It's strongly recommended to turn off the LCD display and plug in the AC adapter while using the PVR for timer record. • When you choose to format the data in...

User Manual
Page 13
... Player To view photos, you want to attach voice narration and press the RECORD button to start recording. Scroll up/down the scroller to select previous/next photo • Press OK button to magnify/shrink the selected photo • Press MENU button to enter Photo Player category. In this category you can review photos, record voice clip, add special effects to enter Display setting...
... Player To view photos, you want to attach voice narration and press the RECORD button to start recording. Scroll up/down the scroller to select previous/next photo • Press OK button to magnify/shrink the selected photo • Press MENU button to enter Photo Player category. In this category you can review photos, record voice clip, add special effects to enter Display setting...

User Manual
Page 14
Scroll up/down to select either to enable or disable the information display and then press the center button of the scroller to enter Effects setting. NEG. Once the effect has applied, it can't be any indicators or key instructions shown on the screen (except low-battery indicator ). 14 PVR User Guide ART/SEPIA/B&W/MOSAIC/NORMAL Scroll down and press the...
Scroll up/down to select either to enable or disable the information display and then press the center button of the scroller to enter Effects setting. NEG. Once the effect has applied, it can't be any indicators or key instructions shown on the screen (except low-battery indicator ). 14 PVR User Guide ART/SEPIA/B&W/MOSAIC/NORMAL Scroll down and press the...
User Manual
Page 18
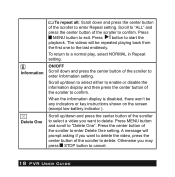
... to delete. Press MENU button to a normal play, select NORMAL in Repeat setting. To return to exit. A message will be any indicators or key instructions shown on the screen (except low-battery indicator ). Scroll up /down to select either to enable or disable the information display and then press the center button of the scroller to delete. Otherwise you may press STOP button to "Delete One...
... to delete. Press MENU button to a normal play, select NORMAL in Repeat setting. To return to exit. A message will be any indicators or key instructions shown on the screen (except low-battery indicator ). Scroll up /down to select either to enable or disable the information display and then press the center button of the scroller to delete. Otherwise you may press STOP button to "Delete One...

User Manual
Page 19
... audio clip during playback. • Press button to pause the playing during playback • Press button to start playing music • Press button to stop playing during playback. Press button again to complete the volume adjustment. • Press MENU button to cancel. ing playback. Voice Player In this folder, press the center button of the scroller to enter Delete All setting. To exit the menu, press MENU again PVR User Guide 19 To enter the Voice Player...
... audio clip during playback. • Press button to pause the playing during playback • Press button to start playing music • Press button to stop playing during playback. Press button again to complete the volume adjustment. • Press MENU button to cancel. ing playback. Voice Player In this folder, press the center button of the scroller to enter Delete All setting. To exit the menu, press MENU again PVR User Guide 19 To enter the Voice Player...

User Manual
Page 27
... scroller to enter the AV Recorder Menu. AV Recorder In this category you can record your favorite TV show directly with PVR or set the time. Scroll up /down to set the SECOND and then press the center button of the scroller to enter. • Press button to start recording • Press button to stop recording during playback • Press MENU button to confirm. Scroll...
... scroller to enter the AV Recorder Menu. AV Recorder In this category you can record your favorite TV show directly with PVR or set the time. Scroll up /down to set the SECOND and then press the center button of the scroller to enter. • Press button to start recording • Press button to stop recording during playback • Press MENU button to confirm. Scroll...

User Manual
Page 31
...User Guide 31 Scroll up/down to change the DAY and then press the center button of the scroller to confirm. Scroll up /down to change the YEAR and then press the center button of the scroller to enter Date/Time setting. To record the change the date setting, press the center of the scroller or press OK button... again. Step 2. To change you've made, scroll down to...
...User Guide 31 Scroll up/down to change the DAY and then press the center button of the scroller to confirm. Scroll up /down to change the YEAR and then press the center button of the scroller to enter Date/Time setting. To record the change the date setting, press the center of the scroller or press OK button... again. Step 2. To change you've made, scroll down to...

User Manual
Page 32
... change the time setting, scroll down to enter Date/Time setting. Step 2. TIME Scroll down and press the center of the scroller to TIME adjustment item, and then press the center button of the scroller. To change the MINUTE and then press the center of the scroller or press OK button to confirm. To exit the menu, press MENU button. 32 PVR User Guide...
... change the time setting, scroll down to enter Date/Time setting. Step 2. TIME Scroll down and press the center of the scroller to TIME adjustment item, and then press the center button of the scroller. To change the MINUTE and then press the center of the scroller or press OK button to confirm. To exit the menu, press MENU button. 32 PVR User Guide...
User Manual
Page 35
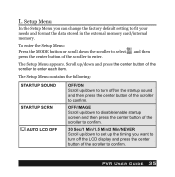
... factory default setting to enter each item. PVR User Guide 35 Setup Menu In the Setup Menu you want to turn off the LCD display and press the center button of the scroller to confirm. To enter the Setup Menu: Press the MODE button or scroll down to turn off /on the startup sound and then press the center button of the scroller to fit your needs and format the data...
... factory default setting to enter each item. PVR User Guide 35 Setup Menu In the Setup Menu you want to turn off the LCD display and press the center button of the scroller to confirm. To enter the Setup Menu: Press the MODE button or scroll down to turn off /on the startup sound and then press the center button of the scroller to fit your needs and format the data...
User Manual
Page 37
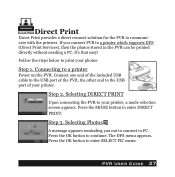
... of the included USB cable to the USB port of the PVR, the other end to communicate with the printers. Press the MODE button to print your printer, a mode selection screen appears. PVR User Guide 37 It's that easy! Follow the steps below to enter DIRECT PRINT. Step 2. Connecting to your photos: Step 1. Selecting DIRECT PRINT Upon connecting the PVR to a printer Power on the...
... of the included USB cable to the USB port of the PVR, the other end to communicate with the printers. Press the MODE button to print your printer, a mode selection screen appears. PVR User Guide 37 It's that easy! Follow the steps below to enter DIRECT PRINT. Step 2. Connecting to your photos: Step 1. Selecting DIRECT PRINT Upon connecting the PVR to a printer Power on the...
User Manual
Page 40
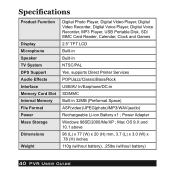
... Card Slot Internal Memory File Format Power Mass Storage Dimensions Weight Digital Photo Player, Digital Video Player, Digital Video Recorder, Digital Voice Player, Digital Voice Recorder, MP3 Player, USB Portable Disk, SD/ MMC Card Reader, Calendar, Clock and Games 2.5" TFT LCD Built-in Built-in NTSC/PAL Yes, supports Direct Printer Services POP/Jazz/Classic/Bass/Rock USB/AV In/Earphone/DC-in SD/MMC Built-in 32MB (Preformat Space) ASF(video)/JPEG(photo)/MP3/WAV(audio) Rechargeable Li-ion Battery x1 ; Power Adapter Windows...
... Card Slot Internal Memory File Format Power Mass Storage Dimensions Weight Digital Photo Player, Digital Video Player, Digital Video Recorder, Digital Voice Player, Digital Voice Recorder, MP3 Player, USB Portable Disk, SD/ MMC Card Reader, Calendar, Clock and Games 2.5" TFT LCD Built-in Built-in NTSC/PAL Yes, supports Direct Printer Services POP/Jazz/Classic/Bass/Rock USB/AV In/Earphone/DC-in SD/MMC Built-in 32MB (Preformat Space) ASF(video)/JPEG(photo)/MP3/WAV(audio) Rechargeable Li-ion Battery x1 ; Power Adapter Windows...

User Manual
Page 41
... the product, or damage to tapes, discs, speakers, accessories, or electrical systems. This Warranty does not apply to any part thereof, under normal use and conditions, be proven defective in the opinion of the Company, has suffered or been damaged through alteration, improper installation, mishandling, misuse, neglect, accident, or by removal or defacement of the factory serial number/bar code label...
... the product, or damage to tapes, discs, speakers, accessories, or electrical systems. This Warranty does not apply to any part thereof, under normal use and conditions, be proven defective in the opinion of the Company, has suffered or been damaged through alteration, improper installation, mishandling, misuse, neglect, accident, or by removal or defacement of the factory serial number/bar code label...


