Instruction Manual
Page 1
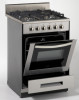
... en la página 27 Avanti Products has a policy of The Mackle Co., Inc. P.O. Miami, Florida 33152 www.avantiproducts.com de Modelos: DG2450SS Stainless Steel DG2451W White DG2450SS-1 Stainless Steel DG2452B Black GAS RANGE COCINA DE GAS BEFORE USE, PLEASE READ AND FOLLOW ALL SAFETY RULES AND OPERATING INSTRUCTIONS. INSTRUCTION MANUAL MANUAL DE INSTRUCCIONES Model Numbers / Nos. AND SAVE FOR LOCAL GAS AND ELECTRICAL INSPECTOR'S USE. Box 520604 -
... en la página 27 Avanti Products has a policy of The Mackle Co., Inc. P.O. Miami, Florida 33152 www.avantiproducts.com de Modelos: DG2450SS Stainless Steel DG2451W White DG2450SS-1 Stainless Steel DG2452B Black GAS RANGE COCINA DE GAS BEFORE USE, PLEASE READ AND FOLLOW ALL SAFETY RULES AND OPERATING INSTRUCTIONS. INSTRUCTION MANUAL MANUAL DE INSTRUCCIONES Model Numbers / Nos. AND SAVE FOR LOCAL GAS AND ELECTRICAL INSPECTOR'S USE. Box 520604 -

Instruction Manual
Page 3
... may result in Manufacturered (Mobile) Homes: The installation must conform with the National Fuel Gas Code, ANSI Z223.1 / NFPA.54, latest edition.... YOU BEGIN! Warning means that can happen if the instructions are very important. All safety messages will follow the Safety...installed by a licensed plumber or gas fitter. • When using ball-type gas shut-off valves, they shall be the T-handle type. • A flexible gas connector, when used, must not exceed 3 feet in this range must conform with the Manufactured Home Construction and Safety standard, Title 24 CFR, Part...
... may result in Manufacturered (Mobile) Homes: The installation must conform with the National Fuel Gas Code, ANSI Z223.1 / NFPA.54, latest edition.... YOU BEGIN! Warning means that can happen if the instructions are very important. All safety messages will follow the Safety...installed by a licensed plumber or gas fitter. • When using ball-type gas shut-off valves, they shall be the T-handle type. • A flexible gas connector, when used, must not exceed 3 feet in this range must conform with the Manufactured Home Construction and Safety standard, Title 24 CFR, Part...

Instruction Manual
Page 4
... fire, electrical shock or injury when using a lift jack) also increases the possibility of your area. 4 Do not push against any other servicing should be used for cleaning and/or service: • Disconnect AC power supply. • Carefully remove the range by a switch or pull chain. • Never clean appliance parts with cleaning and maintenance operations, make several adjustments to the appliance before cleaning or servicing. Only authorized replacement parts may...
... fire, electrical shock or injury when using a lift jack) also increases the possibility of your area. 4 Do not push against any other servicing should be used for cleaning and/or service: • Disconnect AC power supply. • Carefully remove the range by a switch or pull chain. • Never clean appliance parts with cleaning and maintenance operations, make several adjustments to the appliance before cleaning or servicing. Only authorized replacement parts may...
Instruction Manual
Page 7
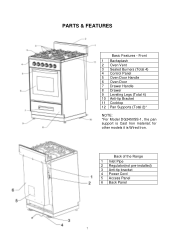
PARTS & FEATURES Basic Features - Back of the Range 1 Inlet Pipe 2 Regulator(not pre-installed) 3 Anti-tip bracket 4 Power Cord 5 Access Panel 6 Back Panel 7 Front 1 Backsplash 2 Oven Vent 3 Sealed Burners (Total 4) 4 Control Panel 5 Oven Door Handle 6 Oven Door 7 Drawer Handle 8 Drawer 9 Leveling Legs (Total 4) 10 Anti-tip Bracket 11 Cooktop 12 Pan Supports (Total 2)* NOTE: *For Model DG2450SS-1, the pan support is Wired Iron. for other models it is Cast Iron material;
PARTS & FEATURES Basic Features - Back of the Range 1 Inlet Pipe 2 Regulator(not pre-installed) 3 Anti-tip bracket 4 Power Cord 5 Access Panel 6 Back Panel 7 Front 1 Backsplash 2 Oven Vent 3 Sealed Burners (Total 4) 4 Control Panel 5 Oven Door Handle 6 Oven Door 7 Drawer Handle 8 Drawer 9 Leveling Legs (Total 4) 10 Anti-tip Bracket 11 Cooktop 12 Pan Supports (Total 2)* NOTE: *For Model DG2450SS-1, the pan support is Wired Iron. for other models it is Cast Iron material;
Instruction Manual
Page 8
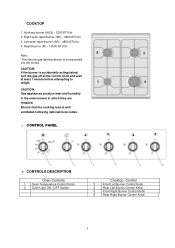
... produce heat and humidity in the environment in which they are installed. Right semi-rapid burner (SR) - 4800 BTU/hr 3. Ensure that the cooking area is accidentally extinguished, turn the gas off at the control knob and wait at least 1 minute before attempting to relight. CAUTION: If the burner is well ventilated following national/local codes. CONTROL PANEL CONTROLS DESCRIPTION Oven Controls 1 Oven Temperature Control Knob 2 Oven Light ON / OFF Switch Cooktop Control...
... produce heat and humidity in the environment in which they are installed. Right semi-rapid burner (SR) - 4800 BTU/hr 3. Ensure that the cooking area is accidentally extinguished, turn the gas off at the control knob and wait at least 1 minute before attempting to relight. CAUTION: If the burner is well ventilated following national/local codes. CONTROL PANEL CONTROLS DESCRIPTION Oven Controls 1 Oven Temperature Control Knob 2 Oven Light ON / OFF Switch Cooktop Control...
Instruction Manual
Page 9
... cook top) ● 1 Instruction Manual ● 1 Installation Manual √ Clean the interior surface with lukewarm water using a soft cloth √ Have the installer show you the location of the range's gas shut-off valve and how to shut it is specifically recommended in the burner assembly ● 1 Broiler Grid ● 1 Broiler Tray ● 1 Regulator ● 1 Regulator Connector ● 5 Screws(3 pcs were pre-installed on steel and aluminum parts √Check to repair or replace any part...
... cook top) ● 1 Instruction Manual ● 1 Installation Manual √ Clean the interior surface with lukewarm water using a soft cloth √ Have the installer show you the location of the range's gas shut-off valve and how to shut it is specifically recommended in the burner assembly ● 1 Broiler Grid ● 1 Broiler Tray ● 1 Regulator ● 1 Regulator Connector ● 5 Screws(3 pcs were pre-installed on steel and aluminum parts √Check to repair or replace any part...
Instruction Manual
Page 10
...; Turn the oven on to the maximum temperature to eliminate any non domestic application and therefore CANNOT be void if the appliance is advised to follow these instructions: √ Clean the interior of the oven with a clean cloth soaked in compliance with the applicable regulations. The appliance guarantee will be used within a non domestic environment i.e. Read the instructions carefully before installing and using...
...; Turn the oven on to the maximum temperature to eliminate any non domestic application and therefore CANNOT be void if the appliance is advised to follow these instructions: √ Clean the interior of the oven with a clean cloth soaked in compliance with the applicable regulations. The appliance guarantee will be used within a non domestic environment i.e. Read the instructions carefully before installing and using...
Instruction Manual
Page 11
... health and environmental protection regulations, ensuring in use kitchen clothes and gloves when handling hot parts or utensils. √ Stand away from the range when opening oven door. Hot air or steam which escapes can cause burns to hands, face, and/or eyes. √ Never clean the oven with aluminium foil. In case of doubt, do not use , ensure that electrical cables connecting other unqualified people to...
... health and environmental protection regulations, ensuring in use kitchen clothes and gloves when handling hot parts or utensils. √ Stand away from the range when opening oven door. Hot air or steam which escapes can cause burns to hands, face, and/or eyes. √ Never clean the oven with aluminium foil. In case of doubt, do not use , ensure that electrical cables connecting other unqualified people to...

Instruction Manual
Page 12
... power supply. Do not push against any electrical appliance implies the necessity to follow a series of fundamental rules. In particular: ✓ Never touch the appliance with wet hands or feet; ✓ Do not operate the appliance barefooted; ✓ Do not allow children or disabled people to use care in handling. 7. This information is heavy; Shut off gas at main supply. C. AlI openings...
... power supply. Do not push against any electrical appliance implies the necessity to follow a series of fundamental rules. In particular: ✓ Never touch the appliance with wet hands or feet; ✓ Do not operate the appliance barefooted; ✓ Do not allow children or disabled people to use care in handling. 7. This information is heavy; Shut off gas at main supply. C. AlI openings...

Instruction Manual
Page 13
... gas range must be installed with all electrical connections in accordance with national and local codes. REPLACEMENT PARTS Only authorized replacement parts may be plugged directly into a properly grounded socket. Contact the nearest AVANTI parts distributor in performing service on the range. The CO generated during the operation will have a normal CO level of less than 5 PPM.) NON-VENTED GAS COOKING APPLIANCES: In a residential application are available from the power plug. All gas...
... gas range must be installed with all electrical connections in accordance with national and local codes. REPLACEMENT PARTS Only authorized replacement parts may be plugged directly into a properly grounded socket. Contact the nearest AVANTI parts distributor in performing service on the range. The CO generated during the operation will have a normal CO level of less than 5 PPM.) NON-VENTED GAS COOKING APPLIANCES: In a residential application are available from the power plug. All gas...

Instruction Manual
Page 14
... the operations for lighting. To re-light the burner, return the knob to light the burner in the HI position, try again with concave or convex bases 14 When the range is not being used, set the gas knobs to their OFF positions and also close the gas shut-off valve placed on the panel achieves the following functions: When knob is adjusted by turning the knobs which control the valves. Adjust the gas valve to...
... the operations for lighting. To re-light the burner, return the knob to light the burner in the HI position, try again with concave or convex bases 14 When the range is not being used, set the gas knobs to their OFF positions and also close the gas shut-off valve placed on the panel achieves the following functions: When knob is adjusted by turning the knobs which control the valves. Adjust the gas valve to...
Instruction Manual
Page 15
... these instructions - It is advised to 10,000 BTU on this unit range from the oven burner. Altitude effects on burners: The surface burners used on natural gas installation under 2,000 feet above the gas knobs indicate the correspondence between the knob and the burner. Insert shelves and tray - A small diameter pot or pan placed on to the maximum temperature (position 500) to eliminate possible traces of gas fuel. Switch off the electrical supply...
... these instructions - It is advised to 10,000 BTU on this unit range from the oven burner. Altitude effects on burners: The surface burners used on natural gas installation under 2,000 feet above the gas knobs indicate the correspondence between the knob and the burner. Insert shelves and tray - A small diameter pot or pan placed on to the maximum temperature (position 500) to eliminate possible traces of gas fuel. Switch off the electrical supply...
Instruction Manual
Page 16
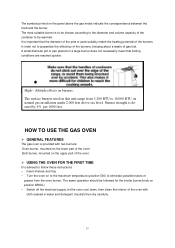
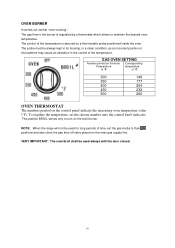
... gas shut-off valve placed on the main gas supply line. The control of the temperature. NOTE: When the range will not be used for long periods of time, set the chosen number onto the control knob indicator. VERY IMPORTANT: The oven/broil shall be used always with the door closed. 16 GAS OVEN SETTING Number printed on the knob Corresponding Temperature temperature in °F in the control of the temperature is regulated by a thermostatic probe positioned inside the oven. To regulate the temperature, set the gas knobs...
... gas shut-off valve placed on the main gas supply line. The control of the temperature. NOTE: When the range will not be used for long periods of time, set the chosen number onto the control knob indicator. VERY IMPORTANT: The oven/broil shall be used always with the door closed. 16 GAS OVEN SETTING Number printed on the knob Corresponding Temperature temperature in °F in the control of the temperature is regulated by a thermostatic probe positioned inside the oven. To regulate the temperature, set the gas knobs...

Instruction Manual
Page 17
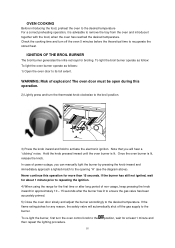
... turn the oven control knob to its full extent. To re-light the burner, first turn the thermostat knob counter-clockwise to max position or 500ºF A 3) Press the knob inward and hold to activate the electronic ignition. To light the oven burner operate as follows: 1) Open the oven door to the then repeat the lighting procedure. WARNING: Risk of power outage, you will automatically shut off the gas supply to the opening "A" (see the diagram...
... turn the oven control knob to its full extent. To re-light the burner, first turn the thermostat knob counter-clockwise to max position or 500ºF A 3) Press the knob inward and hold to activate the electronic ignition. To light the oven burner operate as follows: 1) Open the oven door to the then repeat the lighting procedure. WARNING: Risk of power outage, you will automatically shut off the gas supply to the opening "A" (see the diagram...
Instruction Manual
Page 18
... ignition. 4) When using the range for the first time or after long period of non-usage, keep pressing the knob inward for approximately 10 - 15 seconds after the burner has lit to ensure the gas valve has been accurately primed. 5) Close the oven door slowly and adjust the burner accordingly to its full extent. To re-light the burner, first turn the thermostat knob clockwise to the broil...
... ignition. 4) When using the range for the first time or after long period of non-usage, keep pressing the knob inward for approximately 10 - 15 seconds after the burner has lit to ensure the gas valve has been accurately primed. 5) Close the oven door slowly and adjust the burner accordingly to its full extent. To re-light the burner, first turn the thermostat knob clockwise to the broil...

Instruction Manual
Page 20
... products. STAINLESS STEEL ELEMENTS Stainless steel parts must be cleaned after every use, using cleaning products with a cloth soaked in the gas valves, shut the main gas supply and call the Service Department. 20 INSIDE OF OVEN This must be cleaned with a chamois leather. Note: regular use a specific non-abrasive product available commercially or a little hot vinegar. GAS VALVES In the event of the high flame temperature. The oven must be rinsed...
... products. STAINLESS STEEL ELEMENTS Stainless steel parts must be cleaned after every use, using cleaning products with a cloth soaked in the gas valves, shut the main gas supply and call the Service Department. 20 INSIDE OF OVEN This must be cleaned with a chamois leather. Note: regular use a specific non-abrasive product available commercially or a little hot vinegar. GAS VALVES In the event of the high flame temperature. The oven must be rinsed...
Instruction Manual
Page 23
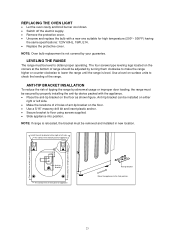
... or improper door loading, the range must be level to check the leveling of range should be adjusted by your guarantee. REPLACING THE OVEN LIGHT • Let the oven cavity and broil burner cool down. • Switch off the electric supply. • Remove the protective cover. • Unscrew and replace the bulb with the appliance. • Place the anti-tip bracket on the floor as shown figure. NOTE: Oven bulb replacement is not covered by turning them...
... or improper door loading, the range must be level to check the leveling of range should be adjusted by your guarantee. REPLACING THE OVEN LIGHT • Let the oven cavity and broil burner cool down. • Switch off the electric supply. • Remove the protective cover. • Unscrew and replace the bulb with the appliance. • Place the anti-tip bracket on the floor as shown figure. NOTE: Oven bulb replacement is not covered by turning them...

Instruction Manual
Page 24
.... Lightly fan the flame and allow burner to open ports. PROBLEMS WITH YOUR GAS RANGE? Light pilots manually. Use a small gauge wire or needle to operate until flame is set at the desired temperature. Make sure temperature control is plugged into grounded outlet. Be sure the power cord is set at desired temperature. Oven or broiler does not heat. Dust particles in range "Cleaning" section. Range cord is orange. Do not increase fuse capacity. Burner ports are clogged. See range conversion section of installation manual. Check/reset circuit breaker...
.... Lightly fan the flame and allow burner to open ports. PROBLEMS WITH YOUR GAS RANGE? Light pilots manually. Use a small gauge wire or needle to operate until flame is set at the desired temperature. Make sure temperature control is plugged into grounded outlet. Be sure the power cord is set at desired temperature. Oven or broiler does not heat. Dust particles in range "Cleaning" section. Range cord is orange. Do not increase fuse capacity. Burner ports are clogged. See range conversion section of installation manual. Check/reset circuit breaker...
Instruction Manual
Page 25
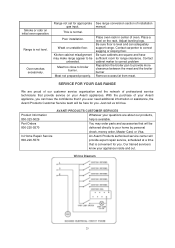
... not prepared properly. Adjust leveling legs. Contact cabinet maker to correct problem Reposition the broiler pan to broiler burner. Just call us toll-free. An Avanti Products authorized service center will provide expert repair service, scheduled at a time that if you can adequately support range. Wiring Diagram 25 Weak or unstable floor. Kitchen cabinet misalignment may order parts and accessories that provide service on your Avanti appliance, you ever need additional...
... not prepared properly. Adjust leveling legs. Contact cabinet maker to correct problem Reposition the broiler pan to broiler burner. Just call us toll-free. An Avanti Products authorized service center will provide expert repair service, scheduled at a time that if you can adequately support range. Wiring Diagram 25 Weak or unstable floor. Kitchen cabinet misalignment may order parts and accessories that provide service on your Avanti appliance, you ever need additional...
Parts and Accessories
Page 4
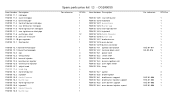
....5 oven light switch FS01SS 15.6 lamp FS01SS 15.7 igniter FS01SS 15.8 broiler igniter FS01SS 16.1 broil burner support FS01SS 16.2 broil burner injector support FS01SS 16.3 oven burner support FS01SS 16.4 oven burner injector suport For reference RKZ-01-011 RQ-02-016 RKZ-01-006 RKZ-01-004 RKZ-01-005 RKZ-01-008 QTY/Pce 1 1 1 1 1 1 1 1 1 1 4 1 1 1 1 1 1 1 1 4 2 1 1 1 1 DG2450SS For reference QTY/Pc 1 1 1 1 1 1 1 12 1 1 1 1 1 4 5 2 1 1 6 6 1 1 1 1 1 1 1 1 Item Number Description FS01SS 13.9 rear left burner...
....5 oven light switch FS01SS 15.6 lamp FS01SS 15.7 igniter FS01SS 15.8 broiler igniter FS01SS 16.1 broil burner support FS01SS 16.2 broil burner injector support FS01SS 16.3 oven burner support FS01SS 16.4 oven burner injector suport For reference RKZ-01-011 RQ-02-016 RKZ-01-006 RKZ-01-004 RKZ-01-005 RKZ-01-008 QTY/Pce 1 1 1 1 1 1 1 1 1 1 4 1 1 1 1 1 1 1 1 4 2 1 1 1 1 DG2450SS For reference QTY/Pc 1 1 1 1 1 1 1 12 1 1 1 1 1 4 5 2 1 1 6 6 1 1 1 1 1 1 1 1 Item Number Description FS01SS 13.9 rear left burner...


