
Instruction Manual
Page 1
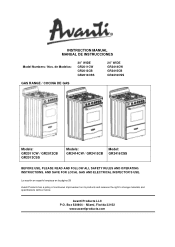
... reserves the right to change materials and specifications without notice. Box 520604 - Avanti Products LLC P.O. INSTRUCTION MANUAL MANUAL DE INSTRUCCIONES Model Numbers / Nos. de Modelos: 20" WIDE GR2011CW GR2012CB GR2013CSS 24" WIDE GR2414CW GR2415CB GR2416CSS GAS RANGE / COCINA DE GAS Models: GR2011CW / GR2012CB GR2013CSS Models: Model: GR2414CW / GR2415CB GR2416CSS BEFORE USE, PLEASE READ AND FOLLOW ALL SAFETY RULES AND OPERATING INSTRUCTIONS. AND SAVE FOR LOCAL GAS AND ELECTRICAL INSPECTOR'S USE. Miami, Florida 33152...
... reserves the right to change materials and specifications without notice. Box 520604 - Avanti Products LLC P.O. INSTRUCTION MANUAL MANUAL DE INSTRUCCIONES Model Numbers / Nos. de Modelos: 20" WIDE GR2011CW GR2012CB GR2013CSS 24" WIDE GR2414CW GR2415CB GR2416CSS GAS RANGE / COCINA DE GAS Models: GR2011CW / GR2012CB GR2013CSS Models: Model: GR2414CW / GR2415CB GR2416CSS BEFORE USE, PLEASE READ AND FOLLOW ALL SAFETY RULES AND OPERATING INSTRUCTIONS. AND SAVE FOR LOCAL GAS AND ELECTRICAL INSPECTOR'S USE. Miami, Florida 33152...
Instruction Manual
Page 3
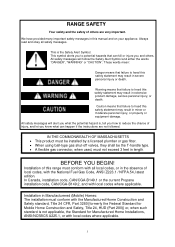
... if the instructions are very important. Caution means that can kill or injure you know what the potential hazard is, tell you how to heed this manual and on your appliance. RANGE SAFETY Your safety and the safety of local codes, with the National Fuel Gas Code, ANSI Z223.1 / NFPA.54, latest edition. In Canada, installation code, CAN/CGA...
... if the instructions are very important. Caution means that can kill or injure you know what the potential hazard is, tell you how to heed this manual and on your appliance. RANGE SAFETY Your safety and the safety of local codes, with the National Fuel Gas Code, ANSI Z223.1 / NFPA.54, latest edition. In Canada, installation code, CAN/CGA...
Instruction Manual
Page 4
... electrical code requirements. • Replacement Parts - Use care in handling. • The misuse of bending the leg spindles or the internal coupling connectors. • It is important for space heating. IMPORTANT SAFE GUIDES Before the appliance is used, it must be installed and grounded by a qualified technician in accordance with cleaning and maintenance operations, make several adjustments to level it. • Never allow children to repair or replace...
... electrical code requirements. • Replacement Parts - Use care in handling. • The misuse of bending the leg spindles or the internal coupling connectors. • It is important for space heating. IMPORTANT SAFE GUIDES Before the appliance is used, it must be installed and grounded by a qualified technician in accordance with cleaning and maintenance operations, make several adjustments to level it. • Never allow children to repair or replace...
Instruction Manual
Page 8
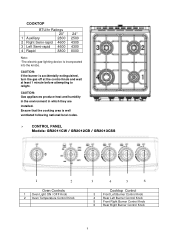
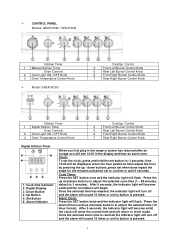
... 4300 8000 Note: -The electric gas-lighting device is well ventilated following national/local codes. CONTROL PANEL Models: GR2011CW / GR2012CB / GR2013CSS 1 2 Oven Controls 1 Oven Light ON / OFF Knob 2 Oven Temperature Control Knob 3 4 5 6 Cooktop Control 3 Front Left Burner Control Knob 4 Rear Left Burner Control Knob 5 Front Right Burner Control Knob 6 Rear Right Burner Control Knob 8 CAUTION: Gas appliances produce heat and humidity in the environment in which they are installed. Ensure that the cooking area is incorporated into the knobs. CAUTION: If the...
... 4300 8000 Note: -The electric gas-lighting device is well ventilated following national/local codes. CONTROL PANEL Models: GR2011CW / GR2012CB / GR2013CSS 1 2 Oven Controls 1 Oven Light ON / OFF Knob 2 Oven Temperature Control Knob 3 4 5 6 Cooktop Control 3 Front Left Burner Control Knob 4 Rear Left Burner Control Knob 5 Front Right Burner Control Knob 6 Rear Right Burner Control Knob 8 CAUTION: Gas appliances produce heat and humidity in the environment in which they are installed. Ensure that the cooking area is incorporated into the knobs. CAUTION: If the...
Instruction Manual
Page 9
..., the clock will show the current time and will begin. After 5 seconds, the indicator light will become solid and the countdown will return to adjust the selected cook-time (1 - 99 minutes, default is 3 minutes). CONTROL PANEL Models: GR2414CW / GR2415CB Kitchen Timer 1 Manual Kitchen Timer Oven Controls 2 Oven Light ON / OFF Knob 3 Oven Temperature Control Knob Model: GR2416CSS Cooktop Control 4 Front Left Burner Control Knob 5 Rear Left Burner Control Knob 6 Front Right Burner Control Knob 7 Rear Right Burner Control Knob Kitchen Timer 1 Digital...
..., the clock will show the current time and will begin. After 5 seconds, the indicator light will become solid and the countdown will return to adjust the selected cook-time (1 - 99 minutes, default is 3 minutes). CONTROL PANEL Models: GR2414CW / GR2415CB Kitchen Timer 1 Manual Kitchen Timer Oven Controls 2 Oven Light ON / OFF Knob 3 Oven Temperature Control Knob Model: GR2416CSS Cooktop Control 4 Front Left Burner Control Knob 5 Rear Left Burner Control Knob 6 Front Right Burner Control Knob 7 Rear Right Burner Control Knob Kitchen Timer 1 Digital...
Instruction Manual
Page 10
... the parts listed below ● 1 Backsplash ● LP Gas Conversion Packet(injectors for LP gas, 6pcs) ● 1 Anti-tip bracket ● 2 Pan supports ● 2 Oven racks ● 4 Caps and bases in the burner assembly ● 1 Broiler Grid ● 1 Broiler Tray ● 1 Regulator(Pre-installed) ● 5 Screws for Backsplash ● 1 Instruction Manual ● 1 Installation Manual √ Clean the interior surface with lukewarm water using a soft cloth √ Have the installer show you the location of the range's gas shut-off valve...
... the parts listed below ● 1 Backsplash ● LP Gas Conversion Packet(injectors for LP gas, 6pcs) ● 1 Anti-tip bracket ● 2 Pan supports ● 2 Oven racks ● 4 Caps and bases in the burner assembly ● 1 Broiler Grid ● 1 Broiler Tray ● 1 Regulator(Pre-installed) ● 5 Screws for Backsplash ● 1 Instruction Manual ● 1 Installation Manual √ Clean the interior surface with lukewarm water using a soft cloth √ Have the installer show you the location of the range's gas shut-off valve...
Instruction Manual
Page 11
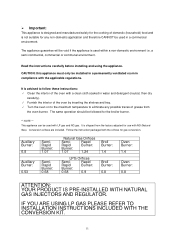
... Burner: 0.68 Natural Gas Orifices Semi- Rapid Rapid Burner: Burner: 1.07 1.24 LPG Orifices Semi- CAUTION: this appliance must only be void if the appliance is used with NG (Natural Gas). Conversion orifices are included. Follow the instruction packaged with the applicable regulations. a semi commercial, commercial or communal environment. Rapid Rapid Burner: Burner: 0.68 0.9 Broil Burner: 1.4 Broil Burner: 0.8 Oven Burner: 1.4 Oven Burner: 0.8 ATTENTION: YOUR PRODUCT IS PRE-INSTALLED WITH NATURAL GAS INJECTORS AND REGULATOR. The same operation should be used...
... Burner: 0.68 Natural Gas Orifices Semi- Rapid Rapid Burner: Burner: 1.07 1.24 LPG Orifices Semi- CAUTION: this appliance must only be void if the appliance is used with NG (Natural Gas). Conversion orifices are included. Follow the instruction packaged with the applicable regulations. a semi commercial, commercial or communal environment. Rapid Rapid Burner: Burner: 0.68 0.9 Broil Burner: 1.4 Broil Burner: 0.8 Oven Burner: 1.4 Oven Burner: 0.8 ATTENTION: YOUR PRODUCT IS PRE-INSTALLED WITH NATURAL GAS INJECTORS AND REGULATOR. The same operation should be used...
Instruction Manual
Page 12
... electric power supply. √ If you should be carried out by qualified service personnel only. √ Danger of burns! Do not store flammable material in the oven or in the bottom drawer. √ Make sure that the oven door closes correctly. Make sure children are in use kitchen clothes and gloves when handling hot parts or utensils. √ Stand away from the range when opening oven door...
... electric power supply. √ If you should be carried out by qualified service personnel only. √ Danger of burns! Do not store flammable material in the oven or in the bottom drawer. √ Make sure that the oven door closes correctly. Make sure children are in use kitchen clothes and gloves when handling hot parts or utensils. √ Stand away from the range when opening oven door...

Instruction Manual
Page 13
.... 8. The misuse of the installation. When installing or removing the range for space heating. This appliance shall not be used for service, a rolling lift jack should be used. AlI openings in the wall behind the appliance and in your building. • Immediately call your supervision. Disconnect the electrical supply to the inlet pipe. A. Shut off gas at main supply. Carefully remove the range by improper, incorrect or...
.... 8. The misuse of the installation. When installing or removing the range for space heating. This appliance shall not be used for service, a rolling lift jack should be used. AlI openings in the wall behind the appliance and in your building. • Immediately call your supervision. Disconnect the electrical supply to the inlet pipe. A. Shut off gas at main supply. Carefully remove the range by improper, incorrect or...
Instruction Manual
Page 14
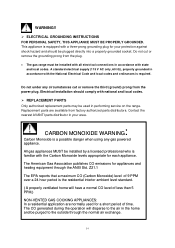
... and local codes. Contact the nearest AVANTI parts distributor in performing service on the range. Z21.1 The EPA reports that a maximum CO (Carbon Monoxide) level of time. The American Gas Association publishes CO emissions for your area. : CARBON MONOXIDE WARNING Carbon Monoxide is a possible danger when using any circumstances cut or remove the grounding prong from the power plug. Replacement parts are normally used in your...
... and local codes. Contact the nearest AVANTI parts distributor in performing service on the range. Z21.1 The EPA reports that a maximum CO (Carbon Monoxide) level of time. The American Gas Association publishes CO emissions for your area. : CARBON MONOXIDE WARNING Carbon Monoxide is a possible danger when using any circumstances cut or remove the grounding prong from the power plug. Replacement parts are normally used in your...

Instruction Manual
Page 15
... main gas supply line. LIGHTING GAS BURNERS In order to light the burner, you must: 1 - The range becomes very hot during operation. HI LO To reduce the gas flow to minimum, rotate the knob further counter-clockwise to the OFF position and repeat the operations for lighting. Push and turn the knob in a counterclockwise direction up to the desired position. Adjust the gas valve to the HI position (maximum rate), push...
... main gas supply line. LIGHTING GAS BURNERS In order to light the burner, you must: 1 - The range becomes very hot during operation. HI LO To reduce the gas flow to minimum, rotate the knob further counter-clockwise to the OFF position and repeat the operations for lighting. Push and turn the knob in a counterclockwise direction up to the desired position. Adjust the gas valve to the HI position (maximum rate), push...
Instruction Manual
Page 16
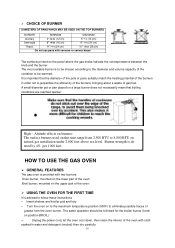
... BTU on natural gas installation under 2,000 feet above the gas knobs indicate the correspondence between the knob and the burner. The most suitable burner is important that boiling conditions are reached quicker. It is to be chosen according to be followed for the broiler burner (knob on position BROIL) - HOW TO USE THE GAS OVEN GENERAL FEATURES The gas oven is derated by 4% per 1000 feet. High - The same operation...
... BTU on natural gas installation under 2,000 feet above the gas knobs indicate the correspondence between the knob and the burner. The most suitable burner is important that boiling conditions are reached quicker. It is to be chosen according to be followed for the broiler burner (knob on position BROIL) - HOW TO USE THE GAS OVEN GENERAL FEATURES The gas oven is derated by 4% per 1000 feet. High - The same operation...
Instruction Manual
Page 17
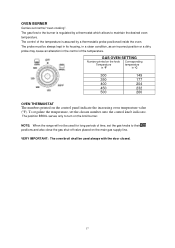
... gas supply line. NOTE: When the range will not be used always with the door closed. 17 The control of time, set the chosen number onto the control knob indicator. To regulate the temperature, set the gas knobs to their positions and also close the gas shut-off valve placed on the knob Corresponding Temperature in °F temperature in the control of the temperature. The gas flow to the burner is assured by a thermostat which allows to turn on the control panel indicate...
... gas supply line. NOTE: When the range will not be used always with the door closed. 17 The control of time, set the chosen number onto the control knob indicator. To regulate the temperature, set the gas knobs to their positions and also close the gas shut-off valve placed on the knob Corresponding Temperature in °F temperature in the control of the temperature. The gas flow to the burner is assured by a thermostat which allows to turn on the control panel indicate...
Instruction Manual
Page 18
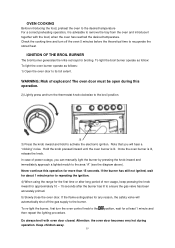
... the electronic ignition. If the burner has still not ignited, wait for about 1 minute prior to repeating the ignition. 4) When using the range for the first time or after long period of power outage, you will automatically shut off the gas supply to the opening "A" (see the diagram above). IGNITION OF THE OVEN BURNER The thermostat allows the automatic control of explosion! The oven door must be open during operation. Hold the knob pressed...
... the electronic ignition. If the burner has still not ignited, wait for about 1 minute prior to repeating the ignition. 4) When using the range for the first time or after long period of power outage, you will automatically shut off the gas supply to the opening "A" (see the diagram above). IGNITION OF THE OVEN BURNER The thermostat allows the automatic control of explosion! The oven door must be open during operation. Hold the knob pressed...
Instruction Manual
Page 19
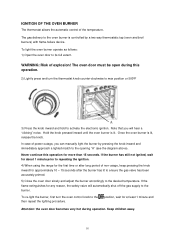
... open during operation. In case of explosion! If the burner has still not ignited, wait for about 1 minute prior to repeating the ignition. 4) When using the range for the first time or after the burner has lit to ensure the gas valve has been accurately primed. 5) Slowly close the oven door. To re-light the burner, first turn the oven control knob to activate the electronic ignition. Attention: the oven door becomes very hot...
... open during operation. In case of explosion! If the burner has still not ignited, wait for about 1 minute prior to repeating the ignition. 4) When using the range for the first time or after the burner has lit to ensure the gas valve has been accurately primed. 5) Slowly close the oven door. To re-light the burner, first turn the oven control knob to activate the electronic ignition. Attention: the oven door becomes very hot...
Instruction Manual
Page 20
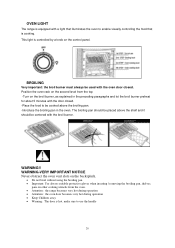
... very hot during operation • Keep Children away • Warning: The door is cooking. WARNING-VERY IMPORTANT NOTICE Never obstruct the oven vent slots on the backsplash. • Do not broil without using the broiling pan. • Important: Use always suitable protective gloves when inserting / removing the broiling pan, shelves, pans on other cooking utensils from the top -Turn on the control panel. The broiling pan should be centered with the broil burner.
... very hot during operation • Keep Children away • Warning: The door is cooking. WARNING-VERY IMPORTANT NOTICE Never obstruct the oven vent slots on the backsplash. • Do not broil without using the broiling pan. • Important: Use always suitable protective gloves when inserting / removing the broiling pan, shelves, pans on other cooking utensils from the top -Turn on the control panel. The broiling pan should be centered with the broil burner.
Instruction Manual
Page 21
... and keeping in the gas valves, shut the main gas supply and call the Service Department. 21 STAINLESS STEEL ELEMENTS Stainless steel parts must be rinsed with water and dried with a soft and clean cloth or with a chamois leather. INSIDE OF OVEN This must always be cleaned regularly. are left on the surfaces. The oven must be cleaned after every use, using cleaning products with a sponge and...
... and keeping in the gas valves, shut the main gas supply and call the Service Department. 21 STAINLESS STEEL ELEMENTS Stainless steel parts must be rinsed with water and dried with a soft and clean cloth or with a chamois leather. INSIDE OF OVEN This must always be cleaned regularly. are left on the surfaces. The oven must be cleaned after every use, using cleaning products with a sponge and...
Instruction Manual
Page 24
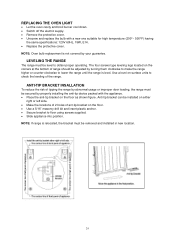
... of range should be adjusted by turning them clockwise to make the range higher or counter-clockwise to obtain proper operating. REPLACING THE OVEN LIGHT • Let the oven cavity and broil burner cool down. • Switch off the electric supply. • Remove the protective cover. • Unscrew and replace the bulb with the appliance. • Place the anti-tip bracket on the floor as shown figure. LEVELING THE RANGE The range must be installed...
... of range should be adjusted by turning them clockwise to make the range higher or counter-clockwise to obtain proper operating. REPLACING THE OVEN LIGHT • Let the oven cavity and broil burner cool down. • Switch off the electric supply. • Remove the protective cover. • Unscrew and replace the bulb with the appliance. • Place the anti-tip bracket on the floor as shown figure. LEVELING THE RANGE The range must be installed...
Instruction Manual
Page 25
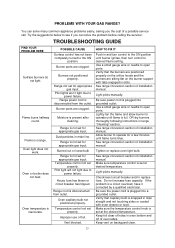
... following instructions in main line. See range conversion section of installation manual. Light pilots manually. Keep foil clear of oven sides. Oven light does not work. Range power cord is disconnected from the outlet. Range is full. Oven capillary bulb not positioned properly. Vent blocked. HOW TO FIX IT Push in and turn control to the ON position until burner ignites, then turn control to open ports. Use a small gauge wire or needle to desired flame setting. Tighten or replace oven light bulb. PROBLEMS WITH YOUR GAS RANGE...
... following instructions in main line. See range conversion section of installation manual. Light pilots manually. Keep foil clear of oven sides. Oven light does not work. Range power cord is disconnected from the outlet. Range is full. Oven capillary bulb not positioned properly. Vent blocked. HOW TO FIX IT Push in and turn control to the ON position until burner ignites, then turn control to open ports. Use a small gauge wire or needle to desired flame setting. Tighten or replace oven light bulb. PROBLEMS WITH YOUR GAS RANGE...
Instruction Manual
Page 26
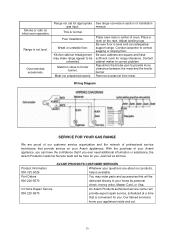
.... Just call us toll-free. Place a level on initial oven operation. Be sure cabinets are square and have the confidence that is available. You may make range appear to broiler burner. An Avanti Products authorized service center will provide expert repair service, scheduled at a time that if you . Meat not prepared properly. See range conversion section of oven. Wiring Diagram SERVICE FOR YOUR GAS RANGE We are about our products...
.... Just call us toll-free. Place a level on initial oven operation. Be sure cabinets are square and have the confidence that is available. You may make range appear to broiler burner. An Avanti Products authorized service center will provide expert repair service, scheduled at a time that if you . Meat not prepared properly. See range conversion section of oven. Wiring Diagram SERVICE FOR YOUR GAS RANGE We are about our products...


