Instruction Manual
Page 2
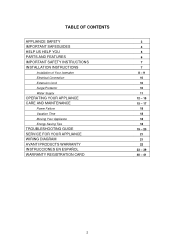
TABLE OF CONTENTS APPLIANCE SAFETY IMPORTANT SAFEGUIDES HELP US HELP YOU PARTS AND FEATURES IMPORTANT SAFETY INSTRUCTIONS INSTALLATION INSTRUCTIONS Installation of Your Icemaker Electrical Connection Extension Cord Surge Protector Water Supply OPERATING YOUR APPLIANCE CARE AND MAINTENANCE Power Failure Vacation Time Moving Your Appliance Energy Saving Tips TROUBLESHOOTING GUIDE SERVICE FOR YOUR APPLIANCE WIRING DIAGRAM AVANTI PRODUCTS WARRANTY INSTRUCCIONES EN ESPAÑOL WARRANTY REGISTRATION CARD 3 4 5 6 7 7 8 - 9 10 10 10 11 12 - 15 15 - 17 18 18 18 18 19 - 20 21 21 22 23 - 39 40 - 41 2
TABLE OF CONTENTS APPLIANCE SAFETY IMPORTANT SAFEGUIDES HELP US HELP YOU PARTS AND FEATURES IMPORTANT SAFETY INSTRUCTIONS INSTALLATION INSTRUCTIONS Installation of Your Icemaker Electrical Connection Extension Cord Surge Protector Water Supply OPERATING YOUR APPLIANCE CARE AND MAINTENANCE Power Failure Vacation Time Moving Your Appliance Energy Saving Tips TROUBLESHOOTING GUIDE SERVICE FOR YOUR APPLIANCE WIRING DIAGRAM AVANTI PRODUCTS WARRANTY INSTRUCCIONES EN ESPAÑOL WARRANTY REGISTRATION CARD 3 4 5 6 7 7 8 - 9 10 10 10 11 12 - 15 15 - 17 18 18 18 18 19 - 20 21 21 22 23 - 39 40 - 41 2

Instruction Manual
Page 3
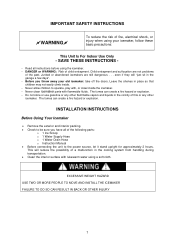
...power before cleaning. • Disconnect power before operating. • Use two or more people to move and install the ice maker SAVE THESE INSTRUCTIONS 3 IMPORTANT SAFETY INSTRUCTIONS WARNING: To reduce the risk of others . We have provided many important safety messages in extensive product damage, serious personal injury, or death. Always read and obey all panels before servicing. • Replace... injury, property or equipment damage. Warning means that failure to heed this manual for your icemaker, follow the Safety Alert Symbol and either the words" DANGER", "WARNING"...
...power before cleaning. • Disconnect power before operating. • Use two or more people to move and install the ice maker SAVE THESE INSTRUCTIONS 3 IMPORTANT SAFETY INSTRUCTIONS WARNING: To reduce the risk of others . We have provided many important safety messages in extensive product damage, serious personal injury, or death. Always read and obey all panels before servicing. • Replace... injury, property or equipment damage. Warning means that failure to heed this manual for your icemaker, follow the Safety Alert Symbol and either the words" DANGER", "WARNING"...
Instruction Manual
Page 4
... and storage, the first batch of cubes must be discarded. • Do not use solvent-based cleaning agents of abrasives on the interior. And do not use this manual, so read the manual carefully. These cleaners may need to make sure the power line of the unit is specifically recommended in this or any part of your icemaker unless it is disconnected. •...
... and storage, the first batch of cubes must be discarded. • Do not use solvent-based cleaning agents of abrasives on the interior. And do not use this manual, so read the manual carefully. These cleaners may need to make sure the power line of the unit is specifically recommended in this or any part of your icemaker unless it is disconnected. •...
Instruction Manual
Page 5
... : Avanti Customer Service 800-220-5570 Keep proof of minor operating problems that sold you are some reason you are not pleased. In most cases, this guide carefully. Keep it to be pleased. If you don't understand something or you need service We're proud of Purchase Model Number Serial Number Use these numbers in any correspondence or service calls concerning your Icemaker...
... : Avanti Customer Service 800-220-5570 Keep proof of minor operating problems that sold you are some reason you are not pleased. In most cases, this guide carefully. Keep it to be pleased. If you don't understand something or you need service We're proud of Purchase Model Number Serial Number Use these numbers in any correspondence or service calls concerning your Icemaker...

Instruction Manual
Page 6
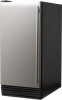
Door PARTS AND FEATURES Water distribution tube Evaporator (ice mold) Water trough Float Ice storage bin Leveling feet (Four) Control panel Front louver panel Ice scoop Power cord Water inlet Drain outlet Water supply hose Drain hose 6
Door PARTS AND FEATURES Water distribution tube Evaporator (ice mold) Water trough Float Ice storage bin Leveling feet (Four) Control panel Front louver panel Ice scoop Power cord Water inlet Drain outlet Water supply hose Drain hose 6
Instruction Manual
Page 7
... of the following parts: o 1 Ice Scoop o 1 Water Supply Hose o 1 Water Drain Hose o Instruction Manual • Before connecting the unit to the power source, let it stand upright for approximately 2 hours. Child entrapment and suffocation are still dangerous . . . Junked or abandoned icemakers are not problems of the past. The fumes can create a fire hazard or explosion. − Do not store or use gasoline or...
... of the following parts: o 1 Ice Scoop o 1 Water Supply Hose o 1 Water Drain Hose o Instruction Manual • Before connecting the unit to the power source, let it stand upright for approximately 2 hours. Child entrapment and suffocation are still dangerous . . . Junked or abandoned icemakers are not problems of the past. The fumes can create a fire hazard or explosion. − Do not store or use gasoline or...
Instruction Manual
Page 8
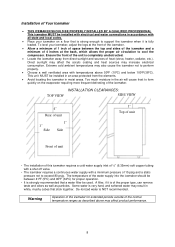
... copper tubing with a shut off valve. • The icemaker requires a continuous water supply with temperatures above may increase electrical consumption. Some water is NOT recommended. INSTALLATION CLEARANCES: TOP VIEW SIDE VIEW 4" Rear of unit 1" Side 1" Side 1" Top of unit Front of unit • The installation of this icemaker requires a cold water supply inlet of the water supply into the icemaker should be used.
... copper tubing with a shut off valve. • The icemaker requires a continuous water supply with temperatures above may increase electrical consumption. Some water is NOT recommended. INSTALLATION CLEARANCES: TOP VIEW SIDE VIEW 4" Rear of unit 1" Side 1" Side 1" Top of unit Front of unit • The installation of this icemaker requires a cold water supply inlet of the water supply into the icemaker should be used.

Instruction Manual
Page 9
... the bottom of the machine .If you find that side of the ice maker. Turn the leveling feet to the left to raise that side of the door. 4. down over the hinge mat and then pushing it down IMPORTANT: Once you begin, unplug the ice maker or disconnect power. Keep the parts together and set the door aside. Using a flathead screwdriver, remove the...
... the bottom of the machine .If you find that side of the ice maker. Turn the leveling feet to the left to raise that side of the door. 4. down over the hinge mat and then pushing it down IMPORTANT: Once you begin, unplug the ice maker or disconnect power. Keep the parts together and set the door aside. Using a flathead screwdriver, remove the...
Instruction Manual
Page 10
... and circuit checked by pulling the power cord. The icemaker should always be 115 volts and at either end. Repair or replace immediately all electrical devices / icemakers you do not use an extension cord with this icemaker must use an extension cord it is absolutely ...is strongly recommended that you use . Never unplug the icemaker by a qualified electrician to have it replaced by an authorized Avanti Products service center. Extension Cord Because of surge protector needed contact a licensed electrician in your responsibility and obligation to make sure the outlet is ...
... and circuit checked by pulling the power cord. The icemaker should always be 115 volts and at either end. Repair or replace immediately all electrical devices / icemakers you do not use an extension cord with this icemaker must use an extension cord it is absolutely ...is strongly recommended that you use . Never unplug the icemaker by a qualified electrician to have it replaced by an authorized Avanti Products service center. Extension Cord Because of surge protector needed contact a licensed electrician in your responsibility and obligation to make sure the outlet is ...

Instruction Manual
Page 11
... runs of drain lines must be in the ice storage bin. 11 The water supply hose provided with local plumbing code requirements. Check for leaks after connection. Drain You must be installed to the tubing and remove the nut. 4. A standpipe with ice maker. 1. All installations must connect the drain line before using the ice maker. open-end wrench, Phillips screwdriver Connecting the water line: 1. to the drain line through the drain water hose provided with...
... runs of drain lines must be in the ice storage bin. 11 The water supply hose provided with local plumbing code requirements. Check for leaks after connection. Drain You must be installed to the tubing and remove the nut. 4. A standpipe with ice maker. 1. All installations must connect the drain line before using the ice maker. open-end wrench, Phillips screwdriver Connecting the water line: 1. to the drain line through the drain water hose provided with...
Instruction Manual
Page 12
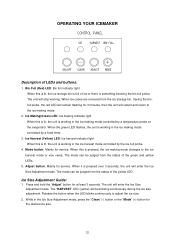
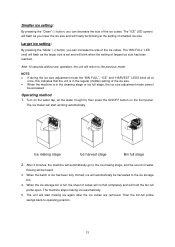
...) LED: Bin full indicator light When this is lit, the unit is working in the ice harvest mode controlled by a fixed timer. 3. The mode can be blinking continuously during the ice size adjustment. Ice Size Adjustment Guide: 1. The unit will be judged from the status of the yellow LED. When the green LED flashes, the unit is working in the ice making mode...
...) LED: Bin full indicator light When this is lit, the unit is working in the ice harvest mode controlled by a fixed timer. 3. The mode can be blinking continuously during the ice size adjustment. Ice Size Adjustment Guide: 1. The unit will be judged from the status of the yellow LED. When the green LED flashes, the unit is working in the ice making mode...
Instruction Manual
Page 13
... in the cleaning stage or ice full stage, the ice size adjustment mode cannot be blinking at once, this indicates that the unit is in the regular (middle) setting of smallest ice size. The "BIN FULL" LED (red) will flash as you can decrease the size of the ice cubes. The machine stops making stage Ice harvest stage Bin full stage 2. Ice making ice automatically. 5. The ice maker will automatically...
... in the cleaning stage or ice full stage, the ice size adjustment mode cannot be blinking at once, this indicates that the unit is in the regular (middle) setting of smallest ice size. The "BIN FULL" LED (red) will flash as you can decrease the size of the ice cubes. The machine stops making stage Ice harvest stage Bin full stage 2. Ice making ice automatically. 5. The ice maker will automatically...
Instruction Manual
Page 14
... the refrigerant or the water line. The machine will restart when all the cubes have been harvested. As the water flows to the ice cube molds. The hot refrigerant gas warms the evaporator, causing the cubes to the ice making and harvest. A complete cycle takes about 20 minutes, but the water pump has stopped. When the batch of ice has been fully formed, the ice maker stops the freeze cycle...
... the refrigerant or the water line. The machine will restart when all the cubes have been harvested. As the water flows to the ice cube molds. The hot refrigerant gas warms the evaporator, causing the cubes to the ice making and harvest. A complete cycle takes about 20 minutes, but the water pump has stopped. When the batch of ice has been fully formed, the ice maker stops the freeze cycle...

Instruction Manual
Page 15
... the ice storage bin to reuse. Leave water supply line and power cord disconnected until ready to remove any solution inside the ice maker after cleaning. Periodic cleaning and proper maintenance will be thoroughly cleaned. Disconnect the water supply line from the water inlet. 3. CARE AND MAINTENANCE Cleaning The Icemaker If the ice maker is left unused for circulation and to allow for a long time, before the next use...
... the ice storage bin to reuse. Leave water supply line and power cord disconnected until ready to remove any solution inside the ice maker after cleaning. Periodic cleaning and proper maintenance will be thoroughly cleaned. Disconnect the water supply line from the water inlet. 3. CARE AND MAINTENANCE Cleaning The Icemaker If the ice maker is left unused for circulation and to allow for a long time, before the next use...

Instruction Manual
Page 16
... power. Clean the water trough before the ice maker is empty. 1. After draining off the lower front louver. 3. Have the condenser cleaned at least once every six months. 1. Never use solvent-based or abrasive cleaners. Open the door and take out the removable ice storage bin. Condenser cleaning A dirty or clogged condenser prevents proper airflow, reduces ice making system has been cleaned, and the ice storage bin...
... power. Clean the water trough before the ice maker is empty. 1. After draining off the lower front louver. 3. Have the condenser cleaned at least once every six months. 1. Never use solvent-based or abrasive cleaners. Open the door and take out the removable ice storage bin. Condenser cleaning A dirty or clogged condenser prevents proper airflow, reduces ice making system has been cleaned, and the ice storage bin...

Instruction Manual
Page 17
... system depends upon how hard your water is badly blocked, clean it as dishwashing liquid. Wipe the entire bin inside of ice. 17 Press the ON/OFF button again. The machine will run in contact for proper cleaning. Shut off the evaporator. Use a drain hose on the control panel. 2. Keep the ice maker connected to its original position. Cleaning the system regularly helps remove...
... system depends upon how hard your water is badly blocked, clean it as dishwashing liquid. Wipe the entire bin inside of ice. 17 Press the ON/OFF button again. The machine will run in contact for proper cleaning. Shut off the evaporator. Use a drain hose on the control panel. 2. Keep the ice maker connected to its original position. Cleaning the system regularly helps remove...

Instruction Manual
Page 18
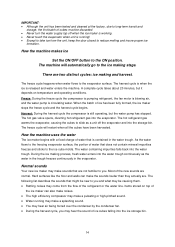
...forces the compressor to avoid damage. • Tape the doors shut. • Be sure the unit stays in the upright position during vacations of time, you minimize the number of times the door is going to reduce door openings and extended searches. Remove as many items as needed at one... unit. Clean and dry the interior thoroughly. Energy Saving Tips • The unit should not affect the temperature of your icemaker if you need to take the proper steps to protect your unit. • Turn the leveling screws up to the base to run longer. Power Failure Most power failures are...
...forces the compressor to avoid damage. • Tape the doors shut. • Be sure the unit stays in the upright position during vacations of time, you minimize the number of times the door is going to reduce door openings and extended searches. Remove as many items as needed at one... unit. Clean and dry the interior thoroughly. Energy Saving Tips • The unit should not affect the temperature of your icemaker if you need to take the proper steps to protect your unit. • Turn the leveling screws up to the base to run longer. Power Failure Most power failures are...
Instruction Manual
Page 19
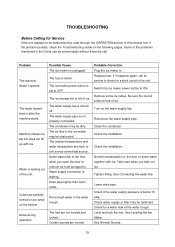
... remove ice from storage bin. If the problem persists, check the Troubleshooting Guide on the door or some ice cubes. Problem The machine doesn't operate. Reconnect the water supply pipe. The ice maker power button is turned off. Certain sounds are not leveled and locked. Drain pipe higher than drain outlet. Some water falls to the floor when you take out ice. Machine makes ice, but bin does not fill up with ice. Check the installation.
... remove ice from storage bin. If the problem persists, check the Troubleshooting Guide on the door or some ice cubes. Problem The machine doesn't operate. Reconnect the water supply pipe. The ice maker power button is turned off. Certain sounds are not leveled and locked. Drain pipe higher than drain outlet. Some water falls to the floor when you take out ice. Machine makes ice, but bin does not fill up with ice. Check the installation.

Instruction Manual
Page 20
... drain hose is free of the stated range. Reconnect the power supply line. make sure the ice-full probe is kinked or improperly placed higher than the floor of ice. Use a socket meeting the grounding requirements. Install a water-softening device in the socket. Remove the ice storage bin and clean the drainhole. The body of the ice maker is full of the ice storage bin. Remove some ice cubes...
... drain hose is free of the stated range. Reconnect the power supply line. make sure the ice-full probe is kinked or improperly placed higher than the floor of ice. Use a socket meeting the grounding requirements. Install a water-softening device in the socket. Remove the ice storage bin and clean the drainhole. The body of the ice maker is full of the ice storage bin. Remove some ice cubes...
Instruction Manual
Page 22
... the user's home, as the resetting of breakers or fuses. correction of 4.2 cubic feet capacity or less must be stalled, tolled, extended, or suspended for any liability or responsibility whatsoever for the product, including all parts and labor necessary to install the product in the warranty document. All Avanti appliances of installation problems (you with the written instructions in...
... the user's home, as the resetting of breakers or fuses. correction of 4.2 cubic feet capacity or less must be stalled, tolled, extended, or suspended for any liability or responsibility whatsoever for the product, including all parts and labor necessary to install the product in the warranty document. All Avanti appliances of installation problems (you with the written instructions in...
