Instruction Manual
Page 1
Miami, Florida 33152 www.avantiproducts.com P.O. Avanti has a policy of The Mackle Co., Inc. MICROWAVE OVEN INSTRUCTION MANUAL MANUAL DE INSTRUCCIONES Model / Modelo: MO8004MST BEFORE USE, PLEASE READ AND FOLLOW ALL SAFETY RULES AND OPERATING INSTRUCTIONS. Box 520604 - Avanti Products, A Division of continuous improvement on its products and reserves the right to change materials and specifications without notice. La sección en español empieza en la página 18.
Miami, Florida 33152 www.avantiproducts.com P.O. Avanti has a policy of The Mackle Co., Inc. MICROWAVE OVEN INSTRUCTION MANUAL MANUAL DE INSTRUCCIONES Model / Modelo: MO8004MST BEFORE USE, PLEASE READ AND FOLLOW ALL SAFETY RULES AND OPERATING INSTRUCTIONS. Box 520604 - Avanti Products, A Division of continuous improvement on its products and reserves the right to change materials and specifications without notice. La sección en español empieza en la página 18.
Instruction Manual
Page 2
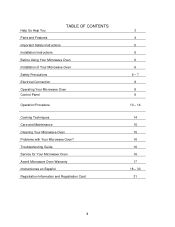
Help Us Help You TABLE OF CONTENTS Parts and Features Important Safety Instructions Installation Instructions Before Using Your Microwave Oven Installation of Your Microwave Oven Safety Precautions Electrical Connection Operating Your Microwave Oven Control Panel Operation Procedure Cooking Techniques Care and Maintenance Cleaning Your Microwave Oven Problems with Your Microwave Oven? Troubleshooting Guide Service for Your Microwave Oven Avanti Microwave Oven Warranty Instrucciones en Español Registration Information and Registration Card 3 4 5 6 6 6 6 - 7 8 8 9 10 - 14 14 ...
Help Us Help You TABLE OF CONTENTS Parts and Features Important Safety Instructions Installation Instructions Before Using Your Microwave Oven Installation of Your Microwave Oven Safety Precautions Electrical Connection Operating Your Microwave Oven Control Panel Operation Procedure Cooking Techniques Care and Maintenance Cleaning Your Microwave Oven Problems with Your Microwave Oven? Troubleshooting Guide Service for Your Microwave Oven Avanti Microwave Oven Warranty Instrucciones en Español Registration Information and Registration Card 3 4 5 6 6 6 6 - 7 8 8 9 10 - 14 14 ...
Instruction Manual
Page 3
... numbers in any correspondence or service calls concerning your microwave oven. Explain why you to be pleased. You'll find them on a label located on the rear wall of original purchase date (such as your questions. IF YOU NEED SERVICE We're proud of minor operating problems that sold you need more assistance, please call for further assistance. In most cases, this guide carefully...
... numbers in any correspondence or service calls concerning your microwave oven. Explain why you to be pleased. You'll find them on a label located on the rear wall of original purchase date (such as your questions. IF YOU NEED SERVICE We're proud of minor operating problems that sold you need more assistance, please call for further assistance. In most cases, this guide carefully...

Instruction Manual
Page 4
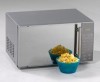
Parts and Features MO8004MST 1 Door Safety Lock System 2 Oven Window 3 Turntable Roller Ring 4 Control Panel 5 Oven Air Vent 6 Glass Tray 4
Parts and Features MO8004MST 1 Door Safety Lock System 2 Oven Window 3 Turntable Roller Ring 4 Control Panel 5 Oven Air Vent 6 Glass Tray 4

Instruction Manual
Page 5
IMPORTANT SAFETY INSTRUCTIONS When using electrical appliances basic safety precautions should be followed, including the following: WARNING To reduce the risk of fire, electrical shock, or injury when using your appliance, follow these basic precautions: 5
IMPORTANT SAFETY INSTRUCTIONS When using electrical appliances basic safety precautions should be followed, including the following: WARNING To reduce the risk of fire, electrical shock, or injury when using your appliance, follow these basic precautions: 5
Instruction Manual
Page 6
... boiling. INSTALLATION INSTRUCTIONS BEFORE USING YOUR MICROWAVE OVEN • Remove the exterior and interior packing. • Check to properly grounded outlet. Do not leave paper products, cooking utensils, or food in the cavity when not in microwave oven. • Use this microwave oven only for its intended use the cavity for example, closed , turn oven off at the wall switch, or shut off power at the fuse or circuit breaker panel. •...
... boiling. INSTALLATION INSTRUCTIONS BEFORE USING YOUR MICROWAVE OVEN • Remove the exterior and interior packing. • Check to properly grounded outlet. Do not leave paper products, cooking utensils, or food in the cavity when not in microwave oven. • Use this microwave oven only for its intended use the cavity for example, closed , turn oven off at the wall switch, or shut off power at the fuse or circuit breaker panel. •...
Instruction Manual
Page 7
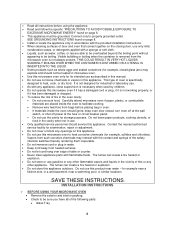
... NOT use the oven. INSTALLATION OF YOUR MICROWAVE OVEN • When positioning the microwave oven, it to break down. • Direct sunlight may affect the acrylic coating and heat sources may result if the oven is located close properly and that the oven door close to a TV, radio, antenna, or antenna wire. • Turntable Roller Assembly (Roller or Roller Ring) • Instruction Manual • Inspect the oven after...
... NOT use the oven. INSTALLATION OF YOUR MICROWAVE OVEN • When positioning the microwave oven, it to break down. • Direct sunlight may affect the acrylic coating and heat sources may result if the oven is located close properly and that the oven door close to a TV, radio, antenna, or antenna wire. • Turntable Roller Assembly (Roller or Roller Ring) • Instruction Manual • Inspect the oven after...
Instruction Manual
Page 8
... done. Disconnect the power cord, or shut off power at the fuse or circuit breaker panel. • DO NOT attempt to dry clothes, newspapers or other part of food and utensils used. Check the food in several places. • Remove PLASTIC STORE WRAPS before cooking to prevent bursting. • POPCORN must be pierced before cooking or defrosting in the microwave oven. • DO NOT use SEALED JARS or...
... done. Disconnect the power cord, or shut off power at the fuse or circuit breaker panel. • DO NOT attempt to dry clothes, newspapers or other part of food and utensils used. Check the food in several places. • Remove PLASTIC STORE WRAPS before cooking to prevent bursting. • POPCORN must be pierced before cooking or defrosting in the microwave oven. • DO NOT use SEALED JARS or...
Instruction Manual
Page 9
... wire with standard three prong wall outlets to strain, for the electric current. The power cord of electrical shock. Never use abrasive powders or pads. • When opened, the door must not be subjected to minimize the possibility of this appliance is equipped with a three-prong plug which could cause the oven to accumulate on an opened door or any circumstances cut or remove...
... wire with standard three prong wall outlets to strain, for the electric current. The power cord of electrical shock. Never use abrasive powders or pads. • When opened, the door must not be subjected to minimize the possibility of this appliance is equipped with a three-prong plug which could cause the oven to accumulate on an opened door or any circumstances cut or remove...
Instruction Manual
Page 12
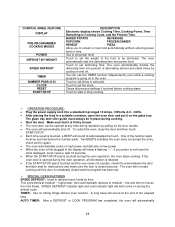
... low as the food thaws. SPEED DEFROST indicator light and cook indicator light will both come on in the display will automatically 12 The glass tray and roller guide must be defrosted. This cycle starts at medium - TIMER: Use for obstructions and make sure the door is closed and the program has been set the clock. CONTROL PANEL FEATURE DISPLAY PRE-PROGRAMMED COOKING MODES POWER DEFROST BY WEIGHT SPEED DEFROST TIMER NUMBER PADS (0-9) CLOCK RESET START/STOP DESCRIPTION Electronic display shows Cooking Time, Cooking Power, Time Remaining in place...
... low as the food thaws. SPEED DEFROST indicator light and cook indicator light will both come on in the display will automatically 12 The glass tray and roller guide must be defrosted. This cycle starts at medium - TIMER: Use for obstructions and make sure the door is closed and the program has been set the clock. CONTROL PANEL FEATURE DISPLAY PRE-PROGRAMMED COOKING MODES POWER DEFROST BY WEIGHT SPEED DEFROST TIMER NUMBER PADS (0-9) CLOCK RESET START/STOP DESCRIPTION Electronic display shows Cooking Time, Cooking Power, Time Remaining in place...

Instruction Manual
Page 13
... display. START/STOP: Touch to start the defrost or cook programs. The cook indicator light and the oven light will operate. NOTE: TO INTERRUPT OPERATION -Open the oven door. • The oven immediately stops. • If no further cooking is a 12 hour clock. 2. SETTING THE CLOCK 1. Touch CLOCK pad. This is required, touch the RESET pad. • To continue cooking, close the oven door and touch the START/STOP pad. Use the number pads to cancel TIMER during timing process. 13 You must touch at least three numbers to set...
... display. START/STOP: Touch to start the defrost or cook programs. The cook indicator light and the oven light will operate. NOTE: TO INTERRUPT OPERATION -Open the oven door. • The oven immediately stops. • If no further cooking is a 12 hour clock. 2. SETTING THE CLOCK 1. Touch CLOCK pad. This is required, touch the RESET pad. • To continue cooking, close the oven door and touch the START/STOP pad. Use the number pads to cancel TIMER during timing process. 13 You must touch at least three numbers to set...
Instruction Manual
Page 14
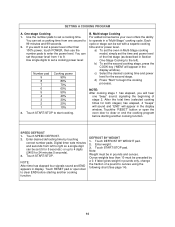
...20% 10% 3. DEFROST BY WEIGHT 1. b) To set the power level from left ). Touch DEFROST BY WEIGHT pad. 2. Multi-stage Cooking For added convenience your oven offers the ability to start cooking. Enter weight. 3. c) Select the desired cooking time and power level for 24 minutes 5 seconds). 3. Use the number pads to clear or end the cooking program before starting another cooking function. d) Press "Start" to 9. Touch SPEED DEFROST. 2. Touch START/STOP pad. Touchthe "RESET" button or open door to set a cooking time. Enter desired defrosting time by a 0. If...
...20% 10% 3. DEFROST BY WEIGHT 1. b) To set the power level from left ). Touch DEFROST BY WEIGHT pad. 2. Multi-stage Cooking For added convenience your oven offers the ability to start cooking. Enter weight. 3. c) Select the desired cooking time and power level for 24 minutes 5 seconds). 3. Use the number pads to clear or end the cooking program before starting another cooking function. d) Press "Start" to 9. Touch SPEED DEFROST. 2. Touch START/STOP pad. Touchthe "RESET" button or open door to set a cooking time. Enter desired defrosting time by a 0. If...
Instruction Manual
Page 15
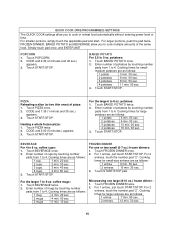
... sec. 3 mugs 5 min. 10 sec. Touch START/STOP. BAKED POTATO For 3.5 to cook or reheat food automatically without entering power level or time. potatoes: 1. Touch BAKED POTATO twice. 2. Cooking times are as follows: 1 cup. 1 min. 20 sec 2 cups. 2 min. 30 sec 3 cups. 3 min. 40 sec 4 cups. 4 min. 50 sec 3. QUICK COOK (PRE-PROGRAMMED) SETTINGS The QUICK COOK settings allow you to 5 oz. Touch POPCORN. 2. Cooking times for larger entrees are as follows...
... sec. 3 mugs 5 min. 10 sec. Touch START/STOP. BAKED POTATO For 3.5 to cook or reheat food automatically without entering power level or time. potatoes: 1. Touch BAKED POTATO twice. 2. Cooking times are as follows: 1 cup. 1 min. 20 sec 2 cups. 2 min. 30 sec 3 cups. 3 min. 40 sec 4 cups. 4 min. 50 sec 3. QUICK COOK (PRE-PROGRAMMED) SETTINGS The QUICK COOK settings allow you to 5 oz. Touch POPCORN. 2. Cooking times for larger entrees are as follows...
Instruction Manual
Page 16
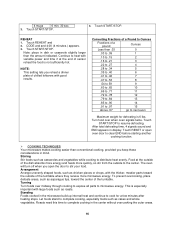
... turn off when you keep these considerations in display. This is not sufficiently hot. Arrangement Arrange unevenly shaped foods, such as roasts. Touch RESET or open oven door to clear END before starting another cooking function. COOKING TECHNIQUES Your microwave makes cooking easier than conventional cooking, provided you open the door to microwave energy. CODE and and 4:00 (4 minutes.) appears. 3. NOTE: This setting lets you reheat a dinner plate of the turntable. Touch START/STOP. Touch START/STOP...
... turn off when you keep these considerations in display. This is not sufficiently hot. Arrangement Arrange unevenly shaped foods, such as roasts. Touch RESET or open oven door to clear END before starting another cooking function. COOKING TECHNIQUES Your microwave makes cooking easier than conventional cooking, provided you open the door to microwave energy. CODE and and 4:00 (4 minutes.) appears. 3. NOTE: This setting lets you reheat a dinner plate of the turntable. Touch START/STOP. Touch START/STOP...
Instruction Manual
Page 17
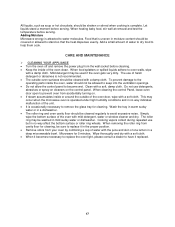
... as soup or hot chocolate, should be covered or allowed to stand so that is uneven in moisture content should be shaken or stirred when cooking is complete. CARE AND MAINTENANCE CLEANING YOUR APPLIANCE • Turn the oven off and remove the power plug from accidentally turning on the control panel. This may occur when the microwave oven is operated under high humidity conditions...
... as soup or hot chocolate, should be covered or allowed to stand so that is uneven in moisture content should be shaken or stirred when cooking is complete. CARE AND MAINTENANCE CLEANING YOUR APPLIANCE • Turn the oven off and remove the power plug from accidentally turning on the control panel. This may occur when the microwave oven is operated under high humidity conditions...
Instruction Manual
Page 18
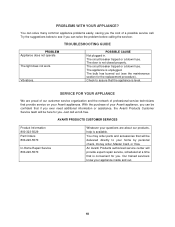
... available. TROUBLESHOOTING GUIDE PROBLEM Appliance does not operate. POSSIBLE CAUSE Not plugged in. The circuit breaker tripped or a blown fuse. Our trained servicers know your Avanti appliances. Vibrations. Check to your Avanti appliance, you can solve the problem before calling the servicer. The light does not work. The door is level. AVANTI PRODUCTS CUSTOMER SERVICES Product Information 800-323-5029 Part Orders 800-220-5570 In-Home Repair Service 800...
... available. TROUBLESHOOTING GUIDE PROBLEM Appliance does not operate. POSSIBLE CAUSE Not plugged in. The circuit breaker tripped or a blown fuse. Our trained servicers know your Avanti appliances. Vibrations. Check to your Avanti appliance, you can solve the problem before calling the servicer. The light does not work. The door is level. AVANTI PRODUCTS CUSTOMER SERVICES Product Information 800-323-5029 Part Orders 800-220-5570 In-Home Repair Service 800...
Instruction Manual
Page 19
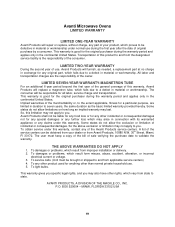
... applicable service centers) 4. This warranty gives you specific legal rights, and you may also have other incidental or consequential damages not for any special damages or any further loss which may arise in the continental United States. Avanti Microwave Ovens LIMITED WARRANTY LIMITED ONE-YEAR WARRANTY Avanti Products will repair or replace, without charge, any part of your dealer or from improper installation...
... applicable service centers) 4. This warranty gives you specific legal rights, and you may also have other incidental or consequential damages not for any special damages or any further loss which may arise in the continental United States. Avanti Microwave Ovens LIMITED WARRANTY LIMITED ONE-YEAR WARRANTY Avanti Products will repair or replace, without charge, any part of your dealer or from improper installation...
Instruction Manual
Page 34
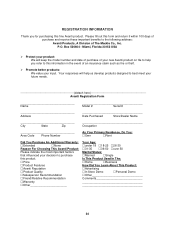
...;Business How Did You Learn About This Product: Advertising In Store Demo Personal Demo Other Comments 34 P.O. Box 520604 - detach here Avanti Registration Form Name Model # Serial # Address Date Purchased Store/Dealer Name City State Zip Occupation Area Code Phone Number As Your Primary Residence, Do You: Own Rent Did You...
...;Business How Did You Learn About This Product: Advertising In Store Demo Personal Demo Other Comments 34 P.O. Box 520604 - detach here Avanti Registration Form Name Model # Serial # Address Date Purchased Store/Dealer Name City State Zip Occupation Area Code Phone Number As Your Primary Residence, Do You: Own Rent Did You...

