Instruction Manual
Page 1
Miami, Florida 33152 www.avantiproducts.com Avanti has a policy of continuous improvement on its products and reserves the right to change materials and specifications without notice. Box 520604 - Avanti Products LLC P.O. TOASTER OVEN / BROILER TOSTADOR-ASADOR / HORNEADOR FOUR COMPACTE INSTRUCTION MANUAL MANUAL DE INSTRUCCIONES MANUEL D'INSTRUCTIONS Model Number / No. de Modelo / Nos de Modèle: MODEL: POBW111B-IS BEFORE USE, PLEASE READ AND FOLLOW ALL SAFETY RULES AND OPERATING INSTRUCTIONS.
Miami, Florida 33152 www.avantiproducts.com Avanti has a policy of continuous improvement on its products and reserves the right to change materials and specifications without notice. Box 520604 - Avanti Products LLC P.O. TOASTER OVEN / BROILER TOSTADOR-ASADOR / HORNEADOR FOUR COMPACTE INSTRUCTION MANUAL MANUAL DE INSTRUCCIONES MANUEL D'INSTRUCTIONS Model Number / No. de Modelo / Nos de Modèle: MODEL: POBW111B-IS BEFORE USE, PLEASE READ AND FOLLOW ALL SAFETY RULES AND OPERATING INSTRUCTIONS.

Instruction Manual
Page 2
TABLE OF CONTENTS Important Safety Instructions Help Us Help You Parts and Features Installation Instructions Before Using Your Appliance Installation of Your Appliance Electrical Connection Operating Your Appliance Control Panel Using Your Oven Care and Maintenance Cleaning Your Appliance Storing Your Appliance Troubleshooting Guide Service for Your Appliance Your Avanti Products Warranty Instrucciones en Español Instructions de Français Registration Information 2 3 4 5 6 6 6 6 7 7 8 - 10 10 10 11 12 12 13 14 - 17 18 - 30 Last Page
TABLE OF CONTENTS Important Safety Instructions Help Us Help You Parts and Features Installation Instructions Before Using Your Appliance Installation of Your Appliance Electrical Connection Operating Your Appliance Control Panel Using Your Oven Care and Maintenance Cleaning Your Appliance Storing Your Appliance Troubleshooting Guide Service for Your Appliance Your Avanti Products Warranty Instrucciones en Español Instructions de Français Registration Information 2 3 4 5 6 6 6 6 7 7 8 - 10 10 10 11 12 12 13 14 - 17 18 - 30 Last Page
Instruction Manual
Page 3
... electrical parts involving a risk of electrical shock. • When broiling, use your appliance for other than metal or glass. • A fire may catch fire or melt. • Never clean the appliance with a frayed or damaged cord or plug, after the appliance malfunctions, is not in operation. Always use handles or knobs. Pieces can be smothered completely by covering it with metal foil. Turns the controls...
... electrical parts involving a risk of electrical shock. • When broiling, use your appliance for other than metal or glass. • A fire may catch fire or melt. • Never clean the appliance with a frayed or damaged cord or plug, after the appliance malfunctions, is not in operation. Always use handles or knobs. Pieces can be smothered completely by covering it with metal foil. Turns the controls...
Instruction Manual
Page 4
...'ll find them on a label located on the back side of Purchase Model Number Serial Number Use these numbers in any correspondence or service calls concerning your new appliance properly. Save time and money. Before you call : Avanti Customer Service 800-220-5570 Keep proof of minor operating problems that sold you are not happy with this guide to help you can correct yourself...
...'ll find them on a label located on the back side of Purchase Model Number Serial Number Use these numbers in any correspondence or service calls concerning your new appliance properly. Save time and money. Before you call : Avanti Customer Service 800-220-5570 Keep proof of minor operating problems that sold you are not happy with this guide to help you can correct yourself...
Instruction Manual
Page 5
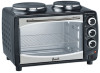
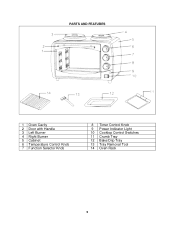
PARTS AND FEATURES 1 Oven Cavity 2 Door with Handle 3 Left Burner 4 Right Burner 5 Cabinet 6 Temperature Control Knob 7 Function Selector Knob 8 Timer Control Knob 9 Power Indicator Light 10 Cooktop Control Switches 11 Crumb Tray 12 Bake/Drip Tray 13 Tray Removal Tool 14 Oven Rack 5
PARTS AND FEATURES 1 Oven Cavity 2 Door with Handle 3 Left Burner 4 Right Burner 5 Cabinet 6 Temperature Control Knob 7 Function Selector Knob 8 Timer Control Knob 9 Power Indicator Light 10 Cooktop Control Switches 11 Crumb Tray 12 Bake/Drip Tray 13 Tray Removal Tool 14 Oven Rack 5

Instruction Manual
Page 6
INSTALLATION INSTRUCTIONS Before Using Your Appliance • Remove the exterior and interior packing. • Check to be sure you have all of the following parts: • 1 Bake/Broil/Drip Pan • 1 Oven Rack • 1 Crumb Tray • 1 Bake/Broil/Drip Pan Removal Tool • 1 Instruction Manual • Remove all the items inside your oven unless it is specially recommended in this appliance. NOTICE BEFORE YOU USE THIS OVEN FOR THE FIRST TIME: THE HEATING ELEMENTS HAVE...
INSTALLATION INSTRUCTIONS Before Using Your Appliance • Remove the exterior and interior packing. • Check to be sure you have all of the following parts: • 1 Bake/Broil/Drip Pan • 1 Oven Rack • 1 Crumb Tray • 1 Bake/Broil/Drip Pan Removal Tool • 1 Instruction Manual • Remove all the items inside your oven unless it is specially recommended in this appliance. NOTICE BEFORE YOU USE THIS OVEN FOR THE FIRST TIME: THE HEATING ELEMENTS HAVE...
Instruction Manual
Page 8
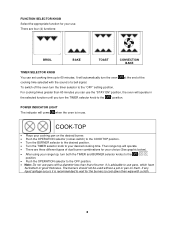
..." setting position. To switch off the oven turn the timer selector to your cooking pan on them. For cooking times greater than that of good thickness. Then range top will operate. • There are four (4) functions: BROIL BAKE TOAST CONVECTION BAKE TIMER SELECTOR KNOB You can use the "STAY ON" position, the oven will operate in use pans, which have flat bottom of burner. POWER INDICATOR LIGHT The indicator will automatically turn the oven at...
..." setting position. To switch off the oven turn the timer selector to your cooking pan on them. For cooking times greater than that of good thickness. Then range top will operate. • There are four (4) functions: BROIL BAKE TOAST CONVECTION BAKE TIMER SELECTOR KNOB You can use the "STAY ON" position, the oven will operate in use pans, which have flat bottom of burner. POWER INDICATOR LIGHT The indicator will automatically turn the oven at...
Instruction Manual
Page 9
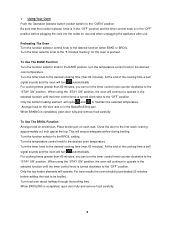
... can turn the timer control knob counter-clockwise to the "OFF" position. When BROILING is completed, open door fully and remove food carefully, 9 Preheating The Oven Turn the function selector control knob to the desired cooking time (max 60 minutes). Turn the timer knob to the desired function either BAKE or BROIL. Only the top heater elements will ensure adequate airflow during broiling. Turn the temperature control knob to be preheated 20 minutes before plugging the cord...
... can turn the timer control knob counter-clockwise to the "OFF" position. When BROILING is completed, open door fully and remove food carefully, 9 Preheating The Oven Turn the function selector control knob to the desired cooking time (max 60 minutes). Turn the timer knob to the desired function either BAKE or BROIL. Only the top heater elements will ensure adequate airflow during broiling. Turn the temperature control knob to be preheated 20 minutes before plugging the cord...
Instruction Manual
Page 10
... bread require different toasting times. Lighter breads and waffles require a shorter toasting time. To Use The CONVECTION BAKE Function Turn the function selector knob to the CONV BAKE position, turn the timer control knob counter-clockwise to maintain the selected When toasting is completed, open door fully and remove food carefully. Remove the crumb tray, wire rack and drip/baking pan. Darker breads, muffins, and English muffins require a longer toasting time. in the Bake/Broil/Drip pan. The glass oven door...
... bread require different toasting times. Lighter breads and waffles require a shorter toasting time. To Use The CONVECTION BAKE Function Turn the function selector knob to the CONV BAKE position, turn the timer control knob counter-clockwise to maintain the selected When toasting is completed, open door fully and remove food carefully. Remove the crumb tray, wire rack and drip/baking pan. Darker breads, muffins, and English muffins require a longer toasting time. in the Bake/Broil/Drip pan. The glass oven door...

Instruction Manual
Page 11
Store the appliance in a dry location such as on a table or countertop or in electrical shock or personal injury. Storing Your Appliance Allow the appliance to cool completely before storing. Other than the recommended cleaning, no further user maintenance should be necessary. 11 CAUTION Failure to unplug the appliance could result in a cupboard shelf. If storing the appliance for long periods of time make certain that the appliance is clean and free of food particles.
Store the appliance in a dry location such as on a table or countertop or in electrical shock or personal injury. Storing Your Appliance Allow the appliance to cool completely before storing. Other than the recommended cleaning, no further user maintenance should be necessary. 11 CAUTION Failure to unplug the appliance could result in a cupboard shelf. If storing the appliance for long periods of time make certain that the appliance is clean and free of food particles.

Instruction Manual
Page 12
... operate. • Unit not plugged in drip/baking pan. Plug the unit into a 120V AC electrical outlet. • The circuit breaker tripped or a blown fuse. • Be sure that will cycle and to your appliance inside appliance, on your Avanti appliances. You may need additional information or assistance, the Avanti Products Customer Service team will provide expert repair service, scheduled at a time that is not set . • Only one heating element...
... operate. • Unit not plugged in drip/baking pan. Plug the unit into a 120V AC electrical outlet. • The circuit breaker tripped or a blown fuse. • Be sure that will cycle and to your appliance inside appliance, on your Avanti appliances. You may need additional information or assistance, the Avanti Products Customer Service team will provide expert repair service, scheduled at a time that is not set . • Only one heating element...
Instruction Manual
Page 13
... DATE REPLACEMENT PARTS AND REPAIR OF PURCHASE ON GLASS PARTS AND LABOR TO CORRECT DEFECTS IN FINISH OF PORCELAIN ENAMEL, MATERIAL OR WORKMANSHIP. PAINTED OR BRIGHT METAL FINISHED SERVICE MUST BE PROVIDED BY AN PARTS AUTHORIZED SERVICE COMPANY. CARRY IN SERVICE ONLY. DAMAGED AS A RESULT OF MISUSE SERVICE MUST BE PROVIDED BY AN OR LACK OF REASONABLE CARE. This warranty gives you specific...
... DATE REPLACEMENT PARTS AND REPAIR OF PURCHASE ON GLASS PARTS AND LABOR TO CORRECT DEFECTS IN FINISH OF PORCELAIN ENAMEL, MATERIAL OR WORKMANSHIP. PAINTED OR BRIGHT METAL FINISHED SERVICE MUST BE PROVIDED BY AN PARTS AUTHORIZED SERVICE COMPANY. CARRY IN SERVICE ONLY. DAMAGED AS A RESULT OF MISUSE SERVICE MUST BE PROVIDED BY AN OR LACK OF REASONABLE CARE. This warranty gives you specific...

Instruction Manual
Page 31
...product: Price Product Features Avanti Reputation Product Quality Salesperson Recommendation Friend / Relative Recommendation Warranty Other Comments: Occupation As your future needs. detach here Avanti Registration Card Name Model # Serial # Address Date Purchased Store / Dealer Name City State Zip E-mail Address Area Code Phone Number...: Married Single Is This Product Used In The: Home Business How Did You Learn About This Product: Advertising In-Store...
...product: Price Product Features Avanti Reputation Product Quality Salesperson Recommendation Friend / Relative Recommendation Warranty Other Comments: Occupation As your future needs. detach here Avanti Registration Card Name Model # Serial # Address Date Purchased Store / Dealer Name City State Zip E-mail Address Area Code Phone Number...: Married Single Is This Product Used In The: Home Business How Did You Learn About This Product: Advertising In-Store...

Instruction Manual
Page 32
POBW111B-IS - 04072017 32 PRINTED IN CHINA
POBW111B-IS - 04072017 32 PRINTED IN CHINA
