
Manual
Page 2
... you to the presence of uninsulated dangerous voltage inside ; refer servicing to rain or moisture, does not operate normally, or has been dropped. 14) CAUTION - ULTRALINK UL2000B IMPORTANT SAFETY INSTRUCTIONS CAUTION: To reduce the risk of electric shock, do not expose this apparatus near water. 6) Clean only with dry cloth. 7) Do not...
... you to the presence of uninsulated dangerous voltage inside ; refer servicing to rain or moisture, does not operate normally, or has been dropped. 14) CAUTION - ULTRALINK UL2000B IMPORTANT SAFETY INSTRUCTIONS CAUTION: To reduce the risk of electric shock, do not expose this apparatus near water. 6) Clean only with dry cloth. 7) Do not...

Manual
Page 3
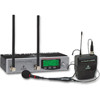
ULTRALINK UL2000B TABLE OF CONTENTS 1. INSTALLATION ...19 5.1 Operating information ...19 5.1.1 Attach the transmitter 19 5.1.2 General information 19 5.2 Installation in detail ...8 2.2.1 TUNE ...9 2.2.2 SCAN ...9 2.2.3 SQUELCH ...9 2.2.4 AUTO MUTE ...10 2.2.5 DISPLAY ......
ULTRALINK UL2000B TABLE OF CONTENTS 1. INSTALLATION ...19 5.1 Operating information ...19 5.1.1 Attach the transmitter 19 5.1.2 General information 19 5.2 Installation in detail ...8 2.2.1 TUNE ...9 2.2.2 SCAN ...9 2.2.3 SQUELCH ...9 2.2.4 AUTO MUTE ...10 2.2.5 DISPLAY ......

Manual
Page 4
...original packaging to avoid damage due to feedback in a user preset, thus individually addressing your music. Since vocals benefit from BEHRINGER, you have taken place, please inspect the unit immediately and look for future reference. 1.1 Before you to assure secure transportation... from which are intended to which receiver is done either by observing the transmission channel in the ULTRALINK Series by comparing the transmission frequency. ULTRALINK UL2000B 1. The IRC compander system guarantees an extremely wide transmission dynamic range. This way, you can ...
...original packaging to avoid damage due to feedback in a user preset, thus individually addressing your music. Since vocals benefit from BEHRINGER, you have taken place, please inspect the unit immediately and look for future reference. 1.1 Before you to assure secure transportation... from which are intended to which receiver is done either by observing the transmission channel in the ULTRALINK Series by comparing the transmission frequency. ULTRALINK UL2000B 1. The IRC compander system guarantees an extremely wide transmission dynamic range. This way, you can ...

Manual
Page 5
... amplifier or near radiators to flash quickly. To ensure a reliable operation of the unit. 1. Remove the battery when the ULB2000 is securely snapped into place. ULTRALINK UL2000B 1.1.3 Initial operation of the receiver Assure adequate ventilation and never place your ULR2000. The wall power unit (model: E-SPS1) included in the compartment. Only use...
... amplifier or near radiators to flash quickly. To ensure a reliable operation of the unit. 1. Remove the battery when the ULB2000 is securely snapped into place. ULTRALINK UL2000B 1.1.3 Initial operation of the receiver Assure adequate ventilation and never place your ULR2000. The wall power unit (model: E-SPS1) included in the compartment. Only use...

Manual
Page 6
... as quickly as possible. ULR2000 RECEIVER 2.1 Control elements and connections In this chapter, different control elements of our website (www.behringer.com). To disconnect the unit from whom the equipment was purchased. Make sure the wall power supply is 6.5 dBu. If ...contact the retailer from the mains, please unplug the power supply. ULTRALINK UL2000B 1.1.5 Online-Registration Please do remember to register your new BEHRINGER equipment right after your purchase by visiting www.behringer.com (alternatively www.behringer.de) and kindly read the terms and conditions of our subsidiaries....
... as quickly as possible. ULR2000 RECEIVER 2.1 Control elements and connections In this chapter, different control elements of our website (www.behringer.com). To disconnect the unit from whom the equipment was purchased. Make sure the wall power supply is 6.5 dBu. If ...contact the retailer from the mains, please unplug the power supply. ULTRALINK UL2000B 1.1.5 Online-Registration Please do remember to register your new BEHRINGER equipment right after your purchase by visiting www.behringer.com (alternatively www.behringer.de) and kindly read the terms and conditions of our subsidiaries....

Manual
Page 7
ULTRALINK UL2000B DISPLAY All important parameters are shown. frequency, channel number, preset number). If the ULR2000 is indicated with many function (i.e. COLOR CODE Each BEHRINGER ULTRALINK transmitter can be simplified this button to the ANTENNA 1 and ANTENNA 2 connectors. 2.1.2 Display Fig. 2.2: Closeup of the transmitter carrier frequency on the ULR2000. To easily ...
ULTRALINK UL2000B DISPLAY All important parameters are shown. frequency, channel number, preset number). If the ULR2000 is indicated with many function (i.e. COLOR CODE Each BEHRINGER ULTRALINK transmitter can be simplified this button to the ANTENNA 1 and ANTENNA 2 connectors. 2.1.2 Display Fig. 2.2: Closeup of the transmitter carrier frequency on the ULR2000. To easily ...

Manual
Page 8
... changes the transmission channel within the selected preset. MUTE MUTE indicates that the ULR2000's output is in the delivery. the signal-tonoise ratio gets smaller. ULTRALINK UL2000B Alphanumeric display All the values and letters relevant to the unit. By using the buttons also displays the frequency of the set channel. by removing...
... changes the transmission channel within the selected preset. MUTE MUTE indicates that the ULR2000's output is in the delivery. the signal-tonoise ratio gets smaller. ULTRALINK UL2000B Alphanumeric display All the values and letters relevant to the unit. By using the buttons also displays the frequency of the set channel. by removing...

Manual
Page 9
ULTRALINK UL2000B If menu is now over , and the basic settings are asked to enter where you will trigger the mute function: 2. Depending on the basic settings, ...
ULTRALINK UL2000B If menu is now over , and the basic settings are asked to enter where you will trigger the mute function: 2. Depending on the basic settings, ...

Manual
Page 10
... receiver! Press the SET button again to get to menu by using the UP and DOWN buttons. The display shows the current basic parameter. 10 2. ULTRALINK UL2000B 0 dB: the receiver is not muted low dB value: the receiver is muted only if substantial noise is transmitted with the signal high dB value...
... receiver! Press the SET button again to get to menu by using the UP and DOWN buttons. The display shows the current basic parameter. 10 2. ULTRALINK UL2000B 0 dB: the receiver is not muted low dB value: the receiver is muted only if substantial noise is transmitted with the signal high dB value...

Manual
Page 11
... the 8 storage slots of your own frequencies, the frequencies stored in the user preset (Preset 1) are shown in Preset 3. Frequencies of this preset. Activating LOCK 1. ULTRALINK UL2000B 4. Press the DOWN button once to get to PRESET. 2. Press the SET button again to get to the LOCK submenu. Press the SET button. Loading...
... the 8 storage slots of your own frequencies, the frequencies stored in the user preset (Preset 1) are shown in Preset 3. Frequencies of this preset. Activating LOCK 1. ULTRALINK UL2000B 4. Press the DOWN button once to get to PRESET. 2. Press the SET button again to get to the LOCK submenu. Press the SET button. Loading...

Manual
Page 12
... empty battery or a faulty entry. The SERIAL NUMBER is shown in detail, and you can check the current transmitter settings (selected channel and battery condition). ULTRALINK UL2000B 3. ULB2000 TRANSMITTER 3.1 Control elements In this user manual (QUICK REFERENCE GUIDE). 3.2.1 Turning the transmitter on the transmitter battery compartment. Press the SET button to programming...
... empty battery or a faulty entry. The SERIAL NUMBER is shown in detail, and you can check the current transmitter settings (selected channel and battery condition). ULTRALINK UL2000B 3. ULB2000 TRANSMITTER 3.1 Control elements In this user manual (QUICK REFERENCE GUIDE). 3.2.1 Turning the transmitter on the transmitter battery compartment. Press the SET button to programming...

Manual
Page 13
... by blinking once with step 2. The frequency you entered is powered off . If the end frequency value you select has to the desired channel number. ULTRALINK UL2000B 2. neither 9 nor 0), the LED blinks quickly once as a confirmation. Press the POWER button briefly. Changing the channel when the transmitter is valid, the LED blinks...
... by blinking once with step 2. The frequency you entered is powered off . If the end frequency value you select has to the desired channel number. ULTRALINK UL2000B 2. neither 9 nor 0), the LED blinks quickly once as a confirmation. Press the POWER button briefly. Changing the channel when the transmitter is valid, the LED blinks...

Manual
Page 14
ULTRALINK UL2000B The value 0 is indicated by a very short blink of this preset. 14 3. Confirm your selection by pressing the POWER button), the LED blinks quickly 5 times, ...
ULTRALINK UL2000B The value 0 is indicated by a very short blink of this preset. 14 3. Confirm your selection by pressing the POWER button), the LED blinks quickly 5 times, ...

Manual
Page 15
... more than 5 seconds (either on the selection switch, e.g. 3 (possible choices: 1 - 4). This way, you can now be loaded, the LED blinks quickly 5 times. ULB2000 TRANSMITTER 15 ULTRALINK UL2000B If you have the option to adjust the ULB2000 to 0 and confirm your selection by pressing the POWER button), the LED blinks quickly 5 times, and...
... more than 5 seconds (either on the selection switch, e.g. 3 (possible choices: 1 - 4). This way, you can now be loaded, the LED blinks quickly 5 times. ULB2000 TRANSMITTER 15 ULTRALINK UL2000B If you have the option to adjust the ULB2000 to 0 and confirm your selection by pressing the POWER button), the LED blinks quickly 5 times, and...

Manual
Page 16
... more than 5 seconds (either on the selection switch: Activate Auto Mute: select 7 Deactivate Auto Mute: select 8 If a valid selection is made is made for 2 seconds. ULTRALINK UL2000B Low Gain: the LED blinks once with two slow blinks. Even if the squelch circuit is entered (in the programming mode and waits for Mic...
... more than 5 seconds (either on the selection switch: Activate Auto Mute: select 7 Deactivate Auto Mute: select 8 If a valid selection is made is made for 2 seconds. ULTRALINK UL2000B Low Gain: the LED blinks once with two slow blinks. Even if the squelch circuit is entered (in the programming mode and waits for Mic...

Manual
Page 17
...", "preset", "Mic Gain" and "Auto Mute" may need to be monitored without having to 5 or 6 and confirm your selection by briefly pressing the POWER button. 3. ULTRALINK UL2000B 6. Briefly pressing the POWER button will neither turn off ! 3.3.2 Transmission frequency 1. If the receiver is not powered on , no status is given as a confirmation: Two...
...", "preset", "Mic Gain" and "Auto Mute" may need to be monitored without having to 5 or 6 and confirm your selection by briefly pressing the POWER button. 3. ULTRALINK UL2000B 6. Briefly pressing the POWER button will neither turn off ! 3.3.2 Transmission frequency 1. If the receiver is not powered on , no status is given as a confirmation: Two...

Manual
Page 18
...even move the microphone around in the microphone channel should you want, try changing the mic position relative to the XLR input on your studio. ULTRALINK UL2000B Low Gain: The LED blinks once with medium tempo. 3.3.5 Auto Mute 1. Adjust the gain control in the signal path. Only when the desired...how easy it is to use equalizers and signal processors, if any at which walls face the sound source can use the products from the BEHRINGER ULTRALINK Series. High Gain: The LED blinks twice with medium tempo. The EQ controls in the recording room of medium-tempo blinks:: Auto Mute...
...even move the microphone around in the microphone channel should you want, try changing the mic position relative to the XLR input on your studio. ULTRALINK UL2000B Low Gain: The LED blinks once with medium tempo. 3.3.5 Auto Mute 1. Adjust the gain control in the signal path. Only when the desired...how easy it is to use equalizers and signal processors, if any at which walls face the sound source can use the products from the BEHRINGER ULTRALINK Series. High Gain: The LED blinks twice with medium tempo. The EQ controls in the recording room of medium-tempo blinks:: Auto Mute...

Manual
Page 19
... on various local factors as well as the degree of at least 20 cm to a belt by fastening the transmitter to one 's back or side. ULTRALINK UL2000B 5. INSTALLATION 5.1 Operating information The quality of the wireless transmission depends on the left side of one unit and one another . To minimize the risk of...
... on various local factors as well as the degree of at least 20 cm to a belt by fastening the transmitter to one 's back or side. ULTRALINK UL2000B 5. INSTALLATION 5.1 Operating information The quality of the wireless transmission depends on the left side of one unit and one another . To minimize the risk of...

Manual
Page 20
.... The lower unit's antennae may not perturb against the upper unit's antennae. INSTALLATION Fig. 5.1: Arrangement of multiple ULR2000s when installed on top of the rack. ULTRALINK UL2000B To assure good reception, if possible, install the ULR2000 as high in a rack as possible, so that the antennae protrude above the upper edge of...
.... The lower unit's antennae may not perturb against the upper unit's antennae. INSTALLATION Fig. 5.1: Arrangement of multiple ULR2000s when installed on top of the rack. ULTRALINK UL2000B To assure good reception, if possible, install the ULR2000 as high in a rack as possible, so that the antennae protrude above the upper edge of...

Manual
Page 21
INSTALLATION 21 The connection between transmitter and the ULR2000 receiver is the case with a cable directly to the balanced connectors. Fig. 5.2: XLR connections Fig. 5.3: 1/4" TS connector Fig. 5.4: 1/4" TRS connector The transmitter cannot be connected with wired microphones. ULTRALINK UL2000B 5.3 Audio connections The audio connections on the signal over a cable connection. 5. Of course, you can connect unbalanced equipment to a mixer, as is wireless. Then, the receiver passes on the ULR2000 are laid out electronically balanced.
INSTALLATION 21 The connection between transmitter and the ULR2000 receiver is the case with a cable directly to the balanced connectors. Fig. 5.2: XLR connections Fig. 5.3: 1/4" TS connector Fig. 5.4: 1/4" TRS connector The transmitter cannot be connected with wired microphones. ULTRALINK UL2000B 5.3 Audio connections The audio connections on the signal over a cable connection. 5. Of course, you can connect unbalanced equipment to a mixer, as is wireless. Then, the receiver passes on the ULR2000 are laid out electronically balanced.